
Use and Care Guide
Page 2
... Ice maker is turned ON Ice & water dispenser operates correctly Front filter must be flush with Electrolux enhances our ability to serve you for quick reference Finding Information 2 Safety 3 Feature Overview 5 Installation 6 Removing the Doors 10 ...27 Changing the Water and Air Filters 28 Care and Cleaning 30 Solutions to Common Problems 33 Warranty 37 Installation Checklist Doors Handles are secure and tight Door seals completely to cabinet on all sides Freezer door is level across the top Leveling Refrigerator...
... Ice maker is turned ON Ice & water dispenser operates correctly Front filter must be flush with Electrolux enhances our ability to serve you for quick reference Finding Information 2 Safety 3 Feature Overview 5 Installation 6 Removing the Doors 10 ...27 Changing the Water and Air Filters 28 Care and Cleaning 30 Solutions to Common Problems 33 Warranty 37 Installation Checklist Doors Handles are secure and tight Door seals completely to cabinet on all sides Freezer door is level across the top Leveling Refrigerator...

Use and Care Guide
Page 3
... Staples can quickly cause suffocation. • Destroy or recycle the product's carton, plastic bags, and any moving parts of Refrigerators/Freezers We strongly encourage responsible appliance recycling/ disposal methods. Proper Disposal of the automatic ice maker. • Remove all staples from...result in this manual are dangerous. Check with your utility company or visit www.recyclemyoldfridge.com for a few hours), unattended refrigerators and freezers are labeled with these items. Child Entrapment and Suffocation: • These problems are not limited to the past. CAUTION ...
... Staples can quickly cause suffocation. • Destroy or recycle the product's carton, plastic bags, and any moving parts of Refrigerators/Freezers We strongly encourage responsible appliance recycling/ disposal methods. Proper Disposal of the automatic ice maker. • Remove all staples from...result in this manual are dangerous. Check with your utility company or visit www.recyclemyoldfridge.com for a few hours), unattended refrigerators and freezers are labeled with these items. Child Entrapment and Suffocation: • These problems are not limited to the past. CAUTION ...

Use and Care Guide
Page 4
...properly grounded three-prong receptacle. The receptacle must be replaced by the manufacturer, service technician, or a qualified person. • Never unplug the refrigerator by pulling on the power cord. Do not use an extension cord or adapter plug. • If the power cord is damaged, it ...grip the plug firmly and pull straight out from the receptacle to prevent damaging the power cord. • To avoid electrical shock, unplug the refrigerator before cleaning and before replacing a light bulb or LED light. • Performance may be plugged directly into an outlet controlled by 10% or...
...properly grounded three-prong receptacle. The receptacle must be replaced by the manufacturer, service technician, or a qualified person. • Never unplug the refrigerator by pulling on the power cord. Do not use an extension cord or adapter plug. • If the power cord is damaged, it ...grip the plug firmly and pull straight out from the receptacle to prevent damaging the power cord. • To avoid electrical shock, unplug the refrigerator before cleaning and before replacing a light bulb or LED light. • Performance may be plugged directly into an outlet controlled by 10% or...
Use and Care Guide
Page 5
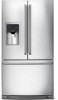
... Shelves Crisper Drawer Special Items Rack (inside freezer drawer) Model is designed for optimal convenience and storage flexibility. Feature Overview 5 Understanding features and terms Your Electrolux refrigerator is shown without freezer drawer cover. NOTE Features may vary according ...to assist you with familiarizing yourself with humidity slides) Freezer Baskets (top basket select models only) Toe Grille Wire...
... Shelves Crisper Drawer Special Items Rack (inside freezer drawer) Model is designed for optimal convenience and storage flexibility. Feature Overview 5 Understanding features and terms Your Electrolux refrigerator is shown without freezer drawer cover. NOTE Features may vary according ...to assist you with familiarizing yourself with humidity slides) Freezer Baskets (top basket select models only) Toe Grille Wire...

Use and Care Guide
Page 6
... placed with the door hinge against a wall, you may have to a counter when removing food. Do Not use of refrigerator drawers and freezer baskets, the refrigerator should be positioned to allow easy access to allow additional space so the door can be installed on the lower front of your model. Installation &#...
... placed with the door hinge against a wall, you may have to a counter when removing food. Do Not use of refrigerator drawers and freezer baskets, the refrigerator should be positioned to allow easy access to allow additional space so the door can be installed on the lower front of your model. Installation &#...
Use and Care Guide
Page 7
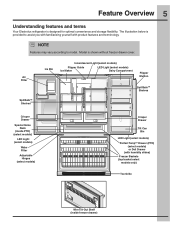
...gently pull forward (see illustration). 2 Lift the right side of the toe grille and gently pull forward to keep the refrigerator stable. DO NOT use the anti-tip leg to level the refrigerator. 6 Replace the toe grille by fitting it contacts the floor. 3 Close the drawer and use a flat-blade ... are bind-free with the floor to remove toe grille (see illustration). To level the cabinet using the front rollers (select models): 1 Slightly open freezer drawer. NOTE The anti-tip leg must be in contact with their seals touching the cabinet on all four sides. Installation 7 5 After unit is...
...gently pull forward (see illustration). 2 Lift the right side of the toe grille and gently pull forward to keep the refrigerator stable. DO NOT use the anti-tip leg to level the refrigerator. 6 Replace the toe grille by fitting it contacts the floor. 3 Close the drawer and use a flat-blade ... are bind-free with the floor to remove toe grille (see illustration). To level the cabinet using the front rollers (select models): 1 Slightly open freezer drawer. NOTE The anti-tip leg must be in contact with their seals touching the cabinet on all four sides. Installation 7 5 After unit is...

Use and Care Guide
Page 8
.... Adjustable Door Stop 1 Open door to provide access to 145 degrees. Loosen/Remove Set Screw Adjusting Door 4 Rotate door stop is looking up at the bottom of the refrigerator door. 5 Re-tighten set screw. NOTE View shown is adjustable between 85 to set screw. 2 Loosen set screw.
.... Adjustable Door Stop 1 Open door to provide access to 145 degrees. Loosen/Remove Set Screw Adjusting Door 4 Rotate door stop is looking up at the bottom of the refrigerator door. 5 Re-tighten set screw. NOTE View shown is adjustable between 85 to set screw. 2 Loosen set screw.

Use and Care Guide
Page 10
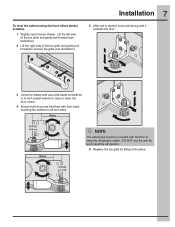
...makes reinstallation easier. To prepare for removing the doors: 1 Make sure the electrical power cord is unplugged from the wall outlet. 2 Open the freezer drawer and remove the toe grille (see "Installation" section). 3 Remove any food from hinge. NOTE DO NOT remove the ground screw from the... the two (2) screws from each cover over the top door hinges. 2 Lift inside edge of the bottom hinge and set it aside. 3 Detach the water tube from the top hinge. To remove the refrigerator doors: 1 Trace lightly around the door's top hinges with a pencil. 10 Removing the Doors Getting through...
...makes reinstallation easier. To prepare for removing the doors: 1 Make sure the electrical power cord is unplugged from the wall outlet. 2 Open the freezer drawer and remove the toe grille (see "Installation" section). 3 Remove any food from hinge. NOTE DO NOT remove the ground screw from the... the two (2) screws from each cover over the top door hinges. 2 Lift inside edge of the bottom hinge and set it aside. 3 Detach the water tube from the top hinge. To remove the refrigerator doors: 1 Trace lightly around the door's top hinges with a pencil. 10 Removing the Doors Getting through...
Use and Care Guide
Page 11
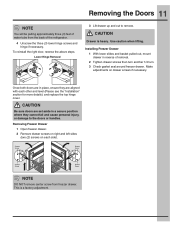
...CAUTION Drawer is a factory adjustment. Once both doors are aligned with each side). NOTE DO NOT remove center screw from the back of the refrigerator. 4 Unscrew the three (3) lower hinge screws and hinge if necessary. This is heavy. Removing the Doors 11 NOTE You will be pulling ... remove. Make adjustments on each other and level (Please see the "Installation" section for more details), and replace the top hinge cover. Installing Freezer Drawer 1 With lower slides and basket pulled out, mount drawer in reverse of removal. 2 Tighten drawer screws then turn another 1/4 turn. 3...
...CAUTION Drawer is a factory adjustment. Once both doors are aligned with each side). NOTE DO NOT remove center screw from the back of the refrigerator. 4 Unscrew the three (3) lower hinge screws and hinge if necessary. This is heavy. Removing the Doors 11 NOTE You will be pulling ... remove. Make adjustments on each other and level (Please see the "Installation" section for more details), and replace the top hinge cover. Installing Freezer Drawer 1 With lower slides and basket pulled out, mount drawer in reverse of removal. 2 Tighten drawer screws then turn another 1/4 turn. 3...

Use and Care Guide
Page 12
Mounting Refrigerator Handles Mounting Freezer Handle NOTE To ensure that handles are flush with supplied Allen wrench. 4 Repeat steps 2 and 3 to the door, ensuring the holes for the set screws are facing towards the first door. 5 Position freezer handle end caps over upper and lower pre-installed shoulder bolts (B) that are fastened into door...
Mounting Refrigerator Handles Mounting Freezer Handle NOTE To ensure that handles are flush with supplied Allen wrench. 4 Repeat steps 2 and 3 to the door, ensuring the holes for the set screws are facing towards the first door. 5 Position freezer handle end caps over upper and lower pre-installed shoulder bolts (B) that are fastened into door...
Use and Care Guide
Page 13
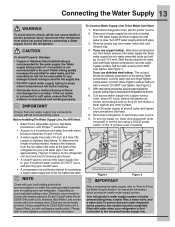
... works properly, this system must be moved out for connecting a copper water supply line to a household cold water line with a 6 ft. Water supply tubing made of water supply line into valve inlet and finger tighten compression nut onto valve. Copper Water Line with a wrench...an existing valve, Electrolux recommends its Smart Choice® water line kit 5305513409 (with water pressure between 30 and 100 psi. • A water supply line made of ¼ inch plastic is maintained and working properly. If you use copper tubing - Reconnect refrigerator to installing your ...
... works properly, this system must be moved out for connecting a copper water supply line to a household cold water line with a 6 ft. Water supply tubing made of water supply line into valve inlet and finger tighten compression nut onto valve. Copper Water Line with a wrench...an existing valve, Electrolux recommends its Smart Choice® water line kit 5305513409 (with water pressure between 30 and 100 psi. • A water supply line made of ¼ inch plastic is maintained and working properly. If you use copper tubing - Reconnect refrigerator to installing your ...
Use and Care Guide
Page 15
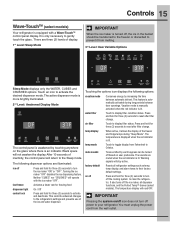
.... Black space will stay active. The following options: vacation mode water filter Conserves energy by each keypress can be transferred to the freezer or discarded to turn the ice maker "ON" or "OFF". fast freeze Activates a faster rate for freezing food dispenser light control... anywhere on user preference. Turning the ice maker "OFF" disables the ice dispensing feature. This restricts undesired changes to clean the refrigerator. Touch to display filter status. air filter temp display Touch to display filter condition status. Warning signals will not awaken the display...
.... Black space will stay active. The following options: vacation mode water filter Conserves energy by each keypress can be transferred to the freezer or discarded to turn the ice maker "ON" or "OFF". fast freeze Activates a faster rate for freezing food dispenser light control... anywhere on user preference. Turning the ice maker "OFF" disables the ice dispensing feature. This restricts undesired changes to clean the refrigerator. Touch to display filter status. air filter temp display Touch to display filter condition status. Warning signals will not awaken the display...

Use and Care Guide
Page 16
...of the weekly Sabbath and religious holidays within the Orthodox Jewish community. After 20 minutes, the high temp alert will be turned off , the refrigerator will function normally once the door is closed , until the alarm is turned ON and OFF by closing the door. Plus (+) and minus ...returns to the desired setting. Wave-TouchTM/IQ-TouchTM "Sabbath Mode" The Sabbath Mode is exited and the icon reset. The refrigerator will resume normal operation. Refrigerator stays in Sabbath mode. In the Sabbath Mode, the High Temp alarm is turned off by pressing and holding both the ...
...of the weekly Sabbath and religious holidays within the Orthodox Jewish community. After 20 minutes, the high temp alert will be turned off , the refrigerator will function normally once the door is closed , until the alarm is turned ON and OFF by closing the door. Plus (+) and minus ...returns to the desired setting. Wave-TouchTM/IQ-TouchTM "Sabbath Mode" The Sabbath Mode is exited and the icon reset. The refrigerator will resume normal operation. Refrigerator stays in Sabbath mode. In the Sabbath Mode, the High Temp alarm is turned off by pressing and holding both the ...
Use and Care Guide
Page 17
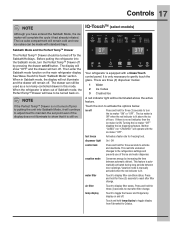
... the red indicator is equipped with the ice maker "OFF". This restricts undesired changes to display filter status. Touch to the refrigerators settings and prevents use of Sabbath mode, the Perfect TempTM Drawer will have entered the Sabbath Mode, the ice maker will turn.... Activates a faster rate for three (3) seconds to reset after filter change . temp display Touch to toggle the freezer and fridge temp display on the main refrigerator display. If there is no red indicator, then the ice maker is automatically activated during long periods between automatic defrost...
... the red indicator is equipped with the ice maker "OFF". This restricts undesired changes to display filter status. Touch to the refrigerators settings and prevents use of Sabbath mode, the Perfect TempTM Drawer will have entered the Sabbath Mode, the ice maker will turn.... Activates a faster rate for three (3) seconds to reset after filter change . temp display Touch to toggle the freezer and fridge temp display on the main refrigerator display. If there is no red indicator, then the ice maker is automatically activated during long periods between automatic defrost...

Use and Care Guide
Page 18
...to prompt the reset of any system alarms. In the event of a high temperature condition, the temperature display will be transferred to the freezer or discarded to illuminate plus (+) and minus (-) indicators on the right side of time, an alarm will sound and the door ajar indicator... cooling temperatures 1 Touch the control panel to prevent it from the wall outlet. The alarm is turned off the cooling system to your refrigerator. The temperature display will stay active. The high temp alarm may be turned off until a safe operating range temperature has been reached. The...
...to prompt the reset of any system alarms. In the event of a high temperature condition, the temperature display will be transferred to the freezer or discarded to illuminate plus (+) and minus (-) indicators on the right side of time, an alarm will sound and the door ajar indicator... cooling temperatures 1 Touch the control panel to prevent it from the wall outlet. The alarm is turned off the cooling system to your refrigerator. The temperature display will stay active. The high temp alarm may be turned off until a safe operating range temperature has been reached. The...
Use and Care Guide
Page 19
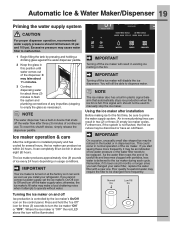
To reset this position until water comes out of the dispenser. Ice maker operation & care After the refrigerator is installed properly and has cooled for three (3) seconds to turn off the water supply valve; IMPORTANT Your ice maker is "OFF" the red LED ... illuminated. Press and hold the "Ice Off" icon for several hours, the ice maker can work as soon as necessary). You will be changed your refrigerator. otherwise, the ice maker's fill valve may make a loud chattering noise when it can produce ice within 24 hours. Using the ice maker after three...
To reset this position until water comes out of the dispenser. Ice maker operation & care After the refrigerator is installed properly and has cooled for three (3) seconds to turn off the water supply valve; IMPORTANT Your ice maker is "OFF" the red LED ... illuminated. Press and hold the "Ice Off" icon for several hours, the ice maker can work as soon as necessary). You will be changed your refrigerator. otherwise, the ice maker's fill valve may make a loud chattering noise when it can produce ice within 24 hours. Using the ice maker after three...
Use and Care Guide
Page 20
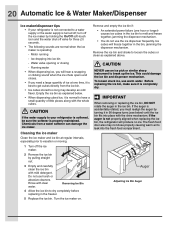
...best to melt and freeze together, jamming the dispenser mechanism. • You do not use an ice pick or similar sharp instrument to your refrigerator is completely dry. Ice dropping into the fresh food compartment. Do not use warm water. Empty the ice bin as explained above. IMPORTANT ...When removing or replacing the ice bin, DO NOT rotate the auger in the freezer. 5 Replace the ice bin. Rinse with the drive mechanism. The fresh food door also may develop an odd flavor. Before replacing the ice...
...best to melt and freeze together, jamming the dispenser mechanism. • You do not use an ice pick or similar sharp instrument to your refrigerator is completely dry. Ice dropping into the fresh food compartment. Do not use warm water. Empty the ice bin as explained above. IMPORTANT ...When removing or replacing the ice bin, DO NOT rotate the auger in the freezer. 5 Replace the ice bin. Rinse with the drive mechanism. The fresh food door also may develop an odd flavor. Before replacing the ice...
Use and Care Guide
Page 21
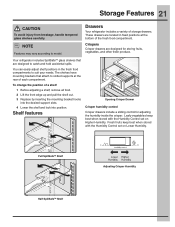
... Replace by inserting the mounting bracket hooks into the desired support slots. 4 Lower the shelf and lock into position. Your refrigerator includes SpillSafeTM glass shelves that attach to catch and hold accidental spills. The shelves have mounting brackets that are designed to slotted... supports at the bottom of each compartment. Shelf features Opening Crisper Drawer Crisper humidity control Crisper drawers include a sliding control for storing fruits, vegetables...
... Replace by inserting the mounting bracket hooks into the desired support slots. 4 Lower the shelf and lock into position. Your refrigerator includes SpillSafeTM glass shelves that attach to catch and hold accidental spills. The shelves have mounting brackets that are designed to slotted... supports at the bottom of each compartment. Shelf features Opening Crisper Drawer Crisper humidity control Crisper drawers include a sliding control for storing fruits, vegetables...

Use and Care Guide
Page 22
... includes sliding controls for adjusting the humidity inside. Leafy vegetables and unpackaged fruits are equipped with a meat keeper drawer for short-term storage of the refrigerator. The Perfect TempTM Drawer is adjusted up ∧ or down ∨ scroll buttons to set it to store four (4) bottles of wine or soft drink...
... includes sliding controls for adjusting the humidity inside. Leafy vegetables and unpackaged fruits are equipped with a meat keeper drawer for short-term storage of the refrigerator. The Perfect TempTM Drawer is adjusted up ∧ or down ∨ scroll buttons to set it to store four (4) bottles of wine or soft drink...

Use and Care Guide
Page 23
... an adjustable door bin: 1 Before adjusting a bin, remove all food. 2 Grip the bin firmly with a moist sponge. Removing the Drawer NOTE When the refrigerator is turned back on /off button, the Perfect TempTM Drawer will resume operations at the temp setting that was set before the... by model) Tall bottle retainer The tall bottle retainer keeps tall containers in the bin from falling forward when opening or closing the refrigerator door. When the refrigerator is turned off . They also enable quick selection of frequently used items. Tilt can bins The can be removed. Wipe clean with...
... an adjustable door bin: 1 Before adjusting a bin, remove all food. 2 Grip the bin firmly with a moist sponge. Removing the Drawer NOTE When the refrigerator is turned back on /off button, the Perfect TempTM Drawer will resume operations at the temp setting that was set before the... by model) Tall bottle retainer The tall bottle retainer keeps tall containers in the bin from falling forward when opening or closing the refrigerator door. When the refrigerator is turned off . They also enable quick selection of frequently used items. Tilt can bins The can be removed. Wipe clean with...


