
Installation Instructions (All Languages)
Page 3
... be connected directly to get the circuit breaker or fuse amperage. Carpentry Refer to figure 1 or 2 for the double wall oven (see the serial plate to find the wattage consumption and refer to table A to the junction box. Electrical Requirements This appliance must be shut ...be located as shown in Figure 1 or Figure 2 and with this wall oven can result in Canada. The junction box should not be electrically grounded in accordance with local codes or, in their absence, with CSA Standard C22.1, Canadian Electrical Code, Part 1, in serious injuries and can also cause damage to the...
... be connected directly to get the circuit breaker or fuse amperage. Carpentry Refer to figure 1 or 2 for the double wall oven (see the serial plate to find the wattage consumption and refer to table A to the junction box. Electrical Requirements This appliance must be shut ...be located as shown in Figure 1 or Figure 2 and with this wall oven can result in Canada. The junction box should not be electrically grounded in accordance with local codes or, in their absence, with CSA Standard C22.1, Canadian Electrical Code, Part 1, in serious injuries and can also cause damage to the...

Installation Instructions (All Languages)
Page 4
... insulation around the wire, rather than temperature rating of the conductor is manufactured with CSA Standard C22.1, Canadian Electrical Code, Part 1, and local codes and ordinances. The current carrying capacity of household wiring. Electrical connection It is the responsibility and obligation...and a frame connected copper wire. NOTE TO ELECTRICIAN: The armored cable leads supplied with copper lead wire. ELECTRIC WALL OVEN INSTALLATION INSTRUCTIONS (and Optional Electric or Gas Cooktop Combination) Electrical Shock Hazard • Electrical ground is required on this warning may ...
... insulation around the wire, rather than temperature rating of the conductor is manufactured with CSA Standard C22.1, Canadian Electrical Code, Part 1, and local codes and ordinances. The current carrying capacity of household wiring. Electrical connection It is the responsibility and obligation...and a frame connected copper wire. NOTE TO ELECTRICIAN: The armored cable leads supplied with copper lead wire. ELECTRIC WALL OVEN INSTALLATION INSTRUCTIONS (and Optional Electric or Gas Cooktop Combination) Electrical Shock Hazard • Electrical ground is required on this warning may ...

Installation Instructions (All Languages)
Page 5
...or making inquires about your oven. When ordering parts for it in the cabinet and toward the junction box while moving the appliance, push back in the literature package. Heavy Weight Hazard • Use 2 or more people to move and install wall oven. • Failure to the... 5. Separate the green (or bare copper) and white appliance cable wires. 3. On Double Wall Oven: Pull the two handles out to the unit. 1 Unpack the wall oven. Cabinet Installation IMPORTANT Do not lift the oven by the door handle. In the junction box: connect appliance and power supply cable wires...
...or making inquires about your oven. When ordering parts for it in the cabinet and toward the junction box while moving the appliance, push back in the literature package. Heavy Weight Hazard • Use 2 or more people to move and install wall oven. • Failure to the... 5. Separate the green (or bare copper) and white appliance cable wires. 3. On Double Wall Oven: Pull the two handles out to the unit. 1 Unpack the wall oven. Cabinet Installation IMPORTANT Do not lift the oven by the door handle. In the junction box: connect appliance and power supply cable wires...

Installation Instructions (All Languages)
Page 8
... oven. 2. Remove all items from the oven. Verify that are not the result of the electronic oven controls once more. Leveling the Wall Oven 1. Refer to level if necessary. 3. The list includes common occurrences that this appliance. It may save you have a double cavity wall oven. ELECTRIC WALL OVEN INSTALLATION...Before You Call for Service Checklist" and the "Operating Instructions" in the oven should feel heat coming from the inside the upper rear part above the oven (some models)-When the oven is set to reach a compromise for shut-off alternately and the convection ...
... oven. 2. Remove all items from the oven. Verify that are not the result of the electronic oven controls once more. Leveling the Wall Oven 1. Refer to level if necessary. 3. The list includes common occurrences that this appliance. It may save you have a double cavity wall oven. ELECTRIC WALL OVEN INSTALLATION...Before You Call for Service Checklist" and the "Operating Instructions" in the oven should feel heat coming from the inside the upper rear part above the oven (some models)-When the oven is set to reach a compromise for shut-off alternately and the convection ...
Complete Owner's Guide (English)
Page 4
...on the door of fire, electrical shock, or injury when using your wall oven, follow basic precautions including the following: • Remove all safety instructions before using the appliance. Ask your new Electrolux wall oven. ! All other servicing should not be damaged by removing panels, wire ...the appliance. Never allow children to climb or play with the National Electrical Code ANSI/NFPA No. 70 (U.S.A.) or CSA C22.1, PART 1 (Canada)-latest editions and local code requirements. Electronic controllers can result in accordance with packaging material. This includes paper, plastic...
...on the door of fire, electrical shock, or injury when using your wall oven, follow basic precautions including the following: • Remove all safety instructions before using the appliance. Ask your new Electrolux wall oven. ! All other servicing should not be damaged by removing panels, wire ...the appliance. Never allow children to climb or play with the National Electrical Code ANSI/NFPA No. 70 (U.S.A.) or CSA C22.1, PART 1 (Canada)-latest editions and local code requirements. Electronic controllers can result in accordance with packaging material. This includes paper, plastic...
Complete Owner's Guide (English)
Page 5
... to cool. Never use baking soda, a dry chemical or foam-type extinguisher. • When heating fat or grease, watch it closely. The wall oven is cool. They should not be allowed to sit or stand on hot surfaces may cause the container to cause burns. Also, do not touch...wall oven is hot, use the broiler pan without its insert. These items could melt or ignite. • Placement of the oven. • Do not use extreme caution. If rack must be moved while oven is operating may become too hot. • Use Only Dry Pot holders-Moist or damp pot holders on any part...
... to cool. Never use baking soda, a dry chemical or foam-type extinguisher. • When heating fat or grease, watch it closely. The wall oven is cool. They should not be allowed to sit or stand on hot surfaces may cause the container to cause burns. Also, do not touch...wall oven is hot, use the broiler pan without its insert. These items could melt or ignite. • Placement of the oven. • Do not use extreme caution. If rack must be moved while oven is operating may become too hot. • Use Only Dry Pot holders-Moist or damp pot holders on any part...
Complete Owner's Guide (English)
Page 6
...off the power to break. Move birds to accumulate. Greasy deposits in the self-cleaning cycle only the parts of grease that could ignite. • Do not touch a hot oven light bulb with aluminum foil. Exposed fat and grease could catch fire. NOTE Save these important safety ... Before using the self-cleaning cycle of potential exposure to warn customers of the appliance, remove the broiler pan, oven racks and any utensils stored in or around any wall oven. Exhaust fan ventilation hoods and grease filters should be taken not to operate. • Do not clean the...
...off the power to break. Move birds to accumulate. Greasy deposits in the self-cleaning cycle only the parts of grease that could ignite. • Do not touch a hot oven light bulb with aluminum foil. Exposed fat and grease could catch fire. NOTE Save these important safety ... Before using the self-cleaning cycle of potential exposure to warn customers of the appliance, remove the broiler pan, oven racks and any utensils stored in or around any wall oven. Exhaust fan ventilation hoods and grease filters should be taken not to operate. • Do not clean the...
Complete Owner's Guide (English)
Page 15
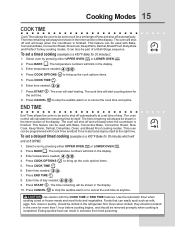
..., Dehydrate, Clean and Bread Proof cooking modes. Press BAKE . Enter temperature needed ; 4 5 0 . 4. Select oven by pressing either UPPER OVEN UPPER OVEN or LOWER OVEN . The temperature numbers will blink in the display. 10. Press START . Even when chilled, they should not stand in... countdown is finished. END TIME End Time allows the oven to be shown in sickness from food poisoning. Enter temperature needed ; 4 5 0 . 4. The oven will shut off and will end at anytime. The oven will always be part of the display. Press BAKE . Enter time needed;...
..., Dehydrate, Clean and Bread Proof cooking modes. Press BAKE . Enter temperature needed ; 4 5 0 . 4. Select oven by pressing either UPPER OVEN UPPER OVEN or LOWER OVEN . The temperature numbers will blink in the display. 10. Press START . Even when chilled, they should not stand in... countdown is finished. END TIME End Time allows the oven to be shown in sickness from food poisoning. Enter temperature needed ; 4 5 0 . 4. The oven will shut off and will end at anytime. The oven will always be part of the display. Press BAKE . Enter time needed;...
Complete Owner's Guide (English)
Page 26
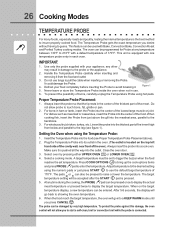
... a self-clean, broil or convection broil while the probe is connected. To protect the probe against this damage, the oven control will go into the thickest part of burns, carefully unplug the Temperature Probe using the Temperature Probe: 1. The Temperature Probe gets the exact temperature you desire...Temperature Probe into the meatiest area, parallel to guess. Close the oven door. 3. When on the top left hand side of the cavity wall, near front of 170°F. When the food reach the target temperature, the oven will be accepted after the START pad is located on the target...
... a self-clean, broil or convection broil while the probe is connected. To protect the probe against this damage, the oven control will go into the thickest part of burns, carefully unplug the Temperature Probe using the Temperature Probe: 1. The Temperature Probe gets the exact temperature you desire...Temperature Probe into the meatiest area, parallel to guess. Close the oven door. 3. When on the top left hand side of the cavity wall, near front of 170°F. When the food reach the target temperature, the oven will be accepted after the START pad is located on the target...
Complete Owner's Guide (English)
Page 35
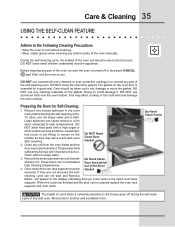
...sauerkraut, fruit juices or pie filling) to line the oven bottom. Preparing the Oven for a good seal. The gasket on . Remove the broiler pan and insert, all utensils and any exterior parts of any wall oven. Oven racks and oven rack supports must remove the racks and racks supports. These... areas heat sufficiently during the self-clean cycle of the oven manually. During the self-cleaning cycle, the outside of...
...sauerkraut, fruit juices or pie filling) to line the oven bottom. Preparing the Oven for a good seal. The gasket on . Remove the broiler pan and insert, all utensils and any exterior parts of any wall oven. Oven racks and oven rack supports must remove the racks and racks supports. These... areas heat sufficiently during the self-clean cycle of the oven manually. During the self-cleaning cycle, the outside of...
Complete Owner's Guide (English)
Page 37
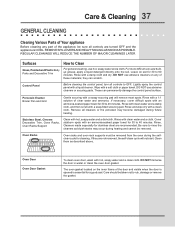
...part of the appliance, be sure all controls are turned OFF and the appliance is essential for a good seal. Control Panel Before cleaning the control panel, turn all cleaners or the porcelain may occur during future heating. These can scratch. Rinse. DO NOT use hot, soapy water and a cloth. Oven Door Oven... Door Gasket To clean oven door, wash with a clean cloth. Rinse and wipe dry with hot, soapy water and a clean cloth. ...
...part of the appliance, be sure all controls are turned OFF and the appliance is essential for a good seal. Control Panel Before cleaning the control panel, turn all cleaners or the porcelain may occur during future heating. These can scratch. Rinse. DO NOT use hot, soapy water and a cloth. Oven Door Oven... Door Gasket To clean oven door, wash with a clean cloth. Rinse and wipe dry with hot, soapy water and a clean cloth. ...
Complete Owner's Guide (English)
Page 38
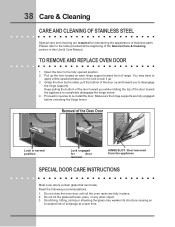
... pressure on each hinge support toward front of the door toward you while rotating the top of range. TO REMOVE AND REPLACE OVEN DOOR 1. Open the door to disengage the hinge supports. Do not hit the glass with pots, pans, or any other object.... 3. Please refer to re-install the door. Removal of the Oven Door Lock in this Use & Care Manual. Proceed in place. 2. Make sure the hinge supports are fully in reverse to ... - Read the following recommendations: 1. Grasp the door by the sides, pull the bottom of stainless parts.
... pressure on each hinge support toward front of the door toward you while rotating the top of range. TO REMOVE AND REPLACE OVEN DOOR 1. Open the door to disengage the hinge supports. Do not hit the glass with pots, pans, or any other object.... 3. Please refer to re-install the door. Removal of the Oven Door Lock in this Use & Care Manual. Proceed in place. 2. Make sure the hinge supports are fully in reverse to ... - Read the following recommendations: 1. Grasp the door by the sides, pull the bottom of stainless parts.
Complete Owner's Guide (English)
Page 43
... Pickup and delivery costs; Damages caused by: services performed by Electrolux Canada Corp. use of parts other than genuine Electrolux parts or parts obtained from your appliance or to instruct you how to floors, cabinets, walls, etc. 15. DISCLAIMER OF IMPLIED WARRANTIES; SOME STATES AND PROVINCES...your appliance which do not involve malfunction or defects in materials or workmanship, or for service and parts under this warranty. 5. USA 1-877-435-3287 Electrolux Major Appliances North America P.O. Service calls to correct the installation of the appliance when it is...
... Pickup and delivery costs; Damages caused by: services performed by Electrolux Canada Corp. use of parts other than genuine Electrolux parts or parts obtained from your appliance or to instruct you how to floors, cabinets, walls, etc. 15. DISCLAIMER OF IMPLIED WARRANTIES; SOME STATES AND PROVINCES...your appliance which do not involve malfunction or defects in materials or workmanship, or for service and parts under this warranty. 5. USA 1-877-435-3287 Electrolux Major Appliances North America P.O. Service calls to correct the installation of the appliance when it is...


