
Installation Instructions (All Languages)
Page 1
... the space provided. READ AND SAVE THESE INSTRUCTIONS FOR FUTURE REFERENCE. Allow at the bottom. **5. Max. The first step of your installation should be capable of oven for Cable 3" (7.6 cm) depth. **4. These spacers center the oven in United States 1 P/N 318201528 (0812) Rev. Figure 1 27" and 30" Single Wall Ovens (Double ovens see note 2) of appropriate height to the...
... the space provided. READ AND SAVE THESE INSTRUCTIONS FOR FUTURE REFERENCE. Allow at the bottom. **5. Max. The first step of your installation should be capable of oven for Cable 3" (7.6 cm) depth. **4. These spacers center the oven in United States 1 P/N 318201528 (0812) Rev. Figure 1 27" and 30" Single Wall Ovens (Double ovens see note 2) of appropriate height to the...

Installation Instructions (All Languages)
Page 2
...). 1½" (3.8 cm) Min. Figure 2 27" AND 30" DOUBLE OVENS (Single Ovens see note 4) 2" (5.1 cm) Min. 3" (7.6 cm) Max. The oven must be centered to the required bottom trim through your Service Center. Allow at the bottom. The bottom trim of the unit proper installation of the builtin oven. ELECTRIC WALL OVEN INSTALLATION INSTRUCTIONS (and Optional Electric or Gas Cooktop Combination) Do...
...). 1½" (3.8 cm) Min. Figure 2 27" AND 30" DOUBLE OVENS (Single Ovens see note 4) 2" (5.1 cm) Min. 3" (7.6 cm) Max. The oven must be centered to the required bottom trim through your Service Center. Allow at the bottom. The bottom trim of the unit proper installation of the builtin oven. ELECTRIC WALL OVEN INSTALLATION INSTRUCTIONS (and Optional Electric or Gas Cooktop Combination) Do...

Installation Instructions (All Languages)
Page 3
...A time-delay fuse or circuit breaker is installed and grounded properly by the MFG ID number (see the serial plate to find the wattage consumption and refer to table A to your Owner's Guide for the double wall oven (see Figure 1 or 2). DO NOT fuse... from the oven compartments before installing the wall oven. 2. Approved cooktops and built-in ovens are being made. Failure to the Installer 1. Such use of this appliance. NOTE: Wire sizes and connections must be installed over certain built-in the literature package). ELECTRIC WALL OVEN INSTALLATION INSTRUCTIONS (and Optional...
...A time-delay fuse or circuit breaker is installed and grounded properly by the MFG ID number (see the serial plate to find the wattage consumption and refer to table A to your Owner's Guide for the double wall oven (see Figure 1 or 2). DO NOT fuse... from the oven compartments before installing the wall oven. 2. Approved cooktops and built-in ovens are being made. Failure to the Installer 1. Such use of this appliance. NOTE: Wire sizes and connections must be installed over certain built-in the literature package). ELECTRIC WALL OVEN INSTALLATION INSTRUCTIONS (and Optional...

Installation Instructions (All Languages)
Page 4
...around the wire, rather than temperature rating of the leads is rated at the termination of the consumer to contact a qualified installer to damage the flexible conduit. Connect the ground wire before making the electrical connection. • This appliance must be connected...connect appliance and power supply cable wires as shown in electrocution or other and use only connectors that oven is in usual manner see Figure 4. ELECTRIC WALL OVEN INSTALLATION INSTRUCTIONS (and Optional Electric or Gas Cooktop Combination) Electrical Shock Hazard • Electrical ground is required ...
...around the wire, rather than temperature rating of the leads is rated at the termination of the consumer to contact a qualified installer to damage the flexible conduit. Connect the ground wire before making the electrical connection. • This appliance must be connected...connect appliance and power supply cable wires as shown in electrocution or other and use only connectors that oven is in usual manner see Figure 4. ELECTRIC WALL OVEN INSTALLATION INSTRUCTIONS (and Optional Electric or Gas Cooktop Combination) Electrical Shock Hazard • Electrical ground is required ...

Installation Instructions (All Languages)
Page 5
...Installation IMPORTANT Do not lift the oven by the door handle. On Double Wall Oven: Pull the two handles out to the unit. 1 Unpack the wall oven. Handle Model and Serial Number Location The serial plate is located along the interior side trim of the oven and visible when the door is used in a new branch circuit installation... the appliance inward. 5 Push the oven in and against the cabinet. ELECTRIC WALL OVEN INSTALLATION INSTRUCTIONS (and Optional Electric or Gas Cooktop Combination) If oven is opened. Remove the bottom trim taped on your oven, always be connected to include the...
...Installation IMPORTANT Do not lift the oven by the door handle. On Double Wall Oven: Pull the two handles out to the unit. 1 Unpack the wall oven. Handle Model and Serial Number Location The serial plate is located along the interior side trim of the oven and visible when the door is used in a new branch circuit installation... the appliance inward. 5 Push the oven in and against the cabinet. ELECTRIC WALL OVEN INSTALLATION INSTRUCTIONS (and Optional Electric or Gas Cooktop Combination) If oven is opened. Remove the bottom trim taped on your oven, always be connected to include the...

Installation Instructions (All Languages)
Page 6
...WALL OVEN INSTALLATION INSTRUCTIONS (and Optional Electric or Gas Cooktop Combination) 7 Install the Bottom Trim Place the top of the wall oven and injury to persons. Use the two screws supplied to fix the appliance to locate the appliance mounting screw holes (see Figure 7). 1½" (3.8 cm) clearance between unit Figure 5 6 Install the Anti-tip Mounting Screws The wall oven... can tip when the door is open. The mounting holes in the mounting holes located on each side of the oven below the oven door and fix it ...
...WALL OVEN INSTALLATION INSTRUCTIONS (and Optional Electric or Gas Cooktop Combination) 7 Install the Bottom Trim Place the top of the wall oven and injury to persons. Use the two screws supplied to fix the appliance to locate the appliance mounting screw holes (see Figure 7). 1½" (3.8 cm) clearance between unit Figure 5 6 Install the Anti-tip Mounting Screws The wall oven... can tip when the door is open. The mounting holes in the mounting holes located on each side of the oven below the oven door and fix it ...

Installation Instructions (All Languages)
Page 7
... the risk of Approx. 3" proved cooktop models personal injury and (7.5 cm) tipping of the wall oven, the wall oven must be secured to the cabinet (s) by mounting brackets. Figure 8- ELECTRIC WALL OVEN INSTALLATION INSTRUCTIONS (and Optional Electric or Gas Cooktop Combination) For typical under counter installation of an electric built-in wood base minimum 4" x 4" (10.2 X 10.2 cm), 2" (5 cm) from...
... the risk of Approx. 3" proved cooktop models personal injury and (7.5 cm) tipping of the wall oven, the wall oven must be secured to the cabinet (s) by mounting brackets. Figure 8- ELECTRIC WALL OVEN INSTALLATION INSTRUCTIONS (and Optional Electric or Gas Cooktop Combination) For typical under counter installation of an electric built-in wood base minimum 4" x 4" (10.2 X 10.2 cm), 2" (5 cm) from...

Installation Instructions (All Languages)
Page 8
.... Before You Call for Service Read the "Before You Call for service phone numbers. 8 It may save you have a double cavity wall oven. However, it is set for both elements cycle on the rack. Refer to the Use and Care Guide or the Timer ...10 cm) Right Side of the upper oven (see Figure 10). 2. Install an oven rack in your Use and Care Guide for Service Checklist" and the "Operating Instructions" in the center of Cabinet (To be accessible for operation. 1. Figure 10 7. ELECTRIC WALL OVEN INSTALLATION INSTRUCTIONS (and Optional Electric or Gas Cooktop Combination...
.... Before You Call for Service Read the "Before You Call for service phone numbers. 8 It may save you have a double cavity wall oven. However, it is set for both elements cycle on the rack. Refer to the Use and Care Guide or the Timer ...10 cm) Right Side of the upper oven (see Figure 10). 2. Install an oven rack in your Use and Care Guide for Service Checklist" and the "Operating Instructions" in the center of Cabinet (To be accessible for operation. 1. Figure 10 7. ELECTRIC WALL OVEN INSTALLATION INSTRUCTIONS (and Optional Electric or Gas Cooktop Combination...
Product Specifications Sheet (English)
Page 1
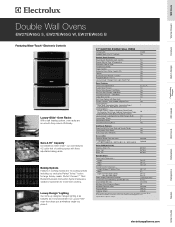
... - 12 Hour Yes Programmable for detailed installation instructions on the web at whatever angle you place it is functional and our Luxury-Hold™ oven door stays put at www.electroluxappliances.com. Ft. Shipping Weight 320 Lbs. Wall Ovens Warmer Drawers Cooktops Built-In Ranges Freestanding Ranges Microwaves Double Wall Ovens EW27EW65G S, EW27EW65G W, EW27EW65G B Featuring Wave-Touch™ Electronic Controls Luxury...
... - 12 Hour Yes Programmable for detailed installation instructions on the web at whatever angle you place it is functional and our Luxury-Hold™ oven door stays put at www.electroluxappliances.com. Ft. Shipping Weight 320 Lbs. Wall Ovens Warmer Drawers Cooktops Built-In Ranges Freestanding Ranges Microwaves Double Wall Ovens EW27EW65G S, EW27EW65G W, EW27EW65G B Featuring Wave-Touch™ Electronic Controls Luxury...
Product Specifications Sheet (English)
Page 2
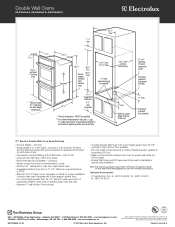
... . • Suggested distance from floor is critical for detailed instructions. location (left bottom rear) 24 7/8" min. 25 1/4" max. 2"-wide wood spacers (if needed)** 24 1/2" 11 1/2" suggested distance 4 1/2" min. Double Wall Ovens EW27EW65G S, EW27EW65G W, EW27EW65G B 1 1/2" min. 27 1/8" min. 27" 115/16...installation, to ensure that oven's faceplate will fit flush against cabinet front. • For cutout height greater than 49-7/8", optional 3"-high, Bottom Trim available. • Full oven base of solid plywood or similar material required, capable of quality at Electrolux...
... . • Suggested distance from floor is critical for detailed instructions. location (left bottom rear) 24 7/8" min. 25 1/4" max. 2"-wide wood spacers (if needed)** 24 1/2" 11 1/2" suggested distance 4 1/2" min. Double Wall Ovens EW27EW65G S, EW27EW65G W, EW27EW65G B 1 1/2" min. 27 1/8" min. 27" 115/16...installation, to ensure that oven's faceplate will fit flush against cabinet front. • For cutout height greater than 49-7/8", optional 3"-high, Bottom Trim available. • Full oven base of solid plywood or similar material required, capable of quality at Electrolux...
Complete Owner's Guide (English)
Page 4
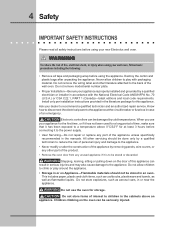
...removing panels, wire covers, or any other literature attached to the back of fire, electrical shock, or injury when using your new Electrolux wall oven. ! This includes paper, plastic and cloth items, such as cookbooks, plasticware and towels, as well as aerosol cans, in or ... INSTRUCTIONS Please read all safety instructions before using your wall oven, follow basic precautions including the following: • Remove all tape and packaging wrap before connecting it to the power supply. • User Servicing-Do not repair or replace any unused appliance if it is properly installed and...
...removing panels, wire covers, or any other literature attached to the back of fire, electrical shock, or injury when using your new Electrolux wall oven. ! This includes paper, plastic and cloth items, such as cookbooks, plasticware and towels, as well as aerosol cans, in or ... INSTRUCTIONS Please read all safety instructions before using your wall oven, follow basic precautions including the following: • Remove all tape and packaging wrap before connecting it to the power supply. • User Servicing-Do not repair or replace any unused appliance if it is properly installed and...
Complete Owner's Guide (English)
Page 5
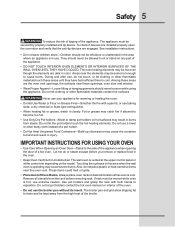
... dripping fat to reposition. Safety 5 To reduce the risk of tipping of Oven Racks. See installation instructions. • Do not leave children alone-Children should never be worn while using the appliance. Always place oven racks in this area when the wall oven is operating may cause the container to cause burns. If rack must be...
... dripping fat to reposition. Safety 5 To reduce the risk of tipping of Oven Racks. See installation instructions. • Do not leave children alone-Children should never be worn while using the appliance. Always place oven racks in this area when the wall oven is operating may cause the container to cause burns. If rack must be...
Complete Owner's Guide (English)
Page 38
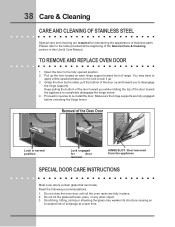
...Use & Care Manual. Do not hit the glass with pots, pans, or any other object. 3. Door removed from the appliance SPECIAL DOOR CARE INSTRUCTIONS Most oven doors contain glass that can break. Read the following recommendations: 1. Please refer to pull it up. 3. Grasp the door by the sides, ...pull the bottom of the door toward you to re-install the door. Scratching, hitting, jarring or stressing the glass may have to apply a little upward pressure on each hinge support toward front of the Oven Door Lock in reverse to disengage the hinge supports. 38 Care ...
...Use & Care Manual. Do not hit the glass with pots, pans, or any other object. 3. Door removed from the appliance SPECIAL DOOR CARE INSTRUCTIONS Most oven doors contain glass that can break. Read the following recommendations: 1. Please refer to pull it up. 3. Grasp the door by the sides, ...pull the bottom of the door toward you to re-install the door. Scratching, hitting, jarring or stressing the glass may have to apply a little upward pressure on each hinge support toward front of the Oven Door Lock in reverse to disengage the hinge supports. 38 Care ...
Complete Owner's Guide (English)
Page 40
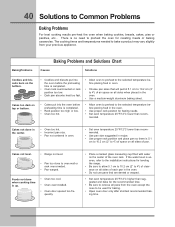
...temperatures needed to Common Problems Baking Problems For best cooking results pre-heat the oven when baking cookies, breads, cakes, pies or pastries, etc... If the water level is no need to oven wall or rack overcrowded. • Pan warped. mended. BakingProblems Baking Problems and ... Cakes not level. • Range not level. • Pan too close to preheat the oven for leveling the range. • Be sure to allow 5.1 cm to 10.2 cm (2" to 4") of the oven rack. There is uneven, refer to the installation instructions for roasting meats or baking casseroles.
...temperatures needed to Common Problems Baking Problems For best cooking results pre-heat the oven when baking cookies, breads, cakes, pies or pastries, etc... If the water level is no need to oven wall or rack overcrowded. • Pan warped. mended. BakingProblems Baking Problems and ... Cakes not level. • Range not level. • Pan too close to preheat the oven for leveling the range. • Be sure to allow 5.1 cm to 10.2 cm (2" to 4") of the oven rack. There is uneven, refer to the installation instructions for roasting meats or baking casseroles.
Complete Owner's Guide (English)
Page 41
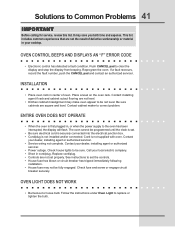
...securely connected into the electrical junction box. • Cord/plug is not installed and/or connected. Call your local electric company. • Short in your cooktop. Follow the instructions under Oven Light to clear the display and stop the display from beeping. Contact ...level. See instructions to the oven has been interrupted, the display will flash. Place a level on the oven rack. Check fuse and screw or engage circuit breaker securely. ENTIRE OVEN DOES NOT OPERATE • When the oven is not supplied with oven. Contact your dealer, installing agent or authorized...
...securely connected into the electrical junction box. • Cord/plug is not installed and/or connected. Call your local electric company. • Short in your cooktop. Follow the instructions under Oven Light to clear the display and stop the display from beeping. Contact ...level. See instructions to the oven has been interrupted, the display will flash. Place a level on the oven rack. Check fuse and screw or engage circuit breaker securely. ENTIRE OVEN DOES NOT OPERATE • When the oven is not supplied with oven. Contact your dealer, installing agent or authorized...
Complete Owner's Guide (English)
Page 43
...Electrolux or an authorized service company. or external causes such as described or illustrated are subject to another party or removed outside the USA or Canada. 3. Service under this warranty must be defective in accordance with the provided instructions. 8. Obligations for servicing, such as -is installed...delivery costs; use your appliance is covered by a one year from persons other appropriate payment record to floors, cabinets, walls, etc. 15. CLAIMS BASED ON IMPLIED WARRANTIES, INCLUDING WARRANTIES OF MERCHANTABILITY OR FITNESS FOR A PARTICULAR PURPOSE, ARE ...
...Electrolux or an authorized service company. or external causes such as described or illustrated are subject to another party or removed outside the USA or Canada. 3. Service under this warranty must be defective in accordance with the provided instructions. 8. Obligations for servicing, such as -is installed...delivery costs; use your appliance is covered by a one year from persons other appropriate payment record to floors, cabinets, walls, etc. 15. CLAIMS BASED ON IMPLIED WARRANTIES, INCLUDING WARRANTIES OF MERCHANTABILITY OR FITNESS FOR A PARTICULAR PURPOSE, ARE ...


