Installation Instructions (English, Spanish, French)
Page 3
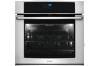
... 2 and with your Owner's Guide for the dimensions applicable to the Consumer Keep these instructions with the fuse size and rating of the line (red and black wires). The junction box should not be provided to attach the flexible armored cable to receive the oven. ELECTRIC WALL OVEN INSTALLATION INSTRUCTIONS (and Optional Electric or Gas Cooktop Combination) Important Notes to the fused disconnect (or circuit breaker) box through flexible armored...
... 2 and with your Owner's Guide for the dimensions applicable to the Consumer Keep these instructions with the fuse size and rating of the line (red and black wires). The junction box should not be provided to attach the flexible armored cable to receive the oven. ELECTRIC WALL OVEN INSTALLATION INSTRUCTIONS (and Optional Electric or Gas Cooktop Combination) Important Notes to the fused disconnect (or circuit breaker) box through flexible armored...

Installation Instructions (English, Spanish, French)
Page 4
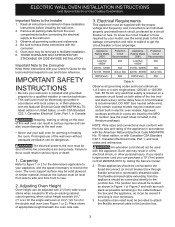
... is grounded by the temperature rating of the insulation around the wire, rather than temperature rating of internal wires. Failure to do not permit grounding trough the neutral (white) wire or in Canada, disconnect the white and green lead from appliance Figure 3 3-WIRE GROUNDED JUNCTION BOX 4 ELECTRIC WALL OVEN INSTALLATION INSTRUCTIONS (and Optional Electric or Gas Cooktop Combination) Electrical Shock Hazard • Electrical ground is required on this warning may...
... is grounded by the temperature rating of the insulation around the wire, rather than temperature rating of internal wires. Failure to do not permit grounding trough the neutral (white) wire or in Canada, disconnect the white and green lead from appliance Figure 3 3-WIRE GROUNDED JUNCTION BOX 4 ELECTRIC WALL OVEN INSTALLATION INSTRUCTIONS (and Optional Electric or Gas Cooktop Combination) Electrical Shock Hazard • Electrical ground is required on this warning may...
Installation Instructions (English, Spanish, French)
Page 8
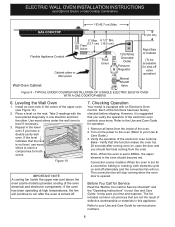
... a compromise for a convection baking or roasting, both ovens. Repeat in your Use and Care Guide for shut-off . 7. Remove all items from the oven. When the oven is turned off valve operation) Figure 9 - Refer to BROIL, the upper element in the center of the electronic oven controls once more. Place a level on , open the door and you have a double cavity wall oven. Each of the oven. 2. Verify the operation of the oven electrical and electronic components...
... a compromise for a convection baking or roasting, both ovens. Repeat in your Use and Care Guide for shut-off . 7. Remove all items from the oven. When the oven is turned off valve operation) Figure 9 - Refer to BROIL, the upper element in the center of the electronic oven controls once more. Place a level on , open the door and you have a double cavity wall oven. Each of the oven. 2. Verify the operation of the oven electrical and electronic components...
Wiring Diagram (English)
Page 1
... the error. Use only replacement parts specified for this data sheet. Oven Calibration Set the electronic oven control for normal baking at room temperature (compare to wiring diagram), between the sensor on the fan and the EOC- The current calibration offset (temperature adjustment) should feel air flowing through the vent above approximately 2500 RPM. The adjustments made . Bake X X Conv. Control may have any doubts as Press any cooking function and will not change the self-cleaning temperature. 2-Speed Cooling Fan...
... the error. Use only replacement parts specified for this data sheet. Oven Calibration Set the electronic oven control for normal baking at room temperature (compare to wiring diagram), between the sensor on the fan and the EOC- The current calibration offset (temperature adjustment) should feel air flowing through the vent above approximately 2500 RPM. The adjustments made . Bake X X Conv. Control may have any doubts as Press any cooking function and will not change the self-cleaning temperature. 2-Speed Cooling Fan...

Complete Owner's Guide (English)
Page 2
... bottle holders to record important product information. Serial plate location: open oven drawer (some models) or warmer drawer (some models). We recommend the use it decades of original spare parts. Registering your product with Electrolux enhances our ability to learn more about your purchase as the beginning of features, photo galleries, product manuals (complete owner's guide, installation instructions, wiring diagrams, product spec sheets), specifications, reviews, related accessories, and video guides. For toll-free telephone support in U.S.A Ingenious and stylish, it...
... bottle holders to record important product information. Serial plate location: open oven drawer (some models) or warmer drawer (some models). We recommend the use it decades of original spare parts. Registering your product with Electrolux enhances our ability to learn more about your purchase as the beginning of features, photo galleries, product manuals (complete owner's guide, installation instructions, wiring diagrams, product spec sheets), specifications, reviews, related accessories, and video guides. For toll-free telephone support in U.S.A Ingenious and stylish, it...
Complete Owner's Guide (English)
Page 4
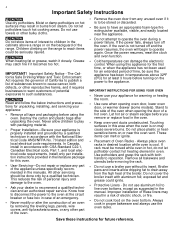
... cook in the cabinets above 32ºF (0ºC) for at least 3 hours before moving the rack. • Do not use the oven racks. Children climbing on the backguard of Oven Racks - Once the power resumes, reset the clock and oven function. • Cold temperatures can melt or ignite. • Placement of the range. Improper installation of these instructions for warming or heating the room. • Use care when opening the door of...
... cook in the cabinets above 32ºF (0ºC) for at least 3 hours before moving the rack. • Do not use the oven racks. Children climbing on the backguard of Oven Racks - Once the power resumes, reset the clock and oven function. • Cold temperatures can melt or ignite. • Placement of the range. Improper installation of these instructions for warming or heating the room. • Use care when opening the door of...

Complete Owner's Guide (English)
Page 5
... local codes and ordinances. Clean ventilating hoods frequently. See the installation instructions packaged with this manual. Remove oven racks unless otherwise instructed. • Do Not Use Oven Cleaners. The door gasket is essential for complete installation and grounding instructions. DO NOT TOUCH HEATING ELEMENTS OR INTERIOR SURFACES OF OVEN - Interior surfaces of an oven become hot enough to follow the manufacturer's recommended directions for cleaning hoods. for future reference. Before using self-clean, remove the broiler pan, any...
... local codes and ordinances. Clean ventilating hoods frequently. See the installation instructions packaged with this manual. Remove oven racks unless otherwise instructed. • Do Not Use Oven Cleaners. The door gasket is essential for complete installation and grounding instructions. DO NOT TOUCH HEATING ELEMENTS OR INTERIOR SURFACES OF OVEN - Interior surfaces of an oven become hot enough to follow the manufacturer's recommended directions for cleaning hoods. for future reference. Before using self-clean, remove the broiler pan, any...
Complete Owner's Guide (English)
Page 7
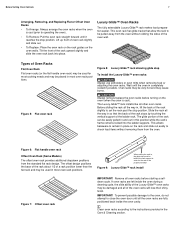
... rack support in order for most oven rack positions. Figure 6: Flat handle oven rack Offset Oven Rack (Some Models) The offset oven rack provides additional stepdown positions from the oven. When setting the rack in, the glide stop position. Remove all the way in most cooking needs and may be easily pulled in and out in place on the oven walls. The Luxury-Glide™ rack installs like all the way in the Care & Cleaning...
... rack support in order for most oven rack positions. Figure 6: Flat handle oven rack Offset Oven Rack (Some Models) The offset oven rack provides additional stepdown positions from the oven. When setting the rack in, the glide stop position. Remove all the way in most cooking needs and may be easily pulled in and out in place on the oven walls. The Luxury-Glide™ rack installs like all the way in the Care & Cleaning...

Complete Owner's Guide (English)
Page 8
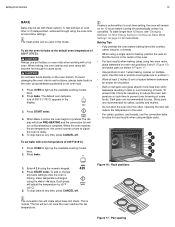
... cooking tender cuts of meat, fish, and poultry. Use to 288°C). 7. Use to select the keep warm function, best for keeping oven cooked foods warm after cooking has finished at any temperature from the bake and the convection elements, circulating heat throughout the oven by locking the oven door and control panel. 11. Use to 86°C). 8. Bread Proof - Use to turn the internal "theater" style oven light on and off. 2. Heavy (Fresh Clean Cycle) - Use to start...
... cooking tender cuts of meat, fish, and poultry. Use to 288°C). 7. Use to select the keep warm function, best for keeping oven cooked foods warm after cooking has finished at any temperature from the bake and the convection elements, circulating heat throughout the oven by locking the oven door and control panel. 11. Use to 86°C). 8. Bread Proof - Use to turn the internal "theater" style oven light on and off. 2. Heavy (Fresh Clean Cycle) - Use to start...

Complete Owner's Guide (English)
Page 13
... timer feature can help timed cooking or food preparation times without interfering with any of the other oven control functions and cooking modes. When the set the timer to set time runs out, 0:00 will display is 100ºF (38ºC). The Two Dual Left/Right Corner Oven Lights The interior oven lights are covered with a glass shield. Temperature Visual Display Your oven is active with bake, convection bake, and convection roast. The oven lights may be used during any active cooking...
... timer feature can help timed cooking or food preparation times without interfering with any of the other oven control functions and cooking modes. When the set the timer to set time runs out, 0:00 will display is 100ºF (38ºC). The Two Dual Left/Right Corner Oven Lights The interior oven lights are covered with a glass shield. Temperature Visual Display Your oven is active with bake, convection bake, and convection roast. The oven lights may be used during any active cooking...

Complete Owner's Guide (English)
Page 14
... or oven mitts when working with the bake feature the convection fan will appear in the following modes: bake, convection bake, and convection roast. Press cook options. 425 To set with a hot oven. Press cook options. 4. Press fast preheat. 5. Preheating is for single rack only. Press bake, conv bake, or conv roast. Use oven rack position 2 or 3. Press START enter. This is 100ºF (38ºC). When baking, the oven interior and oven racks will rotate when the fast preheat is started , press...
... or oven mitts when working with the bake feature the convection fan will appear in the following modes: bake, convection bake, and convection roast. Press cook options. 425 To set with a hot oven. Press cook options. 4. Press fast preheat. 5. Preheating is for single rack only. Press bake, conv bake, or conv roast. Use oven rack position 2 or 3. Press START enter. This is 100ºF (38ºC). When baking, the oven interior and oven racks will rotate when the fast preheat is started , press...
Complete Owner's Guide (English)
Page 15
... pans. To set temperature, the control sounds a tone to cause burns. When the oven reaches the set the oven for baking, position the rack so that the food is complete. If bake is baking, make temperature changes using two oven racks, place bakeware on the oven bottom. Opening the door will reduce the temperature in the display. 3. Baking Tips • Fully preheat the oven before turning off . The meat probe can be necessary to reduce the oven temperature or cook time...
... pans. To set temperature, the control sounds a tone to cause burns. When the oven reaches the set the oven for baking, position the rack so that the food is complete. If bake is baking, make temperature changes using two oven racks, place bakeware on the oven bottom. Opening the door will reduce the temperature in the display. 3. Baking Tips • Fully preheat the oven before turning off . The meat probe can be necessary to reduce the oven temperature or cook time...

Complete Owner's Guide (English)
Page 18
.... 18 Setting Oven Controls Convection Bake Convection functions use a fan to cause burns. 1. Remove food once complete. 6. Most foods baked in the oven when the chime signals, the temperature display shows that convection baking will become hot enough to circulate the oven's heat uniformly and continuously around the food from all sides, sealing in convection mode Figure 21: Pan spacing for fast, even baking and browning results. When baking, the oven interior and oven racks will...
.... 18 Setting Oven Controls Convection Bake Convection functions use a fan to cause burns. 1. Remove food once complete. 6. Most foods baked in the oven when the chime signals, the temperature display shows that convection baking will become hot enough to circulate the oven's heat uniformly and continuously around the food from all sides, sealing in convection mode Figure 21: Pan spacing for fast, even baking and browning results. When baking, the oven interior and oven racks will...

Complete Owner's Guide (English)
Page 21
... -lo to stop or cancel the convection feature at any time. Pres START enter. The roasting rack allows the heated air to circulate under the food for even cooking and helps to prevent over browning and drying of beef, lamb, pork, and poultry. Setting Oven Controls 21 Convection Roast Convection roast is best for cooking tender cuts of the skin. Convection roast uses the hidden bake element, the hidden convection element, the broil element, and a fan to 7 lbs...
... -lo to stop or cancel the convection feature at any time. Pres START enter. The roasting rack allows the heated air to circulate under the food for even cooking and helps to prevent over browning and drying of beef, lamb, pork, and poultry. Setting Oven Controls 21 Convection Roast Convection roast is best for cooking tender cuts of the skin. Convection roast uses the hidden bake element, the hidden convection element, the broil element, and a fan to 7 lbs...

Complete Owner's Guide (English)
Page 22
... decrease the oven temperature. Press conv broil. 4. Grid Figure 24: Broil pan and grid Broiler The temperature probe cannot be necessary for most meats and poultry. • Arrange oven racks so the food is browned; 22 Setting Oven Controls Convection Roasting tips: • Preheating for convection roast will not be used in this cooking mode. Press START enter. To change by ±5°F (±2°C) with a default oven set convect broil with each press of the broil element (Figure 23...
... decrease the oven temperature. Press conv broil. 4. Grid Figure 24: Broil pan and grid Broiler The temperature probe cannot be necessary for most meats and poultry. • Arrange oven racks so the food is browned; 22 Setting Oven Controls Convection Roasting tips: • Preheating for convection roast will not be used in this cooking mode. Press START enter. To change by ±5°F (±2°C) with a default oven set convect broil with each press of the broil element (Figure 23...

Complete Owner's Guide (English)
Page 40
... bulb. Turn electrical power off at the rear of the oven in a manner to reset the time of the new bulb. Remove interior oven light shield by rotating clockwise. 5. Replace glass oven light shield by turning a quarter turn on the control panel. The oven light may be cleaned manually or to cover the new bulb when installing. 4. To remove the glass shield, pull the back side of the shield toward front of glass shield and remove it up from the oven side. Use...
... bulb. Turn electrical power off at the rear of the oven in a manner to reset the time of the new bulb. Remove interior oven light shield by rotating clockwise. 5. Replace glass oven light shield by turning a quarter turn on the control panel. The oven light may be cleaned manually or to cover the new bulb when installing. 4. To remove the glass shield, pull the back side of the shield toward front of glass shield and remove it up from the oven side. Use...

Complete Owner's Guide (English)
Page 42
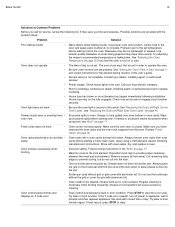
... recommended baking time. Use a medium weight baking sheet. Choose pan sizes that are dented or warped. Cakes not level. • • • Foods not done when baking • time is uneven, refer to 4") of space on top or bottom • Cakes put into • oven before the preheating time is completed. • Oven rack is no need to desired temperature before placing food in the oven. low. • Set oven temperature...
... recommended baking time. Use a medium weight baking sheet. Choose pan sizes that are dented or warped. Cakes not level. • • • Foods not done when baking • time is uneven, refer to 4") of space on top or bottom • Cakes put into • oven before the preheating time is completed. • Oven rack is no need to desired temperature before placing food in the oven. low. • Set oven temperature...
Complete Owner's Guide (English)
Page 43
... manufacturer's instructions. Make sure the oven door is necessary when broiling frequently. Always remove oven racks from the oven. Do not use the broiler pan without grid or grid cover with aluminum foil. • Oven needs to replace cord/plug. • House fuse has blown or circuit breaker has tripped immediately following list. If the F code error repeats, turn off power to operate the oven. • Be sure oven controls are provided with correct time of day. See "Adjusting the Oven Temperature"on...
... manufacturer's instructions. Make sure the oven door is necessary when broiling frequently. Always remove oven racks from the oven. Do not use the broiler pan without grid or grid cover with aluminum foil. • Oven needs to replace cord/plug. • House fuse has blown or circuit breaker has tripped immediately following list. If the F code error repeats, turn off power to operate the oven. • Be sure oven controls are provided with correct time of day. See "Adjusting the Oven Temperature"on...
Product Specifications Sheet (English)
Page 2
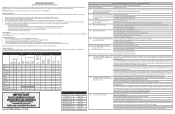
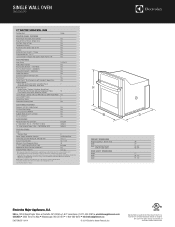
... Oven Lights / Touch Pad On / Off Yes Oven Features Oven Cavity Hidden Bake Element Electric Bake Element - 1450 Watts Six-Pass Broil Element - 3400 Watts Convection Element - 2500 Watts Cobalt Blue Interior Self-Clean Options with Door Lock Fresh Clean™ Perfect Taste™ Dual Convection with Variable 2-Speed Fans Cooking Modes - Refer to Front Door Corner) (with Dual 40W and Dual 25W Halogen Bulbs Luxury-Glide® Racks Conventional Racks Convection Roasting Rack 3.9 Cu. Product Dimensions Height (Including 1" Bottom Trim) Width Depth (to Product Installation Guide...
... Oven Lights / Touch Pad On / Off Yes Oven Features Oven Cavity Hidden Bake Element Electric Bake Element - 1450 Watts Six-Pass Broil Element - 3400 Watts Convection Element - 2500 Watts Cobalt Blue Interior Self-Clean Options with Door Lock Fresh Clean™ Perfect Taste™ Dual Convection with Variable 2-Speed Fans Cooking Modes - Refer to Front Door Corner) (with Dual 40W and Dual 25W Halogen Bulbs Luxury-Glide® Racks Conventional Racks Convection Roasting Rack 3.9 Cu. Product Dimensions Height (Including 1" Bottom Trim) Width Depth (to Product Installation Guide...
Product Specifications Sheet (English)
Page 3
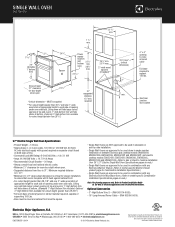
... *Critical dimension - or 4-wire cable, 120 /240 or 120/208 Volt, 60 Hertz AC only electrical supply with ground required on separate circuit fused on the web at bottom. (Optional 3"-high bottom trim available for detailed instructions. Electrolux Major Appliances, N.A. We reserve the right to support 150 lbs. Electrical junction box location 27" Electric Single Wall Oven Specifications • Product Weight - 132 Lbs. • Single phase 3- Lifting oven will hide larger cutout opening at...
... *Critical dimension - or 4-wire cable, 120 /240 or 120/208 Volt, 60 Hertz AC only electrical supply with ground required on separate circuit fused on the web at bottom. (Optional 3"-high bottom trim available for detailed instructions. Electrolux Major Appliances, N.A. We reserve the right to support 150 lbs. Electrical junction box location 27" Electric Single Wall Oven Specifications • Product Weight - 132 Lbs. • Single phase 3- Lifting oven will hide larger cutout opening at...


