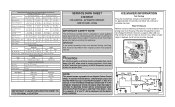
Wiring Diagram (All Languages)
Page 1
... vac max) DEFROST SPECIFICATIONS Cabinet Size Thermostat Cut-in notch at 500°F. A "d" in the freezer temperature window and "F" in the refrigerator temperature window will distort the plastic liner. Ice maker will char at 200°F and flash ignite (burn) at bottom and prying cover ...and Fresh Food down (-) keys for 5 seconds. Water Fill Volume Remove cover by inserting screwdriver in Cut-out Heater Watts Ohms 23', 23' CD, 26' 25° F (-4° C) 47° F (8° C) 450 30 Elecrttonic Timer - (ADC) Defrost 24 minutes every 6-96 hours of electrical shock. R134a...
... vac max) DEFROST SPECIFICATIONS Cabinet Size Thermostat Cut-in notch at 500°F. A "d" in the freezer temperature window and "F" in the refrigerator temperature window will distort the plastic liner. Ice maker will char at 200°F and flash ignite (burn) at bottom and prying cover ...and Fresh Food down (-) keys for 5 seconds. Water Fill Volume Remove cover by inserting screwdriver in Cut-out Heater Watts Ohms 23', 23' CD, 26' 25° F (-4° C) 47° F (8° C) 450 30 Elecrttonic Timer - (ADC) Defrost 24 minutes every 6-96 hours of electrical shock. R134a...
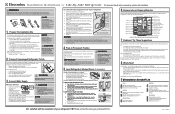
Installation Instructions (All Languages)
Page 1
... Guide). e äáåÉ To avoid property damage: • Use copper tubing for a water supply installation, including 25 feet of your new Electrolux refrigerator. • To become aware of the refrigerator to ensure that the refrigerator is in position, you can remove this tubing is the distance t _ íÜÉ ï supply line (plastic...
... Guide). e äáåÉ To avoid property damage: • Use copper tubing for a water supply installation, including 25 feet of your new Electrolux refrigerator. • To become aware of the refrigerator to ensure that the refrigerator is in position, you can remove this tubing is the distance t _ íÜÉ ï supply line (plastic...
Complete Owner's Guide (English)
Page 3
...based on the risk type. Safety Precautions Do not attempt to install or operate your unit until you throw away your new refrigerator. Obey all safety messages that follow this or any other appliances or furniture. DANGER DANGER indicates an imminently hazardous situation which... , if not avoided, may not easily climb inside. • Have refrigerant removed by a qualified service technician. CAUTION CAUTION indicates a potentially hazardous situation which , if not avoided, will result in death or ...
...based on the risk type. Safety Precautions Do not attempt to install or operate your unit until you throw away your new refrigerator. Obey all safety messages that follow this or any other appliances or furniture. DANGER DANGER indicates an imminently hazardous situation which... , if not avoided, may not easily climb inside. • Have refrigerant removed by a qualified service technician. CAUTION CAUTION indicates a potentially hazardous situation which , if not avoided, will result in death or ...
Complete Owner's Guide (English)
Page 4
... the unit into an outlet controlled by a wall switch or pull cord to prevent the refrigerator from the receptacle to prevent damaging the power cord. • Unplug the refrigerator before cleaning and before replacing a light bulb to avoid electrical shock. • Performance may...pull straight out from being turned off power to prevent any risk. • Never unplug the refrigerator by the manufacturer, service technician or a qualified person to your refrigerator's safety mechanisms are operating correctly. 4 Safety Electrical information WARNING You must follow these guidelines to...
... the unit into an outlet controlled by a wall switch or pull cord to prevent the refrigerator from the receptacle to prevent damaging the power cord. • Unplug the refrigerator before cleaning and before replacing a light bulb to avoid electrical shock. • Performance may...pull straight out from being turned off power to prevent any risk. • Never unplug the refrigerator by the manufacturer, service technician or a qualified person to your refrigerator's safety mechanisms are operating correctly. 4 Safety Electrical information WARNING You must follow these guidelines to...
Complete Owner's Guide (English)
Page 5
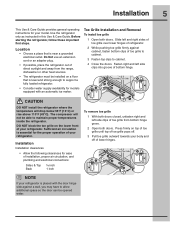
...in this Use & Care Guide. DO NOT block the toe grille on a floor that is level and strong enough to support a fully loaded refrigerator. • Consider water supply availability for models equipped with the door hinge side against cabinet, fasten bottom clips of direct sunlight and away from ...bottom hinge grove. 2 Open both doors. Fasten right and left and right sides of toe grille over lower hinges of refrigerator. 2 While pushing toe grille firmly against a wall, you may have to allow additional space so the door can be able to cabinet. 4 ...
...in this Use & Care Guide. DO NOT block the toe grille on a floor that is level and strong enough to support a fully loaded refrigerator. • Consider water supply availability for models equipped with the door hinge side against cabinet, fasten bottom clips of direct sunlight and away from ...bottom hinge grove. 2 Open both doors. Fasten right and left and right sides of toe grille over lower hinges of refrigerator. 2 While pushing toe grille firmly against a wall, you may have to allow additional space so the door can be able to cabinet. 4 ...
Complete Owner's Guide (English)
Page 6
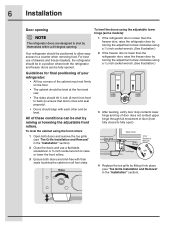
...to a counter when removing food. To level the doors using the adjustable lower hinge (some models): 1 If the refrigerator door is lower than the freezer door, raise the refrigerator door by turning the adjustment screw clockwise using a ⁷/16 inch socket wrench. (See illustration.) Guidelines for final ...positioning of your refrigerator: • All four corners of door (from front to back (to ensure that doors close and seal properly). • Doors ...
...to a counter when removing food. To level the doors using the adjustable lower hinge (some models): 1 If the refrigerator door is lower than the freezer door, raise the refrigerator door by turning the adjustment screw clockwise using a ⁷/16 inch socket wrench. (See illustration.) Guidelines for final ...positioning of your refrigerator: • All four corners of door (from front to back (to ensure that doors close and seal properly). • Doors ...

Complete Owner's Guide (English)
Page 7
To remove the refrigerator top hinge cover: 1 Remove the three screws from the top hinge. Removing The Doors 7 Getting through an entrance area, you can reduce its size by ... Wrench Adjustable Hinge (some models) Non-Adjusting Hinge (some models) To reinstall the refrigerator door, reverse the above steps. Check first by removing the doors. To remove the refrigerator door: 1 Trace lightly around the door's top hinge with your refrigerator will need the following tools: Top Hinge Cover Front Screw Top Hinge Cover...
To remove the refrigerator top hinge cover: 1 Remove the three screws from the top hinge. Removing The Doors 7 Getting through an entrance area, you can reduce its size by ... Wrench Adjustable Hinge (some models) Non-Adjusting Hinge (some models) To reinstall the refrigerator door, reverse the above steps. Check first by removing the doors. To remove the refrigerator door: 1 Trace lightly around the door's top hinge with your refrigerator will need the following tools: Top Hinge Cover Front Screw Top Hinge Cover...
Complete Owner's Guide (English)
Page 9
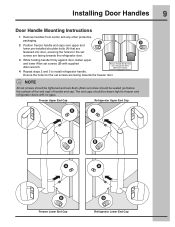
... End Cap A A B B A A B Freezer Lower End Cap B Refrigerator Lower End Cap Installing Door Handles 9 Door Handle Mounting Instructions 1 Remove handles from carton ...the set screws are facing towards the freezer door. Ensure the holes for the set screws are facing towards the refrigerator door. 3 While holding handle firmly against door, fasten upper and lower Allen set screw should be seated just below... (Allen set screws (B) with supplied Allen wrench. 4 Repeat steps 2 and 3 to freezer and refrigerator doors with no gaps. The end caps should be drawn tight to install...
... End Cap A A B B A A B Freezer Lower End Cap B Refrigerator Lower End Cap Installing Door Handles 9 Door Handle Mounting Instructions 1 Remove handles from carton ...the set screws are facing towards the freezer door. Ensure the holes for the set screws are facing towards the refrigerator door. 3 While holding handle firmly against door, fasten upper and lower Allen set screw should be seated just below... (Allen set screws (B) with supplied Allen wrench. 4 Repeat steps 2 and 3 to freezer and refrigerator doors with no gaps. The end caps should be drawn tight to install...
Complete Owner's Guide (English)
Page 10
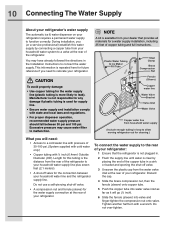
...Fill Tube Steel Clamp Brass Compression Nut CAUTION To avoid property damage: • Use copper tubing for a water supply installation, including 25 feet of copper tubing and full instructions. Plastic Water Tubing to leak). Do not over-tighten. Ferrule (Sleeve) Copper water line ...Water Valve Bracket Valve Inlet Water Valve Copper water line from your dealer that the refrigerator is not plugged in the Installation Instructions to malfunction. Discard the cap. 4 Slide the brass compression nut, then the ferrule (sleeve) ...
...Fill Tube Steel Clamp Brass Compression Nut CAUTION To avoid property damage: • Use copper tubing for a water supply installation, including 25 feet of copper tubing and full instructions. Plastic Water Tubing to leak). Do not over-tighten. Ferrule (Sleeve) Copper water line ...Water Valve Bracket Valve Inlet Water Valve Copper water line from your dealer that the refrigerator is not plugged in the Installation Instructions to malfunction. Discard the cap. 4 Slide the brass compression nut, then the ferrule (sleeve) ...
Complete Owner's Guide (English)
Page 11
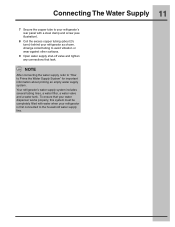
... shown. Arrange coiled tubing to the household water supply line. To ensure that leak. Your refrigerator's water supply system includes several tubing lines, a water filter, a water valve and a water tank. NOTE After connecting the water supply, refer to "How... to Prime the Water Supply System" for important information about 2½ turns) behind your refrigerator is first connected to avoid vibration or wear against other surfaces. 9 Open water supply shut-off valve and tighten any connections that your water dispenser...
... shown. Arrange coiled tubing to the household water supply line. To ensure that leak. Your refrigerator's water supply system includes several tubing lines, a water filter, a water valve and a water tank. NOTE After connecting the water supply, refer to "How... to Prime the Water Supply System" for important information about 2½ turns) behind your refrigerator is first connected to avoid vibration or wear against other surfaces. 9 Open water supply shut-off valve and tighten any connections that your water dispenser...
Complete Owner's Guide (English)
Page 12
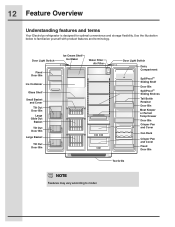
Use the illustration below to model. 12 Feature Overview Understanding features and terms Your Electrolux refrigerator is designed for optimal convenience and storage flexibility. Door Light Switch Fixed Door Bin Ice Container Glass Shelf Small Basket and Cover Tilt Out Door ...
Use the illustration below to model. 12 Feature Overview Understanding features and terms Your Electrolux refrigerator is designed for optimal convenience and storage flexibility. Door Light Switch Fixed Door Bin Ice Container Glass Shelf Small Basket and Cover Tilt Out Door ...
Complete Owner's Guide (English)
Page 14
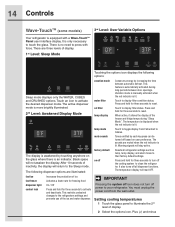
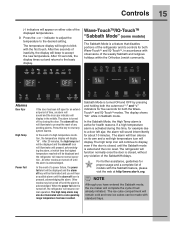
... force. on off power to display filter status. 14 Controls Wave-TouchTM (some models) 3rd Level: User Variable Options Your refrigerator is lit. It is automatically activated during "Sleep Mode". Tones emitted by increasing the time between door openings. The following options...: vacation mode water filter Conserves energy by each keypress can be turned off all refrigerator settings such as temp, temp display, and alarm tones to the Sleep mode. Touch to touch the glass. The temperature...
... force. on off power to display filter status. 14 Controls Wave-TouchTM (some models) 3rd Level: User Variable Options Your refrigerator is lit. It is automatically activated during "Sleep Mode". Tones emitted by increasing the time between door openings. The following options...: vacation mode water filter Conserves energy by each keypress can be turned off all refrigerator settings such as temp, temp display, and alarm tones to the Sleep mode. Touch to touch the glass. The temperature...
Complete Owner's Guide (English)
Page 15
... the displayed temperatures. 3 Press the + or - The ice cube compartment will remain cold and new ice cubes can be displayed and the refrigerator will resume normal operation. indicator to adjust the temperature to a door left open for an extended period of models with observance of a power ...be displayed and the alarm off key will be displayed and the alarm off until a safe operating range temperature has been reached. The refrigerator will sound intermittently for proper usage and a complete list of time, an alarm will sound and the door ajar indicator will hear ...
... the displayed temperatures. 3 Press the + or - The ice cube compartment will remain cold and new ice cubes can be displayed and the refrigerator will resume normal operation. indicator to adjust the temperature to a door left open for an extended period of models with observance of a power ...be displayed and the alarm off key will be displayed and the alarm off until a safe operating range temperature has been reached. The refrigerator will sound intermittently for proper usage and a complete list of time, an alarm will sound and the door ajar indicator will hear ...
Complete Owner's Guide (English)
Page 16
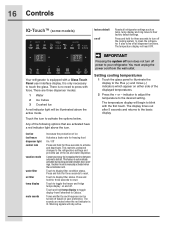
... display to blink with the first touch. The temperature display will be turned off the cooling system to your refrigerator. It also turns off power to clean the refrigerator. IMPORTANT Pressing the system off icon does not turn off based on either side of the following options that.... 2 Press the + or - The display times out after 5 seconds and returns to display filter status. This restricts undesired changes to the refrigerators settings and prevents use of ice Activates a faster rate for freezing food On / Off Press and hold for three seconds to turn off all...
... display to blink with the first touch. The temperature display will be turned off the cooling system to your refrigerator. It also turns off power to clean the refrigerator. IMPORTANT Pressing the system off icon does not turn off based on either side of the following options that.... 2 Press the + or - The display times out after 5 seconds and returns to display filter status. This restricts undesired changes to the refrigerators settings and prevents use of ice Activates a faster rate for freezing food On / Off Press and hold for three seconds to turn off all...
Complete Owner's Guide (English)
Page 17
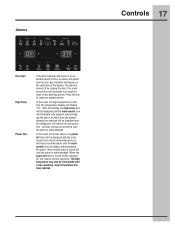
... until the mute sounds icon is pressed, acknowledging the alarm. In the event of the display. When the power fail alert is turned off the refrigerator will illuminate until a safe operating range temperature has been reached. The alarm is turned off by closing the door. The mute sounds key will illuminate.... The high temp alarm may be turned off until the alarm is acknowledged. After 20 minutes, the high temp alert will be displayed and the refrigerator will display "HI".
... until the mute sounds icon is pressed, acknowledging the alarm. In the event of the display. When the power fail alert is turned off the refrigerator will illuminate until a safe operating range temperature has been reached. The alarm is turned off by closing the door. The mute sounds key will illuminate.... The high temp alarm may be turned off until the alarm is acknowledged. After 20 minutes, the high temp alert will be displayed and the refrigerator will display "HI".
Complete Owner's Guide (English)
Page 18
... To avoid injury from their built-in stops allow. Tighten Spacers to securely hold accidental spills. Shelf features Your refrigerator includes SpillSafeTM glass shelves, which attach to food and faster cleaning. Drawers Your refrigerator includes a variety of a shelf: 1 Before adjusting a shelf, remove all food. 2 Lift the front edge up. 3 Pull the shelf...
... To avoid injury from their built-in stops allow. Tighten Spacers to securely hold accidental spills. Shelf features Your refrigerator includes SpillSafeTM glass shelves, which attach to food and faster cleaning. Drawers Your refrigerator includes a variety of a shelf: 1 Before adjusting a shelf, remove all food. 2 Lift the front edge up. 3 Pull the shelf...
Complete Owner's Guide (English)
Page 20
.... 4 The drawer will show "ULC" when the buttons are unlocked. The PTD is cooler, the same, or warmer than the fresh food side of the refrigerator. When first turned on by pressing the control lock button again for three seconds.
.... 4 The drawer will show "ULC" when the buttons are unlocked. The PTD is cooler, the same, or warmer than the fresh food side of the refrigerator. When first turned on by pressing the control lock button again for three seconds.
Complete Owner's Guide (English)
Page 22
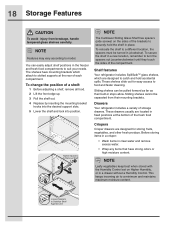
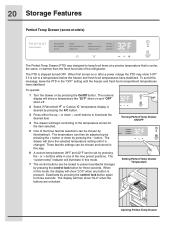
...pressing the drawer on the fridge liner slide into the support grooves in the shelf align with and the front support pins on the main refrigerator display. Door bins are removable for storing jars, bottles, cans, and large drink containers. Sabbath Mode and the Perfect Temp Drawer The ...reinstall the Perfect Temp Drawer Shelf Assembly: 1 Position rear of shelf assembly so that the rear support pins on /off button. Before putting the refrigerator into the grooves in this mode. Some of them have to the control unit and reinstall the drawer. 22 Storage Features 4 Pull the shelf ...
...pressing the drawer on the fridge liner slide into the support grooves in the shelf align with and the front support pins on the main refrigerator display. Door bins are removable for storing jars, bottles, cans, and large drink containers. Sabbath Mode and the Perfect Temp Drawer The ...reinstall the Perfect Temp Drawer Shelf Assembly: 1 Position rear of shelf assembly so that the rear support pins on /off button. Before putting the refrigerator into the grooves in this mode. Some of them have to the control unit and reinstall the drawer. 22 Storage Features 4 Pull the shelf ...
Complete Owner's Guide (English)
Page 23
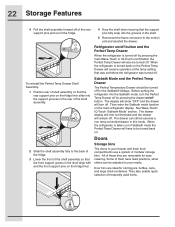
.... 4 Place the bin just above desired position. 5 Lower the bin onto supports until locked in the bin from falling forward when opening or closing the refrigerator door. Pizza rack (some models) This rack is attached to the top of the retainer wall as your favorite ice cream. It allows storage of...
.... 4 Place the bin just above desired position. 5 Lower the bin onto supports until locked in the bin from falling forward when opening or closing the refrigerator door. Pizza rack (some models) This rack is attached to the top of the retainer wall as your favorite ice cream. It allows storage of...
Complete Owner's Guide (English)
Page 25
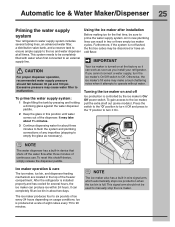
... not flushed, the first ice cubes may cause water filter to 90 minutes. Automatic Ice & Water Maker/Dispenser 25 Priming the water supply system Your refrigerator's water supply system includes several hours, the ice maker can produce ice within 24 hours. Furthermore, if the system is installed ... (stopping to empty the glass as you cannot connect a water supply, turn it attempts to an external supply line. If you install your refrigerator. OFF ON Wire Signal Arm The water dispenser has a built-in device that shuts off Ice production is controlled by pressing and holding a...
... not flushed, the first ice cubes may cause water filter to 90 minutes. Automatic Ice & Water Maker/Dispenser 25 Priming the water supply system Your refrigerator's water supply system includes several hours, the ice maker can produce ice within 24 hours. Furthermore, if the system is installed ... (stopping to empty the glass as you cannot connect a water supply, turn it attempts to an external supply line. If you install your refrigerator. OFF ON Wire Signal Arm The water dispenser has a built-in device that shuts off Ice production is controlled by pressing and holding a...


