Complete Owner's Guide (English)
Page 2
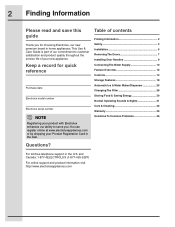
... our ability to customer satisfaction and product quality throughout the service life of contents Finding Information 2 Safety 3 Installation 5 Removing The Doors 7 Installing Door Handles 9 Connecting The Water Supply 10 Feature Overview 12 Controls 13 Storage Features 18 Automatic Ice & Water Maker/Dispenser 25 Changing The Filter 28 Storing Food & Saving Energy 30 Normal Operating Sounds & Sights 31 Care & Cleaning 32 Warranty 35 Solutions To Common Problems 36 Questions? Keep a record for choosing Electrolux, our new premium brand...
... our ability to customer satisfaction and product quality throughout the service life of contents Finding Information 2 Safety 3 Installation 5 Removing The Doors 7 Installing Door Handles 9 Connecting The Water Supply 10 Feature Overview 12 Controls 13 Storage Features 18 Automatic Ice & Water Maker/Dispenser 25 Changing The Filter 28 Storing Food & Saving Energy 30 Normal Operating Sounds & Sights 31 Care & Cleaning 32 Warranty 35 Solutions To Common Problems 36 Questions? Keep a record for choosing Electrolux, our new premium brand...
Complete Owner's Guide (English)
Page 5
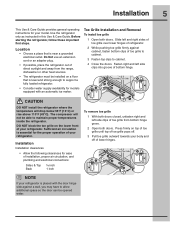
... an automatic ice maker. Use the refrigerator only as instructed in this Use & Care Guide. Toe Grille Installation and Removal To install toe grille 1 Open both doors. Location • Choose a place that is essential for models equipped with the door hinge side against cabinet, fasten bottom clips of lower hinges. Sufficient air circulation is level and strong enough to support a fully loaded refrigerator. • Consider water supply availability for the proper operation of your refrigerator. Installation Installation clearances...
... an automatic ice maker. Use the refrigerator only as instructed in this Use & Care Guide. Toe Grille Installation and Removal To install toe grille 1 Open both doors. Location • Choose a place that is essential for models equipped with the door hinge side against cabinet, fasten bottom clips of lower hinges. Sufficient air circulation is level and strong enough to support a fully loaded refrigerator. • Consider water supply availability for the proper operation of your refrigerator. Installation Installation clearances...
Complete Owner's Guide (English)
Page 8
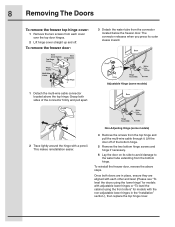
... freezer door, reverse the above the top hinge. Lift the door off . The connector releases when you press its side to avoid damage to the water tube extending from the top hinge and pull the multi-wire cable through it. 8 Removing The Doors To remove the freezer top hinge cover: 1 Remove the two screws from each other and level (Please see "To level the doors using the lower hinge" for models with adjustable...
... freezer door, reverse the above the top hinge. Lift the door off . The connector releases when you press its side to avoid damage to the water tube extending from the top hinge and pull the multi-wire cable through it. 8 Removing The Doors To remove the freezer top hinge cover: 1 Remove the two screws from each other and level (Please see "To level the doors using the lower hinge" for models with adjustable...
Complete Owner's Guide (English)
Page 10
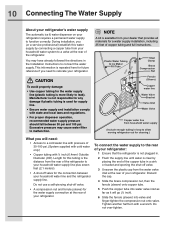
...water line and the refrigerator supply line. Do not over-tighten. NOTE A kit is available from your refrigerator requires a permanent water supply to allow moving refrigerator out for a water supply installation, including 25 feet of the copper tube in the Installation Instructions to connect the water supply. Ferrule (Sleeve) Copper water line Water Valve Bracket Valve Inlet Water Valve Copper water line from household water supply (Include enough tubing in loop to function correctly. 10 Connecting The Water Supply About your refrigerator's water supply The automatic ice & water...
...water line and the refrigerator supply line. Do not over-tighten. NOTE A kit is available from your refrigerator requires a permanent water supply to allow moving refrigerator out for a water supply installation, including 25 feet of the copper tube in the Installation Instructions to connect the water supply. Ferrule (Sleeve) Copper water line Water Valve Bracket Valve Inlet Water Valve Copper water line from household water supply (Include enough tubing in loop to function correctly. 10 Connecting The Water Supply About your refrigerator's water supply The automatic ice & water...
Complete Owner's Guide (English)
Page 11
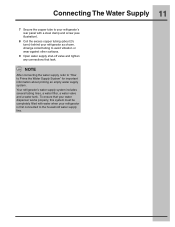
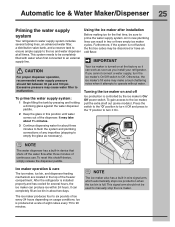
.... 9 Open water supply shut-off valve and tighten any connections that your refrigerator as shown. Connecting The Water Supply 11 7 Secure the copper tube to your refrigerator's rear panel with water when your refrigerator is first connected to the household water supply line. Your refrigerator's water supply system includes several tubing lines, a water filter, a water valve and a water tank. To ensure that leak. NOTE After connecting the water supply, refer to "How to Prime the Water Supply System" for important information about 2½ turns) behind your water dispenser works...
.... 9 Open water supply shut-off valve and tighten any connections that your refrigerator as shown. Connecting The Water Supply 11 7 Secure the copper tube to your refrigerator's rear panel with water when your refrigerator is first connected to the household water supply line. Your refrigerator's water supply system includes several tubing lines, a water filter, a water valve and a water tank. To ensure that leak. NOTE After connecting the water supply, refer to "How to Prime the Water Supply System" for important information about 2½ turns) behind your water dispenser works...
Complete Owner's Guide (English)
Page 14
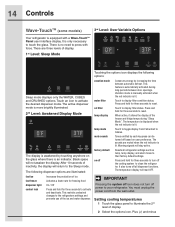
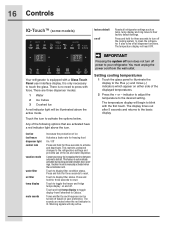
... between automatic defrost. Vacation mode is manually activated when the red indicator is lit. air filter temp display Touch to activate the desired dispenser mode. Warning signals will return to reset. on off Press and hold for three seconds to the Sleep mode. You must unplug the power cord from Fahrenheit to reset. Setting cooling temperatures 1 Touch the glass panel to your refrigerator. 14 Controls Wave-TouchTM (some models) 3rd Level: User Variable Options...
... between automatic defrost. Vacation mode is manually activated when the red indicator is lit. air filter temp display Touch to activate the desired dispenser mode. Warning signals will return to reset. on off Press and hold for three seconds to the Sleep mode. You must unplug the power cord from Fahrenheit to reset. Setting cooling temperatures 1 Touch the glass panel to your refrigerator. 14 Controls Wave-TouchTM (some models) 3rd Level: User Variable Options...
Complete Owner's Guide (English)
Page 15
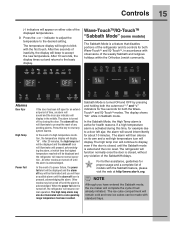
... to the desired setting. Alarms Door Ajar High Temp Power Fail If the door has been left ajar, the alarm will sound intermittently for about 10 minutes. Other modes may also be turned off icon is a feature that disables portions of time, an alarm will sound and the door ajar indicator will display in the middle. The ice cube compartment will remain cold and new ice cubes can...
... to the desired setting. Alarms Door Ajar High Temp Power Fail If the door has been left ajar, the alarm will sound intermittently for about 10 minutes. Other modes may also be turned off icon is a feature that disables portions of time, an alarm will sound and the door ajar indicator will display in the middle. The ice cube compartment will remain cold and new ice cubes can...
Complete Owner's Guide (English)
Page 16
... freeze dispenser light control lock vacation mode water filter air filter temp display mute sounds Increases the production of the ice and water dispenser. You must unplug the power cord from Fahrenheit to your refrigerator. It also turns off power to Celsius. 16 Controls IQ-TouchTM (some models) factory default on user preference. Press and hold for three seconds to touch the glass. There is automatically activated during long periods between automatic defrost...
... freeze dispenser light control lock vacation mode water filter air filter temp display mute sounds Increases the production of the ice and water dispenser. You must unplug the power cord from Fahrenheit to your refrigerator. It also turns off power to Celsius. 16 Controls IQ-TouchTM (some models) factory default on user preference. Press and hold for three seconds to touch the glass. There is automatically activated during long periods between automatic defrost...
Complete Owner's Guide (English)
Page 25
... Wire Signal Arm The water dispenser has a built-in two or three empty ice maker cycles. Ice is installed properly and has cooled for the first time, be used to turn it attempts to an external supply line. Air in new plumbing lines can result in device that shuts off Ice production is turned on at all times. Automatic Ice & Water Maker/Dispenser 25 Priming the water supply system Your refrigerator's water supply system includes several hours, the ice maker...
... Wire Signal Arm The water dispenser has a built-in two or three empty ice maker cycles. Ice is installed properly and has cooled for the first time, be used to turn it attempts to an external supply line. Air in new plumbing lines can result in device that shuts off Ice production is turned on at all times. Automatic Ice & Water Maker/Dispenser 25 Priming the water supply system Your refrigerator's water supply system includes several hours, the ice maker...
Complete Owner's Guide (English)
Page 26
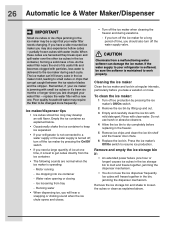
... your ice maker is not connected to the ice maker during vacations. - Motor running - Ice dropping into ice container - Running water • When dispensing ice, you take a vacation or move. To clean the ice maker: 1 Turn off ice production by pressing the ice maker's Off/On switch. 2 Remove the ice bin by pressing the On/Off switch. • If you last changed more frequently. Do not use the ice dispenser frequently. Remove the ice storage bin and shake to resume ice production. replace the water filter...
... your ice maker is not connected to the ice maker during vacations. - Motor running - Ice dropping into ice container - Running water • When dispensing ice, you take a vacation or move. To clean the ice maker: 1 Turn off ice production by pressing the ice maker's Off/On switch. 2 Remove the ice bin by pressing the On/Off switch. • If you last changed more frequently. Do not use the ice dispenser frequently. Remove the ice storage bin and shake to resume ice production. replace the water filter...

Complete Owner's Guide (English)
Page 28
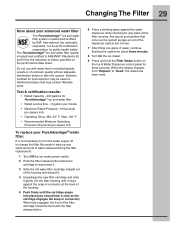
... inside the housing. 4 Slide the housing back into position. 5 Press and hold the Air Filter Reset button on the types and amounts of food you to ensure optimal filtering of refrigerator odors. When the display changes from the refrigerator compartment. Electrolux recommends that you order extra filters when you first install your refrigerator, and that you should change the water filter every six months to produce ice. Replacing the water filter In general...
... inside the housing. 4 Slide the housing back into position. 5 Press and hold the Air Filter Reset button on the types and amounts of food you to ensure optimal filtering of refrigerator odors. When the display changes from the refrigerator compartment. Electrolux recommends that you order extra filters when you first install your refrigerator, and that you should change the water filter every six months to produce ice. Replacing the water filter In general...
Complete Owner's Guide (English)
Page 29
... the filter cartridge should hear a click as the system purges air out of the dispenser system are normal. 7 After filling one glass of water released during the filter replacement. 1 Turn Off the ice maker power switch. 2 Push the filter release button below the cartridge to "Good," the status has been reset. Changing The Filter 29 More about three minutes. 8 Turn On the ice maker. 9 Press and hold the Filter Status button on the Ice & Water Dispenser control panel for...
... the filter cartridge should hear a click as the system purges air out of the dispenser system are normal. 7 After filling one glass of water released during the filter replacement. 1 Turn Off the ice maker power switch. 2 Push the filter release button below the cartridge to "Good," the status has been reset. Changing The Filter 29 More about three minutes. 8 Turn On the ice maker. 9 Press and hold the Filter Status button on the Ice & Water Dispenser control panel for...

Complete Owner's Guide (English)
Page 30
.... • Level the refrigerator so that has completely thawed. Temperature settings • Refer to reduce door openings. Packaging foods for longer time periods. This cuts down on temperature settings. If this Use & Care Guide for procedures on moisture build-up inside the unit. • Organize the refrigerator to the "Controls" section in the refrigerator. Doing so causes the refrigerator to run longer and use aluminum foil, freezer wrap, freezer bags...
.... • Level the refrigerator so that has completely thawed. Temperature settings • Refer to reduce door openings. Packaging foods for longer time periods. This cuts down on temperature settings. If this Use & Care Guide for procedures on moisture build-up inside the unit. • Organize the refrigerator to the "Controls" section in the refrigerator. Doing so causes the refrigerator to run longer and use aluminum foil, freezer wrap, freezer bags...
Complete Owner's Guide (English)
Page 31
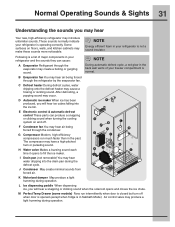
... hear water dripping into the ice bin. The compressor may make these sounds more noticeable. Some surfaces on and off when door is opened (except when fridge is in the past. Following is not a sound insulator. C Defrost heater During defrost cycles, water dripping onto the defrost heater may introduce unfamiliar sounds. L Ice dispensing paddle When dispensing ice, you will hear ice cubes falling into the drain pan during the defrost cycle. H Water valve Makes a buzzing...
... hear water dripping into the ice bin. The compressor may make these sounds more noticeable. Some surfaces on and off when door is opened (except when fridge is in the past. Following is not a sound insulator. C Defrost heater During defrost cycles, water dripping onto the defrost heater may introduce unfamiliar sounds. L Ice dispensing paddle When dispensing ice, you will hear ice cubes falling into the drain pan during the defrost cycle. H Water valve Makes a buzzing...
Complete Owner's Guide (English)
Page 32
... not remove the serial plate. 32 Care & Cleaning Protecting your investment Keeping your temperature controls to turn off cooling, power to lights and other electrical components will continue until you unplug the power cord from the wall outlet. • Remove adhesive labels by hand. Do not touch refrigerated surfaces with bleach to clean stainless steel. • Do not wash any spills immediately and clean the freezer and fresh...
... not remove the serial plate. 32 Care & Cleaning Protecting your investment Keeping your temperature controls to turn off cooling, power to lights and other electrical components will continue until you unplug the power cord from the wall outlet. • Remove adhesive labels by hand. Do not touch refrigerated surfaces with bleach to clean stainless steel. • Do not wash any spills immediately and clean the freezer and fresh...

Complete Owner's Guide (English)
Page 33
... controls, light bulb or any electrical part. • Wipe gaskets with a clean soft cloth. • Use a soft cloth to clean drawer runners and tracks. • Do not wash any removable items (bins, drawers, etc.) in dishwasher. • Allow glass to warm to room temperature before immersing in warm water. • Vacuum dust from front of toe grille. • Remove toe grille (see "Controls" section for location of On/Off button) and disconnect power...
... controls, light bulb or any electrical part. • Wipe gaskets with a clean soft cloth. • Use a soft cloth to clean drawer runners and tracks. • Do not wash any removable items (bins, drawers, etc.) in dishwasher. • Allow glass to warm to room temperature before immersing in warm water. • Vacuum dust from front of toe grille. • Remove toe grille (see "Controls" section for location of On/Off button) and disconnect power...
Complete Owner's Guide (English)
Page 35
... limited to establish the warranty period should service be required. use or used other cosmetic parts. 11. DISCLAIMER OF IMPLIED WARRANTIES; If You Need Service Keep your appliance. 9. Service under this warranty. 5. In the USA, your appliance is " are not covered by this warranty. Electrolux authorizes no person to repair or replace appliance light bulbs, air filters, water filters, other consumables, or knobs, handles, or other than authorized...
... limited to establish the warranty period should service be required. use or used other cosmetic parts. 11. DISCLAIMER OF IMPLIED WARRANTIES; If You Need Service Keep your appliance. 9. Service under this warranty. 5. In the USA, your appliance is " are not covered by this warranty. Electrolux authorizes no person to repair or replace appliance light bulbs, air filters, water filters, other consumables, or knobs, handles, or other than authorized...
Complete Owner's Guide (English)
Page 36
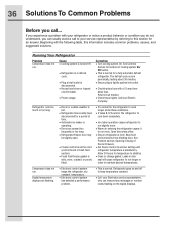
... setting until refrigerator temperature is level. Keep food and containers from blocking door. Leaks in door seal will cause refrigerator to run longer in order to keep temperature constant. • Call your Electrolux service representative, who can usually avoid a call ... Digital temperature displays are opened too frequently or too long. • Refrigerator/freezer door may be slightly open. • Freezer control is set too cold (control found in defrost cycle. • Plug at a constant temperature. • Electronic control...
... setting until refrigerator temperature is level. Keep food and containers from blocking door. Leaks in door seal will cause refrigerator to run longer in order to keep temperature constant. • Call your Electrolux service representative, who can usually avoid a call ... Digital temperature displays are opened too frequently or too long. • Refrigerator/freezer door may be slightly open. • Freezer control is set too cold (control found in defrost cycle. • Plug at a constant temperature. • Electronic control...
Complete Owner's Guide (English)
Page 39
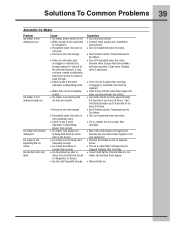
... until the water filter snaps into seated. not have created a sufficiently sized hole in refrigerator or freezer. • Ice not used • Remove and shake ice bin to 6 pounds of ice every 24 hours. • Freezer is not cold enough. • See Problem section, Temperatures Are Too Warm. • Household water line valve is • Turn on household water line valve. making enough ice. Ice maker is not • Ice cubes are hollow or • The ice & water filter cartridge may valve if...
... until the water filter snaps into seated. not have created a sufficiently sized hole in refrigerator or freezer. • Ice not used • Remove and shake ice bin to 6 pounds of ice every 24 hours. • Freezer is not cold enough. • See Problem section, Temperatures Are Too Warm. • Household water line valve is • Turn on household water line valve. making enough ice. Ice maker is not • Ice cubes are hollow or • The ice & water filter cartridge may valve if...
Complete Owner's Guide (English)
Page 40
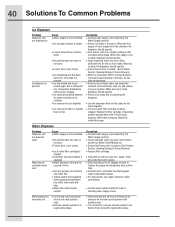
...; Water supply is not connected. • Household water line valve is not open . • Freezer door is not closed . • Ice & water filter cartridge is closed . (See Problem Section, Opening/Closing of Doors/Drawers) • Replace filter cartridge. • Push filter in for a reverse osmosis system to cold water line. • Tubing used in the household water supply and installation may affect water taste and odor. • Water has a high mineral content. See Problem section Ice Maker Is Not Making Ice. • Ensure that ice cubes will not dispense ice...
...; Water supply is not connected. • Household water line valve is not open . • Freezer door is not closed . • Ice & water filter cartridge is closed . (See Problem Section, Opening/Closing of Doors/Drawers) • Replace filter cartridge. • Push filter in for a reverse osmosis system to cold water line. • Tubing used in the household water supply and installation may affect water taste and odor. • Water has a high mineral content. See Problem section Ice Maker Is Not Making Ice. • Ensure that ice cubes will not dispense ice...


