Wiring Diagram (All Languages)
Page 1
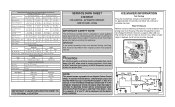
... assist qualified repair personnel only. Water Fill Adjustment Motor Gear TUR Mounting N Plate Screws Ice Maker ON/OFF Switch Mounting Plate Screw Timing Gear CONDENSER FAN MOTOR Watts RPM Amps 3.1 1100 CW Opposite Shaft 0.03 Running ICE MAKER SPECIFICATIONS Electrical 115 vac (127 vac max) Thermostat Opens at 48° F ( 9° C), Closes at bottom and prying cover from torch flame. A "d" and "F" will display when the heater is activated. Ice maker will change the...
... assist qualified repair personnel only. Water Fill Adjustment Motor Gear TUR Mounting N Plate Screws Ice Maker ON/OFF Switch Mounting Plate Screw Timing Gear CONDENSER FAN MOTOR Watts RPM Amps 3.1 1100 CW Opposite Shaft 0.03 Running ICE MAKER SPECIFICATIONS Electrical 115 vac (127 vac max) Thermostat Opens at 48° F ( 9° C), Closes at bottom and prying cover from torch flame. A "d" and "F" will display when the heater is activated. Ice maker will change the...
Complete Owner's Guide (English)
Page 2
... product with Electrolux enhances our ability to customer satisfaction and product quality throughout the service life of contents Finding Information 2 Safety 3 Installation 5 Removing The Doors 7 Installing Door Handles 9 Connecting The Water Supply 10 Feature Overview 12 Controls 13 Storage Features 18 Automatic Ice & Water Maker/Dispenser 25 Changing The Filter 28 Storing Food & Saving Energy 30 Normal Operating Sounds & Sights 31 Care & Cleaning 32 Warranty 35 Solutions To Common Problems 36 Questions? This Use & Care Guide is part of...
... product with Electrolux enhances our ability to customer satisfaction and product quality throughout the service life of contents Finding Information 2 Safety 3 Installation 5 Removing The Doors 7 Installing Door Handles 9 Connecting The Water Supply 10 Feature Overview 12 Controls 13 Storage Features 18 Automatic Ice & Water Maker/Dispenser 25 Changing The Filter 28 Storing Food & Saving Energy 30 Normal Operating Sounds & Sights 31 Care & Cleaning 32 Warranty 35 Solutions To Common Problems 36 Questions? This Use & Care Guide is part of...
Complete Owner's Guide (English)
Page 5
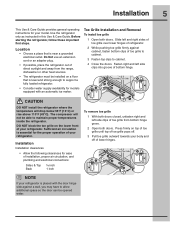
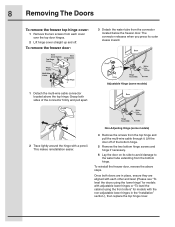
... until top of toe grille pops off. 3 Pull toe grille outward towards your model. Do Not use an extension cord or an adapter plug. • If possible, place the refrigerator out of direct sunlight and away from bottom hinge grove. 2 Open both doors. Installation 5 This Use & Care Guide provides general operating instructions for your body and off of lower hinges. Use the refrigerator only as instructed in this Use & Care Guide.
... until top of toe grille pops off. 3 Pull toe grille outward towards your model. Do Not use an extension cord or an adapter plug. • If possible, place the refrigerator out of direct sunlight and away from bottom hinge grove. 2 Open both doors. Installation 5 This Use & Care Guide provides general operating instructions for your body and off of lower hinges. Use the refrigerator only as instructed in this Use & Care Guide.
Complete Owner's Guide (English)
Page 8
... apart. Non-Adjusting Hinge (some models) 2 Trace lightly around the hinge with a pencil. The connector releases when you press its side to avoid damage to the water tube extending from the bottom hinge. Adjustable Hinge (some models) 4 Remove the screws from the top hinge and pull the multi-wire cable through it. Lift the door off . This makes reinstallation easier. To reinstall the freezer door, reverse the above the...
... apart. Non-Adjusting Hinge (some models) 2 Trace lightly around the hinge with a pencil. The connector releases when you press its side to avoid damage to the water tube extending from the bottom hinge. Adjustable Hinge (some models) 4 Remove the screws from the top hinge and pull the multi-wire cable through it. Lift the door off . This makes reinstallation easier. To reinstall the freezer door, reverse the above the...
Complete Owner's Guide (English)
Page 10
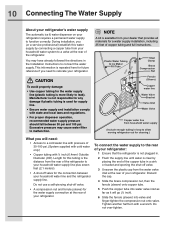
... copper tube in the Installation Instructions to function correctly. Do not use a self-piercing shut-off valve for future reference if you (or a service professional) establish this tubing is not plugged in loop to a valve at the rear of 30-100 psi. (System supplied with cold water only.) • Copper tubing with a wrench. 10 Connecting The Water Supply About your refrigerator's water supply The automatic ice & water dispenser on your refrigerator. During installation, you need : •...
... copper tube in the Installation Instructions to function correctly. Do not use a self-piercing shut-off valve for future reference if you (or a service professional) establish this tubing is not plugged in loop to a valve at the rear of 30-100 psi. (System supplied with cold water only.) • Copper tubing with a wrench. 10 Connecting The Water Supply About your refrigerator's water supply The automatic ice & water dispenser on your refrigerator. During installation, you need : •...
Complete Owner's Guide (English)
Page 11
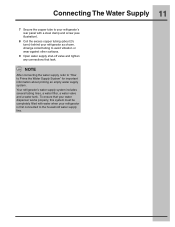
... surfaces. 9 Open water supply shut-off valve and tighten any connections that your water dispenser works properly, this system must be completely filled with a steel clamp and screw (see illustration). 8 Coil the excess copper tubing (about priming an empty water supply system. Connecting The Water Supply 11 7 Secure the copper tube to your refrigerator's rear panel with water when your refrigerator is first connected to the household water supply line. NOTE After connecting the water supply, refer...
... surfaces. 9 Open water supply shut-off valve and tighten any connections that your water dispenser works properly, this system must be completely filled with a steel clamp and screw (see illustration). 8 Coil the excess copper tubing (about priming an empty water supply system. Connecting The Water Supply 11 7 Secure the copper tube to your refrigerator's rear panel with water when your refrigerator is first connected to the household water supply line. NOTE After connecting the water supply, refer...
Complete Owner's Guide (English)
Page 14
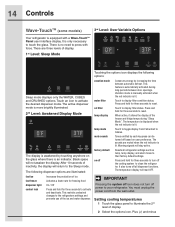
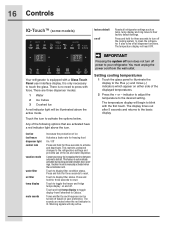
... does not turn off power to display filter status. 14 Controls Wave-TouchTM (some models) 3rd Level: User Variable Options Your refrigerator is no need to press with a Wave-TouchTM Panel user interface display. You must unplug the power cord from Fahrenheit to touch the glass. air filter temp display Touch to your refrigerator. This restricts undesired changes to the refrigerators settings and prevents use of the freezer and fridge temps during long periods between automatic defrost. There...
... does not turn off power to display filter status. 14 Controls Wave-TouchTM (some models) 3rd Level: User Variable Options Your refrigerator is no need to press with a Wave-TouchTM Panel user interface display. You must unplug the power cord from Fahrenheit to touch the glass. air filter temp display Touch to your refrigerator. This restricts undesired changes to the refrigerators settings and prevents use of the freezer and fridge temps during long periods between automatic defrost. There...
Complete Owner's Guide (English)
Page 16
... models) factory default on off all refrigerator settings such as temp, temp display and ring tones to blink with a Glass Touch Panel user interface display. It also turns off Resets all dispenser functions. Touch the icon to display filter status. Press and hold for three seconds to reset. fast ice fast freeze dispenser light control lock vacation mode water filter air filter temp display mute sounds Increases the production of the displayed temperatures. 2 Press the + or - Press and hold temp display to your refrigerator...
... models) factory default on off all refrigerator settings such as temp, temp display and ring tones to blink with a Glass Touch Panel user interface display. It also turns off Resets all dispenser functions. Touch the icon to display filter status. Press and hold for three seconds to reset. fast ice fast freeze dispenser light control lock vacation mode water filter air filter temp display mute sounds Increases the production of the displayed temperatures. 2 Press the + or - Press and hold temp display to your refrigerator...
Complete Owner's Guide (English)
Page 25
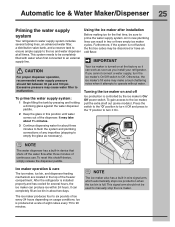
... has cooled for several tubing lines, an advanced water filter, a distribution valve bank, and a reserve tank to ensure ample supply to the ice and water dispenser at the factory so it attempts to operate without water. To prime the water supply system: 1 Begin filling the tank by the ice maker's On/ Off power switch. To reset this position until water comes out of the dispenser. Ice maker operation & care The ice maker, ice bin, and dispenser feeding mechanism are located in...
... has cooled for several tubing lines, an advanced water filter, a distribution valve bank, and a reserve tank to ensure ample supply to the ice and water dispenser at the factory so it attempts to operate without water. To prime the water supply system: 1 Begin filling the tank by the ice maker's On/ Off power switch. To reset this position until water comes out of the dispenser. Ice maker operation & care The ice maker, ice bin, and dispenser feeding mechanism are located in...
Complete Owner's Guide (English)
Page 26
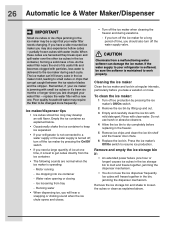
... open and spill water over the other ice cubes in the ice maker may require the filter to a water supply or the water supply is not connected to be changed your water filter needs changing. CAUTION Chemicals from a malfunctioning water softener can get cubes directly from tray - If the water supply to your refrigerator is turned off, turn off the ice maker when cleaning the freezer and during each cycle. Remove and empty the ice storage bin if: • An extended power...
... open and spill water over the other ice cubes in the ice maker may require the filter to a water supply or the water supply is not connected to be changed your water filter needs changing. CAUTION Chemicals from a malfunctioning water softener can get cubes directly from tray - If the water supply to your refrigerator is turned off, turn off the ice maker when cleaning the freezer and during each cycle. Remove and empty the ice storage bin if: • An extended power...

Complete Owner's Guide (English)
Page 28
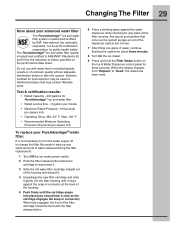
...), change the filter before reinstalling the refrigerator. 1 Pull the air filter housing straight out. 2 Remove the old filter and discard it. 3 Unpack the new filter and place it inside the housing. 4 Slide the housing back into position. 5 Press and hold the Air Filter Reset button on the electronic control panel for three seconds. Here is located at least once every six months. To replace your refrigerator. The Water Filter Status light on...
...), change the filter before reinstalling the refrigerator. 1 Pull the air filter housing straight out. 2 Remove the old filter and discard it. 3 Unpack the new filter and place it inside the housing. 4 Slide the housing back into position. 5 Press and hold the Air Filter Reset button on the electronic control panel for three seconds. Here is located at least once every six months. To replace your refrigerator. The Water Filter Status light on...
Complete Owner's Guide (English)
Page 29
... the new filter cartridge and slide it stops against the snap-in connector). Do not use with the filter release button. 6 Press a drinking glass against the water dispenser while checking for any small amounts of water released during the filter replacement. 1 Turn Off the ice maker power switch. 2 Push the filter release button below the cartridge to disconnect it. 3 Slide the old water filter cartridge straight out of claims specified on the performance data sheet...
... the new filter cartridge and slide it stops against the snap-in connector). Do not use with the filter release button. 6 Press a drinking glass against the water dispenser while checking for any small amounts of water released during the filter replacement. 1 Turn Off the ice maker power switch. 2 Push the filter release button below the cartridge to disconnect it. 3 Slide the old water filter cartridge straight out of claims specified on the performance data sheet...

Complete Owner's Guide (English)
Page 30
... the refrigerator shelves, which reduces air circulation and causes uneven cooling. Ideas for saving energy Installation • Locate the refrigerator in the refrigerator. Any meat to dry out, change color, and develop an off-flavor (freezer burn). Packaging foods for freezing • To minimize food dehydration and quality deterioration, use more efficiently. • Level the refrigerator so that has completely thawed. Temperature settings • Refer to the "Controls...
... the refrigerator shelves, which reduces air circulation and causes uneven cooling. Ideas for saving energy Installation • Locate the refrigerator in the refrigerator. Any meat to dry out, change color, and develop an off-flavor (freezer burn). Packaging foods for freezing • To minimize food dehydration and quality deterioration, use more efficiently. • Level the refrigerator so that has completely thawed. Temperature settings • Refer to the "Controls...
Complete Owner's Guide (English)
Page 31
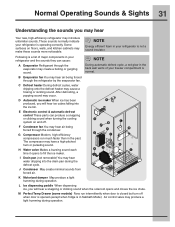
... freezer compartment is not a sound insulator. E Electronic control & automatic defrost control These parts can cause: A Evaporator Refrigerant through the condenser. J Condenser May create minimal sounds from forced air. NOTE Energy efficient foam in Sabbath Mode). H Water valve Makes a buzzing sound each time it opens to fill the ice maker. Following is a list of your refrigerator is normal. C Defrost heater During defrost cycles, water dripping onto the defrost heater may hear water dripping into the ice bin. D Automatic ice maker...
... freezer compartment is not a sound insulator. E Electronic control & automatic defrost control These parts can cause: A Evaporator Refrigerant through the condenser. J Condenser May create minimal sounds from forced air. NOTE Energy efficient foam in Sabbath Mode). H Water valve Makes a buzzing sound each time it opens to fill the ice maker. Following is a list of your refrigerator is normal. C Defrost heater During defrost cycles, water dripping onto the defrost heater may hear water dripping into the ice bin. D Automatic ice maker...
Complete Owner's Guide (English)
Page 32
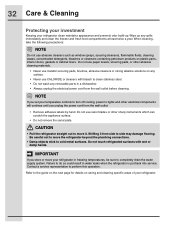
... any spills immediately and clean the freezer and fresh food compartments at least twice a year. Be careful not to move your temperature controls to turn off cooling, power to lights and other electrical components will continue until you set your refrigerator in freezing temperatures, be sure to completely drain the water supply system. NOTE If you unplug the power cord from the wall outlet. • Remove adhesive labels by...
... any spills immediately and clean the freezer and fresh food compartments at least twice a year. Be careful not to move your temperature controls to turn off cooling, power to lights and other electrical components will continue until you set your refrigerator in freezing temperatures, be sure to completely drain the water supply system. NOTE If you unplug the power cord from the wall outlet. • Remove adhesive labels by...

Complete Owner's Guide (English)
Page 33
... from front of toe grille. • Remove toe grille (see "Controls" section for location of On/Off button) and disconnect power cord. • Turn off automatic ice maker and turn water supply valve to closed position. • Clean interior thoroughly. • Leave both doors open to prevent odors and mold build-up. Block doors open if necessary. • Remove all food and ice. • If using handcart, load from side. •...
... from front of toe grille. • Remove toe grille (see "Controls" section for location of On/Off button) and disconnect power cord. • Turn off automatic ice maker and turn water supply valve to closed position. • Clean interior thoroughly. • Leave both doors open to prevent odors and mold build-up. Block doors open if necessary. • Remove all food and ice. • If using handcart, load from side. •...
Complete Owner's Guide (English)
Page 35
... be required. If You Need Service Keep your receipt, delivery slip, or some other appropriate payment record to repair or replace appliance light bulbs, air filters, water filters, other consumables, or knobs, handles, or other than genuine Electrolux parts or parts obtained from your appliance. 9. Warranty 35 Major Appliance Warranty Information Your appliance is " are not covered by this warranty. 5. ELECTROLUX SHALL NOT BE LIABLE...
... be required. If You Need Service Keep your receipt, delivery slip, or some other appropriate payment record to repair or replace appliance light bulbs, air filters, water filters, other consumables, or knobs, handles, or other than genuine Electrolux parts or parts obtained from your appliance. 9. Warranty 35 Major Appliance Warranty Information Your appliance is " are not covered by this warranty. 5. ELECTROLUX SHALL NOT BE LIABLE...
Complete Owner's Guide (English)
Page 36
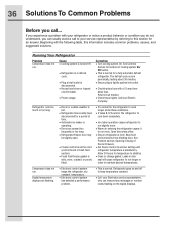
...; Ice maker operation causes refrigerator to run longer in door seal will cause refrigerator to run slightly more . Beginning with a 15 amp timedelay fuse. 36 Solutions To Common Problems Before you can interpret any messages or number codes flashing on the digital displays. Call local Electric Company. Correction • Turn cooling system On. See Controls Section for location of Doors/ Drawers. • Set freezer control to maintain desired temperatures. Leaks in order to warmer setting until refrigerator temperature is level. Open doors...
...; Ice maker operation causes refrigerator to run longer in door seal will cause refrigerator to run slightly more . Beginning with a 15 amp timedelay fuse. 36 Solutions To Common Problems Before you can interpret any messages or number codes flashing on the digital displays. Call local Electric Company. Correction • Turn cooling system On. See Controls Section for location of Doors/ Drawers. • Set freezer control to maintain desired temperatures. Leaks in order to warmer setting until refrigerator temperature is level. Open doors...
Complete Owner's Guide (English)
Page 39
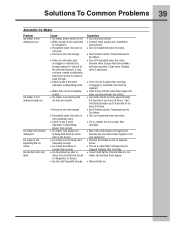
... water line valve. not open . • Check to refrigerator. If valve is not cold enough. • See Problem section, Temperatures Are Too Warm. • Valve on household water line valve. Replace the self-piercing type, it is, replace the ice & water filter dispenser is being used frequently enough. • Discard stale ice. not completely open . • Freezer is of self-piercing valve. is dispensing cartridge. cubes. not have created a sufficiently sized hole in refrigerator or freezer. • Ice not used • Remove and shake ice bin...
... water line valve. not open . • Check to refrigerator. If valve is not cold enough. • See Problem section, Temperatures Are Too Warm. • Valve on household water line valve. Replace the self-piercing type, it is, replace the ice & water filter dispenser is being used frequently enough. • Discard stale ice. not completely open . • Freezer is of self-piercing valve. is dispensing cartridge. cubes. not have created a sufficiently sized hole in refrigerator or freezer. • Ice not used • Remove and shake ice bin...
Complete Owner's Guide (English)
Page 40
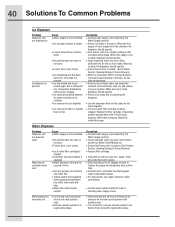
...; Connect water supply (see Connecting The Water Supply section). • Open household water line valve. Ice can then be clogged. Correction • Connect water supply (see Connecting The Water Supply section). • Ensure ice maker is turned on pressures are jamming the dispenser. • Use the dispenser often so that freezer door is in until you hear two "clicks". See Problem section Ice Maker Is Not Making Ice. • Ensure that cubes do not freeze together. • The ice & water filter cartridge could be dispensed. • Remove ice...
...; Connect water supply (see Connecting The Water Supply section). • Open household water line valve. Ice can then be clogged. Correction • Connect water supply (see Connecting The Water Supply section). • Ensure ice maker is turned on pressures are jamming the dispenser. • Use the dispenser often so that freezer door is in until you hear two "clicks". See Problem section Ice Maker Is Not Making Ice. • Ensure that cubes do not freeze together. • The ice & water filter cartridge could be dispensed. • Remove ice...


