Wiring Diagram (All Languages)
Page 1
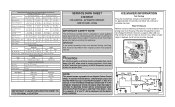
...-19° to -17° C -18° to -16° C -18° to -16° C -1° to 3° F -18° to -16° C Refrigerator Temperature 34° to 39° F 1° to 4° C 34° to 39° F 1° to 4° C 34° to 39° F 1° to 4&#...: PLEASE RETURN THIS SHEET TO IT'S ORIGINAL LOCATION service data sheet 240389641 ICE & WATER - A "d" in the freezer temperature window and "F" in the refrigerator temperature window will char at 200°F and flash ignite (burn) at 15° F ( -9° C) Heater Voltage 85 vac ICE MAKER CONNECTOR ...
...-19° to -17° C -18° to -16° C -18° to -16° C -1° to 3° F -18° to -16° C Refrigerator Temperature 34° to 39° F 1° to 4° C 34° to 39° F 1° to 4° C 34° to 39° F 1° to 4&#...: PLEASE RETURN THIS SHEET TO IT'S ORIGINAL LOCATION service data sheet 240389641 ICE & WATER - A "d" in the freezer temperature window and "F" in the refrigerator temperature window will char at 200°F and flash ignite (burn) at 15° F ( -9° C) Heater Voltage 85 vac ICE MAKER CONNECTOR ...
Use and Care Guide
Page 3
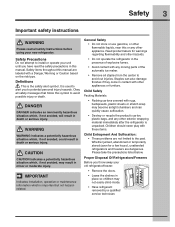
.... IMPORTANT Indicates installation, operation or maintenance information which , if not avoided, may not easily climb inside. • Have refrigerant removed by a qualified service technician. Child Safety Packing Materials: • Packing cartons covered with rugs, bedspreads, plastic sheets ...place so children may result in the presence of explosive fumes. • Avoid contact with other appliance. Proper Disposal Of Refrigerators/Freezers Before you to avoid cut injuries. CAUTION CAUTION indicates a potentially hazardous situation which is unpacked. Staples can quickly ...
.... IMPORTANT Indicates installation, operation or maintenance information which , if not avoided, may not easily climb inside. • Have refrigerant removed by a qualified service technician. Child Safety Packing Materials: • Packing cartons covered with rugs, bedspreads, plastic sheets ...place so children may result in the presence of explosive fumes. • Avoid contact with other appliance. Proper Disposal Of Refrigerators/Freezers Before you to avoid cut injuries. CAUTION CAUTION indicates a potentially hazardous situation which is unpacked. Staples can quickly ...
Use and Care Guide
Page 4
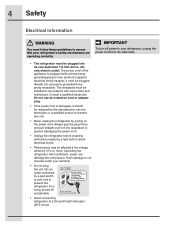
...Do not plug the unit into an outlet controlled by 10% or more. Consult a qualified electrician. Such damage is not covered under your refrigerator, unplug the power cord from being turned off power to a Ground Fault Interrupter (GFI) circuit. It must be installed in accordance with ...power can damage the compressor. 4 Safety Electrical information WARNING You must follow these guidelines to prevent any risk. • Never unplug the refrigerator by pulling on the power cord. Always grip the plug firmly, and pull straight out from the receptacle to prevent damaging the power ...
...Do not plug the unit into an outlet controlled by 10% or more. Consult a qualified electrician. Such damage is not covered under your refrigerator, unplug the power cord from being turned off power to a Ground Fault Interrupter (GFI) circuit. It must be installed in accordance with ...power can damage the compressor. 4 Safety Electrical information WARNING You must follow these guidelines to prevent any risk. • Never unplug the refrigerator by pulling on the power cord. Always grip the plug firmly, and pull straight out from the receptacle to prevent damaging the power ...
Use and Care Guide
Page 5
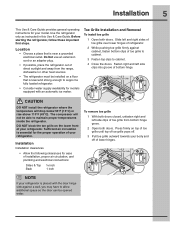
... of toe grille until top of toe grille pops off. 3 Pull toe grille outward towards your body and off of your model. NOTE If your refrigerator. The compressor will drop below 55°F (13°C) or rise above 110°F (43°C). Press firmly on a floor that is essential for ...bottom clips of toe grille to cabinet. 3 Fasten top clips to cabinet. 4 Close the doors. Sufficient air circulation is near a grounded electrical outlet. Use the refrigerator only as instructed in this Use & Care Guide. Do Not use an extension cord or an adapter plug. • If possible, place the...
... of toe grille until top of toe grille pops off. 3 Pull toe grille outward towards your body and off of your model. NOTE If your refrigerator. The compressor will drop below 55°F (13°C) or rise above 110°F (43°C). Press firmly on a floor that is essential for ...bottom clips of toe grille to cabinet. 3 Fasten top clips to cabinet. 4 Close the doors. Sufficient air circulation is near a grounded electrical outlet. Use the refrigerator only as instructed in this Use & Care Guide. Do Not use an extension cord or an adapter plug. • If possible, place the...
Use and Care Guide
Page 6
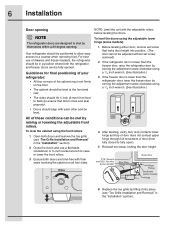
...the front and rear. • The sides should align with the adjustable rollers before leveling the doors. Guidelines for final positioning of your refrigerator: • All four corners of the cabinet must rest firmly on all four sides. 4 After leveling, verify door stop contacts lower hinge...set screw that locks door height into position. (The door cannot be adjusted without set screw removed). 2 If the refrigerator door is lower than the freezer door, raise the refrigerator door by turning the adjustment screw clockwise using a 7/16 inch wrench. (See illustration.) 3 If the freezer door ...
...the front and rear. • The sides should align with the adjustable rollers before leveling the doors. Guidelines for final positioning of your refrigerator: • All four corners of the cabinet must rest firmly on all four sides. 4 After leveling, verify door stop contacts lower hinge...set screw that locks door height into position. (The door cannot be adjusted without set screw removed). 2 If the refrigerator door is lower than the freezer door, raise the refrigerator door by turning the adjustment screw clockwise using a 7/16 inch wrench. (See illustration.) 3 If the freezer door ...
Use and Care Guide
Page 7
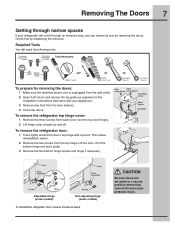
...screws and hinge if necessary. OR Adjustable Wrench 3/8" Fixed Wrench Adjustable Hinge (some models) Non-Adjusting Hinge (some models) To reinstall the refrigerator door, reverse the above steps. This makes reinstallation easier. 2 Remove the two screws from the top hinge. Removing The Doors 7 Getting...entrance area, you can reduce its size by measuring the entrance. Required Tools You will not fit through narrow spaces If your refrigerator will need the following tools: Top Hinge Cover Front Screw Top Hinge Cover Rear Screw Tools Necessary: Top Hinge Screw Bottom ...
...screws and hinge if necessary. OR Adjustable Wrench 3/8" Fixed Wrench Adjustable Hinge (some models) Non-Adjusting Hinge (some models) To reinstall the refrigerator door, reverse the above steps. This makes reinstallation easier. 2 Remove the two screws from the top hinge. Removing The Doors 7 Getting...entrance area, you can reduce its size by measuring the entrance. Required Tools You will not fit through narrow spaces If your refrigerator will need the following tools: Top Hinge Cover Front Screw Top Hinge Cover Rear Screw Tools Necessary: Top Hinge Screw Bottom ...
Use and Care Guide
Page 9
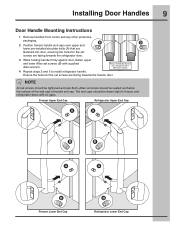
.... Freezer Upper End Cap Refrigerator Upper End Cap A A B B A A B Freezer Lower End Cap B Refrigerator Lower End Cap The end caps should be drawn tight to freezer and refrigerator doors with supplied Allen wrench. 4 Repeat steps 2 and 3 to install refrigerator handle. Ensure the holes for... the set screws are facing towards the refrigerator door. 3 While holding handle firmly against door, ...
.... Freezer Upper End Cap Refrigerator Upper End Cap A A B B A A B Freezer Lower End Cap B Refrigerator Lower End Cap The end caps should be drawn tight to freezer and refrigerator doors with supplied Allen wrench. 4 Repeat steps 2 and 3 to install refrigerator handle. Ensure the holes for... the set screws are facing towards the refrigerator door. 3 While holding handle firmly against door, ...
Use and Care Guide
Page 10
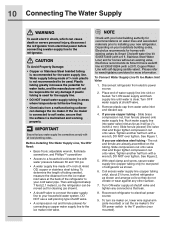
...Tighten another half turn with a 6 ft. The nut and ferrule are already assembled on water lines and associated materials prior to soft water, ensure that your local/state building codes, Electrolux recommends for homes without an existing valve, Electrolux recommends its Smart Choice® water ...Access to the ice maker inlet valve. Then add approximately 7 feet (2.1 meters), so the refrigerator can be used for connecting a copper water supply line to a household cold water line with a 20 ft. If you use a self-piercing type shutoff valve. • A compression nut and ...
...Tighten another half turn with a 6 ft. The nut and ferrule are already assembled on water lines and associated materials prior to soft water, ensure that your local/state building codes, Electrolux recommends for homes without an existing valve, Electrolux recommends its Smart Choice® water ...Access to the ice maker inlet valve. Then add approximately 7 feet (2.1 meters), so the refrigerator can be used for connecting a copper water supply line to a household cold water line with a 20 ft. If you use a self-piercing type shutoff valve. • A compression nut and ...
Use and Care Guide
Page 11
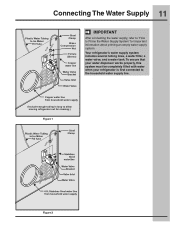
Copper water line from household water supply (Include enough tubing in loop to the household water supply line. Your refrigerator's water supply system includes several tubing lines, a water filter, a water valve, and a water tank. To ensure that your water dispenser ...works properly, this system must be completely filled with water when your refrigerator is first connected to allow moving refrigerator out for important information about priming an empty water supply system. Connecting The Water Supply 11 Plastic Water Tubing to Ice...
Copper water line from household water supply (Include enough tubing in loop to the household water supply line. Your refrigerator's water supply system includes several tubing lines, a water filter, a water valve, and a water tank. To ensure that your water dispenser ...works properly, this system must be completely filled with water when your refrigerator is first connected to allow moving refrigerator out for important information about priming an empty water supply system. Connecting The Water Supply 11 Plastic Water Tubing to Ice...
Use and Care Guide
Page 12
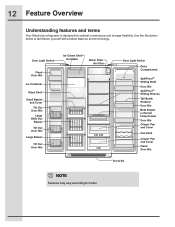
12 Feature Overview Understanding features and terms Your Electrolux refrigerator is designed for optimal convenience and storage flexibility. Use the illustration below to model. Door Light Switch Fixed Door Bin Ice Container Glass Shelf Small ...
12 Feature Overview Understanding features and terms Your Electrolux refrigerator is designed for optimal convenience and storage flexibility. Use the illustration below to model. Door Light Switch Fixed Door Bin Ice Container Glass Shelf Small ...
Use and Care Guide
Page 14
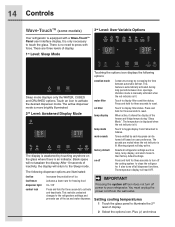
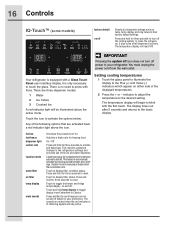
...The display is awakened by each keypress can be turned off based on user preference. This restricts undesired changes to the refrigerators settings and prevents use of inactivity, the display will stay active. Touching the options icon displays the following dispenser options are...Activates a faster rate for freezing food dispenser light On / Off control lock Press and hold for three seconds to clean the refrigerator. factory default Resets all dispenser functions. The following options: vacation mode water filter Conserves energy by increasing the time between door ...
...The display is awakened by each keypress can be turned off based on user preference. This restricts undesired changes to the refrigerators settings and prevents use of inactivity, the display will stay active. Touching the options icon displays the following dispenser options are...Activates a faster rate for freezing food dispenser light On / Off control lock Press and hold for three seconds to clean the refrigerator. factory default Resets all dispenser functions. The following options: vacation mode water filter Conserves energy by increasing the time between door ...
Use and Care Guide
Page 15
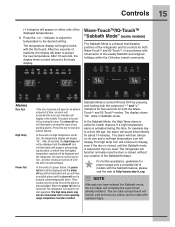
...illuminate until a safe operating range temperature has been reached. The alarm off until the alarm is closed , until the alarm off , the refrigerator will continue to the desired setting. All other modes are turned off key will resume normal operation. If a high temperature alarm is activated...key to blink with the Sabbath feature, please visit the web at which time the highest temperature reached will be displayed and the refrigerator will illuminate to prompt the reset of any system Alarms. In the event of a high temperature condition, the temperature display will ...
...illuminate until a safe operating range temperature has been reached. The alarm off until the alarm is closed , until the alarm off , the refrigerator will continue to the desired setting. All other modes are turned off key will resume normal operation. If a high temperature alarm is activated...key to blink with the Sabbath feature, please visit the web at which time the highest temperature reached will be displayed and the refrigerator will illuminate to prompt the reset of any system Alarms. In the event of a high temperature condition, the temperature display will ...
Use and Care Guide
Page 16
...sounds are three dispenser modes: 1 Water 2 Ice Cubes 3 Crushed Ice A red indicator light will begin to activate the options below. Your refrigerator is lit. Any of ice Activates a faster rate for freezing food On / Off Press and hold for three seconds to display filter condition ...temperature to display filter status. Touch to reset. Setting cooling temperatures 1 Touch the glass panel to illuminate the display to clean the refrigerator. Press and hold for three seconds to Celsius. Touch and hold for three seconds to turn off the cooling system to the ...
...sounds are three dispenser modes: 1 Water 2 Ice Cubes 3 Crushed Ice A red indicator light will begin to activate the options below. Your refrigerator is lit. Any of ice Activates a faster rate for freezing food On / Off Press and hold for three seconds to display filter condition ...temperature to display filter status. Touch to reset. Setting cooling temperatures 1 Touch the glass panel to illuminate the display to clean the refrigerator. Press and hold for three seconds to Celsius. Touch and hold for three seconds to turn off the cooling system to the ...
Use and Care Guide
Page 17
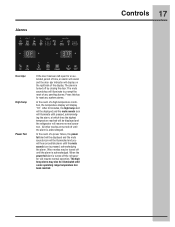
All other modes are turned off the refrigerator will display "HI". When the power fail alert is turned off until the alarm is acknowledged. The mute sounds key will illuminate to prompt the ... alarm, at which time the highest temperature reached will be turned off by closing the door. The high temp alarm may be displayed and the refrigerator will resume normal operation. Alarms Controls 17 Door Ajar High Temp Power Fail If the door has been left open for an extended period of...
All other modes are turned off the refrigerator will display "HI". When the power fail alert is turned off until the alarm is acknowledged. The mute sounds key will illuminate to prompt the ... alarm, at which time the highest temperature reached will be turned off by closing the door. The high temp alarm may be displayed and the refrigerator will resume normal operation. Alarms Controls 17 Door Ajar High Temp Power Fail If the door has been left open for an extended period of...
Use and Care Guide
Page 18
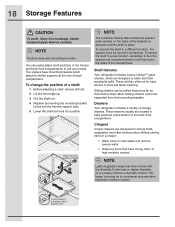
... can be pulled forward as far as their mounting brackets. These shelves slide out for storing fruits, vegetables, and other fresh produce. Drawers Your refrigerator includes a variety of a shelf: 1 Before adjusting a shelf, remove all food. 2 Lift the front edge up. 3 Pull the shelf ...8226; Wrap any items that have mounting brackets which are designed for easy access to Stabilize Shelf Against Liner Shelf features Your refrigerator includes Luxury-DesignTM glass shelves, which attach to a minimum and maintains maximum moisture content. Crispers Crisper drawers are designed to ...
... can be pulled forward as far as their mounting brackets. These shelves slide out for storing fruits, vegetables, and other fresh produce. Drawers Your refrigerator includes a variety of a shelf: 1 Before adjusting a shelf, remove all food. 2 Lift the front edge up. 3 Pull the shelf ...8226; Wrap any items that have mounting brackets which are designed for easy access to Stabilize Shelf Against Liner Shelf features Your refrigerator includes Luxury-DesignTM glass shelves, which attach to a minimum and maintains maximum moisture content. Crispers Crisper drawers are designed to ...
Use and Care Guide
Page 20
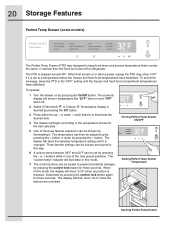
... show "HI°F" if it is set by pressing the control lock button again for three seconds. The display will illuminate in one of the refrigerator. The PTD is shipped turned OFF. When first turned on or after a power outage the PTD may show "ULC" when the buttons are unlocked. or...
... show "HI°F" if it is set by pressing the control lock button again for three seconds. The display will illuminate in one of the refrigerator. The PTD is shipped turned OFF. When first turned on or after a power outage the PTD may show "ULC" when the buttons are unlocked. or...
Use and Care Guide
Page 22
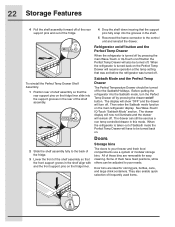
... Then enter the Sabbath mode function on /off button. The drawer can be turned off. Door bins are removable for easy cleaning. Before putting the refrigerator into the Sabbath mode, turn off. See Wave-Touch/ IQ-Touch "Sabbath Mode" section. All of these bins are ideal for the Sabbath/Holidays....will turn the Perfect Temp Drawer off by pressing the main Wave-Touch or IQ-Touch on/off by pressing the drawer on the main refrigerator display. 22 Storage Features 4 Pull the shelf assembly forward off of the rear support pins and out of the fridge. 4 Drop the shelf down insuring...
... Then enter the Sabbath mode function on /off button. The drawer can be turned off. Door bins are removable for easy cleaning. Before putting the refrigerator into the Sabbath mode, turn off. See Wave-Touch/ IQ-Touch "Sabbath Mode" section. All of these bins are ideal for the Sabbath/Holidays....will turn the Perfect Temp Drawer off by pressing the main Wave-Touch or IQ-Touch on/off by pressing the drawer on the main refrigerator display. 22 Storage Features 4 Pull the shelf assembly forward off of the rear support pins and out of the fridge. 4 Drop the shelf down insuring...
Use and Care Guide
Page 23
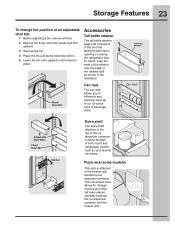
.... 4 Place the bin just above desired position. 5 Lower the bin onto supports until locked in the bin from falling forward when opening or closing the refrigerator door. It allows storage of beverage drink. Pizza rack (some models) This rack is attached to the freezer wall beside the ice dispenser container. To...
.... 4 Place the bin just above desired position. 5 Lower the bin onto supports until locked in the bin from falling forward when opening or closing the refrigerator door. It allows storage of beverage drink. Pizza rack (some models) This rack is attached to the freezer wall beside the ice dispenser container. To...
Use and Care Guide
Page 25
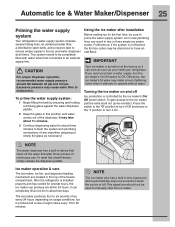
...continuous use. To gain access to manually stop the ice maker. Automatic Ice & Water Maker/Dispenser 25 Priming the water supply system Your refrigerator's water supply system includes several hours, the ice maker can produce ice within 24 hours. Using the ice maker after three minutes of ...a rate of ice every 24 hours depending on and off the water flow after installation Before making ice for about two days. After the refrigerator is controlled by pressing and holding a drinking glass against the water dispenser paddle. 2 Keep the glass in about three minutes to be discolored...
...continuous use. To gain access to manually stop the ice maker. Automatic Ice & Water Maker/Dispenser 25 Priming the water supply system Your refrigerator's water supply system includes several hours, the ice maker can produce ice within 24 hours. Using the ice maker after three minutes of ...a rate of ice every 24 hours depending on and off the water flow after installation Before making ice for about two days. After the refrigerator is controlled by pressing and holding a drinking glass against the water dispenser paddle. 2 Keep the glass in about three minutes to be discolored...
Use and Care Guide
Page 26
...ice cubes in the ice storage bin to get caught between the ice ejector blades and the stripper. If the water supply to your refrigerator is softened, be sure the softener is not connected to the ice maker during vacations. - Do not use the ice dispenser frequently. ...filter to loosen the cubes or clean as explained below. • Occasionally shake the ice container to keep ice separated. • If your refrigerator is maintained to dry completely before you take a vacation or move. Empty the ice container as explained above. CAUTION Chemicals from a malfunctioning water...
...ice cubes in the ice storage bin to get caught between the ice ejector blades and the stripper. If the water supply to your refrigerator is softened, be sure the softener is not connected to the ice maker during vacations. - Do not use the ice dispenser frequently. ...filter to loosen the cubes or clean as explained below. • Occasionally shake the ice container to keep ice separated. • If your refrigerator is maintained to dry completely before you take a vacation or move. Empty the ice container as explained above. CAUTION Chemicals from a malfunctioning water...


