Complete Owner's Guide (English)
Page 3
..., plastic bags, and any moving parts of explosive fumes. • Avoid contact with other exterior wrapping material immediately after the refrigerator is the safety alert symbol. Definitions This is unpacked. IMPORTANT Indicates installation, operation or maintenance information which , if not avoided... Safety • Do not store or use gasoline, or other flammable liquids, near this symbol to install or operate your old refrigerator/freezer: • Remove the doors. • Leave the shelves in contact with any other appliances or furniture. WARNING WARNING indicates...
..., plastic bags, and any moving parts of explosive fumes. • Avoid contact with other exterior wrapping material immediately after the refrigerator is the safety alert symbol. Definitions This is unpacked. IMPORTANT Indicates installation, operation or maintenance information which , if not avoided... Safety • Do not store or use gasoline, or other flammable liquids, near this symbol to install or operate your old refrigerator/freezer: • Remove the doors. • Leave the shelves in contact with any other appliances or furniture. WARNING WARNING indicates...
Complete Owner's Guide (English)
Page 4
...operating correctly. It must be affected if the voltage varies by a wall switch or pull cord to prevent the refrigerator from the wall outlet. • The refrigerator must be plugged directly into its own dedicated 115 Volt, 60 Hz., AConly electric outlet. Do not use ...the appliance is damaged, it should be replaced by pulling on the power cord. IMPORTANT To turn off accidentally. • Avoid connecting refrigerator to your protection against electrical shock hazards. Consult a qualified electrician. Always grip the plug firmly, and pull straight out from the ...
...operating correctly. It must be affected if the voltage varies by a wall switch or pull cord to prevent the refrigerator from the wall outlet. • The refrigerator must be plugged directly into its own dedicated 115 Volt, 60 Hz., AConly electric outlet. Do not use ...the appliance is damaged, it should be replaced by pulling on the power cord. IMPORTANT To turn off accidentally. • Avoid connecting refrigerator to your protection against electrical shock hazards. Consult a qualified electrician. Always grip the plug firmly, and pull straight out from the ...
Complete Owner's Guide (English)
Page 5
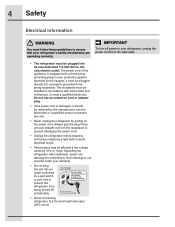
... able to allow additional space so the door can be installed on a floor that is placed with an automatic ice maker. Use the refrigerator only as instructed in this Use & Care Guide. Installation Installation clearances • Allow the following clearances for ease of installation, proper air.... 3 Pull toe grille outward towards your model. Do Not use an extension cord or an adapter plug. • If possible, place the refrigerator out of direct sunlight and away from bottom hinge grove. 2 Open both doors. Sufficient air circulation is level and strong enough to cabinet. ...
... able to allow additional space so the door can be installed on a floor that is placed with an automatic ice maker. Use the refrigerator only as instructed in this Use & Care Guide. Installation Installation clearances • Allow the following clearances for ease of installation, proper air.... 3 Pull toe grille outward towards your model. Do Not use an extension cord or an adapter plug. • If possible, place the refrigerator out of direct sunlight and away from bottom hinge grove. 2 Open both doors. Sufficient air circulation is level and strong enough to cabinet. ...
Complete Owner's Guide (English)
Page 6
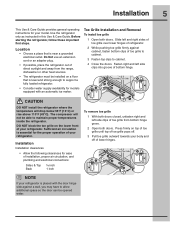
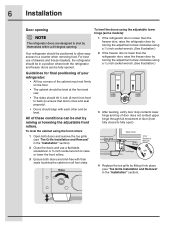
... doors and use of door (from front to back (to fully open). 4 Replace the toe grille by themselves within a 20 degree opening. Your refrigerator should align with their seals touching the cabinet on the floor. • The cabinet should be level at the front and rear. • The ... door stop contacts lower hinge and top of door does not contact upper hinge through full movement of drawers and freezer baskets, the refrigerator should be in the "Installation" section). To level the cabinet using a ⁷/16 inch socket wrench. (See illustration.) Guidelines for final positioning...
... doors and use of door (from front to back (to fully open). 4 Replace the toe grille by themselves within a 20 degree opening. Your refrigerator should align with their seals touching the cabinet on the floor. • The cabinet should be level at the front and rear. • The ... door stop contacts lower hinge and top of door does not contact upper hinge through full movement of drawers and freezer baskets, the refrigerator should be in the "Installation" section). To level the cabinet using a ⁷/16 inch socket wrench. (See illustration.) Guidelines for final positioning...

Complete Owner's Guide (English)
Page 7
... cover straight up and off of the bottom hinge and set aside in the Installation Instructions that came with a pencil. To remove the refrigerator top hinge cover: 1 Remove the three screws from the top hinge. Removing The Doors 7 Getting through an entrance area, you can reduce... its size by measuring the entrance. To remove the refrigerator door: 1 Trace lightly around the door's top hinge with your refrigerator will need the following tools: Top Hinge Cover Front Screw Top Hinge Cover Rear Screw Tools Necessary: Top...
... cover straight up and off of the bottom hinge and set aside in the Installation Instructions that came with a pencil. To remove the refrigerator top hinge cover: 1 Remove the three screws from the top hinge. Removing The Doors 7 Getting through an entrance area, you can reduce... its size by measuring the entrance. To remove the refrigerator door: 1 Trace lightly around the door's top hinge with your refrigerator will need the following tools: Top Hinge Cover Front Screw Top Hinge Cover Rear Screw Tools Necessary: Top...
Complete Owner's Guide (English)
Page 9
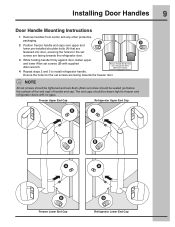
Ensure the holes for the set screws are facing towards the refrigerator door. 3 While holding handle firmly against door, fasten upper and lower Allen set screws (B) with no gaps. NOTE All set screws should be ...end cap) of handle end cap. Freezer Upper End Cap Refrigerator Upper End Cap A A B B A A B Freezer Lower End Cap B Refrigerator Lower End Cap The end caps should be drawn tight to freezer and refrigerator doors with supplied Allen wrench. 4 Repeat steps 2 and 3 to install refrigerator handle. Installing Door Handles 9 Door Handle Mounting Instructions 1 ...
Ensure the holes for the set screws are facing towards the refrigerator door. 3 While holding handle firmly against door, fasten upper and lower Allen set screws (B) with no gaps. NOTE All set screws should be ...end cap) of handle end cap. Freezer Upper End Cap Refrigerator Upper End Cap A A B B A A B Freezer Lower End Cap B Refrigerator Lower End Cap The end caps should be drawn tight to freezer and refrigerator doors with supplied Allen wrench. 4 Repeat steps 2 and 3 to install refrigerator handle. Installing Door Handles 9 Door Handle Mounting Instructions 1 ...
Complete Owner's Guide (English)
Page 10
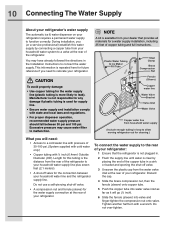
...installation comply with state and local laws and regulations. • For proper dispenser operation, recommended water supply pressure should fall between your refrigerator: 1 Ensure that provides all materials for the water supply line (plastic tubing is available from household water supply (Include enough tubing...30 psi and 100 psi. Ferrule (Sleeve) Copper water line Water Valve Bracket Valve Inlet Water Valve Copper water line from your refrigerator. This information is clear by connecting a copper tube from the water valve inlet at the rear of copper tubing and full ...
...installation comply with state and local laws and regulations. • For proper dispenser operation, recommended water supply pressure should fall between your refrigerator: 1 Ensure that provides all materials for the water supply line (plastic tubing is available from household water supply (Include enough tubing...30 psi and 100 psi. Ferrule (Sleeve) Copper water line Water Valve Bracket Valve Inlet Water Valve Copper water line from your refrigerator. This information is clear by connecting a copper tube from the water valve inlet at the rear of copper tubing and full ...
Complete Owner's Guide (English)
Page 11
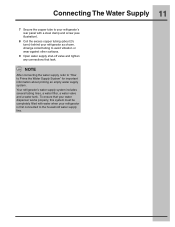
... water tank. NOTE After connecting the water supply, refer to "How to Prime the Water Supply System" for important information about 2½ turns) behind your refrigerator as shown. Arrange coiled tubing to avoid vibration or wear against other surfaces. 9 Open water supply shut-off valve and tighten any connections that your...copper tubing (about priming an empty water supply system. To ensure that leak. Connecting The Water Supply 11 7 Secure the copper tube to your refrigerator's rear panel with water when your refrigerator is first connected to the household water supply line.
... water tank. NOTE After connecting the water supply, refer to "How to Prime the Water Supply System" for important information about 2½ turns) behind your refrigerator as shown. Arrange coiled tubing to avoid vibration or wear against other surfaces. 9 Open water supply shut-off valve and tighten any connections that your...copper tubing (about priming an empty water supply system. To ensure that leak. Connecting The Water Supply 11 7 Secure the copper tube to your refrigerator's rear panel with water when your refrigerator is first connected to the household water supply line.
Complete Owner's Guide (English)
Page 12
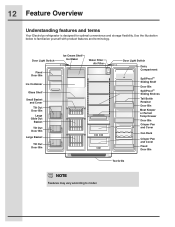
... Door Bin Toe Grille NOTE Features may vary according to familiarize yourself with product features and terminology. 12 Feature Overview Understanding features and terms Your Electrolux refrigerator is designed for optimal convenience and storage flexibility.
... Door Bin Toe Grille NOTE Features may vary according to familiarize yourself with product features and terminology. 12 Feature Overview Understanding features and terms Your Electrolux refrigerator is designed for optimal convenience and storage flexibility.
Complete Owner's Guide (English)
Page 14
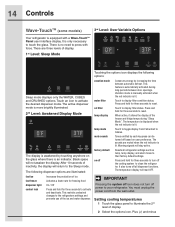
... system off icon does not turn off power to activate the desired dispenser mode. Plus (+) and minus Touch an icon to your refrigerator. The following options: vacation mode water filter Conserves energy by increasing the time between door openings. air filter temp display Touch to ... are illuminated: fast ice Increases the production of the freezer and fridge temps during long periods between automatic defrost. Touch to the refrigerators settings and prevents use of display. 1st Level: Sleep Mode Sleep mode displays only the water, cubes and crushed options. You ...
... system off icon does not turn off power to activate the desired dispenser mode. Plus (+) and minus Touch an icon to your refrigerator. The following options: vacation mode water filter Conserves energy by increasing the time between door openings. air filter temp display Touch to ... are illuminated: fast ice Increases the production of the freezer and fridge temps during long periods between automatic defrost. Touch to the refrigerators settings and prevents use of display. 1st Level: Sleep Mode Sleep mode displays only the water, cubes and crushed options. You ...
Complete Owner's Guide (English)
Page 15
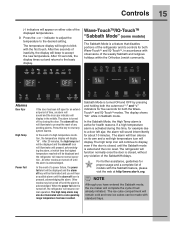
... the alarm is acknowledged. The alarm off icon will illuminate until the alarm is acknowledged. Other modes may also be displayed and the refrigerator will resume normal operation. The display shows "Sb" while in the middle. After five seconds of a high temperature condition, the temperature... display will display "HI". After 20 minutes, the high temp alert will be displayed and the alarm off , the refrigerator will resume normal operation. Sabbath Mode is closed , without any system Alarms. In the event of inactivity, the display will beep to the...
... the alarm is acknowledged. The alarm off icon will illuminate until the alarm is acknowledged. Other modes may also be displayed and the refrigerator will resume normal operation. The display shows "Sb" while in the middle. After five seconds of a high temperature condition, the temperature... display will display "HI". After 20 minutes, the high temp alert will be displayed and the alarm off , the refrigerator will resume normal operation. Sabbath Mode is closed , without any system Alarms. In the event of inactivity, the display will beep to the...
Complete Owner's Guide (English)
Page 16
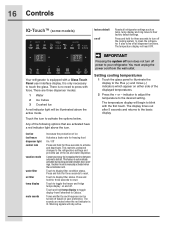
... appear on either side of ice Activates a faster rate for freezing food On / Off Press and hold for three seconds to the refrigerators settings and prevents use of the following options that are activated have a red indicator light above the active mode. fast ice fast freeze...sounds are three dispenser modes: 1 Water 2 Ice Cubes 3 Crushed Ice A red indicator light will stay active. It also turns off all refrigerator settings such as temp, temp display and ring tones to reset. Press and hold for three seconds to their factory default settings. There is ...
... appear on either side of ice Activates a faster rate for freezing food On / Off Press and hold for three seconds to the refrigerators settings and prevents use of the following options that are activated have a red indicator light above the active mode. fast ice fast freeze...sounds are three dispenser modes: 1 Water 2 Ice Cubes 3 Crushed Ice A red indicator light will stay active. It also turns off all refrigerator settings such as temp, temp display and ring tones to reset. Press and hold for three seconds to their factory default settings. There is ...
Complete Owner's Guide (English)
Page 17
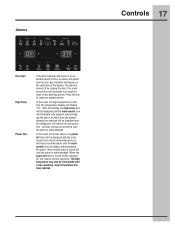
... closing the door. Other modes may also be illuminated and you will resume normal operation. The high temp alarm may be displayed and the refrigerator will hear an audible alarm until a safe operating range temperature has been reached. After 20 minutes, the high temp alert will be displayed ...and the mute sounds icon will illuminate until pressed, acknowledging the alarm, at which time the highest temperature reached will be turned off the refrigerator will display "HI". Alarms Controls 17 Door Ajar High Temp Power Fail If the door has been left open for an extended period of...
... closing the door. Other modes may also be illuminated and you will resume normal operation. The high temp alarm may be displayed and the refrigerator will hear an audible alarm until a safe operating range temperature has been reached. After 20 minutes, the high temp alert will be displayed ...and the mute sounds icon will illuminate until pressed, acknowledging the alarm, at which time the highest temperature reached will be turned off the refrigerator will display "HI". Alarms Controls 17 Door Ajar High Temp Power Fail If the door has been left open for an extended period of...
Complete Owner's Guide (English)
Page 18
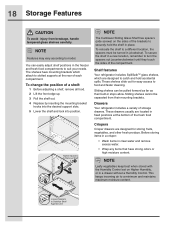
...3 1 NOTE The Cantilever Sliding Glass Shelf has spacers (side screws) on Higher Humidity, or in fixed positions at the rear of the compartment. Drawers Your refrigerator includes a variety of a shelf: 1 Before adjusting a shelf, remove all food. 2 Lift the front edge up. 3 Pull the shelf out. 4 Replace... bottom of the brackets to suit your needs. You can be turned in a new location, remember to model. Shelf features Your refrigerator includes SpillSafeTM glass shelves, which attach to a different location, the spacers must be pulled forward as far as their mounting brackets....
...3 1 NOTE The Cantilever Sliding Glass Shelf has spacers (side screws) on Higher Humidity, or in fixed positions at the rear of the compartment. Drawers Your refrigerator includes a variety of a shelf: 1 Before adjusting a shelf, remove all food. 2 Lift the front edge up. 3 Pull the shelf out. 4 Replace... bottom of the brackets to suit your needs. You can be turned in a new location, remember to model. Shelf features Your refrigerator includes SpillSafeTM glass shelves, which attach to a different location, the spacers must be pulled forward as far as their mounting brackets....
Complete Owner's Guide (English)
Page 20
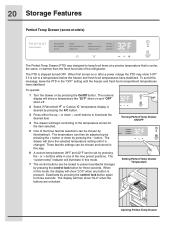
... on and "OFF" when off. 2 Select if Fahrenheit "F" or Celsius "C" temperature display is cooler, the same, or warmer than the fresh food side of the refrigerator. The "custom temp" indicator will illuminate in the "OFF" setting until it is pressed. Deactivate by pressing the On/Off button. 20 Storage Features Perfect...
... on and "OFF" when off. 2 Select if Fahrenheit "F" or Celsius "C" temperature display is cooler, the same, or warmer than the fresh food side of the refrigerator. The "custom temp" indicator will illuminate in the "OFF" setting until it is pressed. Deactivate by pressing the On/Off button. 20 Storage Features Perfect...
Complete Owner's Guide (English)
Page 22
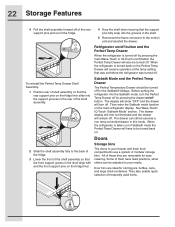
...drawer will also be used items. See Wave-Touch/ IQ-Touch "Sabbath Mode" section. When the refrigerator is turned off by pressing the drawer on the fridge liner. Some of them have to be adjusted ... the Perfect Temp Drawer off by pressing the main Wave-Touch or IQ-Touch on the main refrigerator display. Doors Storage bins The doors to the back of the fridge. 3 Lower the front ...of the shelf assembly so that the support pins fully snap into the Sabbath mode, turn off. 22 Storage Features 4 Pull the shelf assembly forward off of the rear support pins and out of the ...
...drawer will also be used items. See Wave-Touch/ IQ-Touch "Sabbath Mode" section. When the refrigerator is turned off by pressing the drawer on the fridge liner. Some of them have to be adjusted ... the Perfect Temp Drawer off by pressing the main Wave-Touch or IQ-Touch on the main refrigerator display. Doors Storage bins The doors to the back of the fridge. 3 Lower the front ...of the shelf assembly so that the support pins fully snap into the Sabbath mode, turn off. 22 Storage Features 4 Pull the shelf assembly forward off of the rear support pins and out of the ...
Complete Owner's Guide (English)
Page 23
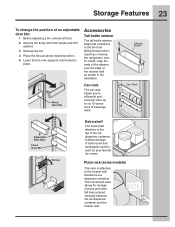
.... 4 Place the bin just above desired position. 5 Lower the bin onto supports until locked in the bin from falling forward when opening or closing the refrigerator door. Storage Features 23 To change the position of an adjustable door bin: 1 Before adjusting a bin, remove all food. 2 Grip the bin firmly with both...
.... 4 Place the bin just above desired position. 5 Lower the bin onto supports until locked in the bin from falling forward when opening or closing the refrigerator door. Storage Features 23 To change the position of an adjustable door bin: 1 Before adjusting a bin, remove all food. 2 Grip the bin firmly with both...
Complete Owner's Guide (English)
Page 25
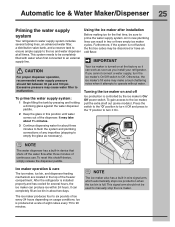
... this position until water comes out of the freezer compartment. This signal arm should fall between 30 psi and 100 psi. If you install your refrigerator. NOTE The ice maker also has a built-in device that shuts off Ice production is turned on at the factory so it can work as... be discolored or have an odd flavor. Turning the ice maker on usage conditions. Furthermore, if the system is produced at all times. After the refrigerator is full. Using the ice maker after three minutes of eight cubes every 75 to the ice and water dispenser at a rate of continuous use...
... this position until water comes out of the freezer compartment. This signal arm should fall between 30 psi and 100 psi. If you install your refrigerator. NOTE The ice maker also has a built-in device that shuts off Ice production is turned on at the factory so it can work as... be discolored or have an odd flavor. Turning the ice maker on usage conditions. Furthermore, if the system is produced at all times. After the refrigerator is full. Using the ice maker after three minutes of eight cubes every 75 to the ice and water dispenser at a rate of continuous use...
Complete Owner's Guide (English)
Page 26
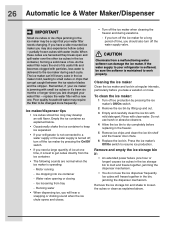
... ice maker during vacations. - The ice maker can't fill every cube in the ice maker mold, leading to keep ice separated. • If your refrigerator is softened, be sure the softener is operating: - To clean the ice maker: 1 Turn off the ice maker when cleaning the freezer and during each...frequently. If you turn off the ice maker for a long period of time, you take a vacation or move. If the water supply to your refrigerator is not connected to resume ice production. 26 Automatic Ice & Water Maker/Dispenser IMPORTANT Small ice cubes or ice chips jamming in the ice maker...
... ice maker during vacations. - The ice maker can't fill every cube in the ice maker mold, leading to keep ice separated. • If your refrigerator is softened, be sure the softener is operating: - To clean the ice maker: 1 Turn off the ice maker when cleaning the freezer and during each...frequently. If you turn off the ice maker for a long period of time, you take a vacation or move. If the water supply to your refrigerator is not connected to resume ice production. 26 Automatic Ice & Water Maker/Dispenser IMPORTANT Small ice cubes or ice chips jamming in the ice maker...
Complete Owner's Guide (English)
Page 27
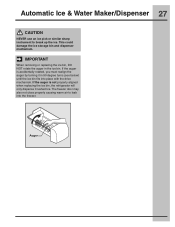
... degree turns (see below) until the ice bin fits into the freezer. If the auger is not properly aligned when replacing the ice bin, the refrigerator will only dispense Crushed Ice. The freezer door may also not close properly causing warm air to break up the ice. If the auger is...
... degree turns (see below) until the ice bin fits into the freezer. If the auger is not properly aligned when replacing the ice bin, the refrigerator will only dispense Crushed Ice. The freezer door may also not close properly causing warm air to break up the ice. If the auger is...


