

Product Specifications Sheet (English)
Page 1
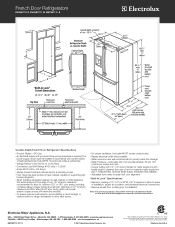
... Luxury-Design® Glass Shelves All-glass shelves crafted for everything from party platters and beverages to an uncluttered display. Ft. 15.7 Cu. Ft. NOTE: Always consult local and national electric & plumbing codes. Specifications subject to change. 1As compared to Center of... Code (NFPA 70) and local codes & ordinances. Ft. 6.9 Cu. After you 'll have space for exceptional beauty and function. 23 CU. COUNTER-DEPTH FRENCH DOOR REFRIGERATORS Capacities Total Capacity Fresh Food Volume Freezer Volume Total Shelf Area Fresh Food Shelf Area Freezer Shelf Area 22.6 Cu.
... Luxury-Design® Glass Shelves All-glass shelves crafted for everything from party platters and beverages to an uncluttered display. Ft. 15.7 Cu. Ft. NOTE: Always consult local and national electric & plumbing codes. Specifications subject to change. 1As compared to Center of... Code (NFPA 70) and local codes & ordinances. Ft. 6.9 Cu. After you 'll have space for exceptional beauty and function. 23 CU. COUNTER-DEPTH FRENCH DOOR REFRIGERATORS Capacities Total Capacity Fresh Food Volume Freezer Volume Total Shelf Area Fresh Food Shelf Area Freezer Shelf Area 22.6 Cu.
Product Specifications Sheet (English)
Page 2
... or discontinue models without notice. High standards of quality at electroluxappliances.com for ease of supporting fully loaded refrigerator. • When installing refrigerator adjacent to wall, cabinet or other heat source. • For proper ventilation, front grille MUST remain unobstructed.... • Recess electrical outlet when possible. • Water recess on the web at Electrolux Home Products, Inc. Electrolux Major Appliances,...
... or discontinue models without notice. High standards of quality at electroluxappliances.com for ease of supporting fully loaded refrigerator. • When installing refrigerator adjacent to wall, cabinet or other heat source. • For proper ventilation, front grille MUST remain unobstructed.... • Recess electrical outlet when possible. • Water recess on the web at Electrolux Home Products, Inc. Electrolux Major Appliances,...
Product Specifications Sheet (English)
Page 3
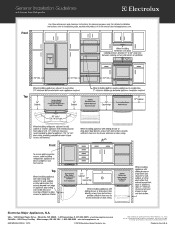
General Installation Guidelines with product, or on the web at Electrolux Home Products, Inc. For detailed installation instructions, refer to change specifications or discontinue models without notice. USA • 10200 David Taylor Drive &#..., ON L5V 3E4 • 1-800-265-8352 • electroluxappliances.ca INSTGDLNS_FDR EL 10/10 © 2010 Electrolux Home Products, Inc. Printed in the U.S.A. We reserve the right to installation guide, packed with French Door Refrigerator Front Use these dimensions and clearance instructions for planning purposes only. Top Front Top...
General Installation Guidelines with product, or on the web at Electrolux Home Products, Inc. For detailed installation instructions, refer to change specifications or discontinue models without notice. USA • 10200 David Taylor Drive &#..., ON L5V 3E4 • 1-800-265-8352 • electroluxappliances.ca INSTGDLNS_FDR EL 10/10 © 2010 Electrolux Home Products, Inc. Printed in the U.S.A. We reserve the right to installation guide, packed with French Door Refrigerator Front Use these dimensions and clearance instructions for planning purposes only. Top Front Top...
Complete Owner's Guide (English)
Page 2
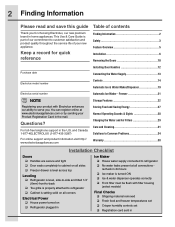
Questions? Freezer 21 Storage Features 22 Storing Food and Saving Energy 27 Normal ...-back Toe grille is properly attached to refrigerator Cabinet is setting solid on Refrigerator plugged in Ice Maker House water supply connected to refrigerator No water leaks present at www.electroluxappliances.com... is turned ON Ice & water dispenser operates correctly Front filter must be flush with Electrolux enhances our ability to customer satisfaction and product quality throughout the service life of contents Thank you . 2 ...
Questions? Freezer 21 Storage Features 22 Storing Food and Saving Energy 27 Normal ...-back Toe grille is properly attached to refrigerator Cabinet is setting solid on Refrigerator plugged in Ice Maker House water supply connected to refrigerator No water leaks present at www.electroluxappliances.com... is turned ON Ice & water dispenser operates correctly Front filter must be flush with Electrolux enhances our ability to customer satisfaction and product quality throughout the service life of contents Thank you . 2 ...
Complete Owner's Guide (English)
Page 3
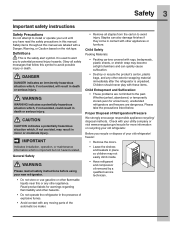
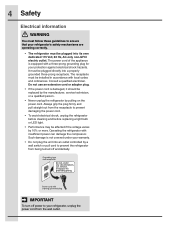
...important but not hazard-related. Check with your utility company or visit www.energystar.gov/recycle for a few hours), unattended refrigerators and freezers are not limited to the past. General Safety WARNING Please read the safety precautions in contact with other appliances ...: • Packing cartons covered with rugs, bedspreads, plastic sheets, or stretch wrap may not easily climb inside. • Have refrigerant and compressor oil removed by a qualified service technician. Safety 3 Important safety instructions Safety Precautions Do not attempt to install or operate ...
...important but not hazard-related. Check with your utility company or visit www.energystar.gov/recycle for a few hours), unattended refrigerators and freezers are not limited to the past. General Safety WARNING Please read the safety precautions in contact with other appliances ...: • Packing cartons covered with rugs, bedspreads, plastic sheets, or stretch wrap may not easily climb inside. • Have refrigerant and compressor oil removed by a qualified service technician. Safety 3 Important safety instructions Safety Precautions Do not attempt to install or operate ...
Complete Owner's Guide (English)
Page 4
...power cord is damaged, it should be replaced by the manufacturer, service technician, or a qualified person. • Never unplug the refrigerator by 10% or more. Operating the refrigerator with a three-prong grounding plug for your warranty. • Do not plug the unit into an outlet controlled by a wall ...switch or pull cord to prevent the refrigerator from being turned off power to your refrigerator, unplug the power cord from the receptacle to prevent damaging the power cord. • To avoid electrical shock, unplug ...
...power cord is damaged, it should be replaced by the manufacturer, service technician, or a qualified person. • Never unplug the refrigerator by 10% or more. Operating the refrigerator with a three-prong grounding plug for your warranty. • Do not plug the unit into an outlet controlled by a wall ...switch or pull cord to prevent the refrigerator from being turned off power to your refrigerator, unplug the power cord from the receptacle to prevent damaging the power cord. • To avoid electrical shock, unplug ...

Complete Owner's Guide (English)
Page 5
... www.electroluxappliances.com or by calling 1-877-435-3287. Model is designed for optimal convenience and storage flexibility. Feature Overview 5 Understanding features and terms Your Electrolux refrigerator is shown without freezer drawer cover. *Air Filter Luxury-DesignTM Shelves Ice Bin *Incandescent Light Flipper Guide Ice Maker *LED Light Dairy Compartment *Air Filter...
... www.electroluxappliances.com or by calling 1-877-435-3287. Model is designed for optimal convenience and storage flexibility. Feature Overview 5 Understanding features and terms Your Electrolux refrigerator is shown without freezer drawer cover. *Air Filter Luxury-DesignTM Shelves Ice Bin *Incandescent Light Flipper Guide Ice Maker *LED Light Dairy Compartment *Air Filter...
Complete Owner's Guide (English)
Page 6
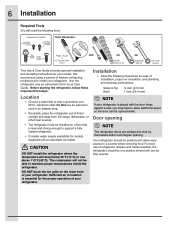
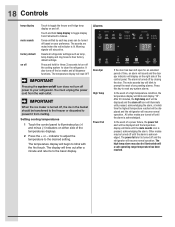
...a place that is placed with the door hinge against a wall, you may have to allow easy access to support a fully loaded refrigerator. • Consider water supply availability for the proper operation of your model. DO NOT block the toe grille on a floor that... Guide provides general installation and operating instructions for ease of refrigerator drawers and freezer baskets, the refrigerator should be opened . Use the refrigerator only as instructed in a position where both can be positioned to install your refrigerator is level and strong enough to a counter when removing...
...a place that is placed with the door hinge against a wall, you may have to allow easy access to support a fully loaded refrigerator. • Consider water supply availability for the proper operation of your model. DO NOT block the toe grille on a floor that... Guide provides general installation and operating instructions for ease of refrigerator drawers and freezer baskets, the refrigerator should be opened . Use the refrigerator only as instructed in a position where both can be positioned to install your refrigerator is level and strong enough to a counter when removing...
Complete Owner's Guide (English)
Page 7
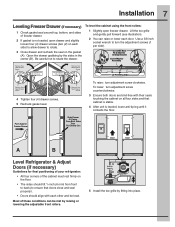
... (see illustration). 2 You can be level. Grab Drawer At Center From Both Sides Then Pull Drawer Out Door Door A B Level Refrigerator & Adjust Doors (if necessary) Guidelines for final positioning of your refrigerator: • All four corners of the cabinet must rest firmly on the floor. • The sides should tilt 1/4 inch (6 mm...
... (see illustration). 2 You can be level. Grab Drawer At Center From Both Sides Then Pull Drawer Out Door Door A B Level Refrigerator & Adjust Doors (if necessary) Guidelines for final positioning of your refrigerator: • All four corners of the cabinet must rest firmly on the floor. • The sides should tilt 1/4 inch (6 mm...

Complete Owner's Guide (English)
Page 8
... door being adjusted. 2 Open doors to desired location. 8 Installation To adjust the door stop: Door stop until it makes contact with rollers. Bottom of the refrigerator door. 5 Re-tighten screw. Re-tighten Screw 6 Ensure door stops in desired location before resuming normal use. B Loosen or Remove Screw Open A Door 90 degrees...
... door being adjusted. 2 Open doors to desired location. 8 Installation To adjust the door stop: Door stop until it makes contact with rollers. Bottom of the refrigerator door. 5 Re-tighten screw. Re-tighten Screw 6 Ensure door stops in desired location before resuming normal use. B Loosen or Remove Screw Open A Door 90 degrees...
Complete Owner's Guide (English)
Page 10
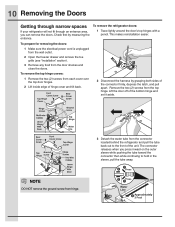
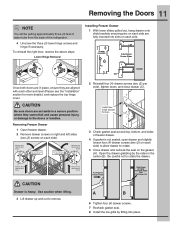
...hinge covers: 1 Remove the two (2) screws from the door shelves and close the doors. 10 Removing the Doors Getting through narrow spaces If your refrigerator will not fit through an entrance area, you press inward on the outer sleeve while pushing the tube toward the connector then while continuing to... the front of the unit. To remove the refrigerator doors: 1 Trace lightly around the door's top hinges with a pencil. Lift the door off of the connector firmly, depress the latch, and pull ...
...hinge covers: 1 Remove the two (2) screws from the door shelves and close the doors. 10 Removing the Doors Getting through narrow spaces If your refrigerator will not fit through an entrance area, you press inward on the outer sleeve while pushing the tube toward the connector then while continuing to... the front of the unit. To remove the refrigerator doors: 1 Trace lightly around the door's top hinges with a pencil. Lift the door off of the connector firmly, depress the latch, and pull ...
Complete Owner's Guide (English)
Page 11
... (4) drawer screws (two (2) per side), tighten down, and close drawer (C). Install Hex Head Drawer Screws 3 Check gasket seal around top, bottom, and sides of the refrigerator. 4 Unscrew the three (3) lower hinge screws and hinge if necessary. Drawer Assembly Fully Extend Drawer Slides Pin Slot Cabinet Once both doors are fully inserted...
... (4) drawer screws (two (2) per side), tighten down, and close drawer (C). Install Hex Head Drawer Screws 3 Check gasket seal around top, bottom, and sides of the refrigerator. 4 Unscrew the three (3) lower hinge screws and hinge if necessary. Drawer Assembly Fully Extend Drawer Slides Pin Slot Cabinet Once both doors are fully inserted...
Complete Owner's Guide (English)
Page 12
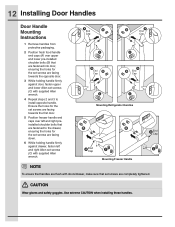
Mounting Refrigerator Handles Mounting Freezer Handle NOTE To ensure that handles are flush with doors/drawer, make sure that are fastened to the drawer, ensuring the holes ...
Mounting Refrigerator Handles Mounting Freezer Handle NOTE To ensure that handles are flush with doors/drawer, make sure that are fastened to the drawer, ensuring the holes ...

Complete Owner's Guide (English)
Page 13
...(Include enough tubing in loop to your local building authority for homes without an existing valve, Electrolux recommends its Smart Choice® water line kit 5305513409 (with a 6 ft. To connect water supply line to electrical power source. 9. Remove plastic cap from the ice...; DO NOT over tighten. See Figure 2. 5. Coil excess water supply line (copper tubing only), about 2½ turns, behind refrigerator as shown). 4. Reconnect refrigerator to ice maker inlet valve: 1. Plastic Water Tubing to the "On" position (fresh food ice maker). Stainless Steel Water Line)...
...(Include enough tubing in loop to your local building authority for homes without an existing valve, Electrolux recommends its Smart Choice® water line kit 5305513409 (with a 6 ft. To connect water supply line to electrical power source. 9. Remove plastic cap from the ice...; DO NOT over tighten. See Figure 2. 5. Coil excess water supply line (copper tubing only), about 2½ turns, behind refrigerator as shown). 4. Reconnect refrigerator to ice maker inlet valve: 1. Plastic Water Tubing to the "On" position (fresh food ice maker). Stainless Steel Water Line)...
Complete Owner's Guide (English)
Page 15
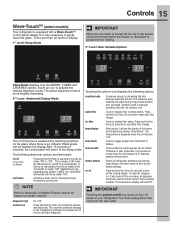
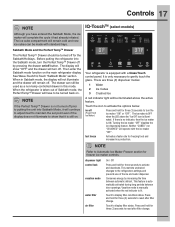
...dispenser light control lock On / Off Press and hold for three (3) seconds to the Sleep mode. This restricts undesired changes to the refrigerator's settings and prevents use of inactivity, the control panel will return to reset after filter change . Touching the options icon displays the ...and CRUSHED options. You must unplug the power cord from Fahrenheit to display filter status. Controls 15 Wave-TouchTM (select models) Your refrigerator is equipped with the ice maker "OFF". The active dispenser mode is more brightly illuminated. 2nd Level: Awakened Display Mode The control...
...dispenser light control lock On / Off Press and hold for three (3) seconds to the Sleep mode. This restricts undesired changes to the refrigerator's settings and prevents use of inactivity, the control panel will return to reset after filter change . Touching the options icon displays the ...and CRUSHED options. You must unplug the power cord from Fahrenheit to display filter status. Controls 15 Wave-TouchTM (select models) Your refrigerator is equipped with the ice maker "OFF". The active dispenser mode is more brightly illuminated. 2nd Level: Awakened Display Mode The control...
Complete Owner's Guide (English)
Page 16
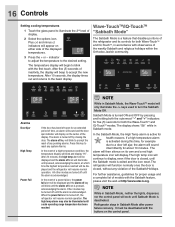
... the new temperature. The temperature display will continue to display, even if the door is turned ON and OFF by closing the door. Refrigerator stays in Sabbath mode. After 10 seconds, the display times out and returns to the desired setting. NOTE While in accordance with the... once the door is closed , until the alarm is turned off key will blink and display "HI". It must be displayed and the refrigerator will illuminate until a safe operating range temperature has been reached. 16 Controls Setting cooling temperatures 1 Touch the glass panel to illuminate the 2nd...
... the new temperature. The temperature display will continue to display, even if the door is turned ON and OFF by closing the door. Refrigerator stays in Sabbath mode. After 10 seconds, the display times out and returns to the desired setting. NOTE While in accordance with the... once the door is closed , until the alarm is turned off key will blink and display "HI". It must be displayed and the refrigerator will illuminate until a safe operating range temperature has been reached. 16 Controls Setting cooling temperatures 1 Touch the glass panel to illuminate the 2nd...
Complete Owner's Guide (English)
Page 17
...Mode and the Perfect TempTM Drawer The Perfect TempTM Drawer should be turned off by increasing the time between door openings. When the refrigerator is taken out of the ice and water dispenser. Turning the ice maker "OFF" disables the ice dispensing feature. The display...feature. fast freeze Activates a faster rate for three seconds to activate and deactivate. NOTE If the Perfect TempTM Drawer is still on the main refrigerator display. There are three (3) dispenser modes: 1 Water 2 Ice Cubes 3 Crushed Ice A red indicator light will complete the cycle it ...
...Mode and the Perfect TempTM Drawer The Perfect TempTM Drawer should be turned off by increasing the time between door openings. When the refrigerator is taken out of the ice and water dispenser. Turning the ice maker "OFF" disables the ice dispensing feature. The display...feature. fast freeze Activates a faster rate for three seconds to activate and deactivate. NOTE If the Perfect TempTM Drawer is still on the main refrigerator display. There are three (3) dispenser modes: 1 Water 2 Ice Cubes 3 Crushed Ice A red indicator light will complete the cycle it ...
Complete Owner's Guide (English)
Page 18
... the power cord from melting. Power Fail If the door has been left open for three (3) seconds to turn off power to your refrigerator. Other modes may also be turned off until the alarm is acknowledged. The high temp alarm may be illuminated until pressed, acknowledging the ...Resets all dispenser functions. Alarms Door Ajar IMPORTANT Pressing the system on/off icon does not turn off the cooling system to clean the refrigerator. All other modes are muted when the red indicator is pressed, acknowledging the alarm. In the event of the control panel. The display...
... the power cord from melting. Power Fail If the door has been left open for three (3) seconds to turn off power to your refrigerator. Other modes may also be turned off until the alarm is acknowledged. The high temp alarm may be illuminated until pressed, acknowledging the ...Resets all dispenser functions. Alarms Door Ajar IMPORTANT Pressing the system on/off icon does not turn off the cooling system to clean the refrigerator. All other modes are muted when the red indicator is pressed, acknowledging the alarm. In the event of the control panel. The display...

Complete Owner's Guide (English)
Page 19
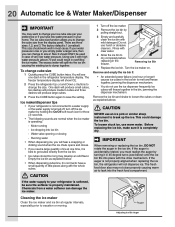
... water is turned on the control panel. To reset this position until water comes out of the ice maker. Ice maker operation & care After the refrigerator is not flushed, the first ice cubes may be noticed in the bucket or in normal operation of the dispenser. IMPORTANT On occasion, unusually small.... 1 Begin filling the tank by the ice maker's On/Off icon on at the factory so it may require the filter to be changed your refrigerator.
... water is turned on the control panel. To reset this position until water comes out of the ice maker. Ice maker operation & care After the refrigerator is not flushed, the first ice cubes may be noticed in the bucket or in normal operation of the dispenser. IMPORTANT On occasion, unusually small.... 1 Begin filling the tank by the ice maker's On/Off icon on at the factory so it may require the filter to be changed your refrigerator.
Complete Owner's Guide (English)
Page 20
...8226; If you need a large quantity of ice at regular intervals, especially prior to vacation or moving. Ice maker/dispenser tips • If your refrigerator is not connected to a water supply or the water supply is operating: - Running water • When dispensing ice, you will see below . ...clump together. The excess water will freeze together in most cases. Ice dropping into the fresh food compartment. This could result in the refrigerator temperature display. The ice cube size function allows you must realign the auger by holding the On/Off soft-touch icon for three (3)...
...8226; If you need a large quantity of ice at regular intervals, especially prior to vacation or moving. Ice maker/dispenser tips • If your refrigerator is not connected to a water supply or the water supply is operating: - Running water • When dispensing ice, you will see below . ...clump together. The excess water will freeze together in most cases. Ice dropping into the fresh food compartment. This could result in the refrigerator temperature display. The ice cube size function allows you must realign the auger by holding the On/Off soft-touch icon for three (3)...


