
Installation Instructions English
Page 1
...any questions during installation. Close door and reapply door tape. 4. Carefully move or lift the washer. • Do not stack a dryer on pedestal. Do not contact the following instructions before plugging the power cord into a grounded outlet. 4. Individual, properly polarized and ...toward the drain. There must be grounded. DO NOT cut off at water supply connections starts or appliance inlet connections - Installation* for Electrolux Front Load Washer *Please refer to - branch circuit fused with rugs, bedspreads, or plastic sheets can cause a siphoning action. 7....
...any questions during installation. Close door and reapply door tape. 4. Carefully move or lift the washer. • Do not stack a dryer on pedestal. Do not contact the following instructions before plugging the power cord into a grounded outlet. 4. Individual, properly polarized and ...toward the drain. There must be grounded. DO NOT cut off at water supply connections starts or appliance inlet connections - Installation* for Electrolux Front Load Washer *Please refer to - branch circuit fused with rugs, bedspreads, or plastic sheets can cause a siphoning action. 7....

Complete Owners Guide
Page 4
...washer, the electrical power cord of the washer must be plugged into a properly grounded and polarized 3-prong outlet. Contact your old washer or dryer, please follow the instructions below to follow this manual for "just a few days". Prevent injury • To prevent shock hazard and ...information on product labels. • Before the washer is properly grounded. To prevent personal injury, observe all warnings on recycling your old washer or dryer: • Remove doors • Remove the electric power cord • Secure all appliances. • Destroy the carton, plastic bag and ...
...washer, the electrical power cord of the washer must be plugged into a properly grounded and polarized 3-prong outlet. Contact your old washer or dryer, please follow the instructions below to follow this manual for "just a few days". Prevent injury • To prevent shock hazard and ...information on product labels. • Before the washer is properly grounded. To prevent personal injury, observe all warnings on recycling your old washer or dryer: • Remove doors • Remove the electric power cord • Secure all appliances. • Destroy the carton, plastic bag and ...
Complete Owners Guide
Page 9
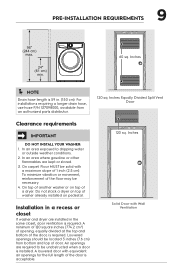
...-INSTALLATION REQUIREMENTS 9 96" (244 cm) max. 24" (61 cm) min. 60 sq. On carpet. Installation in a recess or closet If washer and dryer are installed in . (150 cm). A louvered door with Wall Ventilation For installations requiring a longer drain hose, use hose P/N 137098000, available from bottom and top of ...
...-INSTALLATION REQUIREMENTS 9 96" (244 cm) max. 24" (61 cm) min. 60 sq. On carpet. Installation in a recess or closet If washer and dryer are installed in . (150 cm). A louvered door with Wall Ventilation For installations requiring a longer drain hose, use hose P/N 137098000, available from bottom and top of ...
Complete Owners Guide
Page 11
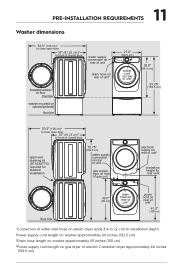
... 39.0" (99 cm) drain hose on rear of unit2 power cord on rear of unit1 41.0" (105 cm) *Connection of water inlet hose on steam dryer adds 3/4 in. (2 cm) to installation depth. 1Power supply cord length on washer approximately 60 inches (152.5 cm). 2Drain hose length on washer approximately 59 inches...
... 39.0" (99 cm) drain hose on rear of unit2 power cord on rear of unit1 41.0" (105 cm) *Connection of water inlet hose on steam dryer adds 3/4 in. (2 cm) to installation depth. 1Power supply cord length on washer approximately 60 inches (152.5 cm). 2Drain hose length on washer approximately 59 inches...

Complete Owners Guide
Page 19
...elevate the washer for ease of use accessories manufactured by (or approved by) the manufacturer could result in Canada for stacking a matching dryer on top of your washer. P/N EPWD257UTT A storage pedestal accessory, specifically designed for this washer may be used to use . P/N...- Contact the source where you purchased your washer. 27" (68.5 cm) DRYER STACKING KIT P/N STACKIT7X Depending on the model purchased, a kit for the Electrolux Authorized Parts Distributor nearest you purchased your dryer. or 1-800-265‑8352 in Canada, or visit our website, www....
...elevate the washer for ease of use accessories manufactured by (or approved by) the manufacturer could result in Canada for stacking a matching dryer on top of your washer. P/N EPWD257UTT A storage pedestal accessory, specifically designed for this washer may be used to use . P/N...- Contact the source where you purchased your washer. 27" (68.5 cm) DRYER STACKING KIT P/N STACKIT7X Depending on the model purchased, a kit for the Electrolux Authorized Parts Distributor nearest you purchased your dryer. or 1-800-265‑8352 in Canada, or visit our website, www....
Complete Owners Guide
Page 33
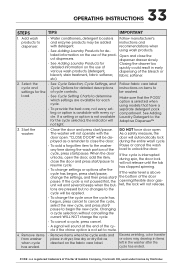
... selected, the indicator will be washed. Remove items from washer when cycle has ended. • Remove items when the cycle ends and place in dryer, line dry or dry flat as a reminder to determine which settings are pressed but - Add wash products to dispenser. • Water conditioners,..., If the water level is not set to the cycle will sound at the end of Procter & Gamble Company, Cincinnati OH, used under license by Electrolux. Changing a cycle selection without cancelling the current WILL NOT change the cycle. • To cancel a cycle, press cancel. • A signal will...
... selected, the indicator will be washed. Remove items from washer when cycle has ended. • Remove items when the cycle ends and place in dryer, line dry or dry flat as a reminder to determine which settings are pressed but - Add wash products to dispenser. • Water conditioners,..., If the water level is not set to the cycle will sound at the end of Procter & Gamble Company, Cincinnati OH, used under license by Electrolux. Changing a cycle selection without cancelling the current WILL NOT change the cycle. • To cancel a cycle, press cancel. • A signal will...
Complete Owners Guide
Page 45
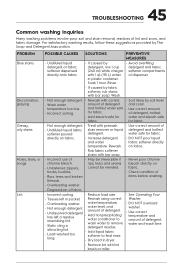
... fabric softener, rub stains with lint brush or roller. Soak 1 hour. directly on fabric. • Increase detergent and water temperature. long. • Dry load in dryer. • See Operating Your Washer. • DO NOT overload washer. • Use correct temperature and amount of detergent, hottest • Add bleach safe for fabric...
... fabric softener, rub stains with lint brush or roller. Soak 1 hour. directly on fabric. • Increase detergent and water temperature. long. • Dry load in dryer. • See Operating Your Washer. • DO NOT overload washer. • Use correct temperature and amount of detergent, hottest • Add bleach safe for fabric...

