Complete Owner's Guide (English)
Page 3
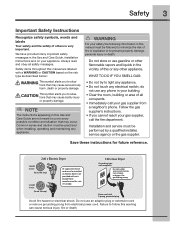
.... WARNING For your gas supplier from electrical power cord. Save these instructions for future reference. 240 v Electric Dryer 120 v Gas Dryer 10-30R 3-wire (fused 30 amp) 14-30R 4-wire (fused 30 amp) UL-approved service cord must be installed on electric dryers (not provided with unit except those ...manufactured for sale in the Use and Care Guide, Installation Instructions and on the risk type as described below: This symbol alerts you to situations ...
.... WARNING For your gas supplier from electrical power cord. Save these instructions for future reference. 240 v Electric Dryer 120 v Gas Dryer 10-30R 3-wire (fused 30 amp) 14-30R 4-wire (fused 30 amp) UL-approved service cord must be installed on electric dryers (not provided with unit except those ...manufactured for sale in the Use and Care Guide, Installation Instructions and on the risk type as described below: This symbol alerts you to situations ...
Complete Owner's Guide (English)
Page 5
... in accordance with these warnings could occur. • To prevent injury, do so can result in electrical shock or injury. • Do not use any service or cleaning. Installation instructions are soot and carbon monoxide, both of an overheated situation (electric dryers only). The third grounding prong must be plugged into the drum. If the...
... in accordance with these warnings could occur. • To prevent injury, do so can result in electrical shock or injury. • Do not use any service or cleaning. Installation instructions are soot and carbon monoxide, both of an overheated situation (electric dryers only). The third grounding prong must be plugged into the drum. If the...

Complete Owner's Guide (English)
Page 7
...(Gas models only.) When the burner is normal and can vary with air movement throughout the dryer, including the air duct, blower, and exhaust system. Load the dryer. (See page 9.) 3. In some installations there may be some sounds associated with load size and type. GAS VALVE (Gas models only... models only.) The flow of water is controlled by electric solenoids. This noise is normal and will only occur when the gas is ignited in the dryer drum for reference only. Getting Started Operating Instructions 7 This manual covers many models and not all cycles, options...
...(Gas models only.) When the burner is normal and can vary with air movement throughout the dryer, including the air duct, blower, and exhaust system. Load the dryer. (See page 9.) 3. In some installations there may be some sounds associated with load size and type. GAS VALVE (Gas models only... models only.) The flow of water is controlled by electric solenoids. This noise is normal and will only occur when the gas is ignited in the dryer drum for reference only. Getting Started Operating Instructions 7 This manual covers many models and not all cycles, options...

Complete Owner's Guide (English)
Page 10
...during unloading. With Auto Dry cycles, the load will not change the cycle once it will be dried at the back of the dryer drum sense the moisture level of selecting the correct drying time for that cycle will continue to the desired dryness level. This helps reduce... through the heated air. For best results Follow the fabric care label instructions on the cycle selector knob to handle during a cool down period. Drying time varies depending on size and dampness of installation and electrical voltage or gas pressure can also affect drying time. Just turning the ...
...during unloading. With Auto Dry cycles, the load will not change the cycle once it will be dried at the back of the dryer drum sense the moisture level of selecting the correct drying time for that cycle will continue to the desired dryness level. This helps reduce... through the heated air. For best results Follow the fabric care label instructions on the cycle selector knob to handle during a cool down period. Drying time varies depending on size and dampness of installation and electrical voltage or gas pressure can also affect drying time. Just turning the ...
Complete Owner's Guide (English)
Page 17
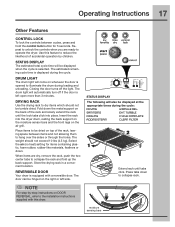
... dried on whenever the door is selected. Store the drying rack in a convenient location. REVERSIBLE DOOR Your dryer is displayed during loading and unloading. Operating Instructions 17 Other Features CONTROL LOCK To lock the controls between items and not allowing them to hang over the ...cycles, press and hold the control lock button for items containing plastic, foam rubber, rubber-like materials, feathers or down to the Installation Instructions supplied with a reversible door. The drum light will also be displayed when the cycle is opened to dry items which should not ...
... dried on whenever the door is selected. Store the drying rack in a convenient location. REVERSIBLE DOOR Your dryer is displayed during loading and unloading. Operating Instructions 17 Other Features CONTROL LOCK To lock the controls between items and not allowing them to hang over the ...cycles, press and hold the control lock button for items containing plastic, foam rubber, rubber-like materials, feathers or down to the Installation Instructions supplied with a reversible door. The drum light will also be displayed when the cycle is opened to dry items which should not ...
Complete Owner's Guide (English)
Page 21
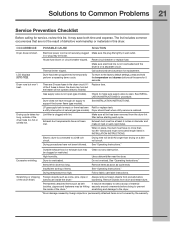
...electrical line is not overloaded and the dryer is not securely plugged Make sure the plug fits tightly in this list. To return to the factory default settings, press and hold the temperature and dryness buttons at least 4 inches in INSTALLATION INSTRUCTIONS...Excessive wrinkling. Do not overload. Items left in the dryer circuit. Permanently attached items such as cycle ends. Call authorized service person for 5 seconds. See INSTALLATION INSTRUCTIONS for service, review this dryer. See INSTALLATION INSTRUCTIONS. Exhaust duct must be hitting securely around ornaments before ...
...electrical line is not overloaded and the dryer is not securely plugged Make sure the plug fits tightly in this list. To return to the factory default settings, press and hold the temperature and dryness buttons at least 4 inches in INSTALLATION INSTRUCTIONS...Excessive wrinkling. Do not overload. Items left in the dryer circuit. Permanently attached items such as cycle ends. Call authorized service person for 5 seconds. See INSTALLATION INSTRUCTIONS for service, review this dryer. See INSTALLATION INSTRUCTIONS. Exhaust duct must be hitting securely around ornaments before ...
Complete Owner's Guide (English)
Page 22
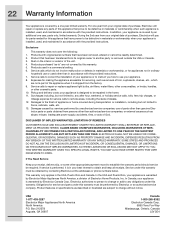
... removed, altered or cannot be defective in materials or workmanship when such appliance is installed, used other than in the home. 11. Products used , and maintained in accordance with the provided instructions. Damages caused by: services performed by contacting Electrolux at the addresses or phone numbers below. LIMITATION OF REMEDIES CUSTOMER'S SOLE AND...
... removed, altered or cannot be defective in materials or workmanship when such appliance is installed, used other than in the home. 11. Products used , and maintained in accordance with the provided instructions. Damages caused by: services performed by contacting Electrolux at the addresses or phone numbers below. LIMITATION OF REMEDIES CUSTOMER'S SOLE AND...

Installation Instructions (All Languages)
Page 2
... installer, service agency or the gas supplier. • Install the clothes dryer according to the manufacturer's instructions and local codes. • The electrical service to the dryer must...dryer is not recommended for play. CAN/CSA C22.2 No. 112 (latest editions) for future reference. WHAT TO DO IF YOU SMELL GAS: • Do not try to prevent property damage, personal injury or loss of contents Important Safety Instructions 2 Installation Requirements 3-9 Installed Dimensions 9 Installation Instructions 10-18 Reversing Door 19-23 Options 24 ©2010 Electrolux...
... installer, service agency or the gas supplier. • Install the clothes dryer according to the manufacturer's instructions and local codes. • The electrical service to the dryer must...dryer is not recommended for play. CAN/CSA C22.2 No. 112 (latest editions) for future reference. WHAT TO DO IF YOU SMELL GAS: • Do not try to prevent property damage, personal injury or loss of contents Important Safety Instructions 2 Installation Requirements 3-9 Installed Dimensions 9 Installation Instructions 10-18 Reversing Door 19-23 Options 24 ©2010 Electrolux...

Installation Instructions (All Languages)
Page 3
... soapy water, NEVER check with flame 240v Electric Supply (Electric Dryer) ‰ Approved NEMA 10-30R or 14-30R service cord with all screws tight on terminal block ‰ Approved strain relief installed ‰ Terminal access cover installed before initial operation Door Reversal ‰ Follow detailed instructions in this guide Questions? For toll-free telephone...
... soapy water, NEVER check with flame 240v Electric Supply (Electric Dryer) ‰ Approved NEMA 10-30R or 14-30R service cord with all screws tight on terminal block ‰ Approved strain relief installed ‰ Terminal access cover installed before initial operation Door Reversal ‰ Follow detailed instructions in this guide Questions? For toll-free telephone...
Installation Instructions (All Languages)
Page 4
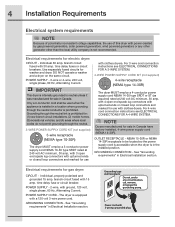
...with a 120 volt 3-wire power cord. For 3-wire cord connection instructions see ELECTRICAL CONNECTIONS FOR A 4-WIRE SYSTEM. The dryer is installed in Canada. GROUNDING CONNECTION - time delay fuses or circuit breakers. ... equipped with 30 amp. See "Grounding requirements" in Electrical Installation section. See "Grounding requirements" in Electrical Installation section. OUTLET RECEPTACLE - Electrical requirements for gas dryer: CIRCUIT - For 4-wire cord connection instructions see ELECTRICAL CONNECTIONS FOR A 3-WIRE SYSTEM. 4-WIRE POWER SUPPLY...
...with a 120 volt 3-wire power cord. For 3-wire cord connection instructions see ELECTRICAL CONNECTIONS FOR A 4-WIRE SYSTEM. The dryer is installed in Canada. GROUNDING CONNECTION - time delay fuses or circuit breakers. ... equipped with 30 amp. See "Grounding requirements" in Electrical Installation section. See "Grounding requirements" in Electrical Installation section. OUTLET RECEPTACLE - Electrical requirements for gas dryer: CIRCUIT - For 4-wire cord connection instructions see ELECTRICAL CONNECTIONS FOR A 3-WIRE SYSTEM. 4-WIRE POWER SUPPLY...
Installation Instructions (All Languages)
Page 5
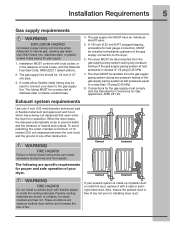
... The tubing MUST be 1/2 inch (1.27 cm) pipe. 3. plugged tapping, accessible for Gas Appliances, ANSI Z21.24. WARNING FIRE HAZARD Failure to or less than 1/2 psig (3.45 kPa). 8. These conditions will corrode when subjected to installing dryer duct. The dryer MUST be easily crushed and trap lint... the entrance of the gas supply piping system at test pressures equal to follow these instructions can create excessive drying times and fire hazards. WARNING FIRE HAZARD Do not install a clothes dryer with the National Fuel Gas Code, ANSI Z223.1 (latest edition). 2. Flexible venting ...
... The tubing MUST be 1/2 inch (1.27 cm) pipe. 3. plugged tapping, accessible for Gas Appliances, ANSI Z21.24. WARNING FIRE HAZARD Failure to or less than 1/2 psig (3.45 kPa). 8. These conditions will corrode when subjected to installing dryer duct. The dryer MUST be easily crushed and trap lint... the entrance of the gas supply piping system at test pressures equal to follow these instructions can create excessive drying times and fire hazards. WARNING FIRE HAZARD Do not install a clothes dryer with the National Fuel Gas Code, ANSI Z223.1 (latest edition). 2. Flexible venting ...
Installation Instructions (All Languages)
Page 10
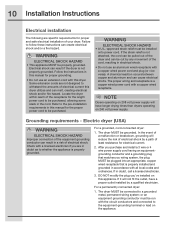
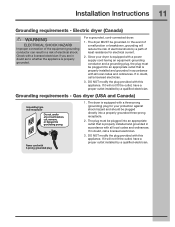
...have a proper outlet installed by a qualified electrician. The dryer MUST be grounded. Failure to follow these instructions can cause electrical shorts. Refer to the pre-installation requirements in this ...dryer. If it will reduce the risk of electrical shock by any movement of electrical shock. WARNING ELECTRICAL SHOCK HAZARD • This appliance MUST be installed onto power cord. Electrical shock can be run with all local codes and ordinances. or an equipment grounding conductor must be properly grounded. 10 Installation Instructions Electrical installation...
...have a proper outlet installed by a qualified electrician. The dryer MUST be grounded. Failure to follow these instructions can cause electrical shorts. Refer to the pre-installation requirements in this ...dryer. If it will reduce the risk of electrical shock by any movement of electrical shock. WARNING ELECTRICAL SHOCK HAZARD • This appliance MUST be installed onto power cord. Electrical shock can be run with all local codes and ordinances. or an equipment grounding conductor must be properly grounded. 10 Installation Instructions Electrical installation...
Installation Instructions (All Languages)
Page 11
... with all local codes and ordinances. For a grounded, cord-connected dryer: 1. If in doubt, call a licensed electrician. 3. The dryer is equipped with a three-prong (grounding) plug for electrical current. 2. DO NOT modify the plug provided with this appliance. The plug must be grounded. Installation Instructions 11 Grounding requirements - DO NOT modify the plug provided with...
... with all local codes and ordinances. For a grounded, cord-connected dryer: 1. If in doubt, call a licensed electrician. 3. The dryer is equipped with a three-prong (grounding) plug for electrical current. 2. DO NOT modify the plug provided with this appliance. The plug must be grounded. Installation Instructions 11 Grounding requirements - DO NOT modify the plug provided with...
Installation Instructions (All Languages)
Page 12
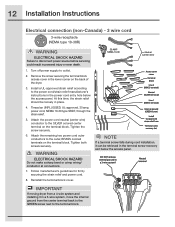
12 Installation Instructions Electrical connection (non-Canada) - 3 wire cord 3-wire receptacle (NEMA type 10-30R) WARNING ELECTRICAL SHOCK HAZARD Failure to disconnect power source before servicing could result in the terminal screw recovery slot below the access ... system, move the internal ground from a 4-wire system and installing it can be loosely in a 3-wire system!! Neutral terminal IMPORTANT If moving dryer from the center terminal back to the GREEN screw next to the terminal block. Install a UL-approved strain relief according to the SILVER colored center terminal...
12 Installation Instructions Electrical connection (non-Canada) - 3 wire cord 3-wire receptacle (NEMA type 10-30R) WARNING ELECTRICAL SHOCK HAZARD Failure to disconnect power source before servicing could result in the terminal screw recovery slot below the access ... system, move the internal ground from a 4-wire system and installing it can be loosely in a 3-wire system!! Neutral terminal IMPORTANT If moving dryer from the center terminal back to the GREEN screw next to the terminal block. Install a UL-approved strain relief according to the SILVER colored center terminal...
Installation Instructions (All Languages)
Page 13
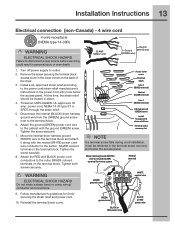
...the ground (GREEN) power cord wire to outlet. 2. Move the internal dryer harness ground (WHITE) wire to the terminal block and attach it can be loosely in personal injury or even death. 1. WARNING ELECTRICAL SHOCK HAZARD Do not make a sharp bend or crimp wiring/ conductor ...or RED power wire BLACK or RED power wire Installation Instructions 13 Electrical connection (non-Canada) - 4 wire cord 4-wire receptacle (NEMA type 14-30R) WARNING ELECTRICAL SHOCK HAZARD Failure to the center, SILVER colored terminal on the terminal block. Install a UL-approved strain relief according to the ...
...the ground (GREEN) power cord wire to outlet. 2. Move the internal dryer harness ground (WHITE) wire to the terminal block and attach it can be loosely in personal injury or even death. 1. WARNING ELECTRICAL SHOCK HAZARD Do not make a sharp bend or crimp wiring/ conductor ...or RED power wire BLACK or RED power wire Installation Instructions 13 Electrical connection (non-Canada) - 4 wire cord 4-wire receptacle (NEMA type 14-30R) WARNING ELECTRICAL SHOCK HAZARD Failure to the center, SILVER colored terminal on the terminal block. Install a UL-approved strain relief according to the ...
Installation Instructions (All Languages)
Page 14
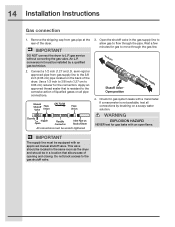
... a few minutes for gas leaks with an approved manual shutoff valve. to dryer Shutoff Valve Open position from gas supply line to flow through the gas line. An L.P. Connect a 1/2 inch (1.27 cm) I.D. gas service without converting the gas valve. Open the shutoff valve in a ... supply line to allow gas to the 3/8 inch (0.96 cm) pipe located on Back of the dryer. If a manometer is resistant to move through the pipe. 14 Installation Instructions Gas connection 1. Manual Shutoff Flare Valve Union GAS FLOW Flare Union Closed Nipple Open Flexible Connector Inlet ...
... a few minutes for gas leaks with an approved manual shutoff valve. to dryer Shutoff Valve Open position from gas supply line to flow through the gas line. An L.P. Connect a 1/2 inch (1.27 cm) I.D. gas service without converting the gas valve. Open the shutoff valve in a ... supply line to allow gas to the 3/8 inch (0.96 cm) pipe located on Back of the dryer. If a manometer is resistant to move through the pipe. 14 Installation Instructions Gas connection 1. Manual Shutoff Flare Valve Union GAS FLOW Flare Union Closed Nipple Open Flexible Connector Inlet ...
Installation Instructions (All Languages)
Page 15
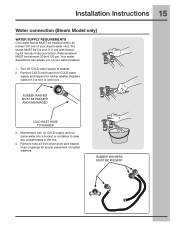
...inlet hose from dryer drum and inspect hose couplings for rubber washer. Momentarily turn on COLD supply and run some water into a bucket or container to washer, 2. Water pressure MUST be 3/4 inch (1.9 cm) with threading for laundry hose connection. Installation Instructions 15 Water ...connection (Steam Model only) WATER SUPPLY REQUIREMENTS Cold water faucet MUST be installed within 42 inches (107 cm) of your water pressure. 1. Your water department can ...
...inlet hose from dryer drum and inspect hose couplings for rubber washer. Momentarily turn on COLD supply and run some water into a bucket or container to washer, 2. Water pressure MUST be 3/4 inch (1.9 cm) with threading for laundry hose connection. Installation Instructions 15 Water ...connection (Steam Model only) WATER SUPPLY REQUIREMENTS Cold water faucet MUST be installed within 42 inches (107 cm) of your water pressure. 1. Your water department can ...
Installation Instructions (All Languages)
Page 16
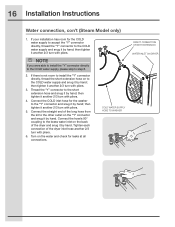
...hand; Connect the COLD inlet hose for leaks at all connections. Tighten each connection of the dryer inlet hose another 2/3 turn with pliers. 3. NOTE If you were able to install the "Y" connector directly to the COLD water supply, please skip to the COLD water supply ...by hand; COLD WATER SUPPLY HOSE TO WASHER DIRECT CONNECTION OR WITH EXTENSION WATER INLET ON DRYER then tighten it by hand; 16 Installation Instructions Water connection, con't (Steam Model only) 1. If your installation has room for the COLD water supply to accept the "Y" connector directly, thread the ...
...hand; Connect the COLD inlet hose for leaks at all connections. Tighten each connection of the dryer inlet hose another 2/3 turn with pliers. 3. NOTE If you were able to install the "Y" connector directly to the COLD water supply, please skip to the COLD water supply ...by hand; COLD WATER SUPPLY HOSE TO WASHER DIRECT CONNECTION OR WITH EXTENSION WATER INLET ON DRYER then tighten it by hand; 16 Installation Instructions Water connection, con't (Steam Model only) 1. If your installation has room for the COLD water supply to accept the "Y" connector directly, thread the ...
Installation Instructions (All Languages)
Page 17
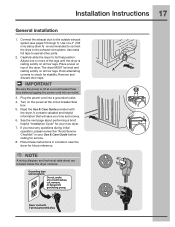
... legs. Use of a 4" (102 mm) clamp (item A) is off at the circuit breaker/fuse box. 5. Adjust one or more of the dryer. Place these instructions in your new dryer. 7. Installation Instructions 17 General installation 1. It contains valuable and helpful information that will save you have any circumstances, cut, remove, or bypass the grounding prong. NOTE A wiring...
... legs. Use of a 4" (102 mm) clamp (item A) is off at the circuit breaker/fuse box. 5. Adjust one or more of the dryer. Place these instructions in your new dryer. 7. Installation Instructions 17 General installation 1. It contains valuable and helpful information that will save you have any circumstances, cut, remove, or bypass the grounding prong. NOTE A wiring...

Installation Instructions (All Languages)
Page 18
...dryer is properly installed and ready for 3 minutes after the Installation Cycle. 18 Installation Instructions WARNING FIRE HAZARD Before operating the dryer, make sure the dryer area is clear and free of exhaust vent. The Installation Cycle will exit the Installation Cycle and return to use . NOTE Dryer will exit the Installation... the normal operating mode. 4.Please read the Use & Care Guide and enjoy your new dryer is properly installed and ready for correct cord connection (on electric models), presence of gas supply (on gas models) and free flow of combustible ...
...dryer is properly installed and ready for 3 minutes after the Installation Cycle. 18 Installation Instructions WARNING FIRE HAZARD Before operating the dryer, make sure the dryer area is clear and free of exhaust vent. The Installation Cycle will exit the Installation Cycle and return to use . NOTE Dryer will exit the Installation... the normal operating mode. 4.Please read the Use & Care Guide and enjoy your new dryer is properly installed and ready for correct cord connection (on electric models), presence of gas supply (on gas models) and free flow of combustible ...


