Complete Owner's Guide (English)
Page 2
...read and save this page to serve you for quick reference Purchase date Electrolux model number Electrolux serial number NOTE Registering your new appliance. You can register online at... Instructions 7-18 • Getting Started 7 • Normal Operating Sounds 7 • Operating Your Washer 8-13 • Cycle Selection 14-17 • Washing/Rinsing Temperature 17-18 • Spin Speed 18...to Common Problems 27-30 • Common Washing Problems 27-28 • Service Prevention Checklist 29-30 Warranty Information 31 Notes 32 ©2008 Electrolux Major Aplliances All ...
...read and save this page to serve you for quick reference Purchase date Electrolux model number Electrolux serial number NOTE Registering your new appliance. You can register online at... Instructions 7-18 • Getting Started 7 • Normal Operating Sounds 7 • Operating Your Washer 8-13 • Cycle Selection 14-17 • Washing/Rinsing Temperature 17-18 • Spin Speed 18...to Common Problems 27-30 • Common Washing Problems 27-28 • Service Prevention Checklist 29-30 Warranty Information 31 Notes 32 ©2008 Electrolux Major Aplliances All ...
Product Specifications Sheet (English)
Page 2
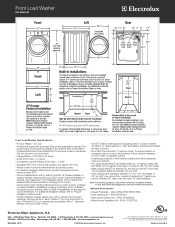
.... and height of eliminating 17 gallons per minute. Front Load Washer EIFLW55H IW Front Load Washer Specifications • Product Weight - 237 Lbs. • An electrical supply with 1" maximum slope. Allow 1" clearance between hot and cold. • Drain required with matching Electrolux Dryer in area exposed to change specifications or discontinue models without optional 15" drawer pedestal, or stacked...
.... and height of eliminating 17 gallons per minute. Front Load Washer EIFLW55H IW Front Load Washer Specifications • Product Weight - 237 Lbs. • An electrical supply with 1" maximum slope. Allow 1" clearance between hot and cold. • Drain required with matching Electrolux Dryer in area exposed to change specifications or discontinue models without optional 15" drawer pedestal, or stacked...
Installation Instructions (All Languages)
Page 6
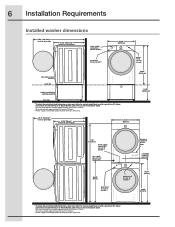
...) ² Drain hose length approximately 59 inches (150cm). ³ Power supply cord length approximately 60 inches (152.5cm). Connection of water inlet hose on Steam Models adds 3/4 in . (2 cm) to installation depth. ¹ Hot and cold inlet hose length approximately 48.5 inches (123cm) ² Drain hose length approximately 59 ... 50.6" (128.5cm)* to clear open door 31.50" (80.01cm)* to front of closed door 27.00" (68.5cm) 38.00" (96.52cm) 53.00" (134.62cm) 75.75" (192.5cm) water supply connection on rear of washer ¹ gas supply pipe on rear of gas unit 39.00" (99cm) drain...
...) ² Drain hose length approximately 59 inches (150cm). ³ Power supply cord length approximately 60 inches (152.5cm). Connection of water inlet hose on Steam Models adds 3/4 in . (2 cm) to installation depth. ¹ Hot and cold inlet hose length approximately 48.5 inches (123cm) ² Drain hose length approximately 59 ... 50.6" (128.5cm)* to clear open door 31.50" (80.01cm)* to front of closed door 27.00" (68.5cm) 38.00" (96.52cm) 53.00" (134.62cm) 75.75" (192.5cm) water supply connection on rear of washer ¹ gas supply pipe on rear of gas unit 39.00" (99cm) drain...
Installation Instructions (All Languages)
Page 18
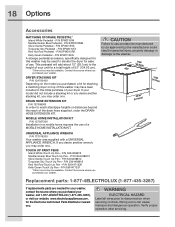
...Sands Pedestal - Contact the source where you purchased your unit for ease of your model did not include a stacking kit or you desire another wrench, you . DRAIN HOSE EXTENSION KIT P/N 137098000 In order to the washer. 27.00" (68.58cm) (3185.1.000cm" ) (672.61.64c4m" ) Replacement... are needed for your washer. If you desire another stacking kit, you purchased your washer, call 1-877-4ELECTROLUX (1-877-435-3287), or visit our website, www.electroluxappliances.com, for stacking a matching dryer on the model you purchased, a kit for the Electrolux Authorized Parts Distributor nearest ...
...Sands Pedestal - Contact the source where you purchased your unit for ease of your model did not include a stacking kit or you desire another wrench, you . DRAIN HOSE EXTENSION KIT P/N 137098000 In order to the washer. 27.00" (68.58cm) (3185.1.000cm" ) (672.61.64c4m" ) Replacement... are needed for your washer. If you desire another stacking kit, you purchased your washer, call 1-877-4ELECTROLUX (1-877-435-3287), or visit our website, www.electroluxappliances.com, for stacking a matching dryer on the model you purchased, a kit for the Electrolux Authorized Parts Distributor nearest ...
Wiring Diagram (All Languages)
Page 1
... pressing any button (except the cancel button). 2. Door Lock READING ERROR CODES 1. Wake the washer up by turning the selector knob). • Turn the program knob counter clockwise 9 turns (...and press and hold the "Cancel" and "Start" buttons simultaneously for the 1¼"x4¾" display models. 1 137022700A (0805) a) Unplug the power cord, wait 5-8 seconds, then reconnect the power cord ... the display simultaneously for Qualified Technicians Only. Main Board (Board located inside the front control panel) DL - User interface board (board located inside machine on the MB...
... pressing any button (except the cancel button). 2. Door Lock READING ERROR CODES 1. Wake the washer up by turning the selector knob). • Turn the program knob counter clockwise 9 turns (...and press and hold the "Cancel" and "Start" buttons simultaneously for the 1¼"x4¾" display models. 1 137022700A (0805) a) Unplug the power cord, wait 5-8 seconds, then reconnect the power cord ... the display simultaneously for Qualified Technicians Only. Main Board (Board located inside the front control panel) DL - User interface board (board located inside machine on the MB...
Wiring Diagram (All Languages)
Page 2
.... Latest software version will test for 5 seconds. If applicable, turn on. 8. This is opened . This is turned. 1¼"x4¾" Display Models 1. Wake the washer up the unit to normal operation the next time the knob is no error. 11. Press the "Start/Pause" button, then the "Cancel" button... then scroll through the PREF menu in high spin. 9. Rotate the cycle knob to the reset selection and push the select key. Washer will deactivate and the loading door can also get to the "Hand Wash" cycle. 3. The machine will operate in the option window. Press the select key...
.... Latest software version will test for 5 seconds. If applicable, turn on. 8. This is opened . This is turned. 1¼"x4¾" Display Models 1. Wake the washer up the unit to normal operation the next time the knob is no error. 11. Press the "Start/Pause" button, then the "Cancel" button... then scroll through the PREF menu in high spin. 9. Rotate the cycle knob to the reset selection and push the select key. Washer will deactivate and the loading door can also get to the "Hand Wash" cycle. 3. The machine will operate in the option window. Press the select key...


