Installation Instructions (All Languages)
Page 2
... carton and plastic bags after the dryer is unpacked. Place all of contents Important Safety Instructions 2 Installation Requirements 3-5 Installed Dimensions 6 Installation Instructions 7-11 Reversing Door 12-17 Options 18 ©2010 Electrolux Major Appliances All rights reserved. Do not stack washer on top of life. WHAT TO DO IF YOU SMELL GAS...
... carton and plastic bags after the dryer is unpacked. Place all of contents Important Safety Instructions 2 Installation Requirements 3-5 Installed Dimensions 6 Installation Instructions 7-11 Reversing Door 12-17 Options 18 ©2010 Electrolux Major Appliances All rights reserved. Do not stack washer on top of life. WHAT TO DO IF YOU SMELL GAS...
Installation Instructions (All Languages)
Page 6
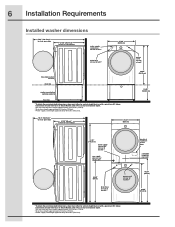
...178; Drain hose length approximately 59 inches (150cm). ³ Power supply cord length approximately 60 inches (152.5cm). 6 Installation Requirements Installed washer dimensions 50.6" (128.53cm)* to clear open door 31.50" (80cm)* to front of closed door water supply connection on rear of unit ¹... on rear of unit ³ freestand washer on floor floor line washer mounted on optional pedestal floor line * To obtain these minimal depth dimensions, dryer must either be vented straight back or with a quick-turn 90° elbow. Connection of water inlet hose on Steam Models adds...
...178; Drain hose length approximately 59 inches (150cm). ³ Power supply cord length approximately 60 inches (152.5cm). 6 Installation Requirements Installed washer dimensions 50.6" (128.53cm)* to clear open door 31.50" (80cm)* to front of closed door water supply connection on rear of unit ¹... on rear of unit ³ freestand washer on floor floor line washer mounted on optional pedestal floor line * To obtain these minimal depth dimensions, dryer must either be vented straight back or with a quick-turn 90° elbow. Connection of water inlet hose on Steam Models adds...