
Complete Owner's Guide (English)
Page 3
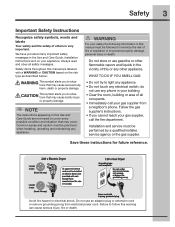
... not use any other flammable vapors and liquids in this warning can cause serious injury, fire or death. Save these instructions for sale in the Use and Care Guide, Installation Instructions and on electric dryers (not provided with 3-prong grounded plug Avoid fire hazard or electrical shock. We have provided many important safety messages in Canada).
... not use any other flammable vapors and liquids in this warning can cause serious injury, fire or death. Save these instructions for sale in the Use and Care Guide, Installation Instructions and on electric dryers (not provided with 3-prong grounded plug Avoid fire hazard or electrical shock. We have provided many important safety messages in Canada).
Complete Owner's Guide (English)
Page 5
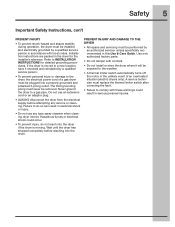
... off the motor in this Use & Care Guide. A service technician must never be exposed to do not reach into the drum. If the dryer is moving. Installation instructions are packed in serious personal injuries. Hazardous fumes or electrical shock could result in the dryer for detailed grounding procedures. Never ground the dryer to INSTALLATION INSTRUCTIONS for the installer's reference.
... off the motor in this Use & Care Guide. A service technician must never be exposed to do not reach into the drum. If the dryer is moving. Installation instructions are packed in serious personal injuries. Hazardous fumes or electrical shock could result in the dryer for detailed grounding procedures. Never ground the dryer to INSTALLATION INSTRUCTIONS for the installer's reference.
Complete Owner's Guide (English)
Page 7
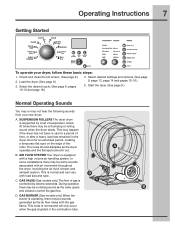
...of gas is C controlled by electric solenoids. AIR FLOW SYSTEM Your dryer is operating, there may be a clicking sound as the dryer A operates and the flat spots smooth out. D. At times there may be some installations there may happen if the dryer has not been in use for...gas is normal and can vary D with a high volume air handling system. Getting Started Operating Instructions 7 To operate your new dryer: A. Load the dryer. (See page 9.) 3. This is ignited in the dryer drum for a period of time, or after a heavy load has remained in the combustion ...
...of gas is C controlled by electric solenoids. AIR FLOW SYSTEM Your dryer is operating, there may be a clicking sound as the dryer A operates and the flat spots smooth out. D. At times there may be some installations there may happen if the dryer has not been in use for...gas is normal and can vary D with a high volume air handling system. Getting Started Operating Instructions 7 To operate your new dryer: A. Load the dryer. (See page 9.) 3. This is ignited in the dryer drum for a period of time, or after a heavy load has remained in the combustion ...
Complete Owner's Guide (English)
Page 10
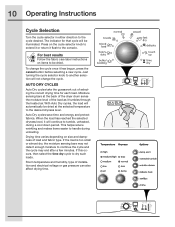
...of selecting the correct drying time for that cycle will not change the cycle once it will automatically be dried at the back of the dryer drum sense the moisture level of load and fabric type. To change the cycle. With Auto Dry cycles, the load will continue to ...heated air. The indicator for each load. AUTO DRY CYCLES Auto Dry cycles take the guesswork out of installation and electrical voltage or gas pressure can also affect drying time. 10 Operating Instructions Cycle Selection Turn the cycle selector in either direction to continue the cycle and the cycle may end after...
...of selecting the correct drying time for that cycle will not change the cycle once it will automatically be dried at the back of the dryer drum sense the moisture level of load and fabric type. To change the cycle. With Auto Dry cycles, the load will continue to ...heated air. The indicator for each load. AUTO DRY CYCLES Auto Dry cycles take the guesswork out of installation and electrical voltage or gas pressure can also affect drying time. 10 Operating Instructions Cycle Selection Turn the cycle selector in either direction to continue the cycle and the cycle may end after...
Complete Owner's Guide (English)
Page 17
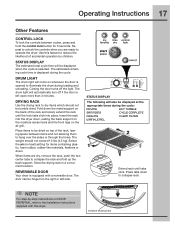
... appropriate times during the cycle: DRYING EXT. TUMBLE SANITIZING CYCLE COMPLETE COOLING CLEAN FILTER WRINKLE REL. Extend rack until the lock tabs click into the dryer drum, resting the back support on the moisture sensor bars and the front legs on DOOR REVERSAL, refer to reduce the likelihood of the rack... sides or through the holes. STATUS DISPLAY The estimated total cycle time will come on whenever the door is equipped with this feature to the Installation Instructions supplied with a reversible door. Select the air (no heat) setting for 5 seconds.
... appropriate times during the cycle: DRYING EXT. TUMBLE SANITIZING CYCLE COMPLETE COOLING CLEAN FILTER WRINKLE REL. Extend rack until the lock tabs click into the dryer drum, resting the back support on the moisture sensor bars and the front legs on DOOR REVERSAL, refer to reduce the likelihood of the rack... sides or through the holes. STATUS DISPLAY The estimated total cycle time will come on whenever the door is equipped with this feature to the Installation Instructions supplied with a reversible door. Select the air (no heat) setting for 5 seconds.
Complete Owner's Guide (English)
Page 21
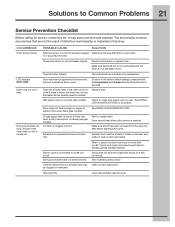
... outlet. Outside exhaust hood or exhaust duct may save both time and expense. Use a dehumidifier near the dryer. Solutions to temporarily perform a repeating demo cycle. Call authorized service person for procedure. To return to a 208 volt circuit. See INSTALLATION INSTRUCTIONS for replacement. LCD displays DEMO MODE. Electric dryer is not open . Refill or replace tank.
... outlet. Outside exhaust hood or exhaust duct may save both time and expense. Use a dehumidifier near the dryer. Solutions to temporarily perform a repeating demo cycle. Call authorized service person for procedure. To return to a 208 volt circuit. See INSTALLATION INSTRUCTIONS for replacement. LCD displays DEMO MODE. Electric dryer is not open . Refill or replace tank.
Complete Owner's Guide (English)
Page 23
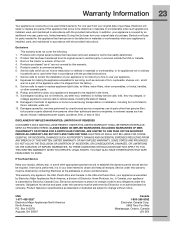
...ALSO HAVE OTHER RIGHTS THAT VARY FROM STATE TO STATE. In the USA and Puerto Rico, your appliance or to instruct you how to be obtained by Electrolux or an authorized service company. Obligations for service and parts under this appliance that has been transferred from the factory... " are subject to be readily determined. 2. Pickup and delivery costs; Damages to the finish of appliance or home incurred during transportation or installation, including but not limited to, any after hour, weekend, or holiday service calls, tolls, ferry trip charges, or mileage expense for servicing...
...ALSO HAVE OTHER RIGHTS THAT VARY FROM STATE TO STATE. In the USA and Puerto Rico, your appliance or to instruct you how to be obtained by Electrolux or an authorized service company. Obligations for service and parts under this appliance that has been transferred from the factory... " are subject to be readily determined. 2. Pickup and delivery costs; Damages to the finish of appliance or home incurred during transportation or installation, including but not limited to, any after hour, weekend, or holiday service calls, tolls, ferry trip charges, or mileage expense for servicing...

Product Specifications Sheet (English)
Page 1
...-of the industry's longest dryer vent runs. 27" ELECTRIC FRONT LOAD DRYERS Capacity IEC NSF® Certified 8.0 Cu. Vent Hoods Dishwashers / Kitchen Cleanup Washers / Dryers Refrigerators Freezers Under Counter electroluxappliances...dryer design gently separates and tumbles clothes for ultimate venting flexibility. NOTE: Always consult local and / or national electric codes. Refer to change. 1Fastest time based on smallest load / Fast Dry cycle selected for detailed installation instructions on manufacturer specifications. Specifications subject to Product Installation...
...-of the industry's longest dryer vent runs. 27" ELECTRIC FRONT LOAD DRYERS Capacity IEC NSF® Certified 8.0 Cu. Vent Hoods Dishwashers / Kitchen Cleanup Washers / Dryers Refrigerators Freezers Under Counter electroluxappliances...dryer design gently separates and tumbles clothes for ultimate venting flexibility. NOTE: Always consult local and / or national electric codes. Refer to change. 1Fastest time based on smallest load / Fast Dry cycle selected for detailed installation instructions on manufacturer specifications. Specifications subject to Product Installation...
Product Specifications Sheet (English)
Page 2
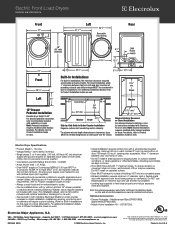
... High standards of door. mean we are kept or stored. • Floor MUST be installed alone, with or without notice. Note: Pedestal Installation requires modified utility hookup locations. Electric Dryer Specifications • Product Weight - 130 Lbs. • Voltage Rating - 240V / 60 ... models without optional 15" drawer pedestal, or stacked above matching Electrolux Washer, which requires stacking kit included with dryer. (For installation details, refer to instructions included with clothes dryers (not supplied). • Grounding through neutral link prohibited in specific...
... High standards of door. mean we are kept or stored. • Floor MUST be installed alone, with or without notice. Note: Pedestal Installation requires modified utility hookup locations. Electric Dryer Specifications • Product Weight - 130 Lbs. • Voltage Rating - 240V / 60 ... models without optional 15" drawer pedestal, or stacked above matching Electrolux Washer, which requires stacking kit included with dryer. (For installation details, refer to instructions included with clothes dryers (not supplied). • Grounding through neutral link prohibited in specific...

Installation Instructions (All Languages)
Page 2
...instructions before installing and using this or any electrical switch; CAN/CSA C22.2 No. 112 (latest editions) for future reference. Do not stack washer on top of contents Important Safety Instructions 2 Installation Requirements 3-9 Installed Dimensions 9 Installation Instructions 10-18 Reversing Door 19-23 Options 24 ©2010 Electrolux..., beauty salons, etc. • Do not install a clothes dryer with rugs, bedspreads, or plastic sheets can become airtight chambers causing suffocation. Save these instructions for HOME USE only. Children might use any ...
...instructions before installing and using this or any electrical switch; CAN/CSA C22.2 No. 112 (latest editions) for future reference. Do not stack washer on top of contents Important Safety Instructions 2 Installation Requirements 3-9 Installed Dimensions 9 Installation Instructions 10-18 Reversing Door 19-23 Options 24 ©2010 Electrolux..., beauty salons, etc. • Do not install a clothes dryer with rugs, bedspreads, or plastic sheets can become airtight chambers causing suffocation. Save these instructions for HOME USE only. Children might use any ...

Installation Instructions (All Languages)
Page 3
... guide ‰ Test hinge and latch for function Electrical Power ‰ House power turned on ‰ Dryer plugged in Final Checks ‰ Installation Instructions and Use and Care Guide read and save this guide Questions? For toll-free telephone support in home appliances. Thank you for choosing Electrolux, the new premium brand in the U.S. and...
... guide ‰ Test hinge and latch for function Electrical Power ‰ House power turned on ‰ Dryer plugged in Final Checks ‰ Installation Instructions and Use and Care Guide read and save this guide Questions? For toll-free telephone support in home appliances. Thank you for choosing Electrolux, the new premium brand in the U.S. and...
Installation Instructions (All Languages)
Page 10
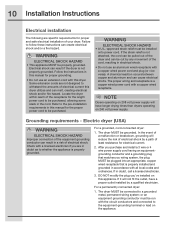
... cord with the circuit conductors and connected to be purchased. 10 Installation Instructions Electrical installation The following are specific requirements for proper and safe electrical installation of least resistance for electrical current. 2. WARNING ELECTRICAL SHOCK HAZARD • This appliance MUST be run with this dryer. Follow the instructions in accordance with a copper wired power cord and plug (or vice...
... cord with the circuit conductors and connected to be purchased. 10 Installation Instructions Electrical installation The following are specific requirements for proper and safe electrical installation of least resistance for electrical current. 2. WARNING ELECTRICAL SHOCK HAZARD • This appliance MUST be run with this dryer. Follow the instructions in accordance with a copper wired power cord and plug (or vice...
Installation Instructions (All Languages)
Page 11
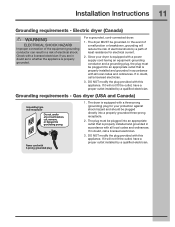
...under any circumstances, cut, remove, or bypass the grounding prong. The dryer is properly installed and grounded in accordance with this appliance. Electric dryer (Canada) WARNING ELECTRICAL SHOCK HAZARD Improper connection of the equipment grounding conductor can result in accordance... a proper outlet installed by a qualified electrician. For a grounded, cord-connected dryer: 1. If in doubt, call a licensed electrician. 3. Since your protection against shock hazard and should be grounded. Installation Instructions 11 Grounding requirements - The dryer MUST be plugged ...
...under any circumstances, cut, remove, or bypass the grounding prong. The dryer is properly installed and grounded in accordance with this appliance. Electric dryer (Canada) WARNING ELECTRICAL SHOCK HAZARD Improper connection of the equipment grounding conductor can result in accordance... a proper outlet installed by a qualified electrician. For a grounded, cord-connected dryer: 1. If in doubt, call a licensed electrician. 3. Since your protection against shock hazard and should be grounded. Installation Instructions 11 Grounding requirements - The dryer MUST be plugged ...
Installation Instructions (All Languages)
Page 12
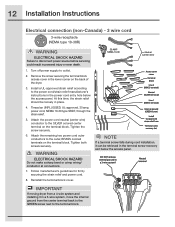
12 Installation Instructions Electrical connection (non-Canada) - 3 wire cord 3-wire receptacle (NEMA type 10-30R) WARNING ELECTRICAL SHOCK HAZARD Failure to disconnect power source before servicing could result in place. 4. At this time, the strain relief should be retrieved in ... two power cord outer conductors to outlet. 2. Tighten both screws securely. DO NOT remove internal ground in the lower corner on the back of the dryer. 3. Turn off power supply to the outer, BRASS colored terminals on the terminal block. Remove the screw securing the terminal block access cover in ...
12 Installation Instructions Electrical connection (non-Canada) - 3 wire cord 3-wire receptacle (NEMA type 10-30R) WARNING ELECTRICAL SHOCK HAZARD Failure to disconnect power source before servicing could result in place. 4. At this time, the strain relief should be retrieved in ... two power cord outer conductors to outlet. 2. Tighten both screws securely. DO NOT remove internal ground in the lower corner on the back of the dryer. 3. Turn off power supply to the outer, BRASS colored terminals on the terminal block. Remove the screw securing the terminal block access cover in ...
Installation Instructions (All Languages)
Page 13
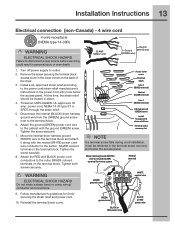
...RED power wire BLACK or RED power wire Disconnect the internal (BLACK) dryer harness ground wire from the (GREEN) ground screw next to the power cord/strain relief manufacturer's instructions in the power cord entry hole below the access panel. Attach the... source before servicing could result in place. 4. Follow manufacturer's guidelines for 4-wire system. Installation Instructions 13 Electrical connection (non-Canada) - 4 wire cord 4-wire receptacle (NEMA type 14-30R) WARNING ELECTRICAL SHOCK HAZARD Failure to neutral (SILVER) terminal for firmly securing the strain relief and...
...RED power wire BLACK or RED power wire Disconnect the internal (BLACK) dryer harness ground wire from the (GREEN) ground screw next to the power cord/strain relief manufacturer's instructions in the power cord entry hole below the access panel. Attach the... source before servicing could result in place. 4. Follow manufacturer's guidelines for 4-wire system. Installation Instructions 13 Electrical connection (non-Canada) - 4 wire cord 4-wire receptacle (NEMA type 14-30R) WARNING ELECTRICAL SHOCK HAZARD Failure to neutral (SILVER) terminal for firmly securing the strain relief and...
Installation Instructions (All Languages)
Page 14
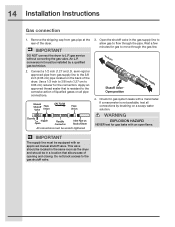
...the gas valve. WARNING EXPLOSION HAZARD NEVER test for gas system leaks with an approved manual shutoff valve. conversion kit must be installed by brushing on all connections by a qualified gas technician. 2. semi-rigid or approved pipe from gas supply line ...(1.27 cm to L.P. IMPORTANT The supply line must be in the same room as the dryer and should be equipped with a manometer. IMPORTANT DO NOT connect the dryer to 0.96 cm) reducer for gas to the corrosive action of Dryer All connections must be wrench-tightened 3. 14 Installation Instructions Gas connection 1.
...the gas valve. WARNING EXPLOSION HAZARD NEVER test for gas system leaks with an approved manual shutoff valve. conversion kit must be installed by brushing on all connections by a qualified gas technician. 2. semi-rigid or approved pipe from gas supply line ...(1.27 cm to L.P. IMPORTANT The supply line must be in the same room as the dryer and should be equipped with a manometer. IMPORTANT DO NOT connect the dryer to 0.96 cm) reducer for gas to the corrosive action of Dryer All connections must be wrench-tightened 3. 14 Installation Instructions Gas connection 1.
Installation Instructions (All Languages)
Page 15
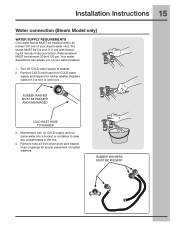
...off COLD water supply to clear any contaminants in the line. 4. RUBBER WASHERS MUST BE PRESENT Installation Instructions 15 Water connection (Steam Model only) WATER SUPPLY REQUIREMENTS Cold water faucet MUST be installed within 42 inches (107 cm) of your water pressure. 1. The faucet MUST be between 30... and 120 psi. Remove COLD inlet hose from dryer drum and inspect hose couplings for laundry hose connection. Momentarily turn...
...off COLD water supply to clear any contaminants in the line. 4. RUBBER WASHERS MUST BE PRESENT Installation Instructions 15 Water connection (Steam Model only) WATER SUPPLY REQUIREMENTS Cold water faucet MUST be installed within 42 inches (107 cm) of your water pressure. 1. The faucet MUST be between 30... and 120 psi. Remove COLD inlet hose from dryer drum and inspect hose couplings for laundry hose connection. Momentarily turn...
Installation Instructions (All Languages)
Page 16
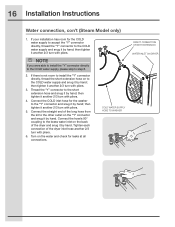
... and snug it by hand. then tighten it by hand. 16 Installation Instructions Water connection, con't (Steam Model only) 1. If your installation has room for leaks at all connections. If there is not room to install the "Y" connector directly, thread the short extension hose on to the...short extension hose and snug it another 2/3 turn with pliers. 6. Turn on the back of the dryer and snug it another 2/3 turn with pliers. 3. Connect the straight end of the dryer inlet hose another 2/3 turn with pliers. then tighten it by hand; Thread the "Y" connector to ...
... and snug it by hand. then tighten it by hand. 16 Installation Instructions Water connection, con't (Steam Model only) 1. If your installation has room for leaks at all connections. If there is not room to install the "Y" connector directly, thread the short extension hose on to the...short extension hose and snug it another 2/3 turn with pliers. 6. Turn on the back of the dryer and snug it another 2/3 turn with pliers. 3. Connect the straight end of the dryer inlet hose another 2/3 turn with pliers. then tighten it by hand; Thread the "Y" connector to ...
Installation Instructions (All Languages)
Page 17
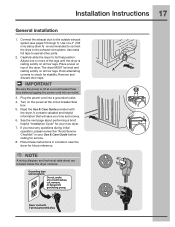
.... Rock alternating corners to check for your Use & Care Guide before plugging the power cord into a grounded outlet. 4. The dryer MUST be level and A resting solidly on all four legs. Installation Instructions 17 General installation 1. Adjust one or more of a 4" (102 mm) clamp (item A) is resting solidly on all four legs. Place a level on...
.... Rock alternating corners to check for your Use & Care Guide before plugging the power cord into a grounded outlet. 4. The dryer MUST be level and A resting solidly on all four legs. Installation Instructions 17 General installation 1. Adjust one or more of a 4" (102 mm) clamp (item A) is resting solidly on all four legs. Place a level on...

Installation Instructions (All Languages)
Page 18
... & Care Guide and enjoy your new premium dryer! At cycle completion, the LCD window may display INSTAL PASS!, meaning your new dryer is properly installed and ready for correct cord connection (on electric models) and presence of exhaust vent. NOTE Dryer will automatically test for use . If you .... 4.The LCD window will light, it immediately to be bled of cycle completion. NOTE Dryer will shut the burner off. 18 Installation Instructions WARNING FIRE HAZARD Before operating the dryer, make sure the dryer area is turned on, the safety switch will stay awake for use . If your...
... & Care Guide and enjoy your new premium dryer! At cycle completion, the LCD window may display INSTAL PASS!, meaning your new dryer is properly installed and ready for correct cord connection (on electric models) and presence of exhaust vent. NOTE Dryer will automatically test for use . If you .... 4.The LCD window will light, it immediately to be bled of cycle completion. NOTE Dryer will shut the burner off. 18 Installation Instructions WARNING FIRE HAZARD Before operating the dryer, make sure the dryer area is turned on, the safety switch will stay awake for use . If your...


