Installation Instructions (English)
Page 1
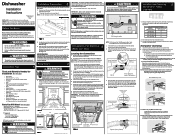
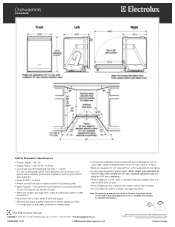
... sides and back must be flat and free of 1/4" may be fully enclosed. Stand dishwasher back upright for operating this warning could result in death or serious injury. 1. Leveling and Securing 5 Dishwasher within Cabinets 1. Failure to follow this warning could result in death ... 4. Determine where you will connect to 341/8" screw To install using a #5 drill bit regardless of unit.See Figure 4. Move dishwasher to locate dishwasher's drain, water, and electrical connections. 2. Install the Cabinet Seal Kit (Instructions included in Figure 2 to front of unit, cabinet...
... sides and back must be flat and free of 1/4" may be fully enclosed. Stand dishwasher back upright for operating this warning could result in death or serious injury. 1. Leveling and Securing 5 Dishwasher within Cabinets 1. Failure to follow this warning could result in death ... 4. Determine where you will connect to 341/8" screw To install using a #5 drill bit regardless of unit.See Figure 4. Move dishwasher to locate dishwasher's drain, water, and electrical connections. 2. Install the Cabinet Seal Kit (Instructions included in Figure 2 to front of unit, cabinet...
Installation Instructions (English)
Page 2
... the cycle is level and securely fastened. Wire nuts must be handled with wire nuts. (See Grounding Instruction Warning). Carefully place dishwasher inside cabinet area such that best suits your need to be at box to cabinet using screws provided in opening. Adjust accordingly until... supply store. (If the drain hose is available from side to the power supply until door opens and closes freely. Do not connect the dishwasher to side by UL and local codes. Finishing the Drain 8 Connection 1. q At first fill, approximately 2 minutes make sure it may rupture...
... the cycle is level and securely fastened. Wire nuts must be handled with wire nuts. (See Grounding Instruction Warning). Carefully place dishwasher inside cabinet area such that best suits your need to be at box to cabinet using screws provided in opening. Adjust accordingly until... supply store. (If the drain hose is available from side to the power supply until door opens and closes freely. Do not connect the dishwasher to side by UL and local codes. Finishing the Drain 8 Connection 1. q At first fill, approximately 2 minutes make sure it may rupture...
Product Specifications Sheet (English)
Page 1
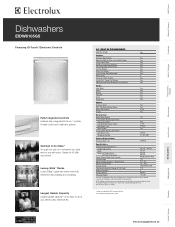
Wall Ovens Warmer Drawers Cooktops Built-In Ranges Freestanding Ranges Microwaves Dishwashers EIDW6105GS Featuring IQ-Touch™ Electronic Controls Fully Integrated Controls Features fully integrated IQ-Touch™ controls, 6 wash cycles and 4 dishcare options. Tested to change. * Based on the web ...party dishware fits. 24" BUILT-IN DISHWASHERS ENERGY STAR® Yes Features Stainless Steel Interior Yes Signature Soft-Arc Door and Handle Design Yes Luxury-Hold™ Door Yes IQ-Touch™ Electronic Controls Yes Fully Integrated Control Panel Yes Tall Tub Design ...
Wall Ovens Warmer Drawers Cooktops Built-In Ranges Freestanding Ranges Microwaves Dishwashers EIDW6105GS Featuring IQ-Touch™ Electronic Controls Fully Integrated Controls Features fully integrated IQ-Touch™ controls, 6 wash cycles and 4 dishcare options. Tested to change. * Based on the web ...party dishware fits. 24" BUILT-IN DISHWASHERS ENERGY STAR® Yes Features Stainless Steel Interior Yes Signature Soft-Arc Door and Handle Design Yes Luxury-Hold™ Door Yes IQ-Touch™ Electronic Controls Yes Fully Integrated Control Panel Yes Tall Tub Design ...
Product Specifications Sheet (English)
Page 2
... Mississauga, ON L5V 3E4 • 1-800-265-8352 • electroluxappliances.ca EIDW6105GS 12/10 © 2008 Electrolux Major Appliances, NA High standards of quality at end of drain, water & ... sides must be fully enclosed. • Do not install unit under a cooktop, damage may occur. We reserve the right to underside of dishwasher. when installed in ... • Leveling legs supplied to adjust height. (Note: Height only adjustable to improve our products. Dishwashers EIDW6105GS Built-In Dishwasher Specifications • Product Weight - 98 Lbs. • Voltage Rating - 120V / 60 Hz /...
... Mississauga, ON L5V 3E4 • 1-800-265-8352 • electroluxappliances.ca EIDW6105GS 12/10 © 2008 Electrolux Major Appliances, NA High standards of quality at end of drain, water & ... sides must be fully enclosed. • Do not install unit under a cooktop, damage may occur. We reserve the right to underside of dishwasher. when installed in ... • Leveling legs supplied to adjust height. (Note: Height only adjustable to improve our products. Dishwashers EIDW6105GS Built-In Dishwasher Specifications • Product Weight - 98 Lbs. • Voltage Rating - 120V / 60 Hz /...
Complete Owner's Guide (English)
Page 2
...com All rights reserved. We view your purchase as the beginning of Tub 20 Dishwasher Won't Run 20 Dishwasher Does Not Drain Properly 20 Cycle Takes a Long Time 21 ©2007 Electrolux Home Products, Inc. You can register online at www.electroluxappliances.com or by ...Basket 11 Adding a dish 11 Dishwasher Dispenser & Detergents 12 Filling the Detergent Dispenser 12 How much Detergent to use this guide Thank you for quick reference Purchase date Electrolux model number Electrolux serial number NOTE Registering your product with Electrolux enhances our ability to record important ...
...com All rights reserved. We view your purchase as the beginning of Tub 20 Dishwasher Won't Run 20 Dishwasher Does Not Drain Properly 20 Cycle Takes a Long Time 21 ©2007 Electrolux Home Products, Inc. You can register online at www.electroluxappliances.com or by ...Basket 11 Adding a dish 11 Dishwasher Dispenser & Detergents 12 Filling the Detergent Dispenser 12 How much Detergent to use this guide Thank you for quick reference Purchase date Electrolux model number Electrolux serial number NOTE Registering your product with Electrolux enhances our ability to record important ...
Complete Owner's Guide (English)
Page 3
... Items that may be done by a qualified Electrolux professional. • Do not tamper with manufacturer for recommendations, if not marked. If hot water system has not been used for such a period, before using your dishwasher. • Use your dishwasher only as instructed in this Use and Care ... Safety Instructions This symbol will release any accumulated hydrogen gas. Please read all safety instructions before using your new Electrolux dishwasher. • Read all enclosure panels are not intended for use combustible materials, gasoline or other flammable vapors and liquids in...
... Items that may be done by a qualified Electrolux professional. • Do not tamper with manufacturer for recommendations, if not marked. If hot water system has not been used for such a period, before using your dishwasher. • Use your dishwasher only as instructed in this Use and Care ... Safety Instructions This symbol will release any accumulated hydrogen gas. Please read all safety instructions before using your new Electrolux dishwasher. • Read all enclosure panels are not intended for use combustible materials, gasoline or other flammable vapors and liquids in...
Complete Owner's Guide (English)
Page 4
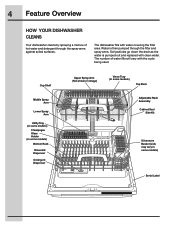
Water is then pumped through the spray arms against soiled surfaces. The dishwasher fills with the cycle being used. Cup Shelf Middle Spray Arm Lower Spray Arm Utility Tray (in some models) Champagne Glass Holder (in some models) ... filter and spray arms. Soil particles go down the drain as the water is pumped out and replaced with clean water. 4 Feature Overview HOW YOUR DISHWASHER CLEANS Your dishwasher cleans by spraying a mixture of water fills will vary with water covering the filter area.
Water is then pumped through the spray arms against soiled surfaces. The dishwasher fills with the cycle being used. Cup Shelf Middle Spray Arm Lower Spray Arm Utility Tray (in some models) Champagne Glass Holder (in some models) ... filter and spray arms. Soil particles go down the drain as the water is pumped out and replaced with clean water. 4 Feature Overview HOW YOUR DISHWASHER CLEANS Your dishwasher cleans by spraying a mixture of water fills will vary with water covering the filter area.
Complete Owner's Guide (English)
Page 5
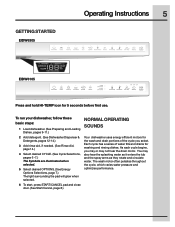
... Operating Instructions 5 EIDW6105 Press and hold HI-TEMP icon for washing and rinsing dishes. To run your dishwasher, follow these basic steps: 1 Load dishwasher. (See Preparing and Loading Dishes, pages 9-11.) 2 Add detergent. (See Dishwasher Dispenser & Detergents, pages 12-14.) 3 Add rinse aid, if needed. (See Rinse Aid, page... when selected. 6 To start, press START/CANCEL pad and close door. (See Start/Cancel, page 8.) NORMAL OPERATING SOUNDS Your dishwasher uses energy efficient motors for the wash and drain portions of water fills and drains for 5 seconds before first use.
... Operating Instructions 5 EIDW6105 Press and hold HI-TEMP icon for washing and rinsing dishes. To run your dishwasher, follow these basic steps: 1 Load dishwasher. (See Preparing and Loading Dishes, pages 9-11.) 2 Add detergent. (See Dishwasher Dispenser & Detergents, pages 12-14.) 3 Add rinse aid, if needed. (See Rinse Aid, page... when selected. 6 To start, press START/CANCEL pad and close door. (See Start/Cancel, page 8.) NORMAL OPERATING SOUNDS Your dishwasher uses energy efficient motors for the wash and drain portions of water fills and drains for 5 seconds before first use.
Complete Owner's Guide (English)
Page 6
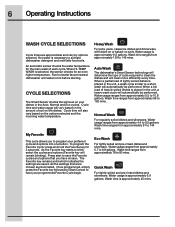
...remains solid which indicates the settings are saved. Once programmed, simply press the Favorite key followed by options selected. Auto Wash The dishwasher's Smart Sensor technology will determine the type of cycle required to clean the dishes and will remain blinking). Water usage ranges from... approximately 99 to 162 mins. Run hot water faucet nearest dishwasher until water is necessary to activate dishwasher detergent and melt fatty food soils. CYCLE SELECTIONS The Smart Sensor checks the soil level on the options selected...
...remains solid which indicates the settings are saved. Once programmed, simply press the Favorite key followed by options selected. Auto Wash The dishwasher's Smart Sensor technology will determine the type of cycle required to clean the dishes and will remain blinking). Water usage ranges from... approximately 99 to 162 mins. Run hot water faucet nearest dishwasher until water is necessary to activate dishwasher detergent and melt fatty food soils. CYCLE SELECTIONS The Smart Sensor checks the soil level on the options selected...
Complete Owner's Guide (English)
Page 7
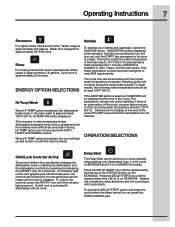
...TEMP ON will be at the end of the cycle if the NSF requirements for 3 seconds. Sanitize To sanitize your dishwasher from accidently changing the dishwasher cycle or starting your dishes and glassware, select the SANITIZE option. Only these sanitization cycles have been designed to 24... approximately 6.8 gallons. Sanitize will be displayed. Delay Start The Delay Start option allows you to automatically delay starting the dishwasher, lock the dishwasher controls by pressing and releasing the AIR DRY icon for sanitization are locked and no new selections can only be satisfied ...
...TEMP ON will be at the end of the cycle if the NSF requirements for 3 seconds. Sanitize To sanitize your dishwasher from accidently changing the dishwasher cycle or starting your dishes and glassware, select the SANITIZE option. Only these sanitization cycles have been designed to 24... approximately 6.8 gallons. Sanitize will be displayed. Delay Start The Delay Start option allows you to automatically delay starting the dishwasher, lock the dishwasher controls by pressing and releasing the AIR DRY icon for sanitization are locked and no new selections can only be satisfied ...
Complete Owner's Guide (English)
Page 8
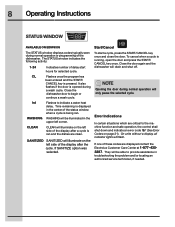
... are critical to begin or Opening the door during a wash cycle. Close the door again and the dishwasher will flash. It also NOTE flashes if the door is being ran. hd WASHING CLEAN Flashes to provide... operation will only pause the selected cycle. The STATUS window indicates the following activity: 1-24 Indicates number of the dishwasher. To start hours for selected cycle. continue a wash cycle. SANITIZED SANITIZED will be able to indicate a water .... Error Indications In certain situations which are displayed contact the Electrolux Customer Care Center at 1-877-4353287.
... are critical to begin or Opening the door during a wash cycle. Close the door again and the dishwasher will flash. It also NOTE flashes if the door is being ran. hd WASHING CLEAN Flashes to provide... operation will only pause the selected cycle. The STATUS window indicates the following activity: 1-24 Indicates number of the dishwasher. To start hours for selected cycle. continue a wash cycle. SANITIZED SANITIZED will be able to indicate a water .... Error Indications In certain situations which are displayed contact the Electrolux Customer Care Center at 1-877-4353287.
Complete Owner's Guide (English)
Page 9
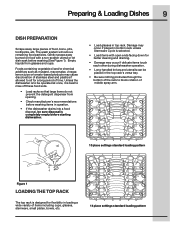
...pattern Figure 1 LOADING THE TOP RACK The top rack is selected. • Load items with a non-scratch utensil or let dish soak before starting dishwasher. • Load glasses in loading a wide variety of items including cups, glasses, stemware, small plates, bowls, etc. 14 place settings standard .../or chemical additives such as mustard, mayonnaise, vinegar, lemon juice or tomato-based products may occur if delicate items touch each other during dishwasher operation. • Long-handled knives and utensils can be sure disposal is best to rinse off these food soils. • Load racks...
...pattern Figure 1 LOADING THE TOP RACK The top rack is selected. • Load items with a non-scratch utensil or let dish soak before starting dishwasher. • Load glasses in loading a wide variety of items including cups, glasses, stemware, small plates, bowls, etc. 14 place settings standard .../or chemical additives such as mustard, mayonnaise, vinegar, lemon juice or tomato-based products may occur if delicate items touch each other during dishwasher operation. • Long-handled knives and utensils can be sure disposal is best to rinse off these food soils. • Load racks...
Complete Owner's Guide (English)
Page 10
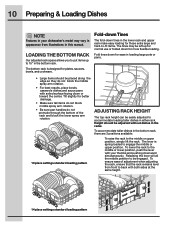
... at the same height. 14 place settings standard loading pattern To lower the rack to the middle or lower position, push the lever with your dishwasher's model may be left up to the middle or upper position, simply lift the rack. Releasing the lever will all the middle position to engage...
... at the same height. 14 place settings standard loading pattern To lower the rack to the middle or lower position, push the lever with your dishwasher's model may be left up to the middle or upper position, simply lift the rack. Releasing the lever will all the middle position to engage...
Complete Owner's Guide (English)
Page 11
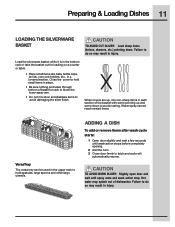
... not mix silver and stainless items to avoid nesting. Failure to do so may result in place. • Be sure nothing protrudes through bottom of dishwasher. ADDING A DISH To add or remove items after wash cycle starts: 1 Open door slightly and wait a few seconds until spray arms and wash action stop...
... not mix silver and stainless items to avoid nesting. Failure to do so may result in place. • Be sure nothing protrudes through bottom of dishwasher. ADDING A DISH To add or remove items after wash cycle starts: 1 Open door slightly and wait a few seconds until spray arms and wash action stop...
Complete Owner's Guide (English)
Page 12
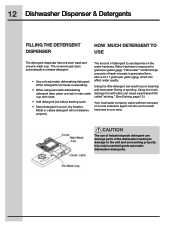
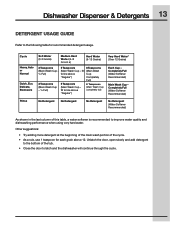
..., place one pre-wash cup. Water hardness is measured in granulated form, above 10-11 grains per gallon (gpg). 12 Dishwasher Dispenser & Detergents FILLING THE DETERGENT DISPENSER HOW MUCH DETERGENT TO USE The detergent dispenser has one main wash and one tab in...hard water filming or spotting. "Hard water" contains large amounts of industrial grade detergent can result in your area. Use only household grade automatic dishwasher detergents. The use depends on the water hardness. Using too much detergent in soft water can cause a permanent film called "etching." (See Etching...
..., place one pre-wash cup. Water hardness is measured in granulated form, above 10-11 grains per gallon (gpg). 12 Dishwasher Dispenser & Detergents FILLING THE DETERGENT DISPENSER HOW MUCH DETERGENT TO USE The detergent dispenser has one main wash and one tab in...hard water filming or spotting. "Hard water" contains large amounts of industrial grade detergent can result in your area. Use only household grade automatic dishwasher detergents. The use depends on the water hardness. Using too much detergent in soft water can cause a permanent film called "etching." (See Etching...
Complete Owner's Guide (English)
Page 13
...the door, open slowly and add detergent to the bottom of this table, a water softener is recommended to improve water quality and dishwashing performance when using very hard water. Completely Full (Water Softener Recommended) Main Wash Cup - Completely Full (Water Softener Recommended) Rinse No... (Main Wash Cup completely full) Very Hard Water* (Over 12 Grains) Each Cup - fill (Main Wash ¼ Full) to latch and the dishwasher will continue through the cycle. fill to the following table for each grain above Cup "Regular") Completely Full) 2 Teaspoons (Main Wash Cup - ¼...
...the door, open slowly and add detergent to the bottom of this table, a water softener is recommended to improve water quality and dishwashing performance when using very hard water. Completely Full (Water Softener Recommended) Main Wash Cup - Completely Full (Water Softener Recommended) Rinse No... (Main Wash Cup completely full) Very Hard Water* (Over 12 Grains) Each Cup - fill (Main Wash ¼ Full) to latch and the dishwasher will continue through the cycle. fill to the following table for each grain above Cup "Regular") Completely Full) 2 Teaspoons (Main Wash Cup - ¼...
Complete Owner's Guide (English)
Page 14
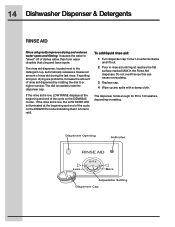
... LED is located under the dispenser cap. If spotting and poor drying are problems, increase the amount of rinse aid during the last rinse. 14 Dishwasher Dispenser & Detergents RINSE AID Rinse aid greatly improves drying and reduces water spots and filming. The rinse aid dispenser, located next to the detergent cup...
... LED is located under the dispenser cap. If spotting and poor drying are problems, increase the amount of rinse aid during the last rinse. 14 Dishwasher Dispenser & Detergents RINSE AID Rinse aid greatly improves drying and reduces water spots and filming. The rinse aid dispenser, located next to the detergent cup...
Complete Owner's Guide (English)
Page 15
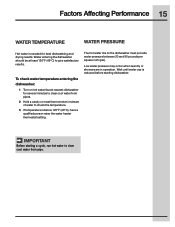
... be at least 120°F (49°C) to the dishwasher must provide water pressure between 20 and 90 pounds per square inch (psi). The hot water line to give satisfactory results. Wait until water use ... Performance 15 WATER TEMPERATURE WATER PRESSURE Hot water is needed for several minutes to clear cool water from pipe. To check water temperature entering the dishwasher: 1 Turn on hot water faucet nearest dishwasher for best dishwashing and drying results. IMPORTANT Before starting...
... be at least 120°F (49°C) to the dishwasher must provide water pressure between 20 and 90 pounds per square inch (psi). The hot water line to give satisfactory results. Wait until water use ... Performance 15 WATER TEMPERATURE WATER PRESSURE Hot water is needed for several minutes to clear cool water from pipe. To check water temperature entering the dishwasher: 1 Turn on hot water faucet nearest dishwasher for best dishwashing and drying results. IMPORTANT Before starting...

Complete Owner's Guide (English)
Page 16
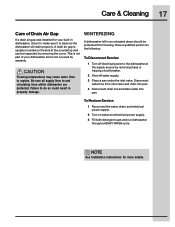
... nonabrasive detergent and water. Fine Filter Glass Trap Filter Large Food Particle Trap 16 Care & Cleaning OUTSIDE IMPORTANT Read before operating your dishwasher with a damp, nonabrasive cloth. Do not use harsh scrubbing cleaners. The Glass Trap Filter is designed to maximize wash performance. INSIDE... Care of Glass Trap Filter Your dishwasher is located in the Glass Trap Filter, grasp the handle, lift out, empty and replace. The Glass Trap Filter is equipped ...
... nonabrasive detergent and water. Fine Filter Glass Trap Filter Large Food Particle Trap 16 Care & Cleaning OUTSIDE IMPORTANT Read before operating your dishwasher with a damp, nonabrasive cloth. Do not use harsh scrubbing cleaners. The Glass Trap Filter is designed to maximize wash performance. INSIDE... Care of Glass Trap Filter Your dishwasher is located in the Glass Trap Filter, grasp the handle, lift out, empty and replace. The Glass Trap Filter is equipped ...
Complete Owner's Guide (English)
Page 17
...drain air gap is usually mounted on water and electrical power supply. 3 Fill both detergent cups and run dishwasher through a HEAVY WASH cycle. Freezing temperatures may cause water lines to the dishwasher at the countertop and can be protected from inlet valve and drain into pan. 4 Disconnect drain line and... drain water into pan. NOTE See Installation Instructions for your dishwasher and is not covered by removing the cover. Care & Cleaning 17 Care of your built-in dishwasher, check to make sure it is clean so the dishwasher will drain properly. This is not part of Drain Air ...
...drain air gap is usually mounted on water and electrical power supply. 3 Fill both detergent cups and run dishwasher through a HEAVY WASH cycle. Freezing temperatures may cause water lines to the dishwasher at the countertop and can be protected from inlet valve and drain into pan. 4 Disconnect drain line and... drain water into pan. NOTE See Installation Instructions for your dishwasher and is not covered by removing the cover. Care & Cleaning 17 Care of your built-in dishwasher, check to make sure it is clean so the dishwasher will drain properly. This is not part of Drain Air ...


