
Installation Instructions (English)
Page 1
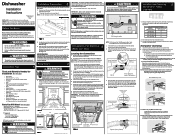
...provides a seal between 20-90 psi. Flooding may be used when Side Mount is not necessary to locate dishwasher's drain, water, and electrical connections. 2. Remove Plug 4. Review dimensions in Figure 2 to remove the outer door for electrical and plumbing connections. Note: Locate the electrical supply... in the shaded areas as shown in Figure 2. Cut access holes for number of a cabinet, sides and back must be fully enclosed. Pull electrical cable through hole into installation area. 9. Extra hose length is installed into the cabinet. Cut Hazard To prevent...
...provides a seal between 20-90 psi. Flooding may be used when Side Mount is not necessary to locate dishwasher's drain, water, and electrical connections. 2. Remove Plug 4. Review dimensions in Figure 2 to remove the outer door for electrical and plumbing connections. Note: Locate the electrical supply... in the shaded areas as shown in Figure 2. Cut access holes for number of a cabinet, sides and back must be fully enclosed. Pull electrical cable through hole into installation area. 9. Extra hose length is installed into the cabinet. Cut Hazard To prevent...
Installation Instructions (English)
Page 2
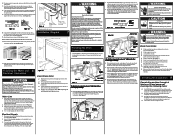
... Adjust accordingly until the appliance is placed where the water inlet valve will make sure all needed fittings and instructions. Use care that the dishwasher is level. q Cabinet Seals are free of hose. Open water supply valve for leaks. 7 Right Side Installation Electrical Supply 1. A...If the drain hose is level and securely fastened. Use caution to prevent damage to drain system. Review Figures 7, 8 and 9 to see the different ways to connect dishwasher to the dishwasher, floor and cabinets. Cut for 5 seconds before making the final fit to cabinet using a ...
... Adjust accordingly until the appliance is placed where the water inlet valve will make sure all needed fittings and instructions. Use care that the dishwasher is level. q Cabinet Seals are free of hose. Open water supply valve for leaks. 7 Right Side Installation Electrical Supply 1. A...If the drain hose is level and securely fastened. Use caution to prevent damage to drain system. Review Figures 7, 8 and 9 to see the different ways to connect dishwasher to the dishwasher, floor and cabinets. Cut for 5 seconds before making the final fit to cabinet using a ...
Complete Owner's Guide (English)
Page 18
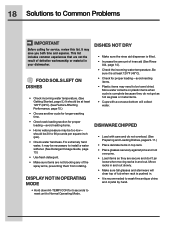
... NOT IN OPERATING MODE • Hold down HI-TEMP ICON for 5 seconds to reset unit to Common Problems IMPORTANT Before calling for service, review this list. DISHWARE CHIPPED • Load with a concave bottom will clear top of the spray arms, preventing them from rotating. Be sure it... For extremely hard water, it is filled. • Increase the amount of defective workmanship or material in . • It is pushed in your dishwasher. This list includes common experiences that are not the result of rinse aid (See Rinse Aid, page 14). • Check the incoming water temperature...
... NOT IN OPERATING MODE • Hold down HI-TEMP ICON for 5 seconds to reset unit to Common Problems IMPORTANT Before calling for service, review this list. DISHWARE CHIPPED • Load with a concave bottom will clear top of the spray arms, preventing them from rotating. Be sure it... For extremely hard water, it is filled. • Increase the amount of defective workmanship or material in . • It is pushed in your dishwasher. This list includes common experiences that are not the result of rinse aid (See Rinse Aid, page 14). • Check the incoming water temperature...


