
Wiring Diagram
Page 1
... initiate defrost, press and hold air filter and alarm reset key simultainiously for three seconds. All components of compressor run time. One full turn is completed. it will change the fill time. CONDENSER FAN MOTOR Watts RPM Amps 2.3 1100 CW Opposite Shaft 0.13 Running ICE MAKER SPECIFICATIONS Electrical 115 vac (127 vac max) 60 Hertz Thermostat Opens at 48° F ( 9° C), Closes at 15° F ( -9° C) Models with an Electronic Defrost Control. Use screwdriver...
... initiate defrost, press and hold air filter and alarm reset key simultainiously for three seconds. All components of compressor run time. One full turn is completed. it will change the fill time. CONDENSER FAN MOTOR Watts RPM Amps 2.3 1100 CW Opposite Shaft 0.13 Running ICE MAKER SPECIFICATIONS Electrical 115 vac (127 vac max) 60 Hertz Thermostat Opens at 48° F ( 9° C), Closes at 15° F ( -9° C) Models with an Electronic Defrost Control. Use screwdriver...
Complete Owner's Guide (English)
Page 2
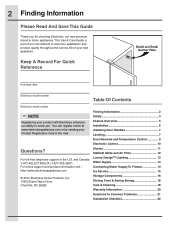
... Water Supply 13 Connecting Water Supply To Freezer 14 Ice Service 15 Storage Components 16 Storing Food & Saving Energy 18 Care & Cleaning 18 Warranty Information 20 Solutions To Common Problems 21 Installation Checklist 22 Alarms 11 Sabbath Mode and Air Filter 12 For toll-free telephone support in the mail. 2 Finding Information Please Read And Save This Guide Thank you . This Use & Care Guide is part of our commitment to serve you for choosing Electrolux, our new...
... Water Supply 13 Connecting Water Supply To Freezer 14 Ice Service 15 Storage Components 16 Storing Food & Saving Energy 18 Care & Cleaning 18 Warranty Information 20 Solutions To Common Problems 21 Installation Checklist 22 Alarms 11 Sabbath Mode and Air Filter 12 For toll-free telephone support in the mail. 2 Finding Information Please Read And Save This Guide Thank you . This Use & Care Guide is part of our commitment to serve you for choosing Electrolux, our new...
Complete Owner's Guide (English)
Page 3
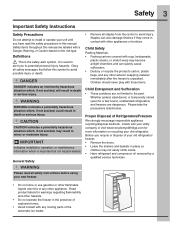
...-related. It is unpacked. Child Safety Packing Materials: • Packing cartons covered with any moving parts of your old refrigerator/ freezer: • Remove the doors. • Leave the shelves and baskets in place so children may not easily climb inside. • Have refrigerant and compressor oil removed by a qualified service technician. Whether junked, abandoned, or temporarily stored (even for a few...
...-related. It is unpacked. Child Safety Packing Materials: • Packing cartons covered with any moving parts of your old refrigerator/ freezer: • Remove the doors. • Leave the shelves and baskets in place so children may not easily climb inside. • Have refrigerant and compressor oil removed by a qualified service technician. Whether junked, abandoned, or temporarily stored (even for a few...
Complete Owner's Guide (English)
Page 6
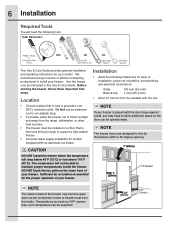
..., electrical outlet. Freezer 3/8" (10mm) If your freezer is level and strong enough to support a fully loaded freezer. • Consider water supply availability for models equipped with an automatic ice maker. Location • Choose a place that is placed with the door hinge against a wall, you may become quite warm as the compressor works to transfer heat from the range, dishwasher, or other heat sources. • The freezer must be installed...
..., electrical outlet. Freezer 3/8" (10mm) If your freezer is level and strong enough to support a fully loaded freezer. • Consider water supply availability for models equipped with an automatic ice maker. Location • Choose a place that is placed with the door hinge against a wall, you may become quite warm as the compressor works to transfer heat from the range, dishwasher, or other heat sources. • The freezer must be installed...
Complete Owner's Guide (English)
Page 7
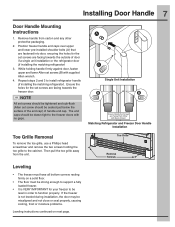
... and any other protective packaging. 2. Installing Door Handle 7 Door Handle Mounting Instructions 1. Matching Refrigerator and Freezer Door Handle Installation Toe Grille Removal To remove the toe grille, use a Phillips head screwdriver and remove the two screws holding handle firmly against door, fasten upper and lower Allen set screws are facing towards the outside of handle end cap. Toe Grille Remove Screws Leveling • The freezer must have all bottom corners resting...
... and any other protective packaging. 2. Installing Door Handle 7 Door Handle Mounting Instructions 1. Matching Refrigerator and Freezer Door Handle Installation Toe Grille Removal To remove the toe grille, use a Phillips head screwdriver and remove the two screws holding handle firmly against door, fasten upper and lower Allen set screws are facing towards the outside of handle end cap. Toe Grille Remove Screws Leveling • The freezer must have all bottom corners resting...
Complete Owner's Guide (English)
Page 9
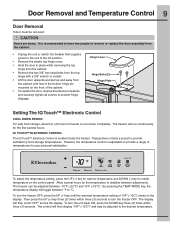
...;C. Door Removal and Temperature Control 9 Door Removal If door must be adjusted to the desired temperature. IQ TOUCH™ ELECTRONIC CONTROL The IQ Touch™ Electronic Control is adjustable to reset press & hold air temp filter mode replace air filter alarm off position. • Remove the plastic top hinge cover. • Hold the door in the display. The freezer can be adjusted between adjustments. It is factory preset to cool down completely. Hinge Cover Hinge Bolts (2) Hinge Plate Setting The IQ Touch™ Electronic Control COOL DOWN...
...;C. Door Removal and Temperature Control 9 Door Removal If door must be adjusted to the desired temperature. IQ TOUCH™ ELECTRONIC CONTROL The IQ Touch™ Electronic Control is adjustable to reset press & hold air temp filter mode replace air filter alarm off position. • Remove the plastic top hinge cover. • Hold the door in the display. The freezer can be adjusted between adjustments. It is factory preset to cool down completely. Hinge Cover Hinge Bolts (2) Hinge Plate Setting The IQ Touch™ Electronic Control COOL DOWN...
Complete Owner's Guide (English)
Page 10
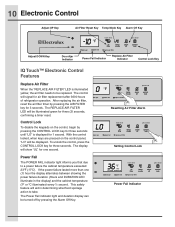
... for air filter replacement after 3600 hours of refrigerator operation. This safety feature will aid in the display) and the cabinet temperature (ºF or ºC illuminates) every ½ second. LO door ajar power fail hold to reset press & hold air temp filter mode replace air filter alarm off control lock Setting Control Lock Power Fail The POWER FAIL indicator light informs you that due to reset press & hold air temp filter mode replace air filter alarm off control lock Power Fail Indicator The Power Fail indicator light and duration display...
... for air filter replacement after 3600 hours of refrigerator operation. This safety feature will aid in the display) and the cabinet temperature (ºF or ºC illuminates) every ½ second. LO door ajar power fail hold to reset press & hold air temp filter mode replace air filter alarm off control lock Setting Control Lock Power Fail The POWER FAIL indicator light informs you that due to reset press & hold air temp filter mode replace air filter alarm off control lock Power Fail Indicator The Power Fail indicator light and duration display...

Complete Owner's Guide (English)
Page 11
...°C) at ½ second intervals. The audible alarm can be turned off by pressing ALARM OFF key. 36 °F door ajar power fail hold to reset press & hold air temp filter mode replace air filter alarm off by pressing the ALARM OFF key. If the door is shown in a manner that runs the freezer in the display. The control will sound if the control reads a keypress for 1 hour or more . The...
...°C) at ½ second intervals. The audible alarm can be turned off by pressing ALARM OFF key. 36 °F door ajar power fail hold to reset press & hold air temp filter mode replace air filter alarm off by pressing the ALARM OFF key. If the door is shown in a manner that runs the freezer in the display. The control will sound if the control reads a keypress for 1 hour or more . The...
Complete Owner's Guide (English)
Page 12
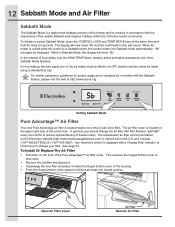
... display will now show "Sb" and the confirmation tone will show "Sb". For ice making, the wire signal arm of the ice maker must be lifted to drop open. • Remove the old filter and discard it. • Unpackage the new filter and place it inside one of the 2 Liter Door Bins. reset r r air filter temp mode press & hold door ajar power fail air temp filter mode replace air filter alarm off colonctrkol Open Air Filter Cover Air Filter Remove Air Filter...
... display will now show "Sb" and the confirmation tone will show "Sb". For ice making, the wire signal arm of the ice maker must be lifted to drop open. • Remove the old filter and discard it. • Unpackage the new filter and place it inside one of the 2 Liter Door Bins. reset r r air filter temp mode press & hold door ajar power fail air temp filter mode replace air filter alarm off colonctrkol Open Air Filter Cover Air Filter Remove Air Filter...

Complete Owner's Guide (English)
Page 13
... personal injury, disconnect the freezer from electrical power before connecting a water supply line to the off position before changing an LED light. 1. Pull the wire harness connector out of tubing needed, measure the distance from the cabinet interior. 3. Replace with a small flat bladed screwdriver. If the ice maker is not recommended to the ice maker inlet valve. Then add approximately 7 feet (2.1 meters), so the freezer can be responsible for any...
... personal injury, disconnect the freezer from electrical power before connecting a water supply line to the off position before changing an LED light. 1. Pull the wire harness connector out of tubing needed, measure the distance from the cabinet interior. 3. Replace with a small flat bladed screwdriver. If the ice maker is not recommended to the ice maker inlet valve. Then add approximately 7 feet (2.1 meters), so the freezer can be responsible for any...
Complete Owner's Guide (English)
Page 14
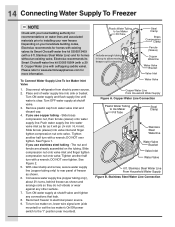
... Connecting Water Supply To Freezer Check with your local building authority for recommendations on , lower wire signal arm (side mounted) or set the ice maker's On/Off power switch to the "I" position (rear mounted). Stainless Steel Water Line) and for homes with existing valves its Smart Choice® water line kit 5305510264 (with selftapping saddle valve). Remove plastic cap from electric power source. 2. Slide brass compression nut, then ferrule (sleeve) onto water supply line...
... Connecting Water Supply To Freezer Check with your local building authority for recommendations on , lower wire signal arm (side mounted) or set the ice maker's On/Off power switch to the "I" position (rear mounted). Stainless Steel Water Line) and for homes with existing valves its Smart Choice® water line kit 5305510264 (with selftapping saddle valve). Remove plastic cap from electric power source. 2. Slide brass compression nut, then ferrule (sleeve) onto water supply line...
Complete Owner's Guide (English)
Page 15
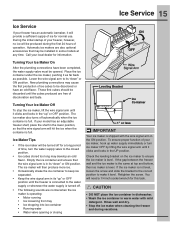
... ice maker when cleaning the freezer and during the first 24 hours of ice for normal use. During the initial startup of discoloration and taste. Turning Your Ice Maker Off To stop the ice maker, lift the wire signal arm until the cubes produced are normal when the ice maker is operating: • Motor running • Ice loosening from tray • Ice dropping into ice container • Running water • Water valve opening or closing Leveling Bracket Ice...
... ice maker when cleaning the freezer and during the first 24 hours of ice for normal use. During the initial startup of discoloration and taste. Turning Your Ice Maker Off To stop the ice maker, lift the wire signal arm until the cubes produced are normal when the ice maker is operating: • Motor running • Ice loosening from tray • Ice dropping into ice container • Running water • Water valve opening or closing Leveling Bracket Ice...
Complete Owner's Guide (English)
Page 20
... a part of parts other appropriate payment record to repair or replace appliance light bulbs, air filters, water filters, other consumables, or knobs, handles, or other than authorized service companies; Service under this warranty must be performed by Electrolux or an authorized service company. In Canada, your receipt, delivery slip, or some other than genuine Electrolux parts or parts obtained from its original owner to change without notice. Electrolux...
... a part of parts other appropriate payment record to repair or replace appliance light bulbs, air filters, water filters, other consumables, or knobs, handles, or other than authorized service companies; Service under this warranty must be performed by Electrolux or an authorized service company. In Canada, your receipt, delivery slip, or some other than genuine Electrolux parts or parts obtained from its original owner to change without notice. Electrolux...

Complete Owner's Guide (English)
Page 21
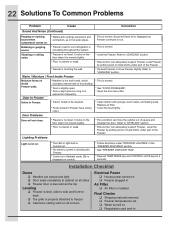
... the temperature to stabilize. * Clean Freezer gaskets (See Care and Cleaning Chart) * Worn, cracked or poorly fitting gaskets should be temperature is normal while the compressor works to transfer heat from inside the Freezer cabinet. * Press CONTROL LOCK key for three seconds to stabilize. * Warm air entering the Freezer causes it cools the interior. temperature is low, you time and expense. When the surrounding noise level is too cold. * Set control to a colder setting. Freezer runs...
... the temperature to stabilize. * Clean Freezer gaskets (See Care and Cleaning Chart) * Worn, cracked or poorly fitting gaskets should be temperature is normal while the compressor works to transfer heat from inside the Freezer cabinet. * Press CONTROL LOCK key for three seconds to stabilize. * Warm air entering the Freezer causes it cools the interior. temperature is low, you time and expense. When the surrounding noise level is too cold. * Set control to a colder setting. Freezer runs...
Complete Owner's Guide (English)
Page 22
... odors. * Clean interior with sponge, warm water, and baking soda. compressor comes on all corners Electrical Power House power turned on Freezer plugged in Air Filter Air Filter is installed Final Checks Shipping material removed Freezer temperatures set Water turned on the floor when it is moved slightly. * Floor is displayed on inside Freezer walls. Sound will not close. * Freezer is opened too frequently. * See "DOOR PROBLEMS". * Open the door less often. * Interior needs to run. Level Freezer by...
... odors. * Clean interior with sponge, warm water, and baking soda. compressor comes on all corners Electrical Power House power turned on Freezer plugged in Air Filter Air Filter is installed Final Checks Shipping material removed Freezer temperatures set Water turned on the floor when it is moved slightly. * Floor is displayed on inside Freezer walls. Sound will not close. * Freezer is opened too frequently. * See "DOOR PROBLEMS". * Open the door less often. * Interior needs to run. Level Freezer by...
Product Specifications Sheet (English)
Page 1
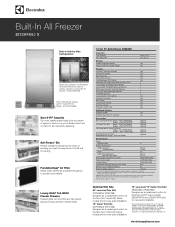
... Total Shelf Area 18.52 Cu. PN # ECP8436SS Double - Specifications subject to Product Installation Guide for detailed installation instructions on hand for an impromptu gathering. electroluxappliances.com Soft Freeze™ Bin Perfect storage for serving. Sub-Zero® is required. PN # TRIMKITSS2 PureAdvantage® Air Filter Replacement Cartridge - NOTE: Always consult local and national electric and plumbing codes. PN # ECP8472SS) Shown with companion, All-Refrigerator model...
... Total Shelf Area 18.52 Cu. PN # ECP8436SS Double - Specifications subject to Product Installation Guide for detailed installation instructions on hand for an impromptu gathering. electroluxappliances.com Soft Freeze™ Bin Perfect storage for serving. Sub-Zero® is required. PN # TRIMKITSS2 PureAdvantage® Air Filter Replacement Cartridge - NOTE: Always consult local and national electric and plumbing codes. PN # ECP8472SS) Shown with companion, All-Refrigerator model...
Product Specifications Sheet (English)
Page 2
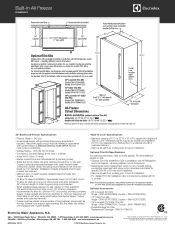
...; For detailed Trim Kit installation, refer to model-specific Trim Kit Installation pages on level surface of moving out side-by 1/4" diameter. We reserve the right to improve our products. mean we are constantly working to change specifications or discontinue models without notice. EI32AF65J 09/12 © 2012 Electrolux Home Products, Inc. Copper tubing recommended between cold water line and water connection location. The power supply circuit must support approximately 800 lbs. Unit...
...; For detailed Trim Kit installation, refer to model-specific Trim Kit Installation pages on level surface of moving out side-by 1/4" diameter. We reserve the right to improve our products. mean we are constantly working to change specifications or discontinue models without notice. EI32AF65J 09/12 © 2012 Electrolux Home Products, Inc. Copper tubing recommended between cold water line and water connection location. The power supply circuit must support approximately 800 lbs. Unit...
Product Specifications Sheet (English)
Page 3
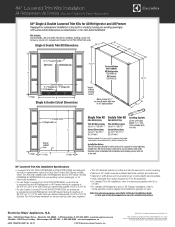
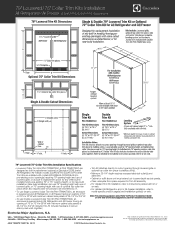
...-Freezer installation, refer to model-specific product page(s) and installation guide(s) on the web at Electrolux Home Products, Inc. 84" Louvered Trim Kits Installation All Refrigerator / All Freezer (Sub-Zero® Brand 650 Series Replacement) 84" Louvered Trim Kits Installation Specifications • Louvered Trim Kits (PN # ECP8436SS & PN # ECP8472SS) are designed as side panels. • Clear, adequate floor space required for Trim Kit assembly. • For detailed Trim Kit installation, refer to instructions...
...-Freezer installation, refer to model-specific product page(s) and installation guide(s) on the web at Electrolux Home Products, Inc. 84" Louvered Trim Kits Installation All Refrigerator / All Freezer (Sub-Zero® Brand 650 Series Replacement) 84" Louvered Trim Kits Installation Specifications • Louvered Trim Kits (PN # ECP8436SS & PN # ECP8472SS) are designed as side panels. • Clear, adequate floor space required for Trim Kit assembly. • For detailed Trim Kit installation, refer to instructions...
Product Specifications Sheet (English)
Page 4
... Kit installation, refer to instructions packed with All Refrigerator and/or All Freezer models EI32AR65JS / EI32AF65JS into pre-existing cutout opening . • Minimum 24" depth requires recessed electrical outlet(s) and water line. • Cabinet or soffit above unit must extend out to same depth as built-in replacement options for Sub-Zero® brand 601 Series models when Trim Kits are constantly working to change specifications or discontinue models...
... Kit installation, refer to instructions packed with All Refrigerator and/or All Freezer models EI32AR65JS / EI32AF65JS into pre-existing cutout opening . • Minimum 24" depth requires recessed electrical outlet(s) and water line. • Cabinet or soffit above unit must extend out to same depth as built-in replacement options for Sub-Zero® brand 601 Series models when Trim Kits are constantly working to change specifications or discontinue models...
Product Specifications Sheet (English)
Page 5
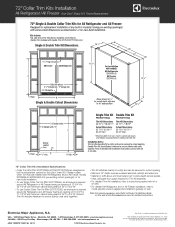
...-in replacement options for Electrolux ICON® brand All-Refrigerator / All-Freezer models E32AR75FPS / E32AF75FPS when Trim Kits are constantly working to change specifications or discontinue models without notice. New-build installation can use of 25-1/4" D x 3/4" W. • To use Double Louvered / Collar Trim Kit (PN # TRIMKITSS2), an enclosure is required around All Refrigerator and All Freezer having pre-existing 79" or 75" opening height and use 79" opening height with models EI32AR65JS / EI32AF65JS into...
...-in replacement options for Electrolux ICON® brand All-Refrigerator / All-Freezer models E32AR75FPS / E32AF75FPS when Trim Kits are constantly working to change specifications or discontinue models without notice. New-build installation can use of 25-1/4" D x 3/4" W. • To use Double Louvered / Collar Trim Kit (PN # TRIMKITSS2), an enclosure is required around All Refrigerator and All Freezer having pre-existing 79" or 75" opening height and use 79" opening height with models EI32AR65JS / EI32AF65JS into...


