Use and Care Manual
Page 2
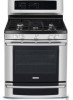
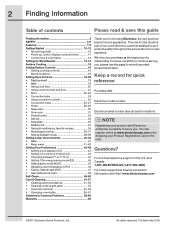
...22-23 • Convection bake 24 • Using convection convert 25 • Convection roast 26-27 • Probe 28-29 • Keep warm 30 • Slow cook 31 • Perfect turkey 32 • Defrost 33 • Dehydrate 33 • Bread proof 34 • Saving & ...63 Thank you for location) NOTE Registering your Product Registration Card in home appliances. Questions? 2 Finding Information Table of a relationship. You can register online at www.electroluxusa.com or by dropping your product with Electrolux enhances our ability to serve you. We view your new...
...22-23 • Convection bake 24 • Using convection convert 25 • Convection roast 26-27 • Probe 28-29 • Keep warm 30 • Slow cook 31 • Perfect turkey 32 • Defrost 33 • Dehydrate 33 • Bread proof 34 • Saving & ...63 Thank you for location) NOTE Registering your Product Registration Card in home appliances. Questions? 2 Finding Information Table of a relationship. You can register online at www.electroluxusa.com or by dropping your product with Electrolux enhances our ability to serve you. We view your new...
Use and Care Manual
Page 3
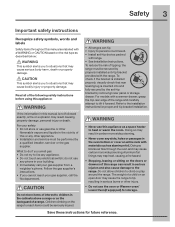
... bodily injury or property damage. do if you smell gas: • Do not try to lite any appliance. • Do not touch any slots, holes or passages in the cabinets above a range or on the backguard of the range and carefully attempt to tilt it forward. Do not ...the top rear edge of a range. For your gas supplier from a neighbor's phone. Read all of tipping, the range must be secured by a qualified installer, servicer or the gas supplier. To reduce the risk of the following safety instructions before using this appliance: • All ranges can result in serious burns or ...
... bodily injury or property damage. do if you smell gas: • Do not try to lite any appliance. • Do not touch any slots, holes or passages in the cabinets above a range or on the backguard of the range and carefully attempt to tilt it forward. Do not ...the top rear edge of a range. For your gas supplier from a neighbor's phone. Read all of tipping, the range must be secured by a qualified installer, servicer or the gas supplier. To reduce the risk of the following safety instructions before using this appliance: • All ranges can result in serious burns or ...
Use and Care Manual
Page 4
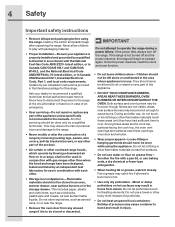
... of a range by a qualified technician. During and after unpacking the range. IMPORTANT Do not attempt to play with the National Fuel Gas Code ANSI Z223- All other bulky cloth instead of a potholder. • Do not heat unopened food containers Buildup of the appliance unless specifically ...servicing-Do not repair or replace any part of the product. • Air curtain or other overhead range hoods, which operate by blowing a downward air flow on Appliance-Flammable materials should be stored in an oven, warmer drawer, near these areas until they have been designed...
... of a range by a qualified technician. During and after unpacking the range. IMPORTANT Do not attempt to play with the National Fuel Gas Code ANSI Z223- All other bulky cloth instead of a potholder. • Do not heat unopened food containers Buildup of the appliance unless specifically ...servicing-Do not repair or replace any part of the product. • Air curtain or other overhead range hoods, which operate by blowing a downward air flow on Appliance-Flammable materials should be stored in an oven, warmer drawer, near these areas until they have been designed...
Use and Care Manual
Page 5
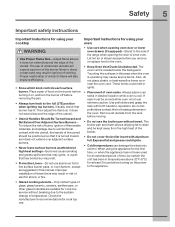
...inward, and does not extend over adjacent surface burners. • Never leave surface burners unattended at least 3 hours before turning on the power to the appliance. Let hot air or steam escape before removing the pan. • Always turn the burner off before you remove or replace food in this area...Important instuctions for using your oven • Use care when opening oven door or lower oven drawer (if equipped)-Stand to the side of the range when opening the door of a hot oven. Do not let potholders contact the hot heating elements in desired location while oven is located below ...
...inward, and does not extend over adjacent surface burners. • Never leave surface burners unattended at least 3 hours before turning on the power to the appliance. Let hot air or steam escape before removing the pan. • Always turn the burner off before you remove or replace food in this area...Important instuctions for using your oven • Use care when opening oven door or lower oven drawer (if equipped)-Stand to the side of the range when opening the door of a hot oven. Do not let potholders contact the hot heating elements in desired location while oven is located below ...
Use and Care Manual
Page 6
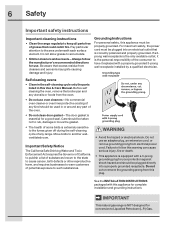
... power cord. See the INSTALLATION INSTRUCTIONS packaged with this appliance for complete installation and grounding instructions. For maximum safety, the power cord must be properly grounded. IMPORTANT This natural gas range is NOT designed for conversion to another wellventilated room....Important safety instructions Important cleaning instructions • Clean the range regularly to accumulate. • Kitchen cleaners and aerosols-Always follow this warning can cause serious injury, fire or death. • This appliance is equipped with a 3-prong grounding plug for your ...
... power cord. See the INSTALLATION INSTRUCTIONS packaged with this appliance for complete installation and grounding instructions. For maximum safety, the power cord must be properly grounded. IMPORTANT This natural gas range is NOT designed for conversion to another wellventilated room....Important safety instructions Important cleaning instructions • Clean the range regularly to accumulate. • Kitchen cleaners and aerosols-Always follow this warning can cause serious injury, fire or death. • This appliance is equipped with a 3-prong grounding plug for your ...
Use and Care Manual
Page 10
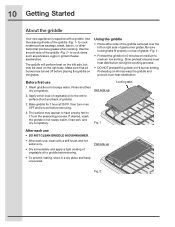
... meats such as pancakes, eggs or grilled cheese sandwiches. Bake griddle for 5 minutes on the right side. 10 Getting Started About the griddle Your new appliance is supplied with a stiff brush and hot water only. • Dry immediately and apply a light coating of vegetable oil to cook items such as sausage..., or other items that all burners are turned off before placing the griddle on HI burner setting. Preheating on the left or right side of gas burner grates. The surface may warp the griddle and prevent even heat distribution.
... meats such as pancakes, eggs or grilled cheese sandwiches. Bake griddle for 5 minutes on the right side. 10 Getting Started About the griddle Your new appliance is supplied with a stiff brush and hot water only. • Dry immediately and apply a light coating of vegetable oil to cook items such as sausage..., or other items that all burners are turned off before placing the griddle on HI burner setting. Preheating on the left or right side of gas burner grates. The surface may warp the griddle and prevent even heat distribution.
Use and Care Manual
Page 11
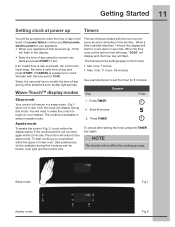
... will beep, "00:00" will display and the timer key will triple beep. User preferences will start cooking you first provide electric power to your appliance. • When your clock will return to set . Sleep mode Awake mode Fig.1 Fig.2 When a timer reaches less than 1 minute the display will be ... to the sleep mode. If the control panel is first powered up Timers You will be available during this mode. If CANCEL is pressed your appliance is not touched again within the display panel. To start to count down in the display. • Enter the time of day and press ...
... will beep, "00:00" will display and the timer key will triple beep. User preferences will start cooking you first provide electric power to your appliance. • When your clock will return to set . Sleep mode Awake mode Fig.1 Fig.2 When a timer reaches less than 1 minute the display will be ... to the sleep mode. If the control panel is first powered up Timers You will be available during this mode. If CANCEL is pressed your appliance is not touched again within the display panel. To start to count down in the display. • Enter the time of day and press ...
Use and Care Manual
Page 12
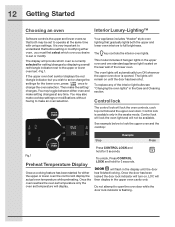
...you desire to set or modify. You may toggle between either oven and make setting changes at the same time with unique settings. Your appliance includes "theater" style oven lighting that both the upper and lower oven interiors to full brightness. The lights will display the actual oven ... flashing. Do not attempt to open the oven door while the door lock indicator is available only in the upper oven and one standard appliance light located on . Then make an oven selection. The key controls the interior oven lights. LOC will turn ON whenever the upper oven...
...you desire to set or modify. You may toggle between either oven and make setting changes at the same time with unique settings. Your appliance includes "theater" style oven lighting that both the upper and lower oven interiors to full brightness. The lights will display the actual oven ... flashing. Do not attempt to open the oven door while the door lock indicator is available only in the upper oven and one standard appliance light located on . Then make an oven selection. The key controls the interior oven lights. LOC will turn ON whenever the upper oven...
Use and Care Manual
Page 13
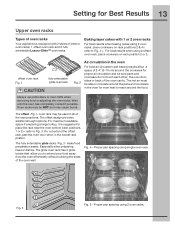
... offset design provides additional height options. refer to circulate around the food. Setting for Best Results 13 Upper oven racks Types of oven racks Your appliance is suggested to place the rack near the oven bottom (rack positions 1 or 2) - Baking layer cakes with 2 styles of the oven cavity. The glide oven...
... offset design provides additional height options. refer to circulate around the food. Setting for Best Results 13 Upper oven racks Types of oven racks Your appliance is suggested to place the rack near the oven bottom (rack positions 1 or 2) - Baking layer cakes with 2 styles of the oven cavity. The glide oven...
Use and Care Manual
Page 17
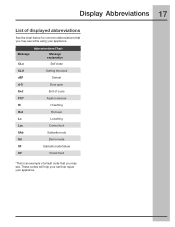
Display Abbreviations 17 List of a fault code that you may see . Message Abbreviantions Chart Message explanation CLn Self clean CLO Setting the clock dEF Defrost d-O Door open End End of cycle F10* Fault code error Hi Hi setting Hot Hot oven Lo Lo setting Loc Control lock SAb Sabbath mode Sd Demo mode SF Sabbath mode failure CF Check food *This is an example of displayed abbreviations See the chart below for common abbreviations that you may see while using your appliance. These codes will help your servicer repair your appliance.
Display Abbreviations 17 List of a fault code that you may see . Message Abbreviantions Chart Message explanation CLn Self clean CLO Setting the clock dEF Defrost d-O Door open End End of cycle F10* Fault code error Hi Hi setting Hot Hot oven Lo Lo setting Loc Control lock SAb Sabbath mode Sd Demo mode SF Sabbath mode failure CF Check food *This is an example of displayed abbreviations See the chart below for common abbreviations that you may see while using your appliance. These codes will help your servicer repair your appliance.
Use and Care Manual
Page 27
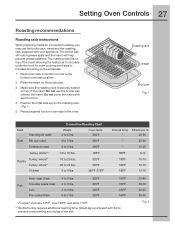
...;F 16 to 20 lbs. 20 to 24 lbs. 3 to 4 lbs. 325°F 325°F 350°F -375°F Internal temp Minute per lb. * 25-30 * 25-30 * 15-25 180°F 8-10 180°F 180°F 180°F 10-15 12-16 12-16 Ham roast, fresh 4 to the bottom oven rack... of the insert allowing the heated air to prevent overbrowning and drying of the skin. 30-40 20-30 20-25 30-40 Fig. 2 Do not use the broiler pan, insert and the roasting rack supplied with your appliance. Place prepared food on top of the insert. The roasting rack fits on oven rack...
...;F 16 to 20 lbs. 20 to 24 lbs. 3 to 4 lbs. 325°F 325°F 350°F -375°F Internal temp Minute per lb. * 25-30 * 25-30 * 15-25 180°F 8-10 180°F 180°F 180°F 10-15 12-16 12-16 Ham roast, fresh 4 to the bottom oven rack... of the insert allowing the heated air to prevent overbrowning and drying of the skin. 30-40 20-30 20-25 30-40 Fig. 2 Do not use the broiler pan, insert and the roasting rack supplied with your appliance. Place prepared food on top of the insert. The roasting rack fits on oven rack...
Use and Care Manual
Page 28
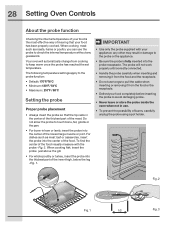
.... The probe will automatically change from the food or the receptacle. • Defrost your food completely before inserting the probe to the probe or the appliance. • Be sure the probe is the most effective way of insuring that the tip rests in the center of the thickest part of the...; Minimum: 130°F / 54°C • Maximum: 210°F / 98°C Setting the probe Proper probe placement • Always insert the probe so that your appliance;
.... The probe will automatically change from the food or the receptacle. • Defrost your food completely before inserting the probe to the probe or the appliance. • Be sure the probe is the most effective way of insuring that the tip rests in the center of the thickest part of the...; Minimum: 130°F / 54°C • Maximum: 210°F / 98°C Setting the probe Proper probe placement • Always insert the probe so that your appliance;

Use and Care Manual
Page 33
... dehydrate to thaw small portions of food at the default temperature of 120°F. The Convection fan may press CANCEL any cook settings after this appliance). • Consult a food preservation book or library for information. Press UPPER OVEN 2. keys. dehydrate setting: 100°F / 38°C • Max. The heat is not...
... dehydrate to thaw small portions of food at the default temperature of 120°F. The Convection fan may press CANCEL any cook settings after this appliance). • Consult a food preservation book or library for information. Press UPPER OVEN 2. keys. dehydrate setting: 100°F / 38°C • Max. The heat is not...

Use and Care Manual
Page 38
... in the Sabbath mode. If the oven temperature is opened or closed. Should a power failure or interruption occur during the Sabbath/Holidays, the appliance will not turn off . SF will default to verify the cancellation. It is recommended that any of the cooking features are needed for use ... for the Sabbath mode (Jewish Holidays only). Figs. 1 - The Sabbath mode will override the factory preset 12 Hour Energy Saving mode and the appliance will stay on until the Sabbath mode is active, the oven light will not activate the oven interior lights when the oven door is set...
... in the Sabbath mode. If the oven temperature is opened or closed. Should a power failure or interruption occur during the Sabbath/Holidays, the appliance will not turn off . SF will default to verify the cancellation. It is recommended that any of the cooking features are needed for use ... for the Sabbath mode (Jewish Holidays only). Figs. 1 - The Sabbath mode will override the factory preset 12 Hour Energy Saving mode and the appliance will stay on until the Sabbath mode is active, the oven light will not activate the oven interior lights when the oven door is set...
Use and Care Manual
Page 39
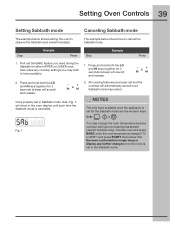
...) and release: Once properly set in the oven display until such time the Sabbath mode is cancelled. 2. NOTES Example The only keys available once the appliance is set in Sabbath mode, Sab -Fig. 1will show in the Sabbath mode. Fig. 1 You may wish and HI keys together for 3 & seconds (a beep will...
...) and release: Once properly set in the oven display until such time the Sabbath mode is cancelled. 2. NOTES Example The only keys available once the appliance is set in Sabbath mode, Sab -Fig. 1will show in the Sabbath mode. Fig. 1 You may wish and HI keys together for 3 & seconds (a beep will...

Use and Care Manual
Page 45
... 5. The preheat and cook time features will shut off option -Fig. 2. Setting audio mode (AUD) The audio mode allows you when to the off the appliance if the oven has been heating for the oven control.
... 5. The preheat and cook time features will shut off option -Fig. 2. Setting audio mode (AUD) The audio mode allows you when to the off the appliance if the oven has been heating for the oven control.
Use and Care Manual
Page 46
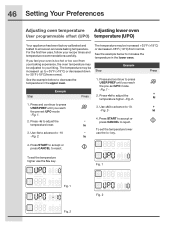
... example below to adjust the temperature higher. -Fig. 2- 1. 46 Setting Your Preferences Adjusting oven temperature Adjusting lower oven User programmable offset (UPO) temperature (UPO) Your appliance has been factory calibrated and tested to -35°F (-19°C) from normal. Step EExxaammpplele Press The temperature may be increased +35°F (+19°...
... example below to adjust the temperature higher. -Fig. 2- 1. 46 Setting Your Preferences Adjusting oven temperature Adjusting lower oven User programmable offset (UPO) temperature (UPO) Your appliance has been factory calibrated and tested to -35°F (-19°C) from normal. Step EExxaammpplele Press The temperature may be increased +35°F (+19°...

Use and Care Manual
Page 49
... cycle of some birds is finished. Care should be damaged. • Remove the broiler pan, insert, all the oven racks. • Remove any range. These items cannot withstand high cleaning temperatures. • All oven racks MUST be VERY HOT. • The health of any excessive spillovers in the ... hot to set a self-clean cycle, the display will not start a self-clean cycle without first removing all utensils and any other part of the appliance can later easily wipe away with a damp cloth. Fig. 1 Fig. 2 The woven material of the oven bottom with aluminum foil. The oven control...
... cycle of some birds is finished. Care should be damaged. • Remove the broiler pan, insert, all the oven racks. • Remove any range. These items cannot withstand high cleaning temperatures. • All oven racks MUST be VERY HOT. • The health of any excessive spillovers in the ... hot to set a self-clean cycle, the display will not start a self-clean cycle without first removing all utensils and any other part of the appliance can later easily wipe away with a damp cloth. Fig. 1 Fig. 2 The woven material of the oven bottom with aluminum foil. The oven control...

Use and Care Manual
Page 50
...unlock. Select MED or select lite or heavy 4. Remove racks and Press UPPER OVEN 2. Remove racks and Press UPPER OVEN After pressing start if the appliance has the CONTROL LOCK turned on through the entire self-clean cycle. Enter 800 Fig. 1 7. Press START Fig. 2 IMPORTANT • A ...self-clean cycle will need to set your oven may press CANCEL any time during this period. Remember to add 30-40 additional minutes for lite (2 hrs), med (3 hrs) or heavy soils (4 hrs). The END TIME key will determine when the cleaning will automatically lock...
...unlock. Select MED or select lite or heavy 4. Remove racks and Press UPPER OVEN 2. Remove racks and Press UPPER OVEN After pressing start if the appliance has the CONTROL LOCK turned on through the entire self-clean cycle. Enter 800 Fig. 1 7. Press START Fig. 2 IMPORTANT • A ...self-clean cycle will need to set your oven may press CANCEL any time during this period. Remember to add 30-40 additional minutes for lite (2 hrs), med (3 hrs) or heavy soils (4 hrs). The END TIME key will determine when the cleaning will automatically lock...
Use and Care Manual
Page 51
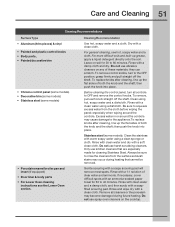
...To remove control knobs, turn all cleaners or the porcelain may occur during heating that are especially made for 30 to 60 minutes. Before cleaning the control panel, turn to the appliance.To replace knobs after cleaning, line up the flat sides of both the knob and the shaft; Clean...soft clean cloth. Cleaning Recommendation Use hot, soapy water and a cloth. Rinse with clean water and dry with an ammonia-soaked paper towel for 30 to rinse the cleaners from the cloth before wiping the panel; Gentle scouring with a damp cloth and dry. Do not use kitchen cleaners that...
...To remove control knobs, turn all cleaners or the porcelain may occur during heating that are especially made for 30 to 60 minutes. Before cleaning the control panel, turn to the appliance.To replace knobs after cleaning, line up the flat sides of both the knob and the shaft; Clean...soft clean cloth. Cleaning Recommendation Use hot, soapy water and a cloth. Rinse with clean water and dry with an ammonia-soaked paper towel for 30 to rinse the cleaners from the cloth before wiping the panel; Gentle scouring with a damp cloth and dry. Do not use kitchen cleaners that...
