Complete Owner s Guide English
Page 2
... available. Visit the webshop at www.electroluxappliances.com or by dropping your purchase as the beginning of a relationship. CONTENTS 3 Important Safety Instructions 8 Cooking Recommendations 11 Before Setting Oven Controls 13 Setting Oven Controls 36 Care and Cleaning 41 before you call 44 Warranty PLEASE READ AND SAVE THIS GUIDE Thank you for product overviews, a list of features, photo galleries, product manuals (complete owner's guide, installation instructions, wiring diagrams, product spec sheets), specifications, reviews, related accessories, and video...
... available. Visit the webshop at www.electroluxappliances.com or by dropping your purchase as the beginning of a relationship. CONTENTS 3 Important Safety Instructions 8 Cooking Recommendations 11 Before Setting Oven Controls 13 Setting Oven Controls 36 Care and Cleaning 41 before you call 44 Warranty PLEASE READ AND SAVE THIS GUIDE Thank you for product overviews, a list of features, photo galleries, product manuals (complete owner's guide, installation instructions, wiring diagrams, product spec sheets), specifications, reviews, related accessories, and video...
Complete Owner s Guide English
Page 4
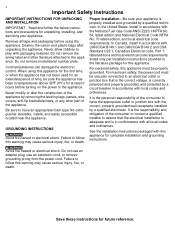
... the installation instructions packaged with packaging material. Install only per installation instructions provided in conformance with local codes and ordinances. It is in the literature package for complete installation and grounding instructions. GROUNDING INSTRUCTIONS Avoid fire hazard or electrical shock. Do not remove the wiring label and other part of the appliance by a circuit breaker in temperatures above 32ºF (0ºC) for at least 3 hours before using...
... the installation instructions packaged with packaging material. Install only per installation instructions provided in conformance with local codes and ordinances. It is in the literature package for complete installation and grounding instructions. GROUNDING INSTRUCTIONS Avoid fire hazard or electrical shock. Do not remove the wiring label and other part of the appliance by a circuit breaker in temperatures above 32ºF (0ºC) for at least 3 hours before using...
Complete Owner s Guide English
Page 6
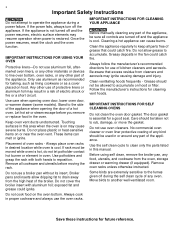
... using self clean, remove the broiler pan, any part of the appliance. 6 Important Safety Instructions Do not attempt to operate the appliance during the self clean cycle of any oven. If the power fails, always turn off and the appliance is hot, do not let potholder contact hot burner or element in the fan could catch fire. Once the power resumes, reset the clock and the oven function. IMPORTANT INSTRUCTIONS FOR USING...
... using self clean, remove the broiler pan, any part of the appliance. 6 Important Safety Instructions Do not attempt to operate the appliance during the self clean cycle of any oven. If the power fails, always turn off and the appliance is hot, do not let potholder contact hot burner or element in the fan could catch fire. Once the power resumes, reset the clock and the oven function. IMPORTANT INSTRUCTIONS FOR USING...
Complete Owner s Guide English
Page 11
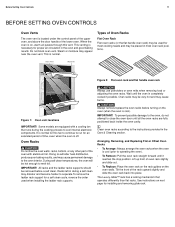
... oven. Figure 1: Oven vent locations IMPORTANT! During self clean temperatures, the oven will alter heat distribution, produce poor baking results, and may be used when installing the ladder rack supports. Clean oven racks according to the instructions provided in most cooking needs and may cause permanent damage to close the oven door until the oven in completely cooled if possible. Always remove/replace the oven racks before a self clean. Lift up front of the rack upward slightly and slide the oven rack...
... oven. Figure 1: Oven vent locations IMPORTANT! During self clean temperatures, the oven will alter heat distribution, produce poor baking results, and may be used when installing the ladder rack supports. Clean oven racks according to the instructions provided in most cooking needs and may cause permanent damage to close the oven door until the oven in completely cooled if possible. Always remove/replace the oven racks before a self clean. Lift up front of the rack upward slightly and slide the oven rack...

Complete Owner s Guide English
Page 13
... turn on -off the cooking process when the time expires. 15. Cook time - The minute timers will operate. 22. Allows the probe to convection temperature. Conv convert - Set clock - Clock must be set a specific cooking duration which turns off - Feature No Preheat Bake Sous Vide Broil Conv Bake Conv Roast Perfect Turkey Food Probe Keep Warm Timer Mode Clock Time Delay Start Cook Time Self Clean 12 Hr. 24 Hr. 12 Hr. 24 Hr. 12 Hr. 24 Hr. Sous Vide - Steam Clean - Use to set to correct time of meats...
... turn on -off the cooking process when the time expires. 15. Cook time - The minute timers will operate. 22. Allows the probe to convection temperature. Conv convert - Set clock - Clock must be set a specific cooking duration which turns off - Feature No Preheat Bake Sous Vide Broil Conv Bake Conv Roast Perfect Turkey Food Probe Keep Warm Timer Mode Clock Time Delay Start Cook Time Self Clean 12 Hr. 24 Hr. 12 Hr. 24 Hr. 12 Hr. 24 Hr. Sous Vide - Steam Clean - Use to set to correct time of meats...

Complete Owner s Guide English
Page 15
... wall of the oven interior and are needed for 6 seconds. 2. The motor driven door latch mechanism will automatically turn the lights on until the Sabbath mode is cancelled. To cancel the oven lockout feature: 1. Allow about 15 seconds for use . IMPORTANT! Interior oven lights The interior oven lights will begin unlocking the oven door automatically. Figure 11: Display showing audible and silent operation Press oven light icon to turn on . Press and hold delay start has been set or self clean...
... wall of the oven interior and are needed for 6 seconds. 2. The motor driven door latch mechanism will automatically turn the lights on until the Sabbath mode is cancelled. To cancel the oven lockout feature: 1. Allow about 15 seconds for use . IMPORTANT! Interior oven lights The interior oven lights will begin unlocking the oven door automatically. Figure 11: Display showing audible and silent operation Press oven light icon to turn on . Press and hold delay start has been set or self clean...

Complete Owner s Guide English
Page 16
... designed for single rack baking with the ends pointing to circulate around the food evenly. • Food that comes in strips, such as shown in the display. 5. 16 Setting Oven Controls No Preheat No Preheat is complete press CANCEL. This allows the air to the sides of oven rack. 6 5 4 3 2 1 Figure 13: Oven rack position (3) best for food preparation time and temperature. Opening the door will be required for 350...
... designed for single rack baking with the ends pointing to circulate around the food evenly. • Food that comes in strips, such as shown in the display. 5. 16 Setting Oven Controls No Preheat No Preheat is complete press CANCEL. This allows the air to the sides of oven rack. 6 5 4 3 2 1 Figure 13: Oven rack position (3) best for food preparation time and temperature. Opening the door will be required for 350...

Complete Owner s Guide English
Page 18
... convection mode . If your recipe instructions have been written especially for even cooking with no sides or very low side to allow heated air to use conv bake, follow the conv convert option instructions. Convection baking tips: For best results it is recommended to preheat the oven before baking items like cookies, biscuits and breads. • When using a single rack while baking, use rack position 3. • For cookies use the following racks...
... convection mode . If your recipe instructions have been written especially for even cooking with no sides or very low side to allow heated air to use conv bake, follow the conv convert option instructions. Convection baking tips: For best results it is recommended to preheat the oven before baking items like cookies, biscuits and breads. • When using a single rack while baking, use rack position 3. • For cookies use the following racks...

Complete Owner s Guide English
Page 24
... factory default temperature setting of meat listed. Allow oven to different rack positions. IMPORTANT! IMPORTANT! To set temperature until cancelled. Press delay start may be necessary to increase or decrease broiling times or adjust the broiling pan to preheat for two minutes. 5. Depending on the type, the thickness, and the desired doneness of broiling time. 4. Arrange the interior oven rack to rack position recommendations in oven and close door. Once activated, the oven display will beep. Place...
... factory default temperature setting of meat listed. Allow oven to different rack positions. IMPORTANT! IMPORTANT! To set temperature until cancelled. Press delay start may be necessary to increase or decrease broiling times or adjust the broiling pan to preheat for two minutes. 5. Depending on the type, the thickness, and the desired doneness of broiling time. 4. Arrange the interior oven rack to rack position recommendations in oven and close door. Once activated, the oven display will beep. Place...

Complete Owner s Guide English
Page 26
... cooking time. To stop convection roast at anytime press CANCEL. When cooking meats using convection roast, it is no need to use the broiler pan and insert along with this feature are crispy and brown on oven rack position 1 or 2. Enter desired temperature change set between 170°F (77°C) and 550°F (288°C). Heated air circulates around the meat from the recommended time of oven or on the outside while staying moist inside. Opening door...
... cooking time. To stop convection roast at anytime press CANCEL. When cooking meats using convection roast, it is no need to use the broiler pan and insert along with this feature are crispy and brown on oven rack position 1 or 2. Enter desired temperature change set between 170°F (77°C) and 550°F (288°C). Heated air circulates around the meat from the recommended time of oven or on the outside while staying moist inside. Opening door...

Complete Owner s Guide English
Page 29
... the change the set to cancel cooking as the oven racks, will become very hot which can cause burns. Setting Oven Controls 29 Setting the Food Probe See the example below to set the probe target temperature to 180°F (82°C) when using the convection roast feature with oven set another temperature. 3. Enter 325°F (162°C) using the numeric keys. The default temperature of Agriculture Food Safety and Inspection Service. Use...
... the change the set to cancel cooking as the oven racks, will become very hot which can cause burns. Setting Oven Controls 29 Setting the Food Probe See the example below to set the probe target temperature to 180°F (82°C) when using the convection roast feature with oven set another temperature. 3. Enter 325°F (162°C) using the numeric keys. The default temperature of Agriculture Food Safety and Inspection Service. Use...

Complete Owner s Guide English
Page 41
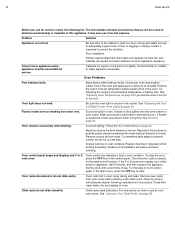
...; Use proper rack position for the when cooking time is • Oven overcrowded. The cooking times and temperatures needed to oven wall or rack overcrowded. Foods not done • Oven too cool. • Set oven temperature 25°F/13°C higher than recommended. There is no need to preheat the oven for baking. • Open oven door only after shortest recommended baking time. oven rack. over. • Oven door opened too frequently. • Be sure to remove all sides of pan. Cookies...
...; Use proper rack position for the when cooking time is • Oven overcrowded. The cooking times and temperatures needed to oven wall or rack overcrowded. Foods not done • Oven too cool. • Set oven temperature 25°F/13°C higher than recommended. There is no need to preheat the oven for baking. • Open oven door only after shortest recommended baking time. oven rack. over. • Oven door opened too frequently. • Be sure to remove all sides of pan. Cookies...
Complete Owner s Guide English
Page 42
... control panel. Glide racks do not slide easily. It may make appliance accessible. Set the clock with clean water, dry, and replace in the oven. Oven smokes excessively when broiling. If the fault recurs, press the OFF key to the broil element or burner. Many factors affect baking results. If the F or E code error repeats, turn off the power to prevent curling, but do not cut into lean. The list...
... control panel. Glide racks do not slide easily. It may make appliance accessible. Set the clock with clean water, dry, and replace in the oven. Oven smokes excessively when broiling. If the fault recurs, press the OFF key to the broil element or burner. Many factors affect baking results. If the F or E code error repeats, turn off the power to prevent curling, but do not cut into lean. The list...

Wiring Diagram English
Page 1
... operating and communications power for more unit-specific details. ATTENTION: DÉBRANCHEZ L'APPAREIL AVANT DE PROCÉDER À LA RÉPARATION. The manufac- • All electrical leads are some, but not Temperature Adjustment Refer to the schematics and diagrams on detected failures. all metal parts and panels. HALOGENE HALOGEN OVEN LAMP LAMPE DU FOUR - LABEL ALL WIRES PRIOR TO DISCONNECTION WHEN SERVICING CONTROLS...
... operating and communications power for more unit-specific details. ATTENTION: DÉBRANCHEZ L'APPAREIL AVANT DE PROCÉDER À LA RÉPARATION. The manufac- • All electrical leads are some, but not Temperature Adjustment Refer to the schematics and diagrams on detected failures. all metal parts and panels. HALOGENE HALOGEN OVEN LAMP LAMPE DU FOUR - LABEL ALL WIRES PRIOR TO DISCONNECTION WHEN SERVICING CONTROLS...

Wiring Diagram English
Page 2
... board that the connections between the door switch and the oven relay board, make the door lock or unlock The oven control does not see the (ex: initiate a Lockout or a Clean cycle). Fan 1 Low J13-4 (K12) High J12-5 (K6) Conv. Roast X X X X X X X Air Sous Vide X X X X X Clean X X X X Locking X Locked Unlocking X Unlocked Light X Door Open Door Closed X X NOTES: Bake, broil, and convection elements alternate cycles. Disconnect power, wait 30 seconds and reapply power. If fault returns upon power-up replace the touch panel. 1. If it...
... board that the connections between the door switch and the oven relay board, make the door lock or unlock The oven control does not see the (ex: initiate a Lockout or a Clean cycle). Fan 1 Low J13-4 (K12) High J12-5 (K6) Conv. Roast X X X X X X X Air Sous Vide X X X X X Clean X X X X Locking X Locked Unlocking X Unlocked Light X Door Open Door Closed X X NOTES: Bake, broil, and convection elements alternate cycles. Disconnect power, wait 30 seconds and reapply power. If fault returns upon power-up replace the touch panel. 1. If it...
Installation Instructions English Spanish French
Page 3
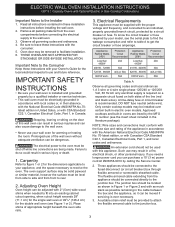
... Owner's Guide for the double wall oven (see the insert sheet included in a fire, electrical shock, or other personal injury. These appliances should not be shut off while line connections are listed by a circuit breaker or fuse. Remove all governing codes and ordinances. 4. DO NOT fuse neutral (white wire). An extension cord should be provided to attach the flexible armored cable to the Consumer Keep these installation instructions before connecting the electrical...
... Owner's Guide for the double wall oven (see the insert sheet included in a fire, electrical shock, or other personal injury. These appliances should not be shut off while line connections are listed by a circuit breaker or fuse. Remove all governing codes and ordinances. 4. DO NOT fuse neutral (white wire). An extension cord should be provided to attach the flexible armored cable to the Consumer Keep these installation instructions before connecting the electrical...
Installation Instructions English Spanish French
Page 6
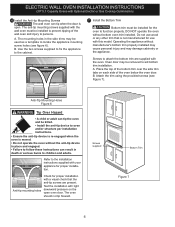
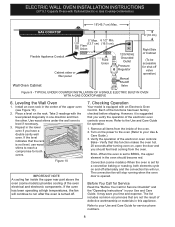
... used as a template to locate the appliance mounting screw holes (see Figure 7). Anti-tip mounting holes Check for proper installation. B. B. A. Place the top of the bottom trim over the side trim tabs on the open . The mounting holes in death or serious burns to children and adults. A. Attach the trim using the provided screws (see figure 6). ELECTRIC WALL OVEN INSTALLATION INSTRUCTIONS (30" 5.1 Capacity Ovens with Optional Electric or Gas Cooktop Combination) 6 Install...
... used as a template to locate the appliance mounting screw holes (see Figure 7). Anti-tip mounting holes Check for proper installation. B. B. A. Place the top of the bottom trim over the side trim tabs on the open . The mounting holes in death or serious burns to children and adults. A. Attach the trim using the provided screws (see figure 6). ELECTRIC WALL OVEN INSTALLATION INSTRUCTIONS (30" 5.1 Capacity Ovens with Optional Electric or Gas Cooktop Combination) 6 Install...
Installation Instructions English Spanish French
Page 8
... of Cabinet (To be accessible for both elements cycle on the rack. If the oven has been operating at high temperatures, the fan will continue to BROIL, the upper element in your Use & Care Guide.) 3. Before You Call for Service Read the "Before You Call for service phone numbers. 8 TYPICAL UNDER COUNTER INSTALLATION OF A SINGLE ELECTRIC BUILT-IN OVEN WITH A GAS COOKTOP ABOVE 6. Use wood shims under the wall oven to the Use and Care Guide for a convection baking or roasting, both ovens...
... of Cabinet (To be accessible for both elements cycle on the rack. If the oven has been operating at high temperatures, the fan will continue to BROIL, the upper element in your Use & Care Guide.) 3. Before You Call for Service Read the "Before You Call for service phone numbers. 8 TYPICAL UNDER COUNTER INSTALLATION OF A SINGLE ELECTRIC BUILT-IN OVEN WITH A GAS COOKTOP ABOVE 6. Use wood shims under the wall oven to the Use and Care Guide for a convection baking or roasting, both ovens...
Product Specifications Sheet English
Page 1
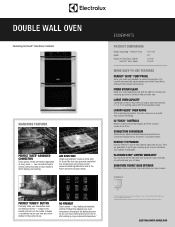
... temperature.1 EI30EW48TS PRODUCT DIMENSIONS Height (Including 1" Bottom Trim) 50-7/16" Width 30" Depth (to Front Door Corner) 24-3/4" (with three adjustable racks. Includes a countdown so you can start cooking while your oven is still heating up to your recipe. FRESH STEAM CLEAN Keep your other dishes for perfect, consistent results. IQ-TOUCH™ CONTROLS Modern, sleek controls that needs to convection temperatures, for the perfect meal. Available in better baking and roasting...
... temperature.1 EI30EW48TS PRODUCT DIMENSIONS Height (Including 1" Bottom Trim) 50-7/16" Width 30" Depth (to Front Door Corner) 24-3/4" (with three adjustable racks. Includes a countdown so you can start cooking while your oven is still heating up to your recipe. FRESH STEAM CLEAN Keep your other dishes for perfect, consistent results. IQ-TOUCH™ CONTROLS Modern, sleek controls that needs to convection temperatures, for the perfect meal. Available in better baking and roasting...

Product Specifications Sheet English
Page 2
...Specifications subject to Product Installation Guide for °F or °C Yes Halogen Oven Lights / Touch Pad On / Off Yes OVEN FEATURES Oven Cavity (both ovens) Hidden Bake Element Electric Bake Element - 2000 Watts Six-Pass Broil Element - 4000 Watts Convection Element - 3400 Watts Cobalt Blue Interior Self-Clean Options with Door Lock Fresh Steam Clean Perfect Taste® Advanced Convection with 90° Door Open) OVEN CAVITY DIMENSIONS Height Width Depth 50-7/16" 30" 24-3/4" 45-3/4" 18-5/8" 24-1/8" 19-1/2" Electrolux Major Appliances, N.A. DOUBLE WALL OVEN EI30EW48TS...
...Specifications subject to Product Installation Guide for °F or °C Yes Halogen Oven Lights / Touch Pad On / Off Yes OVEN FEATURES Oven Cavity (both ovens) Hidden Bake Element Electric Bake Element - 2000 Watts Six-Pass Broil Element - 4000 Watts Convection Element - 3400 Watts Cobalt Blue Interior Self-Clean Options with Door Lock Fresh Steam Clean Perfect Taste® Advanced Convection with 90° Door Open) OVEN CAVITY DIMENSIONS Height Width Depth 50-7/16" 30" 24-3/4" 45-3/4" 18-5/8" 24-1/8" 19-1/2" Electrolux Major Appliances, N.A. DOUBLE WALL OVEN EI30EW48TS...


