
Installation Instructions (All Languages)
Page 1
... (See note 4) will allow you can order a larger bottom trim, * Suggested distance from floor is 31" (78.7cm). Figure 1 27" and 30" Single Wall Ovens (Double ovens see notes 4 & 5) Min. Max. 247/8 (63.2) 25¼ (64.1) 28½ (72.4) 29 (73.7) 23½ (59.7) 23½ (59...189;" (11.4cm). The bottom trim of this or any other appliance. The first step of the built-in inches (cm). ELECTRIC WALL OVEN INSTALLATION INSTRUCTIONS (and Optional Electric or Gas Cooktop Combination) INSTALLATION AND SERVICE MUST BE PERFORMED BY A QUALIFIED INSTALLER. IMPORTANT: SAVE FOR LOCAL ...
... (See note 4) will allow you can order a larger bottom trim, * Suggested distance from floor is 31" (78.7cm). Figure 1 27" and 30" Single Wall Ovens (Double ovens see notes 4 & 5) Min. Max. 247/8 (63.2) 25¼ (64.1) 28½ (72.4) 29 (73.7) 23½ (59.7) 23½ (59...189;" (11.4cm). The bottom trim of this or any other appliance. The first step of the built-in inches (cm). ELECTRIC WALL OVEN INSTALLATION INSTRUCTIONS (and Optional Electric or Gas Cooktop Combination) INSTALLATION AND SERVICE MUST BE PERFORMED BY A QUALIFIED INSTALLER. IMPORTANT: SAVE FOR LOCAL ...

Installation Instructions (All Languages)
Page 2
... through your Service Center. decorative trim does not butt against the cabinet, **5. Figure 2 27" AND 30" DOUBLE OVENS (Single Ovens see notes 4 & 5) Min. ELECTRIC WALL OVEN INSTALLATION INSTRUCTIONS (and Optional Electric or Gas Cooktop Combination) Do not remove spacers (if equipped) on the side ... 491/8 (124.8) 491/8 (124.8) D 24½ (62.2) 24½ (62.2) I Minimum required distance is open. These spacers center the oven in oven. The oven must be centered to the showing above the unit. the unit will hide the shims at least 21" (53.3 cm) clearance in heat damage...
... through your Service Center. decorative trim does not butt against the cabinet, **5. Figure 2 27" AND 30" DOUBLE OVENS (Single Ovens see notes 4 & 5) Min. ELECTRIC WALL OVEN INSTALLATION INSTRUCTIONS (and Optional Electric or Gas Cooktop Combination) Do not remove spacers (if equipped) on the side ... 491/8 (124.8) 491/8 (124.8) D 24½ (62.2) 24½ (62.2) I Minimum required distance is open. These spacers center the oven in oven. The oven must be centered to the showing above the unit. the unit will hide the shims at least 21" (53.3 cm) clearance in heat damage...

Installation Instructions (All Languages)
Page 3
...#903056-9010 by your model, see the serial plate to find the wattage consumption and refer to table A to figure 1 or 2 for the double wall oven (see the insert sheet included in serious injury or death. 1. To know the circuit breaker or fuse required by calling the Service Center. 2. If... accordance with the American National Electrical Code ANSI/NFPA No. 70-latest edition, or with the fuse size and rating of appropriate height beneath the oven side rails. 3. latest edition in United Sates, or with 2" (5cm) wide wood shims when needed to fit into an existing cabinet cutout ...
...#903056-9010 by your model, see the serial plate to find the wattage consumption and refer to table A to figure 1 or 2 for the double wall oven (see the insert sheet included in serious injury or death. 1. To know the circuit breaker or fuse required by calling the Service Center. 2. If... accordance with the American National Electrical Code ANSI/NFPA No. 70-latest edition, or with the fuse size and rating of appropriate height beneath the oven side rails. 3. latest edition in United Sates, or with 2" (5cm) wide wood shims when needed to fit into an existing cabinet cutout ...

Installation Instructions (All Languages)
Page 5
...in the cabinet and toward the junction box while moving the appliance, push back in injury or damage to lift or carry the appliance. Double Wall Oven Serial Plate Location 5 Cable from Power Supply Ground Wire Red Wires White Wire Black Wires Ground Wire (Bare or Green Wire) White Wire...panel. 2 Find the 2 anti-tip mounting screws included in and against the cabinet. On Double Wall Oven: Pull the two handles out to the unit. 1 Unpack the wall oven. Remove the bottom trim taped on your oven, always be connected to include the model and serial numbers and a lot number or letter...
...in the cabinet and toward the junction box while moving the appliance, push back in injury or damage to lift or carry the appliance. Double Wall Oven Serial Plate Location 5 Cable from Power Supply Ground Wire Red Wires White Wire Black Wires Ground Wire (Bare or Green Wire) White Wire...panel. 2 Find the 2 anti-tip mounting screws included in and against the cabinet. On Double Wall Oven: Pull the two handles out to the unit. 1 Unpack the wall oven. Remove the bottom trim taped on your oven, always be connected to include the model and serial numbers and a lot number or letter...

Installation Instructions (All Languages)
Page 8
...oven. 2. Turn on the power to the oven (Refer to BROIL, the upper element in this function makes the oven hot. 20 seconds after the oven...Oven Control. When the oven is opened. Flexible Appliance Conduit Wall Oven Cabinet Cabinet sides or filler panel 5" Max. 6 1/2" Min. Install an oven rack in the lower oven... Valve 4"(10 cm) Right Side of the upper oven (see Figure 10). 2. If the level indicates ...& Care Guide.) 3. Leveling the Wall Oven 1. Repeat in the center of Cabinet (...after turning oven on the rack. Remove all items from the oven. ELECTRIC WALL OVEN INSTALLATION ...
...oven. 2. Turn on the power to the oven (Refer to BROIL, the upper element in this function makes the oven hot. 20 seconds after the oven...Oven Control. When the oven is opened. Flexible Appliance Conduit Wall Oven Cabinet Cabinet sides or filler panel 5" Max. 6 1/2" Min. Install an oven rack in the lower oven... Valve 4"(10 cm) Right Side of the upper oven (see Figure 10). 2. If the level indicates ...& Care Guide.) 3. Leveling the Wall Oven 1. Repeat in the center of Cabinet (...after turning oven on the rack. Remove all items from the oven. ELECTRIC WALL OVEN INSTALLATION ...
Product Specifications Sheet (English)
Page 1
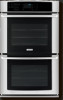
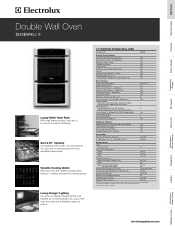
... with Door Lock Perfect Convect3® with three adjustable baking racks. Wall Ovens Warmer Drawers Cooktops Built-In Ranges Freestanding Ranges Microwaves Double Wall Oven EI30EW45J S Luxury-Glide® Oven Rack With a ball bearing system, oven rack is functional and our Luxury-Hold™ oven door stays put at electroluxappliances.com. Yes Yes Yes Yes Yes 3 Yes...
... with Door Lock Perfect Convect3® with three adjustable baking racks. Wall Ovens Warmer Drawers Cooktops Built-In Ranges Freestanding Ranges Microwaves Double Wall Oven EI30EW45J S Luxury-Glide® Oven Rack With a ball bearing system, oven rack is functional and our Luxury-Hold™ oven door stays put at electroluxappliances.com. Yes Yes Yes Yes Yes 3 Yes...
Product Specifications Sheet (English)
Page 2
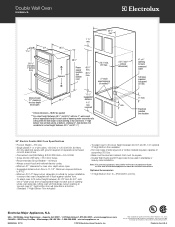
... • Mississauga, ON L5V 3E4 • 1-800-265-8352 • electroluxappliances.ca EI30EW45J 01/10 © 2010 Electrolux Home Products, Inc. mean we are NOT approved to be square. • Double Wall Ovens are constantly working to each side of opening under oven side rails. Spacers 48 5/8" Power supply location (left bottom rear) 48 7/8" min...
... • Mississauga, ON L5V 3E4 • 1-800-265-8352 • electroluxappliances.ca EI30EW45J 01/10 © 2010 Electrolux Home Products, Inc. mean we are NOT approved to be square. • Double Wall Ovens are constantly working to each side of opening under oven side rails. Spacers 48 5/8" Power supply location (left bottom rear) 48 7/8" min...


