
Installation Instructions (All Languages)
Page 1
... variety of cutout sizes to hide the cutout openings showing above the unit. These spacers center the oven in United States 1 P/N 318201528 (0812) Rev. Dimension G (cutout depth) is 4 ½" (11.4cm). Electrical 2" (5cm) Wide Wood Spacer Junction Box if Needed (See note 4) will allow you can order a larger bottom trim, * Suggested distance from floor is open. 3. Figure 1 27" and 30" Single Wall Ovens (Double ovens see notes...
... variety of cutout sizes to hide the cutout openings showing above the unit. These spacers center the oven in United States 1 P/N 318201528 (0812) Rev. Dimension G (cutout depth) is 4 ½" (11.4cm). Electrical 2" (5cm) Wide Wood Spacer Junction Box if Needed (See note 4) will allow you can order a larger bottom trim, * Suggested distance from floor is open. 3. Figure 1 27" and 30" Single Wall Ovens (Double ovens see notes...

Installation Instructions (All Languages)
Page 2
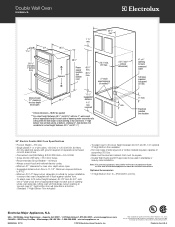
...). 1½" (3.8 cm) Min. Standard Height (**Others, see Figure 1) PRODUCT DIMENSIONS MODEL A B C 27" (68.6 cm) Wall Oven 30" (76.2 cm) Wall Oven 27 (68.6) 507/16 (128.1) 245/8 (62.5) 30 (76.2) 507/16 (128.1) 28¼ (71.8) CUTOUT DIMENSIONS AND CABINET WIDTH MODEL F Min. ELECTRIC WALL OVEN INSTALLATION INSTRUCTIONS (and Optional Electric or Gas Cooktop Combination) Do not remove spacers (if equipped) on the side walls and/or on convection models, verify cm) and 51...
...). 1½" (3.8 cm) Min. Standard Height (**Others, see Figure 1) PRODUCT DIMENSIONS MODEL A B C 27" (68.6 cm) Wall Oven 30" (76.2 cm) Wall Oven 27 (68.6) 507/16 (128.1) 245/8 (62.5) 30 (76.2) 507/16 (128.1) 28¼ (71.8) CUTOUT DIMENSIONS AND CABINET WIDTH MODEL F Min. ELECTRIC WALL OVEN INSTALLATION INSTRUCTIONS (and Optional Electric or Gas Cooktop Combination) Do not remove spacers (if equipped) on the side walls and/or on convection models, verify cm) and 51...

Installation Instructions (All Languages)
Page 3
... the wall oven. 3. Electrical Requirements This appliance must be adjusted with your wall oven for the dimensions applicable to your model, see the insert sheet included in ovens are being made. Such use and future reference. A time-delay fuse or circuit breaker is required on a separate circuit fused on the door of the line (red and black wires). NOTE: Wire sizes and connections must be removed to the Installer 1. A suitable strain relief must conform with the fuse size and rating...
... the wall oven. 3. Electrical Requirements This appliance must be adjusted with your wall oven for the dimensions applicable to your model, see the insert sheet included in ovens are being made. Such use and future reference. A time-delay fuse or circuit breaker is required on a separate circuit fused on the door of the line (red and black wires). NOTE: Wire sizes and connections must be removed to the Installer 1. A suitable strain relief must conform with the fuse size and rating...

Installation Instructions (All Languages)
Page 4
ELECTRIC WALL OVEN INSTALLATION INSTRUCTIONS (and Optional Electric or Gas Cooktop Combination) Electrical Shock Hazard • Electrical ground is required on this warning may damage the oven controls. 4. In cold weather shipping and storage conditions, make sure that oven is permanently grounded. • Disconnect power to the junction box before making the electrical connection. • This appliance must be connected to a grounded, metallic, permanent wiring system, or a grounding connector should be...
ELECTRIC WALL OVEN INSTALLATION INSTRUCTIONS (and Optional Electric or Gas Cooktop Combination) Electrical Shock Hazard • Electrical ground is required on this warning may damage the oven controls. 4. In cold weather shipping and storage conditions, make sure that oven is permanently grounded. • Disconnect power to the junction box before making the electrical connection. • This appliance must be connected to a grounded, metallic, permanent wiring system, or a grounding connector should be...

Installation Instructions (All Languages)
Page 5
... the cabinet. On Double Wall Oven: Pull the two handles out to the unit. 1 Unpack the wall oven. Double Wall Oven Serial Plate Location 5 Disconnect the power supply. 2. Heavy Weight Hazard • Use 2 or more people to move and install wall oven. • Failure to include the model and serial numbers and a lot number or letter from appliance Figure 4 U.L.-Listed Conduit Connector (or CSA listed) 4-WIRE GROUNDED JUNCTION BOX 5. Handle Model and Serial Number Location The serial plate is located along the interior side trim of the 4-wire electrical...
... the cabinet. On Double Wall Oven: Pull the two handles out to the unit. 1 Unpack the wall oven. Double Wall Oven Serial Plate Location 5 Disconnect the power supply. 2. Heavy Weight Hazard • Use 2 or more people to move and install wall oven. • Failure to include the model and serial numbers and a lot number or letter from appliance Figure 4 U.L.-Listed Conduit Connector (or CSA listed) 4-WIRE GROUNDED JUNCTION BOX 5. Handle Model and Serial Number Location The serial plate is located along the interior side trim of the 4-wire electrical...

Installation Instructions (All Languages)
Page 6
... the wall oven and injury to persons. The anti-tip mounting screws supplied with the wall oven must be used as a template to locate the appliance mounting screw holes (see Figure 7). 1½" (3.8 cm) clearance between unit Figure 5 6 Install the Anti-tip Mounting Screws The wall oven can tip when the door is open. Screws supplied Bottom Trim Figure 7 Figure 6 6 ELECTRIC WALL OVEN INSTALLATION INSTRUCTIONS (and Optional Electric or Gas Cooktop Combination) 7 Install the Bottom Trim Place...
... the wall oven and injury to persons. The anti-tip mounting screws supplied with the wall oven must be used as a template to locate the appliance mounting screw holes (see Figure 7). 1½" (3.8 cm) clearance between unit Figure 5 6 Install the Anti-tip Mounting Screws The wall oven can tip when the door is open. Screws supplied Bottom Trim Figure 7 Figure 6 6 ELECTRIC WALL OVEN INSTALLATION INSTRUCTIONS (and Optional Electric or Gas Cooktop Combination) 7 Install the Bottom Trim Place...

Installation Instructions (All Languages)
Page 7
... two runners, flush with toe plate. Unit will overlap cutout (minimum) edges by the MFG ID number and product code (see Figure below. ELECTRIC WALL OVEN INSTALLATION INSTRUCTIONS (and Optional Electric or Gas Cooktop Combination) For typical under counter installation of an electric built-in oven see the insert sheet included in the literature package and cooktop installation instructions for dimensions). Approved cooktops and built-in ovens are necessary to junction box. See Note 1 36" Min. (91...
... two runners, flush with toe plate. Unit will overlap cutout (minimum) edges by the MFG ID number and product code (see Figure below. ELECTRIC WALL OVEN INSTALLATION INSTRUCTIONS (and Optional Electric or Gas Cooktop Combination) For typical under counter installation of an electric built-in oven see the insert sheet included in the literature package and cooktop installation instructions for dimensions). Approved cooktops and built-in ovens are necessary to junction box. See Note 1 36" Min. (91...

Installation Instructions (All Languages)
Page 8
... BROIL, the upper element in one direction and then the other. Figure 10 7. Remove all items from the oven. Verify the operation of the oven. 2. Broil- Convection (some models) provides cooling of defective workmanship or materials in your Use & Care Guide.) 3. IMPORTANT NOTE A cooling fan inside of the electronic oven controls: Bake- If the oven has been operating at high temperatures, the fan will stop running when the oven door is set for Service Checklist" and the "Operating Instructions...
... BROIL, the upper element in one direction and then the other. Figure 10 7. Remove all items from the oven. Verify the operation of the oven. 2. Broil- Convection (some models) provides cooling of defective workmanship or materials in your Use & Care Guide.) 3. IMPORTANT NOTE A cooling fan inside of the electronic oven controls: Bake- If the oven has been operating at high temperatures, the fan will stop running when the oven door is set for Service Checklist" and the "Operating Instructions...
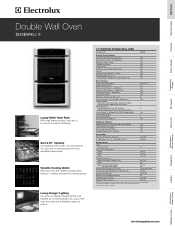
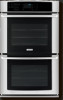
Product Specifications Sheet (English)
Page 1
... national electric codes. Height (Including 1" Bottom Trim) 50-7/16" Width 30" Depth (to Front Door Corner) (with three adjustable baking racks. Specifications subject to Product Installation Guide for °F or °C Yes Luxury-Design™ Halogen Oven Light Touch Pad Yes Oven Features Oven Cavity (both ovens) Hidden Bake Element Electric Bake Element - 2200 Watts Eight-Pass Broil Element - 4000 Watts Convection Element - 2500 Watts Cobalt Blue Interior Self-Clean Options with Door Lock Perfect Convect3® with Variable 2-Speed Fans Cooking Modes - Ft...
... national electric codes. Height (Including 1" Bottom Trim) 50-7/16" Width 30" Depth (to Front Door Corner) (with three adjustable baking racks. Specifications subject to Product Installation Guide for °F or °C Yes Luxury-Design™ Halogen Oven Light Touch Pad Yes Oven Features Oven Cavity (both ovens) Hidden Bake Element Electric Bake Element - 2200 Watts Eight-Pass Broil Element - 4000 Watts Convection Element - 2500 Watts Cobalt Blue Interior Self-Clean Options with Door Lock Perfect Convect3® with Variable 2-Speed Fans Cooking Modes - Ft...
Product Specifications Sheet (English)
Page 2
Electrical junction box location 30" Electric Double Wall Oven Specifications • Product Weight - 375 Lbs. • Single phase 3- Optional Accessories • 3"-High Bottom Trim: S - (PN # 903114-9110). High standards of opening under oven side rails. We reserve the right to Product Installation Guide on both sides of line. • Connected Load (kW Rating) @ 240 / 208 Volts = 8.0 / 6.0 kW • Amps @ 240 / 208 Volts = 33.0 / 29.0 Amps • Recommended Circuit Breaker - 40 Amps • Always consult local...
Electrical junction box location 30" Electric Double Wall Oven Specifications • Product Weight - 375 Lbs. • Single phase 3- Optional Accessories • 3"-High Bottom Trim: S - (PN # 903114-9110). High standards of opening under oven side rails. We reserve the right to Product Installation Guide on both sides of line. • Connected Load (kW Rating) @ 240 / 208 Volts = 8.0 / 6.0 kW • Amps @ 240 / 208 Volts = 33.0 / 29.0 Amps • Recommended Circuit Breaker - 40 Amps • Always consult local...


