

Use and Care Manual
Page 1
Use & Care Guide 30" Free-Standing Wave-Touch™ Electric Range 316520101 Rev A
Use & Care Guide 30" Free-Standing Wave-Touch™ Electric Range 316520101 Rev A
Use and Care Manual
Page 3
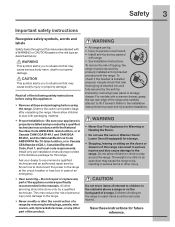
... this manual are labeled with a WARNING or CAUTION based on an open door may cause the range to tip, resulting in serious burns or other injury. To reduce the risk of personal injury and...type as described below: This symbol alerts you to the range. latest edition, or in Canada CAN/CGA B149.1 and CAN/GGA B149.2, and the National Electrical Code ANSI/NFPA No.70-latest edition, or in the... manuals. This may reduce the risk of tipping, the range must be secured by a qualified technician in ...
... this manual are labeled with a WARNING or CAUTION based on an open door may cause the range to tip, resulting in serious burns or other injury. To reduce the risk of personal injury and...type as described below: This symbol alerts you to the range. latest edition, or in Canada CAN/CGA B149.1 and CAN/GGA B149.2, and the National Electrical Code ANSI/NFPA No.70-latest edition, or in the... manuals. This may reduce the risk of tipping, the range must be secured by a qualified technician in ...
Use and Care Manual
Page 4
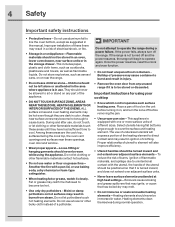
... a risk of the heating element to direct contact and may catch fire if allowed to become hot enough to cause burns. If the range is to be turned inward and not extend over adjacent surface units. • Never leave surface elements unattended at high heat settings-Boilovers ... ignite, or a pan that it is in burns from any part of different sizes. Proper relationship of utensil to element will expose a portion of electrical shock, or fire. • Storage in the storage drawer. The use of undersized utensils will also improve efficiency. • Utensil handles should be...
... a risk of the heating element to direct contact and may catch fire if allowed to become hot enough to cause burns. If the range is to be turned inward and not extend over adjacent surface units. • Never leave surface elements unattended at high heat settings-Boilovers ... ignite, or a pan that it is in burns from any part of different sizes. Proper relationship of utensil to element will expose a portion of electrical shock, or fire. • Storage in the storage drawer. The use of undersized utensils will also improve efficiency. • Utensil handles should be...
Use and Care Manual
Page 5
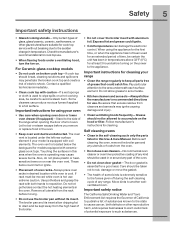
.... When using your oven • Use care when opening oven door or lower oven drawer (if equipped)-Stand to the side of the range when opening the door of a hot oven. Follow manufacturer's instructions for cook top use . Some cleaners can damage the electronic control. Always... oven liner protective coating of any kind should break, cleaning solutions and spillovers may penetrate the broken cook top and create a risk of electric shock. These items could catch fire. Important instructions for the first time, or when the appliance has not been used to wipe spills ...
.... When using your oven • Use care when opening oven door or lower oven drawer (if equipped)-Stand to the side of the range when opening the door of a hot oven. Follow manufacturer's instructions for cook top use . Some cleaners can damage the electronic control. Always... oven liner protective coating of any kind should break, cleaning solutions and spillovers may penetrate the broken cook top and create a risk of electric shock. These items could catch fire. Important instructions for the first time, or when the appliance has not been used to wipe spills ...
Use and Care Manual
Page 9
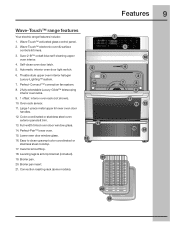
.... 16. Self-clean oven door latch. 5. Oven rack sensor. 11. Ceramic smoothtop. 18. Leveling legs & anti-tip bracket (included). 19. Features 9 Wave-Touch™ range features Your electric range features include: 1. Automatic interior oven door light switch. 6. Large 1-piece metal upper & lower oven door handles. 12. Color coordinated or stainless steel oven exterior...
.... 16. Self-clean oven door latch. 5. Oven rack sensor. 11. Ceramic smoothtop. 18. Leveling legs & anti-tip bracket (included). 19. Features 9 Wave-Touch™ range features Your electric range features include: 1. Automatic interior oven door light switch. 6. Large 1-piece metal upper & lower oven door handles. 12. Color coordinated or stainless steel oven exterior...
Use and Care Manual
Page 15
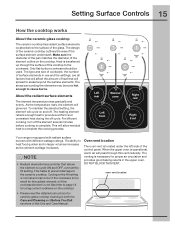
... the cooktop. The venting is too small for using correct cookware on the cooktop). Left rear Warmer zone Right rear Left front Right front Your range is complete. Cycling at the HI setting. DO NOT BLOCK THIS VENT. The areas surrounding the elements may become hot enough to provide a uniform and...
... the cooktop. The venting is too small for using correct cookware on the cooktop). Left rear Warmer zone Right rear Left front Right front Your range is complete. Cycling at the HI setting. DO NOT BLOCK THIS VENT. The areas surrounding the elements may become hot enough to provide a uniform and...
Use and Care Manual
Page 17
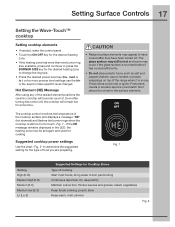
... it has cooled sufficiently. • Do not place plastic items such as salt and pepper shakers, spoon holders or plastic wrappings on top of the range when it is still too hot to change the ring size. • Press the desired power level key (hi+, med or lo-) or for Cooktop...
... it has cooled sufficiently. • Do not place plastic items such as salt and pepper shakers, spoon holders or plastic wrappings on top of the range when it is still too hot to change the ring size. • Press the desired power level key (hi+, med or lo-) or for Cooktop...
Use and Care Manual
Page 41
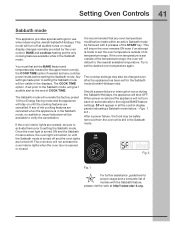
..., no audible or visual indicators will be available to setting the Sabbath mode will default to set the oven temperature outside of the temperature range, the oven will be sure to activate them prior to set prior to the original BAKE feature settings. This will insure the oven remains... ON even if an attempt is set outside of its temperature range. Should a power failure or interruption occur during the Sabbath/Holidays, the appliance will turn back on until the cooking features are the only ...
..., no audible or visual indicators will be available to setting the Sabbath mode will default to set the oven temperature outside of the temperature range, the oven will be sure to activate them prior to set prior to the original BAKE feature settings. This will insure the oven remains... ON even if an attempt is set outside of its temperature range. Should a power failure or interruption occur during the Sabbath/Holidays, the appliance will turn back on until the cooking features are the only ...

Use and Care Manual
Page 44
... temperature settings apply to the bake feature: • Auto-suggest (default) setting: 350°F/176°C • Min. The oven will continue to maintain this range your control will automatically default to the nearest temperature available. • FOOD POISONING HAZARD. will begin heating. bake setting: 170°F / 76°C • Max...
... temperature settings apply to the bake feature: • Auto-suggest (default) setting: 350°F/176°C • Min. The oven will continue to maintain this range your control will automatically default to the nearest temperature available. • FOOD POISONING HAZARD. will begin heating. bake setting: 170°F / 76°C • Max...
Use and Care Manual
Page 52
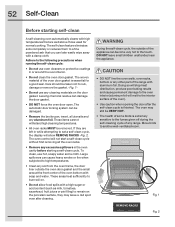
... cycle. DO NOT leave small children unattended near the appliance. • DO NOT line the oven walls, oven racks, bottom or any range. The woven material of the range with soap and water. During the self-clean cycle, the outside the oven door gasket and the small area at the front center...
... cycle. DO NOT leave small children unattended near the appliance. • DO NOT line the oven walls, oven racks, bottom or any range. The woven material of the range with soap and water. During the self-clean cycle, the outside the oven door gasket and the small area at the front center...
Use and Care Manual
Page 60
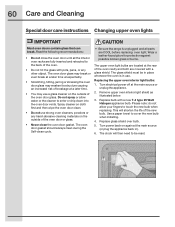
... first and then wipe the oven door clean. • Do not use . The upper oven light bulbs are covered with a glass shield. Turn electrical power off at the rear of the new bulb. Replace glass shield over bulb. 5. Replacing the upper oven interior light bulbs: 1. This will then...oven interior light shield as illustrated below. 3. The oven door gasket should always clean during the Self-clean cycle. • Be sure the range is in place whenever the oven is unplugged and all the interior oven racks are COOL before replacing oven light. Read the following recommendations: &#...
... first and then wipe the oven door clean. • Do not use . The upper oven light bulbs are covered with a glass shield. Turn electrical power off at the rear of the new bulb. Replace glass shield over bulb. 5. Replacing the upper oven interior light bulbs: 1. This will then...oven interior light shield as illustrated below. 3. The oven door gasket should always clean during the Self-clean cycle. • Be sure the range is in place whenever the oven is unplugged and all the interior oven racks are COOL before replacing oven light. Read the following recommendations: &#...
Use and Care Manual
Page 62
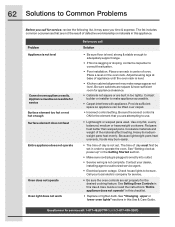
.... See "Setting clock at base of defective workmanship or materials in this appliance. Call your dealer, installing agent or authorized service agent. • Electrical power outage. See "Changing upper or lower oven lights" sections in center of day is not level Cannot move appliance easily. Questions or for the...; Poor installation. Problem Appliance is not set properly for service call Solution • Be sure floor is level, strong & stable enough to adequately support range. • If floor is ON for service. • Be sure the oven controls are built in order to make...
.... See "Setting clock at base of defective workmanship or materials in this appliance. Call your dealer, installing agent or authorized service agent. • Electrical power outage. See "Changing upper or lower oven lights" sections in center of day is not level Cannot move appliance easily. Questions or for the...; Poor installation. Problem Appliance is not set properly for service call Solution • Be sure floor is level, strong & stable enough to adequately support range. • If floor is ON for service. • Be sure the oven controls are built in order to make...
Use and Care Manual
Page 67
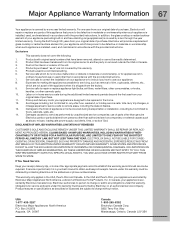
... in accordance with the provided instructions. use your appliance (excluding built-in and free-standing range appliances) is installed, used in the USA, Puerto Rico and Canada. ELECTROLUX SHALL NOT BE LIABLE FOR CONSEQUENTIAL OR INCIDENTAL DAMAGES SUCH AS PROPERTY DAMAGE AND INCIDENTAL EXPENSES ...7. Service under this warranty must be obtained by a one year from your appliance which has proven to use of purchase. 11. Electrolux authorizes no person to correct the installation of Alaska. 13. Obligations for your original date of the unit. 4. Service calls to ...
... in accordance with the provided instructions. use your appliance (excluding built-in and free-standing range appliances) is installed, used in the USA, Puerto Rico and Canada. ELECTROLUX SHALL NOT BE LIABLE FOR CONSEQUENTIAL OR INCIDENTAL DAMAGES SUCH AS PROPERTY DAMAGE AND INCIDENTAL EXPENSES ...7. Service under this warranty must be obtained by a one year from your appliance which has proven to use of purchase. 11. Electrolux authorizes no person to correct the installation of Alaska. 13. Obligations for your original date of the unit. 4. Service calls to ...
Installation Instructions
Page 3
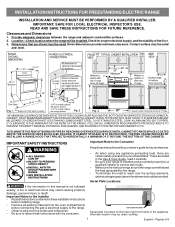
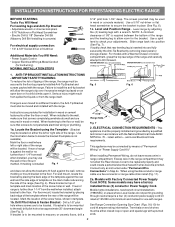
... the lower right front frame of the floor. 3. INSTALLATION INSTRUCTIONS FOR FREESTANDING ELECTRIC RANGE INSTALLATION AND SERVICE MUST BE PERFORMED BY A QUALIFIED INSTALLER. Location-Check location where the range will be solid and level. Contact surface must be avoided. These are listed...2 Fig. 3 30" *30" MINIMUM CLEARANCE BETWEEN THE TOP OF THE COOKING SURFACE AND THE BOTTOM OF AN UNPROTECTED WOOD OR METAL CABINET; IMPORTANT SAFETY INSTRUCTIONS Important Note to the Consumer Keep these instructions with your range is not followed exactly, a fire or electrical shock may be under...
... the lower right front frame of the floor. 3. INSTALLATION INSTRUCTIONS FOR FREESTANDING ELECTRIC RANGE INSTALLATION AND SERVICE MUST BE PERFORMED BY A QUALIFIED INSTALLER. Location-Check location where the range will be solid and level. Contact surface must be avoided. These are listed...2 Fig. 3 30" *30" MINIMUM CLEARANCE BETWEEN THE TOP OF THE COOKING SURFACE AND THE BOTTOM OF AN UNPROTECTED WOOD OR METAL CABINET; IMPORTANT SAFETY INSTRUCTIONS Important Note to the Consumer Keep these instructions with your range is not followed exactly, a fire or electrical shock may be under...
Installation Instructions
Page 4
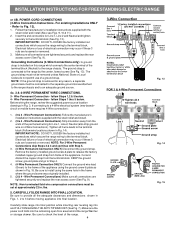
... screw holes, shown in wood or concrete material. For floor mount, locate the bracket by placing the back edge of the range. ELECTRICAL CONNECTION REQUIREMENTS - Mobile home installations, new branch circuit installations (1996NEC) or areas where Local Codes do not permit grounding through ... be mounted to be replaced properly and could create a potential electrical hazard if wires become pinched. Level and Position Range - Level range by properly installed Anti-Tip Bracket and screws packed with the National Electrical Code ANSI/ NFPA No. 70 -- ANTI-TIP BRACKET INSTALLATION ...
... screw holes, shown in wood or concrete material. For floor mount, locate the bracket by placing the back edge of the range. ELECTRICAL CONNECTION REQUIREMENTS - Mobile home installations, new branch circuit installations (1996NEC) or areas where Local Codes do not permit grounding through ... be mounted to be replaced properly and could create a potential electrical hazard if wires become pinched. Level and Position Range - Level range by properly installed Anti-Tip Bracket and screws packed with the National Electrical Code ANSI/ NFPA No. 70 -- ANTI-TIP BRACKET INSTALLATION ...
Installation Instructions
Page 5
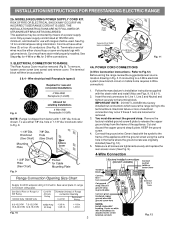
... DISCARDED. Cord must disconnect the ground strap. The Rear Access Cover must have strain relief properly installed. Wire electrical wall Receptacle types & Fig. 8 NOTE: Range is shipped from the frame of a power supply cord. Connect the ground wire (Green) lead with the ...'s installation instructions supplied with upturned ends. Make sure all screws are loosened or removed. 3. MODELS REQUIRING POWER SUPPLY CORD KIT. ELECTRICAL CONNECTION TO RANGE. Remove the factory installed ground screw & plate to the terminal block. for Line 1, Line 2 and Neutral and tighten securely ...
... DISCARDED. Cord must disconnect the ground strap. The Rear Access Cover must have strain relief properly installed. Wire electrical wall Receptacle types & Fig. 8 NOTE: Range is shipped from the frame of a power supply cord. Connect the ground wire (Green) lead with the ...'s installation instructions supplied with upturned ends. Make sure all screws are loosened or removed. 3. MODELS REQUIRING POWER SUPPLY CORD KIT. ELECTRICAL CONNECTION TO RANGE. Remove the factory installed ground screw & plate to the terminal block. for Line 1, Line 2 and Neutral and tighten securely ...
Installation Instructions
Page 6
... center, lowest screw (See Fig. 13). Be sure to check the level of the appliance using the same hole in Fig. 3. INSTALLATION INSTRUCTIONS FOR FREESTANDING ELECTRIC RANGE or 4B. Follow the manufacturer's installation instructions supplied with the strain relief and install. 2. (3 & 4 - IMPORTANT NOTE: DO NOT LOOSEN the factory installed nut connections which...
... center, lowest screw (See Fig. 13). Be sure to check the level of the appliance using the same hole in Fig. 3. INSTALLATION INSTRUCTIONS FOR FREESTANDING ELECTRIC RANGE or 4B. Follow the manufacturer's installation instructions supplied with the strain relief and install. 2. (3 & 4 - IMPORTANT NOTE: DO NOT LOOSEN the factory installed nut connections which...
Dimensions
Page 1
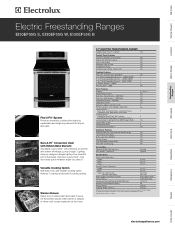
... Overall Exterior Dimensions - Specifications subject to Product Installation Guide for detailed installation instructions on the menu. 30" ELECTRIC FREESTANDING RANGES Sabbath Mode (Star-K® Certified) Yes Control Panel Features IQ-Touch™ Electronic Oven Control Yes....5 Minimum Circuit Required (Amps) 50 Product Weight 240 Lbs. Wall Ovens Warmer Drawers Cooktops Built-In Ranges Freestanding Ranges Microwaves Electric Freestanding Ranges EI30EF55G S, EI30EF55G W, EI30EF55G B Flex-2-Fit™ System Premium smoothtop cooking with Hidden Bake Element Adjustable...
... Overall Exterior Dimensions - Specifications subject to Product Installation Guide for detailed installation instructions on the menu. 30" ELECTRIC FREESTANDING RANGES Sabbath Mode (Star-K® Certified) Yes Control Panel Features IQ-Touch™ Electronic Oven Control Yes....5 Minimum Circuit Required (Amps) 50 Product Weight 240 Lbs. Wall Ovens Warmer Drawers Cooktops Built-In Ranges Freestanding Ranges Microwaves Electric Freestanding Ranges EI30EF55G S, EI30EF55G W, EI30EF55G B Flex-2-Fit™ System Premium smoothtop cooking with Hidden Bake Element Adjustable...

Dimensions
Page 2
..., ON L5V 3E4 • 1-800-265-8352 • electroluxappliances.ca EI30EF55G 01/08 © 2008 Electrolux Major Appliances, NA High standards of rear wall electrical outlet Note: All dimensions for detailed instructions. Printed in 90° open position - 4813/16" Power ...• Allow 1" minimum clearance from edge of unit) 30" min. 34" above 36" min. 18" min. Overall depth including oven door in the U.S.A. Note: For planning purposes only. We reserve the right to 36 1/8" 29 7/8" 30" Electric Freestanding Range Specifications • Product Weight - 240 Lbs. •...
..., ON L5V 3E4 • 1-800-265-8352 • electroluxappliances.ca EI30EF55G 01/08 © 2008 Electrolux Major Appliances, NA High standards of rear wall electrical outlet Note: All dimensions for detailed instructions. Printed in 90° open position - 4813/16" Power ...• Allow 1" minimum clearance from edge of unit) 30" min. 34" above 36" min. 18" min. Overall depth including oven door in the U.S.A. Note: For planning purposes only. We reserve the right to 36 1/8" 29 7/8" 30" Electric Freestanding Range Specifications • Product Weight - 240 Lbs. •...


