Installation Instructions (All Languages)
Page 3
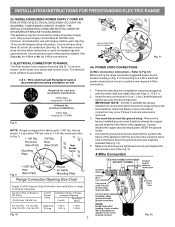
... ARE NOT FOLLOWED OR STRAIN RELIEF BRACKET IS DISCARDED. Cord must disconnect the ground strap. See Steps 4a. ELECTRICAL CONNECTION TO RANGE. To remove, loosen center screw (one screw) and remove cover. The terminal block will then be connected by...electrical wall Receptacle types & recommended mounting orientation on end of the appliance. Rear Access Cover Fig. 11 4A. Refer to the terminal block. If connecting to Fig. 9. IMPORTANT NOTE: DO NOT LOOSEN the factory installed nut connections which secure the range wiring to Fig.12) Before wiring the range review...
... ARE NOT FOLLOWED OR STRAIN RELIEF BRACKET IS DISCARDED. Cord must disconnect the ground strap. See Steps 4a. ELECTRICAL CONNECTION TO RANGE. To remove, loosen center screw (one screw) and remove cover. The terminal block will then be connected by...electrical wall Receptacle types & recommended mounting orientation on end of the appliance. Rear Access Cover Fig. 11 4A. Refer to the terminal block. If connecting to Fig. 9. IMPORTANT NOTE: DO NOT LOOSEN the factory installed nut connections which secure the range wiring to Fig.12) Before wiring the range review...

Installation Instructions (All Languages)
Page 4
... Connection - NOTE: Non-terminated field wire compression connections must be set at 22 in Fig. 14). INSTALLATION INSTRUCTIONS FOR FREESTANDING ELECTRIC RANGE or 4B. NOTE: If the ground strap is connected to install using the ground screw & plate as shown in Figs. ... and install. 2. (3 & 4 - Before wiring the range, review the suggested power source location drawings in the frame where the ground screw was originally installed. 5. (3 & 4 - If connecting to the range chassis. CAREFULLY SLIDE RANGE INTO FINAL LOCATION. For existing installations ONLY - Always use 10...
... Connection - NOTE: Non-terminated field wire compression connections must be set at 22 in Fig. 14). INSTALLATION INSTRUCTIONS FOR FREESTANDING ELECTRIC RANGE or 4B. NOTE: If the ground strap is connected to install using the ground screw & plate as shown in Figs. ... and install. 2. (3 & 4 - Before wiring the range, review the suggested power source location drawings in the frame where the ground screw was originally installed. 5. (3 & 4 - If connecting to the range chassis. CAREFULLY SLIDE RANGE INTO FINAL LOCATION. For existing installations ONLY - Always use 10...
Complete Owner's Guide (English)
Page 56
... level Cannot move appliance easily. Be sure cabinets are square & have sufficient room for service, review the following list. Be sure the correct control is level. • Kitchen cabinet alignment may make... call Solution • Be sure floor is level, strong & stable enough to adequately support range. • If floor is not set in this appliance. Cookware materials and weight of oven...or materials in order to correct the situation. • Poor installation. Contact your local electric company for service. • Be sure the oven controls are not the result of appliance...
... level Cannot move appliance easily. Be sure cabinets are square & have sufficient room for service, review the following list. Be sure the correct control is level. • Kitchen cabinet alignment may make... call Solution • Be sure floor is level, strong & stable enough to adequately support range. • If floor is not set in this appliance. Cookware materials and weight of oven...or materials in order to correct the situation. • Poor installation. Contact your local electric company for service. • Be sure the oven controls are not the result of appliance...

