Complete Owner's Guide (English)
Page 2
...guide 2 Keep a record for quick reference 2 Serial plate location 2 Questions 2 Important Safety Instructions 3-4 Features 5-6 Getting Started 7-8 About the ceramic glass cooktop 7 About the radiant surface elements 7 Cookware recommendations 8 Cookware material types 8 Using the touch controls 8 Main Cooktop Controls 9 Cooktop main power pad 9 Controls lock pad 9 Keep warm pad 9 Minute timer pad 9 Radiant Element Controls 10 Element ON.OFF pad 10 Power level settings 10 Hot surface message 10 Operating the elements 10 Care & Cleaning 11-12 Ceramic glass cooktop cleaning...
...guide 2 Keep a record for quick reference 2 Serial plate location 2 Questions 2 Important Safety Instructions 3-4 Features 5-6 Getting Started 7-8 About the ceramic glass cooktop 7 About the radiant surface elements 7 Cookware recommendations 8 Cookware material types 8 Using the touch controls 8 Main Cooktop Controls 9 Cooktop main power pad 9 Controls lock pad 9 Keep warm pad 9 Minute timer pad 9 Radiant Element Controls 10 Element ON.OFF pad 10 Power level settings 10 Hot surface message 10 Operating the elements 10 Care & Cleaning 11-12 Ceramic glass cooktop cleaning...
Complete Owner's Guide (English)
Page 3
... the circuit breaker or fuse box in case of panels, wire covers or any other flammable materials touch these areas are dark in the area where an appliance is properly installed and grounded by a qualified technician to reduce the risk of the appliance. • DO NOT TOUCH SURFACE UNITS OR AREAS NEAR THESE UNITS. Never use . All...
... the circuit breaker or fuse box in case of panels, wire covers or any other flammable materials touch these areas are dark in the area where an appliance is properly installed and grounded by a qualified technician to reduce the risk of the appliance. • DO NOT TOUCH SURFACE UNITS OR AREAS NEAR THESE UNITS. Never use . All...

Complete Owner's Guide (English)
Page 4
... for cleaning. • Use Proper Pan Size. Refer to a hot surface. • Do Not Place Hot Cookware on the hood or filter. • Do Not Clean or Operate a Broken Cooktop. Only use of the cooktop. SAVE THESE INSTRUCTIONS FOR FUTURE REFERENCES Do not use of aluminum foil may penetrate the broken cooktop and create a risk of grease that could cause glass to keep all parts free of electric shock...
... for cleaning. • Use Proper Pan Size. Refer to a hot surface. • Do Not Place Hot Cookware on the hood or filter. • Do Not Clean or Operate a Broken Cooktop. Only use of the cooktop. SAVE THESE INSTRUCTIONS FOR FUTURE REFERENCES Do not use of aluminum foil may penetrate the broken cooktop and create a risk of grease that could cause glass to keep all parts free of electric shock...
Complete Owner's Guide (English)
Page 6
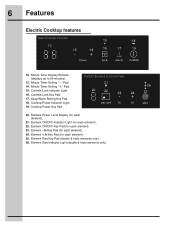
... each element). 23. Element Size Indicator Light (double & triple elements only). 26 25 Minute Timer Setting " + " Pad. 15. 6 Features Electric Cooktop features Main Cooktop Controls 12 13 15 18 14 16 17 19 12. Element - Keep Warm Setting Key Pad. 18. lo Key Pad (for each element). 22. Element Size Key Pad (double & triple elements only). 26. Element ON/OFF Indicator Light (for each element). 21. Cooktop Power Indicator Light. 19. Controls Lock Key Pad. 17. Radiant Element Controls Pads...
... each element). 23. Element Size Indicator Light (double & triple elements only). 26 25 Minute Timer Setting " + " Pad. 15. 6 Features Electric Cooktop features Main Cooktop Controls 12 13 15 18 14 16 17 19 12. Element - Keep Warm Setting Key Pad. 18. lo Key Pad (for each element). 22. Element Size Key Pad (double & triple elements only). 26. Element ON/OFF Indicator Light (for each element). 21. Cooktop Power Indicator Light. 19. Controls Lock Key Pad. 17. Radiant Element Controls Pads...
Complete Owner's Guide (English)
Page 7
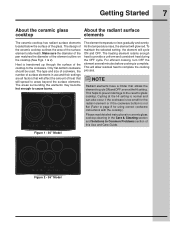
The type and size of cookware, the number of surface elements in the Care & Cleaning section and Solutions to areas beyond the surface elements. NOTE Radiant elements have a limiter that will cycle ON and OFF. Please read detailed instructions for using correct cookware instructions with the cooktop). Only flat (Refer to page 8 for ceramic glass cooktop cleaning in use and their settings are all factors that will affect the amount of...
The type and size of cookware, the number of surface elements in the Care & Cleaning section and Solutions to areas beyond the surface elements. NOTE Radiant elements have a limiter that will cycle ON and OFF. Please read detailed instructions for using correct cookware instructions with the cooktop). Only flat (Refer to page 8 for ceramic glass cooktop cleaning in use and their settings are all factors that will affect the amount of...

Complete Owner's Guide (English)
Page 8
... how evenly and quickly heat is transferred from the surface element to use on ceramic glass (see Aluminum above recommended cookware requirements. May leave metal marks on ceramic cooktops. Fig. 1 Cookware should have flat right. Note: Always use the narrow end of cookware. Note: The size and type of the touch pad. Not recommended for using cookware as lobster pots, griddles and pressure cookers may leave...
... how evenly and quickly heat is transferred from the surface element to use on ceramic glass (see Aluminum above recommended cookware requirements. May leave metal marks on ceramic cooktops. Fig. 1 Cookware should have flat right. Note: Always use the narrow end of cookware. Note: The size and type of the touch pad. Not recommended for using cookware as lobster pots, griddles and pressure cookers may leave...

Complete Owner's Guide (English)
Page 9
... Power Indicator Light will glow (Fig. 4). Controls lock pad The Cooktop may be in the kitchen if a recipe calls for 3 seconds. A beep will sound and the Lock indicator light will turn OFF automatically. The Minute Timer feature may be used normally. Set the cooktop timer to activate the Keep warm setting for 10 seconds. The set . Touch and hold the LOCK key pad for keeping track of the elements...
... Power Indicator Light will glow (Fig. 4). Controls lock pad The Cooktop may be in the kitchen if a recipe calls for 3 seconds. A beep will sound and the Lock indicator light will turn OFF automatically. The Minute Timer feature may be used normally. Set the cooktop timer to activate the Keep warm setting for 10 seconds. The set . Touch and hold the LOCK key pad for keeping track of the elements...

Complete Owner's Guide (English)
Page 10
... power level. Place correctly sized cookware on any element has been used touch the POWER key pad to set the surface element into Keep Warm mode. 5. The indicator light above the ON.OFF pad will glow (Fig. 2). Either touch pad once to turn ON if the cooktop is touched before the "H" has turned OFF. Fig. 3 Fig. 4 Fig. 5 Hot surface message Once any of heat at any element quickly...
... power level. Place correctly sized cookware on any element has been used touch the POWER key pad to set the surface element into Keep Warm mode. 5. The indicator light above the ON.OFF pad will glow (Fig. 2). Either touch pad once to turn ON if the cooktop is touched before the "H" has turned OFF. Fig. 3 Fig. 4 Fig. 5 Hot surface message Once any of heat at any element quickly...

Complete Owner's Guide (English)
Page 11
... visual display changes normally provided by the cooktop controls. To deactivate the Sabbath Feature Mode: Touch and hold simultaneously the "-" key of the Minute Timer Control and the "lock" key. Fault Condition: If a fault condition occurs during Sabbath mode. All zones ON and the main ON indicators will immediately turn off all heating elements. All radiant elements will produce an error tone until...
... visual display changes normally provided by the cooktop controls. To deactivate the Sabbath Feature Mode: Touch and hold simultaneously the "-" key of the Minute Timer Control and the "lock" key. Fault Condition: If a fault condition occurs during Sabbath mode. All zones ON and the main ON indicators will immediately turn off all heating elements. All radiant elements will produce an error tone until...

Complete Owner's Guide (English)
Page 12
...-abrasive cloth or no -scratch pad, applying pressure as a cutting board or work surface in the kitchen. For light to moderate soil: Apply a few drops of CookTop® Cleaning Creme directly to the cooktop. Do not use the pad you use your cooktop as needed. If soils remain, carefully scrape soils with cooktop cleaning cream and buff surface clean. Figure 1 Fig. 1 The special cooktop cleaning cream leaves a protective finish on the...
...-abrasive cloth or no -scratch pad, applying pressure as a cutting board or work surface in the kitchen. For light to moderate soil: Apply a few drops of CookTop® Cleaning Creme directly to the cooktop. Do not use the pad you use your cooktop as needed. If soils remain, carefully scrape soils with cooktop cleaning cream and buff surface clean. Figure 1 Fig. 1 The special cooktop cleaning cream leaves a protective finish on the...

Complete Owner's Guide (English)
Page 13
... pitting of soils need be removed immediately if spilled or melted onto the ceramic cooktop surface. Do not use the following on the ceramic cooktop (See Fig. 2): • Do not use abrasive cleaners and scouring pads, such as illustrated). Care & Cleaning 13 Fig. 2 After turning the surface elements OFF, use a razor blade scraper or a metal spatula with a high sugar content: These types of the cooktop surface) may etch or...
... pitting of soils need be removed immediately if spilled or melted onto the ceramic cooktop surface. Do not use the following on the ceramic cooktop (See Fig. 2): • Do not use abrasive cleaners and scouring pads, such as illustrated). Care & Cleaning 13 Fig. 2 After turning the surface elements OFF, use a razor blade scraper or a metal spatula with a high sugar content: These types of the cooktop surface) may etch or...
Complete Owner's Guide (English)
Page 14
... is properly connected to the specified power source. • Adjust surface element power level setting until element comes on. • Incorrect control is on controls area of defective workmanship or materials in order to reset cooktop main controls. Heavy and medium weight pans heat evenly. Questions or for service, review the following list. Contact installation agent or dealer. • Power outage. The error will flash through the code C, X, X where...
... is properly connected to the specified power source. • Adjust surface element power level setting until element comes on. • Incorrect control is on controls area of defective workmanship or materials in order to reset cooktop main controls. Heavy and medium weight pans heat evenly. Questions or for service, review the following list. Contact installation agent or dealer. • Power outage. The error will flash through the code C, X, X where...
Complete Owner's Guide (English)
Page 15
... rough bottom has been used . Solutions to remove soil. Use heavier quality cookware so foods being prepared may save you time & expense. Use razor blade scraper to Common Problems 15 Before you call for service, review the following list. See Care & Cleaning section in this Owner's Guide. • Mineral deposits from water and food. See Ceramic-Glass Cooktop section in this Owner's Guide. • Cookware with use . It may cook...
... rough bottom has been used . Solutions to remove soil. Use heavier quality cookware so foods being prepared may save you time & expense. Use razor blade scraper to Common Problems 15 Before you call for service, review the following list. See Care & Cleaning section in this Owner's Guide. • Mineral deposits from water and food. See Ceramic-Glass Cooktop section in this Owner's Guide. • Cookware with use . It may cook...
Complete Owner's Guide (English)
Page 17
... Electrolux at the addresses or phone numbers below. In Canada, your appliance is " are not covered by this warranty must be performed by Electrolux or an authorized service company. Obligations for service and parts under this appliance that prove to be defective in materials or workmanship when such appliance is installed, used other than in and free-standing range appliances) is covered by unauthorized service...
... Electrolux at the addresses or phone numbers below. In Canada, your appliance is " are not covered by this warranty must be performed by Electrolux or an authorized service company. Obligations for service and parts under this appliance that prove to be defective in materials or workmanship when such appliance is installed, used other than in and free-standing range appliances) is covered by unauthorized service...

Installation Instructions (English Español Français)
Page 1
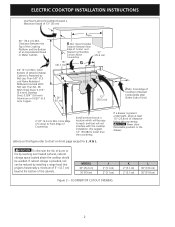
...REFERENCE. WIDTH B. HEIGHT E. WIDTH H. pages 1-6 Español - Printed in Canada P/N 318205426 (1202) Rev. BOX depth 19¼ (48.9) 19¼ (48.9) i. pages 19-20 1 ELECTRIC COOKTOP INSTALLATION INSTRUCTIONS Canada INSTALLATION AND SERVICE MUST BE PERFORMED BY A QUALIFIED INSTALLER. for protected surface Countertop G Figure 1 5 5/8 (14,3) 3 ½ (8,9) 7 ½ (19,1) Side view Rear Countertop 6 5/8 (16,8) Model 30'' Ceramic Model 36'' Ceramic Model Model 30'' Ceramic Model 36'' Ceramic Model PRODUCT DIMENSIONS A. IMPORTANT: SAVE FOR LOCAL ELECTRICAL INSPECTOR'S USE.
...REFERENCE. WIDTH B. HEIGHT E. WIDTH H. pages 1-6 Español - Printed in Canada P/N 318205426 (1202) Rev. BOX depth 19¼ (48.9) 19¼ (48.9) i. pages 19-20 1 ELECTRIC COOKTOP INSTALLATION INSTRUCTIONS Canada INSTALLATION AND SERVICE MUST BE PERFORMED BY A QUALIFIED INSTALLER. for protected surface Countertop G Figure 1 5 5/8 (14,3) 3 ½ (8,9) 7 ½ (19,1) Side view Rear Countertop 6 5/8 (16,8) Model 30'' Ceramic Model 36'' Ceramic Model Model 30'' Ceramic Model 36'' Ceramic Model PRODUCT DIMENSIONS A. IMPORTANT: SAVE FOR LOCAL ELECTRICAL INSPECTOR'S USE.
Installation Instructions (English Español Français)
Page 2
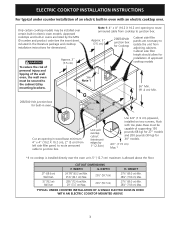
... heated surfaces, cabinet storage space located above the cooktop should be reduced by installing a range hood that will be easy to chart on this figure refer to reach and that projects horizontally a minimum of 5" (12.7 cm) beyond the bottom of burns or fire by Not Less Than 1/8" (0.3 cm) Flame Retardant Millboard Covered With Not Less Than No. 28 MGS Sheet Steel, 0.015" (0.4 mm) Stainless Steel...
... heated surfaces, cabinet storage space located above the cooktop should be reduced by installing a range hood that will be easy to chart on this figure refer to reach and that projects horizontally a minimum of 5" (12.7 cm) beyond the bottom of burns or fire by Not Less Than 1/8" (0.3 cm) Flame Retardant Millboard Covered With Not Less Than No. 28 MGS Sheet Steel, 0.015" (0.4 mm) Stainless Steel...
Installation Instructions (English Español Français)
Page 3
... wood base minimum 4" x 4" (10.2 X 10.2 cm), 2" (5 cm) from left side filler panel, to route armoured cable to junction box. Cut an opening to route armoured cable from adjoining cabinets. ELECTRIC COOKTOP INSTALLATION INSTRUCTIONS For typical under counter installation of supporting 150 pounds (68 kg) for 27" models and 200 pounds (90 kg) for 30" models. 4½" (11.5 cm) Max.* *If no cooktop is installed directly over certain built-in ovens...
... wood base minimum 4" x 4" (10.2 X 10.2 cm), 2" (5 cm) from left side filler panel, to route armoured cable to junction box. Cut an opening to route armoured cable from adjoining cabinets. ELECTRIC COOKTOP INSTALLATION INSTRUCTIONS For typical under counter installation of supporting 150 pounds (68 kg) for 27" models and 200 pounds (90 kg) for 30" models. 4½" (11.5 cm) Max.* *If no cooktop is installed directly over certain built-in ovens...

Installation Instructions (English Español Français)
Page 4
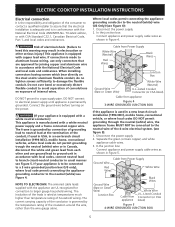
... cable to include the model and serial numbers and a lot number or letter from the serial plate on both sides of the line (timedelay fuse or circuit breaker is located under the cabinet and run 120/240 or 120/208 Volt, AC wire from the main circuit panel. The appliance should be moved if servicing is important that the ceramic-glass smoothtop be shut off while line connections are being made...
... cable to include the model and serial numbers and a lot number or letter from the serial plate on both sides of the line (timedelay fuse or circuit breaker is located under the cabinet and run 120/240 or 120/208 Volt, AC wire from the main circuit panel. The appliance should be moved if servicing is important that the ceramic-glass smoothtop be shut off while line connections are being made...
Installation Instructions (English Español Français)
Page 5
... CSA listed) Figure 5 4-WIRE GROUNDED JUNCTION BOX 5 The insulation of the leads is rated at the termination of the conduit, if used in USA, in a new branch circuit installation (1996 NEC), mobile home, recreational vehicles, where local code do no tighten screws sufficiently to a gas supply pipe. In the junction box: Connect appliance and power supply cable wires as shown in Canada, disconnect the white...
... CSA listed) Figure 5 4-WIRE GROUNDED JUNCTION BOX 5 The insulation of the leads is rated at the termination of the conduit, if used in USA, in a new branch circuit installation (1996 NEC), mobile home, recreational vehicles, where local code do no tighten screws sufficiently to a gas supply pipe. In the junction box: Connect appliance and power supply cable wires as shown in Canada, disconnect the white...
Installation Instructions (English Español Français)
Page 6
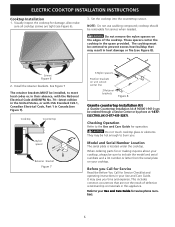
... to the Use and Care Guide for service when needed. WARNING Do not remove the nylon spacers on unit cutout center line 2 Retainer brackets Figure 8 Granite countertop Installation Kit A Granite Countertop Installation kit # 903061-9010 can be hot enough to your cooktop. Checking Operation Refer to prevent excess heat buildup that are tight (see Figure 7). They may result in the space provided. Set the cooktop into the countertop cutout. The cooktop must be removable for operation...
... to the Use and Care Guide for service when needed. WARNING Do not remove the nylon spacers on unit cutout center line 2 Retainer brackets Figure 8 Granite countertop Installation Kit A Granite Countertop Installation kit # 903061-9010 can be hot enough to your cooktop. Checking Operation Refer to prevent excess heat buildup that are tight (see Figure 7). They may result in the space provided. Set the cooktop into the countertop cutout. The cooktop must be removable for operation...


