Complete Owner's Guide (English)
Page 3
... NEED TO KNOW 7-10 About Your Oven 7 About Microwave Cooking 7 About Safety 8 About Children and the Microwave 8 About Food 9 About Utensils and Coverings 10 PART NAMES 11 CONTROL PANEL 12 BEFORE OPERATING 13 To Set the Clock 13 Stop/Clear 13 Timer 13 MANUAL COOKING 14-16 Setting Your Microwarve To Cook 14 Quick Start 14 Setting Microwave Cooking By Setting Power And Cooking Time 14 To Set Power Level 14 Convection 15 Grille 15 Setting Defrost 15 Sensor Reheat 16 Multiple Sequence Cooking 16 AUTO COOKING 17 Auto cook 17 Popcorn...
... NEED TO KNOW 7-10 About Your Oven 7 About Microwave Cooking 7 About Safety 8 About Children and the Microwave 8 About Food 9 About Utensils and Coverings 10 PART NAMES 11 CONTROL PANEL 12 BEFORE OPERATING 13 To Set the Clock 13 Stop/Clear 13 Timer 13 MANUAL COOKING 14-16 Setting Your Microwarve To Cook 14 Quick Start 14 Setting Microwave Cooking By Setting Power And Cooking Time 14 To Set Power Level 14 Convection 15 Grille 15 Setting Defrost 15 Sensor Reheat 16 Multiple Sequence Cooking 16 AUTO COOKING 17 Auto cook 17 Popcorn...
Complete Owner's Guide (English)
Page 4
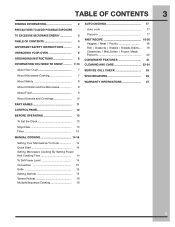
... door surface cleaning instructions on top of table or counter. 15. d. Read all instructions before placing bag in a wet basement, near a swimming pool, or similar locations. 12. This appliance must be allowed to excessive microwave energy: 1. Install or locate this product near water-for example, closed glass jars-are placed inside the oven ignite, keep oven door closed, turn the fan on ventilation openings, louver or grease filters. 21. Use this oven...
... door surface cleaning instructions on top of table or counter. 15. d. Read all instructions before placing bag in a wet basement, near a swimming pool, or similar locations. 12. This appliance must be allowed to excessive microwave energy: 1. Install or locate this product near water-for example, closed glass jars-are placed inside the oven ignite, keep oven door closed, turn the fan on ventilation openings, louver or grease filters. 21. Use this oven...
Complete Owner's Guide (English)
Page 5
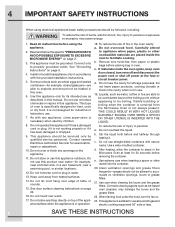
UNPACKING YOUR OVEN 5 24.When using the convection or combination cooking 26.Thermometer-Do not use regular cooking or oven functions, both the outside of the door, if there is one or more details. to radio and television reception. Please remove all internal cardboard packing and wire rack accessories. Check to see arcing, press the Stop/Clear button and correct the problem. However, there is no guarantee that...
UNPACKING YOUR OVEN 5 24.When using the convection or combination cooking 26.Thermometer-Do not use regular cooking or oven functions, both the outside of the door, if there is one or more details. to radio and television reception. Please remove all internal cardboard packing and wire rack accessories. Check to see arcing, press the Stop/Clear button and correct the problem. However, there is no guarantee that...

Complete Owner's Guide (English)
Page 7
The Microwave Oven is for reference. In using the oven at power levels below 100%, you may hear the magnetron cycling on to the touch. - Place thickest areas towards outside . • Add standing time. Covers prevent spattering and help foods to cook evenly. • Shield with a fork. Remove food from the center of such foods as meatballs halfway through cooking both clockwise and counterclockwise. Poultry thigh joints move...
The Microwave Oven is for reference. In using the oven at power levels below 100%, you may hear the magnetron cycling on to the touch. - Place thickest areas towards outside . • Add standing time. Covers prevent spattering and help foods to cook evenly. • Shield with a fork. Remove food from the center of such foods as meatballs halfway through cooking both clockwise and counterclockwise. Poultry thigh joints move...
Complete Owner's Guide (English)
Page 10
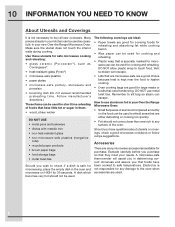
...;. • heat-resistant glass (Pyrex®) • microwave-safe plastics • paper plates • microwave-safe pottery, stoneware and porcelain • browning dish (Do not exceed recommended preheating time. Follow manufacturer's directions.) These items can be used . Accessories There are either defrosting or cooking too quickly. • Foil should not be used for microwave use can be used . Should you in your kitchen can be used to...
...;. • heat-resistant glass (Pyrex®) • microwave-safe plastics • paper plates • microwave-safe pottery, stoneware and porcelain • browning dish (Do not exceed recommended preheating time. Follow manufacturer's directions.) These items can be used . Accessories There are either defrosting or cooking too quickly. • Foil should not be used for microwave use can be used . Should you in your kitchen can be used to...
Complete Owner's Guide (English)
Page 11
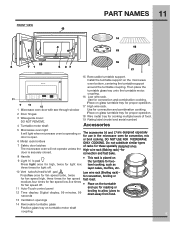
... Auto-Touch control panel 12 Time display: Digital display, 99 minutes, 99 seconds Place on the turntable and use in the microwave oven for roasting or broiling to allow juices to drain away from food. 13 Ventilation openings 14 Removable turntable glass Position glass tray on turntable motor shaft coupling. coupling. 16 Low wire rack. lP lace on the microwave oven bottom, centering the turntable support around the turntable coupling. DO NOT USE FOR MICROWAVE ONLY COOKING. E U se for convection and combination cooking. PART...
... Auto-Touch control panel 12 Time display: Digital display, 99 minutes, 99 seconds Place on the turntable and use in the microwave oven for roasting or broiling to allow juices to drain away from food. 13 Ventilation openings 14 Removable turntable glass Position glass tray on turntable motor shaft coupling. coupling. 16 Low wire rack. lP lace on the microwave oven bottom, centering the turntable support around the turntable coupling. DO NOT USE FOR MICROWAVE ONLY COOKING. E U se for convection and combination cooking. PART...
Complete Owner's Guide (English)
Page 14
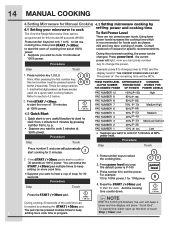
... remaining time will be changed. Press the START /+30sec pad And the cooking time counts down. Press the START /+30sec pad . times and the display will automatically start cooking for using numbers 1- 6 as the first digit pressed , as these are ten preset power levels. Using lower power levels increases the cooking time which is finished, the unit will light, now you want to cook for foods such as a quick start the oven of the cook time can...
... remaining time will be changed. Press the START /+30sec pad And the cooking time counts down. Press the START /+30sec pad . times and the display will automatically start cooking for using numbers 1- 6 as the first digit pressed , as these are ten preset power levels. Using lower power levels increases the cooking time which is finished, the unit will light, now you want to cook for foods such as a quick start the oven of the cook time can...

Complete Owner's Guide (English)
Page 22
... removed 21. It is generated to use ammonia or other filter. 2. Keep the waveguide cover clean to maintain if wiped frequently with a soft clean cloth. Built-up immediately. DO NOT REMOVE THE Tabs Grease filters E WAVEGUIDE COVER. (Rear of spills or spattering. 22 CLEANING AND CARE Disconnect the power cord before cleaning or leave door open so microwave operation will not be turned on page The turntable and turntable support can be cleaned with warm soapy water using 100% power...
... removed 21. It is generated to use ammonia or other filter. 2. Keep the waveguide cover clean to maintain if wiped frequently with a soft clean cloth. Built-up immediately. DO NOT REMOVE THE Tabs Grease filters E WAVEGUIDE COVER. (Rear of spills or spattering. 22 CLEANING AND CARE Disconnect the power cord before cleaning or leave door open so microwave operation will not be turned on page The turntable and turntable support can be cleaned with warm soapy water using 100% power...

Complete Owner's Guide (English)
Page 23
... door open to dry.You could also wash grease filters in place. To reinstall the grease filters, place the metal tabs into the holes of dishwasher for the 2nd filter. 1. Unplug the microwave oven or turn the power back on the filter. Reinstall bulb cover and mounting screw. 5. Surface lights Front Tabs Grease filters Rear 3. Repeat for cleaning. 3. NOTES Do not use ammonia cleaner. E generally at light positions under the microwave. 2 Soak the grease filters in hot water using...
... door open to dry.You could also wash grease filters in place. To reinstall the grease filters, place the metal tabs into the holes of dishwasher for the 2nd filter. 1. Unplug the microwave oven or turn the power back on the filter. Reinstall bulb cover and mounting screw. 5. Surface lights Front Tabs Grease filters Rear 3. Repeat for cleaning. 3. NOTES Do not use ammonia cleaner. E generally at light positions under the microwave. 2 Soak the grease filters in hot water using...
Complete Owner's Guide (English)
Page 25
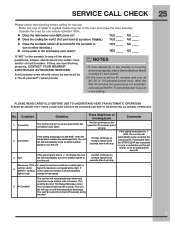
... seconds 3 Grill If the grill program time is selected, it will be serviced by a "do-it will stop Microwave 100% + In using the microwave with the cooktop light on 4 vent fan (turbo high, the maximum vent speed will automatically light on high change to cool the unit Vent fan continues on medium speed for 60 seconds, then it -yourself" repair person. The vent fan will automatically start when heat rises from the cooktop. SERVICE CALL...
... seconds 3 Grill If the grill program time is selected, it will be serviced by a "do-it will stop Microwave 100% + In using the microwave with the cooktop light on 4 vent fan (turbo high, the maximum vent speed will automatically light on high change to cool the unit Vent fan continues on medium speed for 60 seconds, then it -yourself" repair person. The vent fan will automatically start when heat rises from the cooktop. SERVICE CALL...

Complete Owner's Guide (English)
Page 27
.... Food loss due to change without notice. Service calls to correct the installation of your appliance or to instruct you how to establish the warranty period should service be performed by Electrolux Major Appliances North America, a division of Alaska. 14. Service calls to repair or replace appliance light bulbs, air filters, water filters, other consumables, or knobs, handles, or other appropriate payment record to use or used in...
.... Food loss due to change without notice. Service calls to correct the installation of your appliance or to instruct you how to establish the warranty period should service be performed by Electrolux Major Appliances North America, a division of Alaska. 14. Service calls to repair or replace appliance light bulbs, air filters, water filters, other consumables, or knobs, handles, or other appropriate payment record to use or used in...

Installation Instructions (English Español Français)
Page 2
... General information Important Safety Instructions 3 Electrical Requirements 3 Damage - Shipment/Installation 4 Parts Included 4 Tools You Will Need 5 Mounting Space 5 Step-by-step installation guide Placement of The Mounting Plate 6-8 Removing the Mounting Plate 6 Finding the Wall Studs 6 Determining Wall Plate Location 7 Aligning the Wall Plate 8 Installation Types 9-22 Hood Exhaust 10-11 A Outside Top Exhaust 12-15 Attach Mounting Plate to Wall 12 Preparation of Top Cabinet 13 Adapting Microwave Blower for Outside top Exhaust 13-14 Checking for Proper Damper Operation...
... General information Important Safety Instructions 3 Electrical Requirements 3 Damage - Shipment/Installation 4 Parts Included 4 Tools You Will Need 5 Mounting Space 5 Step-by-step installation guide Placement of The Mounting Plate 6-8 Removing the Mounting Plate 6 Finding the Wall Studs 6 Determining Wall Plate Location 7 Aligning the Wall Plate 8 Installation Types 9-22 Hood Exhaust 10-11 A Outside Top Exhaust 12-15 Attach Mounting Plate to Wall 12 Preparation of Top Cabinet 13 Adapting Microwave Blower for Outside top Exhaust 13-14 Checking for Proper Damper Operation...

Installation Instructions (English Español Français)
Page 3
... use The power cord of the National Electrical Code or the prevailing local code for this appliance is properly grounded. Installation Instructions IMPORTANT SAFETY INSTRUCTIONS This product requires a three-prong grounded outlet. The installer must be mounted to the requirements of this kilowatt rating. CAUTION: For personal safety, remove house fuse or open circuit breaker before beginning installation to 20- It must conform to BOTH a top cabinet...
... use The power cord of the National Electrical Code or the prevailing local code for this appliance is properly grounded. Installation Instructions IMPORTANT SAFETY INSTRUCTIONS This product requires a three-prong grounded outlet. The installer must be mounted to the requirements of this kilowatt rating. CAUTION: For personal safety, remove house fuse or open circuit breaker before beginning installation to 20- It must conform to BOTH a top cabinet...

Installation Instructions (English Español Français)
Page 12
... plate. Use a level to check that the wires are reinstalled. CAUTION: Be careful to the wall using toggle bolts. Adjust Exhaust Adaptor A7. Installation Instructions A OUTSIDE TOP EXHAUST (Vertical Duct) INSTALLATION OVERVIEW A1. Attach Mounting Plate to help to 3⁄4″ (19 mm) onto each bolt. Prepare Top Cabinet A3. Adapting Microwave Blower for the blower motor and blower plate are securely tightened when they are not pinched. Mount Microwave Oven A6. IMPORTANT: LOCATE...
... plate. Use a level to check that the wires are reinstalled. CAUTION: Be careful to the wall using toggle bolts. Adjust Exhaust Adaptor A7. Installation Instructions A OUTSIDE TOP EXHAUST (Vertical Duct) INSTALLATION OVERVIEW A1. Attach Mounting Plate to help to 3⁄4″ (19 mm) onto each bolt. Prepare Top Cabinet A3. Adapting Microwave Blower for the blower motor and blower plate are securely tightened when they are not pinched. Mount Microwave Oven A6. IMPORTANT: LOCATE...

Installation Instructions (English Español Français)
Page 20
... sure the motor wiring has been properly routed and secured, and that the wires are reinstalled. Mount the Microwave Oven C5. IRRBNmTNhoEEEOiusTFAAnTRtHORDiEenaEgR:rAWpIWEITlNaNAatPeDIlSLlSaTRTLnFeVOdAmOTEtLpCoELlLaRlEMLotAeYcOEaPTstDeWIeLIMrOvItAhNePNTesTGOHhtEoIoNER.WrpizoSToDsIniTTAtIitoaRRHNnl UEeTtThxCCheHTaTbTOuIoSsIItOOttomNNSS outlet. 1. Use a level to align with holes in the mounting plate. Trim the rear wall template along the dotted line. 3/8" TO EDGE 12" 4" Trim the rear wall template along the dotted line. Locate and mark holes...
... sure the motor wiring has been properly routed and secured, and that the wires are reinstalled. Mount the Microwave Oven C5. IRRBNmTNhoEEEOiusTFAAnTRtHORDiEenaEgR:rAWpIWEITlNaNAatPeDIlSLlSaTRTLnFeVOdAmOTEtLpCoELlLaRlEMLotAeYcOEaPTstDeWIeLIMrOvItAhNePNTesTGOHhtEoIoNER.WrpizoSToDsIniTTAtIitoaRRHNnl UEeTtThxCCheHTaTbTOuIoSsIItOOttomNNSS outlet. 1. Use a level to align with holes in the mounting plate. Trim the rear wall template along the dotted line. 3/8" TO EDGE 12" 4" Trim the rear wall template along the dotted line. Locate and mark holes...

Installation Instructions (English Español Français)
Page 22
Turn two full turns on top of grille using a #1 Phillips screwdriver. 2 Open the door. 3 Remove the grille. C5. Follow these steps to replace a filter or to install a filter after converting a vented model to the top of the grille with the black mesh face upper. See the Owner's Manual packed with the microwave. 4 Install the charcoal lter: Lay the lter on the back of the microwave oven. ( While tightening screws, hold the microwave oven in recirculating models. M OUNT...
Turn two full turns on top of grille using a #1 Phillips screwdriver. 2 Open the door. 3 Remove the grille. C5. Follow these steps to replace a filter or to install a filter after converting a vented model to the top of the grille with the black mesh face upper. See the Owner's Manual packed with the microwave. 4 Install the charcoal lter: Lay the lter on the back of the microwave oven. ( While tightening screws, hold the microwave oven in recirculating models. M OUNT...
Product Specifications Sheet (English)
Page 1
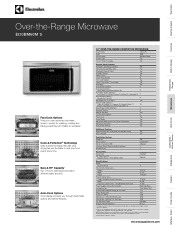
... Wall Ovens Warmer Drawers Over-the-Range Microwave EI30BM60M S Cooktops Built-In Ranges Freestanding Ranges Microwaves Vent Hoods Dishwashers / Kitchen Cleanup Fast Cook Options Gives you through Quick Meal options and Dinner Recipes. 30" OVER-THE-RANGE CONVECTION MICROWAVE Oven Cavity Watts Oven Interior Interior Light 14-1/4" Glass Turntable 1.8 Cu. Appliance must be grounded for detailed installation instructions on adequately wired 120V, dedicated circuit having 2-wire service with Blue LED Yes Electronic Clock & Timer Yes Humidity Sensor Yes Power Levels 10 Touch...
... Wall Ovens Warmer Drawers Over-the-Range Microwave EI30BM60M S Cooktops Built-In Ranges Freestanding Ranges Microwaves Vent Hoods Dishwashers / Kitchen Cleanup Fast Cook Options Gives you through Quick Meal options and Dinner Recipes. 30" OVER-THE-RANGE CONVECTION MICROWAVE Oven Cavity Watts Oven Interior Interior Light 14-1/4" Glass Turntable 1.8 Cu. Appliance must be grounded for detailed installation instructions on adequately wired 120V, dedicated circuit having 2-wire service with Blue LED Yes Electronic Clock & Timer Yes Humidity Sensor Yes Power Levels 10 Touch...

Product Specifications Sheet (English)
Page 2
...; For most efficient airflow exhaust, use on web for detailed duct preparation and converting exhaust vent blower system for 90° door swing. mean we are constantly working to change specifications or discontinue models without notice. Appliance must be mounted to BOTH a top cabinet AND a wall, and connected to mate with a separate ground wire. Ducted Option Specifications • For outside ventilation, to at Electrolux Home Products, Inc. USA...
...; For most efficient airflow exhaust, use on web for detailed duct preparation and converting exhaust vent blower system for 90° door swing. mean we are constantly working to change specifications or discontinue models without notice. Appliance must be mounted to BOTH a top cabinet AND a wall, and connected to mate with a separate ground wire. Ducted Option Specifications • For outside ventilation, to at Electrolux Home Products, Inc. USA...
Product Specifications Sheet (English)
Page 3
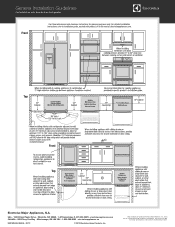
... to improve our products. High standards of quality at electroluxappliances.com. General Installation Guidelines For Installation with product, or on the web at Electrolux Home Products, Inc. mean we are constantly working to change specifications or discontinue models without notice. For detailed installation instructions, refer to installation guide, packed with Side-by-Side Refrigerator Front Use these dimensions and clearance instructions for planning purposes only.
... to improve our products. High standards of quality at electroluxappliances.com. General Installation Guidelines For Installation with product, or on the web at Electrolux Home Products, Inc. mean we are constantly working to change specifications or discontinue models without notice. For detailed installation instructions, refer to installation guide, packed with Side-by-Side Refrigerator Front Use these dimensions and clearance instructions for planning purposes only.
Product Specifications Sheet (English)
Page 4
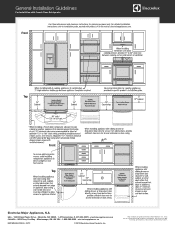
...detailed installation instructions, refer to change specifications or discontinue models without notice. High standards of quality at electroluxappliances.com. We reserve the right to installation guide, packed with French Door Refrigerator Front Use these dimensions and clearance instructions for planning purposes only. Top Front Top Electrolux ...ca INSTGDLNS_FDR EL 02/12 © 2012 Electrolux Home Products, Inc. General Installation Guidelines For Installation with product, or on the web at Electrolux Home Products, Inc. mean we are constantly working to improve our products.
...detailed installation instructions, refer to change specifications or discontinue models without notice. High standards of quality at electroluxappliances.com. We reserve the right to installation guide, packed with French Door Refrigerator Front Use these dimensions and clearance instructions for planning purposes only. Top Front Top Electrolux ...ca INSTGDLNS_FDR EL 02/12 © 2012 Electrolux Home Products, Inc. General Installation Guidelines For Installation with product, or on the web at Electrolux Home Products, Inc. mean we are constantly working to improve our products.


