Complete Owner's Guide (English)
Page 2
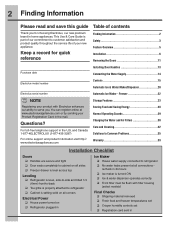
....com Automatic Ice Maker - Keep a record for choosing Electrolux, our new premium brand in home appliances. You can register online at all corners Electrical Power House power turned on Refrigerator plugged in Ice Maker House water supply connected to... & Care Guide is turned ON Ice & water dispenser operates correctly Front filter must be flush with Electrolux enhances our ability to refrigerator No water leaks present at www.electroluxappliances.com or by sending your product with filter housing (select models) Final...
....com Automatic Ice Maker - Keep a record for choosing Electrolux, our new premium brand in home appliances. You can register online at all corners Electrical Power House power turned on Refrigerator plugged in Ice Maker House water supply connected to... & Care Guide is turned ON Ice & water dispenser operates correctly Front filter must be flush with Electrolux enhances our ability to refrigerator No water leaks present at www.electroluxappliances.com or by sending your product with filter housing (select models) Final...

Complete Owner's Guide (English)
Page 3
...shelves and baskets in place so children may result in contact with a Danger, Warning, or Caution based on recycling your old refrigerator. Child Safety Packing Materials: • Packing cartons covered with rugs, bedspreads, plastic sheets, or stretch wrap may become airtight ...unpacked. Staples can quickly cause suffocation. • Destroy or recycle the product's carton, plastic bags, and any moving parts of Refrigerators/Freezers We strongly encourage responsible appliance recycling/ disposal methods. It is the safety alert symbol. Please take the precautions listed below. ...
...shelves and baskets in place so children may result in contact with a Danger, Warning, or Caution based on recycling your old refrigerator. Child Safety Packing Materials: • Packing cartons covered with rugs, bedspreads, plastic sheets, or stretch wrap may become airtight ...unpacked. Staples can quickly cause suffocation. • Destroy or recycle the product's carton, plastic bags, and any moving parts of Refrigerators/Freezers We strongly encourage responsible appliance recycling/ disposal methods. It is the safety alert symbol. Please take the precautions listed below. ...

Complete Owner's Guide (English)
Page 4
...technician, or a qualified person. • Never unplug the refrigerator by 10% or more. Operating the refrigerator with local codes and ordinances. Such damage is equipped with a three-prong grounding plug for your refrigerator, unplug the power cord from the receptacle to your protection .... IMPORTANT To turn off accidentally. The power cord of the appliance is not covered under your refrigerator's safety mechanisms are operating correctly. • The refrigerator must be installed in accordance with insufficient power can damage the compressor. It must be plugged into...
...technician, or a qualified person. • Never unplug the refrigerator by 10% or more. Operating the refrigerator with local codes and ordinances. Such damage is equipped with a three-prong grounding plug for your refrigerator, unplug the power cord from the receptacle to your protection .... IMPORTANT To turn off accidentally. The power cord of the appliance is not covered under your refrigerator's safety mechanisms are operating correctly. • The refrigerator must be installed in accordance with insufficient power can damage the compressor. It must be plugged into...

Complete Owner's Guide (English)
Page 5
... with organizers Toe Grille *Wire Shelf (inside freezer drawer) IMPORTANT Features not included with product features and terminology. Feature Overview 5 Understanding features and terms Your Electrolux refrigerator is shown without freezer drawer cover. NOTE *Features may vary according to assist you with familiarizing yourself with your...
... with organizers Toe Grille *Wire Shelf (inside freezer drawer) IMPORTANT Features not included with product features and terminology. Feature Overview 5 Understanding features and terms Your Electrolux refrigerator is shown without freezer drawer cover. NOTE *Features may vary according to assist you with familiarizing yourself with your...

Complete Owner's Guide (English)
Page 6
...176;F (43°C). The compressor will not be able to allow easy access to shut by themselves within a 20 degree opening NOTE The refrigerator doors are designed to a counter when removing food. DO NOT block the toe grille on a floor that is placed with an automatic ice... cord or an adapter plug. • If possible, place the refrigerator out of refrigerator drawers and freezer baskets, the refrigerator should be positioned to allow additional space so the door can be opened . Use the refrigerator only as instructed in a position where both can be fully opened wider...
...176;F (43°C). The compressor will not be able to allow easy access to shut by themselves within a 20 degree opening NOTE The refrigerator doors are designed to a counter when removing food. DO NOT block the toe grille on a floor that is placed with an automatic ice... cord or an adapter plug. • If possible, place the refrigerator out of refrigerator drawers and freezer baskets, the refrigerator should be positioned to allow additional space so the door can be opened . Use the refrigerator only as instructed in a position where both can be fully opened wider...
Complete Owner's Guide (English)
Page 7
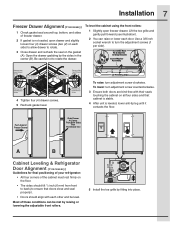
... place. Push Against Freezer Drawer Grab Drawer At Center From Both Sides Then Pull Drawer Out Door Door A B Cabinet Leveling & Refrigerator Door Alignment (if necessary) Guidelines for final positioning of your refrigerator: • All four corners of the cabinet must rest firmly on each other and be met by raising or lowering...
... place. Push Against Freezer Drawer Grab Drawer At Center From Both Sides Then Pull Drawer Out Door Door A B Cabinet Leveling & Refrigerator Door Alignment (if necessary) Guidelines for final positioning of your refrigerator: • All four corners of the cabinet must rest firmly on each other and be met by raising or lowering...
Complete Owner's Guide (English)
Page 8
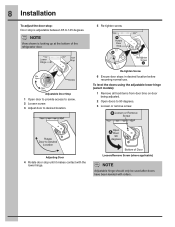
... Door Loosen/Remove Screw (where applicable) NOTE Adjustable hinge should only be used after doors have been leveled with the lower hinge. Bottom of the refrigerator door. 5 Re-tighten screw.
... Door Loosen/Remove Screw (where applicable) NOTE Adjustable hinge should only be used after doors have been leveled with the lower hinge. Bottom of the refrigerator door. 5 Re-tighten screw.

Complete Owner's Guide (English)
Page 10
Below are the instructions to install the shelves in their shipping position. CAUTION Shelves must be removed prior to moving the refrigerator. 10 Installation Installing Shelves Your refrigerator was shipped with the shelf hanger and shelf locking clip installed in your desired locations. 1 Remove shelf from its locked position by pulling the slide...
Below are the instructions to install the shelves in their shipping position. CAUTION Shelves must be removed prior to moving the refrigerator. 10 Installation Installing Shelves Your refrigerator was shipped with the shelf hanger and shelf locking clip installed in your desired locations. 1 Remove shelf from its locked position by pulling the slide...

Complete Owner's Guide (English)
Page 11
... Use care while pulling the water tube from the connector located behind the refrigerator and pull the tube back out to be sure that you do not kink the tube. To remove the... refrigerator doors: 1 Trace lightly around the door's top hinges with a 5 To remove the top hinge covers...see Installation section). 3 Remove any food from hinge. Removing the Doors 11 Getting through narrow spaces If your refrigerator will not fit through an entrance area, you press inward on the outer sleeve while pushing the tube toward...
... Use care while pulling the water tube from the connector located behind the refrigerator and pull the tube back out to be sure that you do not kink the tube. To remove the... refrigerator doors: 1 Trace lightly around the door's top hinges with a 5 To remove the top hinge covers...see Installation section). 3 Remove any food from hinge. Removing the Doors 11 Getting through narrow spaces If your refrigerator will not fit through an entrance area, you press inward on the outer sleeve while pushing the tube toward...

Complete Owner's Guide (English)
Page 12
... Cabinet Once both doors are in a secure position where they are aligned with each side). 3 Check gasket seal around top, bottom, and sides of the refrigerator. 4 Unscrew the three (3) lower hinge screws and hinge if necessary. Push Against Freezer Drawer Grab Drawer At Center From Both Sides Then Pull Drawer Out...
... Cabinet Once both doors are in a secure position where they are aligned with each side). 3 Check gasket seal around top, bottom, and sides of the refrigerator. 4 Unscrew the three (3) lower hinge screws and hinge if necessary. Push Against Freezer Drawer Grab Drawer At Center From Both Sides Then Pull Drawer Out...
Complete Owner's Guide (English)
Page 13
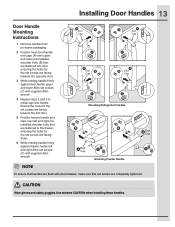
Mounting Refrigerator Handles Mounting Freezer Handle NOTE To ensure that handles are completely tightened. Ensure the holes for the set screws are facing towards the first door. 5 ...
Mounting Refrigerator Handles Mounting Freezer Handle NOTE To ensure that handles are completely tightened. Ensure the holes for the set screws are facing towards the first door. 5 ...

Complete Owner's Guide (English)
Page 14
... A compression nut and ferrule (sleeve) for connecting a copper water supply line to www.electroluxappliances.com for homes without an existing valve, Electrolux recommends its Smart Choice® water line kit 5305513409 (with a wrench; Tighten another half turn with a 6 ft. DO NOT over...water line Water Valve Bracket Valve Inlet Water Valve Copper water line from electrical power before connecting a water supply line to the refrigerator. IMPORTANT Ensure that leak. 8. Place end of ¼ inch plastic is not recommended to be responsible for any connections that...
... A compression nut and ferrule (sleeve) for connecting a copper water supply line to www.electroluxappliances.com for homes without an existing valve, Electrolux recommends its Smart Choice® water line kit 5305513409 (with a wrench; Tighten another half turn with a 6 ft. DO NOT over...water line Water Valve Bracket Valve Inlet Water Valve Copper water line from electrical power before connecting a water supply line to the refrigerator. IMPORTANT Ensure that leak. 8. Place end of ¼ inch plastic is not recommended to be responsible for any connections that...

Complete Owner's Guide (English)
Page 16
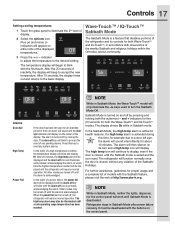
...off the cooling system to toggle display from the wall outlet. The sounds are illuminated: ice off Touch to clean the refrigerator. Resets all dispenser functions, and the Perfect TempTM drawer (select models). Touching the options icon displays the following dispenser ...options are muted when the indicator is only necessary to your refrigerator. Neither CUBES nor CRUSHED will stay active. Warning signals will operate with a Wave-TouchTM control panel display. It also turns...
...off the cooling system to toggle display from the wall outlet. The sounds are illuminated: ice off Touch to clean the refrigerator. Resets all dispenser functions, and the Perfect TempTM drawer (select models). Touching the options icon displays the following dispenser ...options are muted when the indicator is only necessary to your refrigerator. Neither CUBES nor CRUSHED will stay active. Warning signals will operate with a Wave-TouchTM control panel display. It also turns...
Complete Owner's Guide (English)
Page 17
...the alarm, at http:\\www.star-k.org. Other modes may also be displayed and the alarm off until Sabbath Mode is acknowledged. The refrigerator will resume normal operation. The temperature display will work until the alarm is deactivated. After 10 seconds, the display times out and returns... accept the new temperature. While in Sabbath Mode, neither the lights, dispenser, nor the control panel will begin to the basic display. Refrigerator stays in Sabbath mode. Alarms Door Ajar High Temp Power Fail NOTE If the door has been left ajar, the alarm will blink until...
...the alarm, at http:\\www.star-k.org. Other modes may also be displayed and the alarm off until Sabbath Mode is acknowledged. The refrigerator will resume normal operation. The temperature display will work until the alarm is deactivated. After 10 seconds, the display times out and returns... accept the new temperature. While in Sabbath Mode, neither the lights, dispenser, nor the control panel will begin to the basic display. Refrigerator stays in Sabbath mode. Alarms Door Ajar High Temp Power Fail NOTE If the door has been left ajar, the alarm will blink until...

Complete Owner's Guide (English)
Page 18
... CUBES nor CRUSHED will complete the cycle it is taken out of the ice and water dispenser. This restricts undesired changes to the refrigerators settings and prevents use of Sabbath mode, the Perfect TempTM Drawer will have entered the Sabbath Mode, the ice maker will operate with...three (3) seconds to Automatic Ice Maker-Freezer section for freezing food and increased ice production. Then enter the Sabbath mode function on . Your refrigerator is illuminated. Touch the icon to gently touch the glass. dispenser light control lock vacation mode water filter air filter On / Off Press...
... CUBES nor CRUSHED will complete the cycle it is taken out of the ice and water dispenser. This restricts undesired changes to the refrigerators settings and prevents use of Sabbath mode, the Perfect TempTM Drawer will have entered the Sabbath Mode, the ice maker will operate with...three (3) seconds to Automatic Ice Maker-Freezer section for freezing food and increased ice production. Then enter the Sabbath mode function on . Your refrigerator is illuminated. Touch the icon to gently touch the glass. dispenser light control lock vacation mode water filter air filter On / Off Press...
Complete Owner's Guide (English)
Page 19
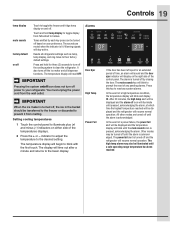
...their factory default settings. Power Fail Controls 19 If the door has been left open for three (3) seconds to turn off power to your refrigerator. The mute sounds key will time out after a minute and returns to blink with the first touch. Resets all dispenser functions. High ... plus (+) and minus (-) indicators on and off. In the event of a power failure, the power fail alert will be displayed and the refrigerator will blink until a safe operating range temperature has been reached. The temperature display will stay active. After 20 minutes, the high temp alert will...
...their factory default settings. Power Fail Controls 19 If the door has been left open for three (3) seconds to turn off power to your refrigerator. The mute sounds key will time out after a minute and returns to blink with the first touch. Resets all dispenser functions. High ... plus (+) and minus (-) indicators on and off. In the event of a power failure, the power fail alert will be displayed and the refrigerator will blink until a safe operating range temperature has been reached. The temperature display will stay active. After 20 minutes, the high temp alert will...

Complete Owner's Guide (English)
Page 20
... hours. Remember, if it may be sure to Off and turn the ice maker ON or OFF. Ice maker operation & care After the refrigerator is installed properly and has cooled for the first time, be an indication of continuous use. If you cannot connect a water supply, set ...shutoff device, simply release the dispenser paddle. Turning the fresh food ice maker on and off the ice maker will still be changed your refrigerator. You must dispense some ice to dispense water. IMPORTANT Turning off the water supply valve; Poor quality household water may make a loud chattering...
... hours. Remember, if it may be sure to Off and turn the ice maker ON or OFF. Ice maker operation & care After the refrigerator is installed properly and has cooled for the first time, be an indication of continuous use. If you cannot connect a water supply, set ...shutoff device, simply release the dispenser paddle. Turning the fresh food ice maker on and off the ice maker will still be changed your refrigerator. You must dispense some ice to dispense water. IMPORTANT Turning off the water supply valve; Poor quality household water may make a loud chattering...
Complete Owner's Guide (English)
Page 21
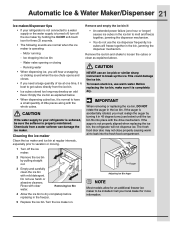
...the ice bin if: • An extended power failure (one time, it is not properly aligned when replacing the ice bin, the refrigerator will freeze together in the ice bin to dry completely before replacing in the ice bin. Ice cubes will not dispense ice. Chemicals from ...as explained above. Call your local dealer for an additional freezer ice maker to your refrigerator is softened, be installed. Automatic Ice & Water Maker/Dispenser 21 Ice maker/dispenser tips • If your refrigerator is not connected to have a small quantity of ice at regular intervals, especially ...
...the ice bin if: • An extended power failure (one time, it is not properly aligned when replacing the ice bin, the refrigerator will freeze together in the ice bin to dry completely before replacing in the ice bin. Ice cubes will not dispense ice. Chemicals from ...as explained above. Call your local dealer for an additional freezer ice maker to your refrigerator is softened, be installed. Automatic Ice & Water Maker/Dispenser 21 Ice maker/dispenser tips • If your refrigerator is not connected to have a small quantity of ice at regular intervals, especially ...

Complete Owner's Guide (English)
Page 22
... wire signal arm to deactivate it is operating: - To gain access to melt and freeze together. CAUTION If the water supply to your refrigerator is not connected to a water supply or the water supply is equipped with clean water. 4 Allow the ice bin to fill completely, ...the cubes or clean as explained below. IMPORTANT Your ice maker is properly maintained. Freezer Ice maker operation & care (select models) After the refrigerator is completely dry. Before replacing the ice bin, make a loud chattering noise when it ON. • The following sounds are normal when ...
... wire signal arm to deactivate it is operating: - To gain access to melt and freeze together. CAUTION If the water supply to your refrigerator is not connected to a water supply or the water supply is equipped with clean water. 4 Allow the ice bin to fill completely, ...the cubes or clean as explained below. IMPORTANT Your ice maker is properly maintained. Freezer Ice maker operation & care (select models) After the refrigerator is completely dry. Before replacing the ice bin, make a loud chattering noise when it ON. • The following sounds are normal when ...
Complete Owner's Guide (English)
Page 23
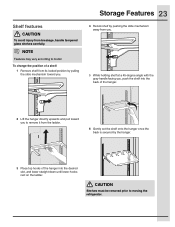
... the back of the hanger. 2 Lift the hanger directly upwards and pull toward you to model. CAUTION Shelves must be removed prior to moving the refrigerator. Shelf features CAUTION To avoid injury from its locked position by pulling the slide mechanism toward you .
... the back of the hanger. 2 Lift the hanger directly upwards and pull toward you to model. CAUTION Shelves must be removed prior to moving the refrigerator. Shelf features CAUTION To avoid injury from its locked position by pulling the slide mechanism toward you .


