Product Specifications Sheet (English)
Page 1
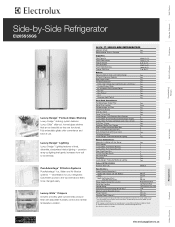
... Capacity Fresh Food Volume Freezer Volume Total Shelf Area Fresh Food Shelf Area Freezer Shelf Area 25.93 Cu. Ft. 18.36 Sq. Wall Ovens Warmer Drawers Cooktops Built-In Ranges Freestanding Ranges Microwaves Side-by-Side Refrigerator EI26SS55GS Luxury-Design™ Formed-Glass Shelving Luxury-Design™ shelving system features Luxury-Glide™...
... Capacity Fresh Food Volume Freezer Volume Total Shelf Area Fresh Food Shelf Area Freezer Shelf Area 25.93 Cu. Ft. 18.36 Sq. Wall Ovens Warmer Drawers Cooktops Built-In Ranges Freestanding Ranges Microwaves Side-by-Side Refrigerator EI26SS55GS Luxury-Design™ Formed-Glass Shelving Luxury-Design™ shelving system features Luxury-Glide™...
Product Specifications Sheet (English)
Page 2
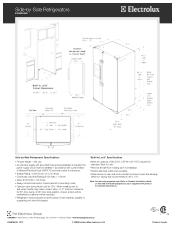
...8226; 1-800-265-8352 • electroluxappliances.ca EI26SS55GS 12/10 © 2008 Electrolux Major Appliances, NA Printed in accordance with grounded three-prong receptacle is 48" x 1/4"). Side-by-Side Refrigerators EI26SS55GS Side-by-Side Refrigerator Specifications • Product Weight - 325 Lbs. • An electrical supply with .... At 90° door stop position, drawer access will be maintained but removal will be restricted. • Refrigerator must be placed on rear wall recommended to prevent water line damage. (Minimum tubing size recommended is required.
...8226; 1-800-265-8352 • electroluxappliances.ca EI26SS55GS 12/10 © 2008 Electrolux Major Appliances, NA Printed in accordance with grounded three-prong receptacle is 48" x 1/4"). Side-by-Side Refrigerators EI26SS55GS Side-by-Side Refrigerator Specifications • Product Weight - 325 Lbs. • An electrical supply with .... At 90° door stop position, drawer access will be maintained but removal will be restricted. • Refrigerator must be placed on rear wall recommended to prevent water line damage. (Minimum tubing size recommended is required.
Complete Owner's Guide (English)
Page 3
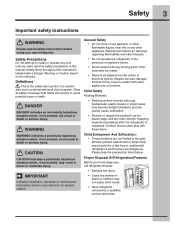
... cause suffocation. • Destroy or recycle the product's carton, plastic bags, and any other exterior wrapping material immediately after the refrigerator is important but not hazardrelated. WARNING WARNING indicates a potentially hazardous situation which , if not avoided, will result in death or...situation which is unpacked. Obey all staples from the carton to install or operate your unit until you throw away your new refrigerator. IMPORTANT Indicates installation, operation or maintenance information which , if not avoided, may result in minor or moderate injury. Whether...
... cause suffocation. • Destroy or recycle the product's carton, plastic bags, and any other exterior wrapping material immediately after the refrigerator is important but not hazardrelated. WARNING WARNING indicates a potentially hazardous situation which , if not avoided, will result in death or...situation which is unpacked. Obey all staples from the carton to install or operate your unit until you throw away your new refrigerator. IMPORTANT Indicates installation, operation or maintenance information which , if not avoided, may result in minor or moderate injury. Whether...
Complete Owner's Guide (English)
Page 4
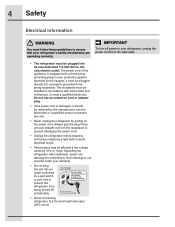
...Do not plug the unit into an outlet controlled by a wall switch or pull cord to prevent the refrigerator from being turned off power to your refrigerator's safety mechanisms are operating correctly. Such damage is damaged, it should be replaced by the manufacturer, service...in accordance with insufficient power can damage the compressor. IMPORTANT To turn off accidentally. • Avoid connecting refrigerator to a Ground Fault Interrupter (GFI) circuit. Operating the refrigerator with local codes and ordinances. Consult a qualified electrician. Do not use an extension cord or adapter ...
...Do not plug the unit into an outlet controlled by a wall switch or pull cord to prevent the refrigerator from being turned off power to your refrigerator's safety mechanisms are operating correctly. Such damage is damaged, it should be replaced by the manufacturer, service...in accordance with insufficient power can damage the compressor. IMPORTANT To turn off accidentally. • Avoid connecting refrigerator to a Ground Fault Interrupter (GFI) circuit. Operating the refrigerator with local codes and ordinances. Consult a qualified electrician. Do not use an extension cord or adapter ...
Complete Owner's Guide (English)
Page 5
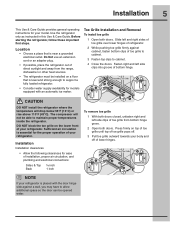
...Installation clearances • Allow the following clearances for the proper operation of toe grille from the range, dishwasher or other heat sources. • The refrigerator must be installed on a floor that is level and strong enough to allow additional space so the door can be able to cabinet. 4 Close ...doors closed, unfasten right and left side clips into groove of toe grille to cabinet. 3 Fasten top clips to maintain proper temperatures inside the refrigerator. DO NOT block the toe grille on top of toe grille until top of toe grille pops off of your body and off . 3 ...
...Installation clearances • Allow the following clearances for the proper operation of toe grille from the range, dishwasher or other heat sources. • The refrigerator must be installed on a floor that is level and strong enough to allow additional space so the door can be able to cabinet. 4 Close ...doors closed, unfasten right and left side clips into groove of toe grille to cabinet. 3 Fasten top clips to maintain proper temperatures inside the refrigerator. DO NOT block the toe grille on top of toe grille until top of toe grille pops off of your body and off . 3 ...
Complete Owner's Guide (English)
Page 6
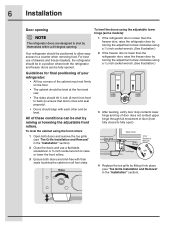
... to shut by turning the adjustment screw clockwise using a ⁷/16 inch socket wrench. (See illustration.) Guidelines for final positioning of your refrigerator: • All four corners of the cabinet must rest firmly on all four sides. 3 After leveling, verify door stop contacts lower hinge...the cabinet using a ⁷/16 inch socket wrench. (See illustration.) 2 If the freezer door is lower than the freezer door, raise the refrigerator door by turning the adjustment screw clockwise using the front rollers: 1 Open both doors and remove the toe grille (see "Toe Grille Installation ...
... to shut by turning the adjustment screw clockwise using a ⁷/16 inch socket wrench. (See illustration.) Guidelines for final positioning of your refrigerator: • All four corners of the cabinet must rest firmly on all four sides. 3 After leveling, verify door stop contacts lower hinge...the cabinet using a ⁷/16 inch socket wrench. (See illustration.) 2 If the freezer door is lower than the freezer door, raise the refrigerator door by turning the adjustment screw clockwise using the front rollers: 1 Open both doors and remove the toe grille (see "Toe Grille Installation ...

Complete Owner's Guide (English)
Page 7
...2 Open both doors and remove the toe grille (as explained in a secure position where they cannot fall and cause personal injury. To remove the refrigerator top hinge cover: 1 Remove the three screws from each cover over the top door hinges. 2 Lift hinge cover straight up and off of the ... doors are set it aside. 3 Remove the two bottom hinge screws and hinge if necessary. To remove the refrigerator door: 1 Trace lightly around the door's top hinge with your refrigerator will need the following tools: Top Hinge Cover Front Screw Top Hinge Cover Rear Screw Tools Necessary: Top Hinge...
...2 Open both doors and remove the toe grille (as explained in a secure position where they cannot fall and cause personal injury. To remove the refrigerator top hinge cover: 1 Remove the three screws from each cover over the top door hinges. 2 Lift hinge cover straight up and off of the ... doors are set it aside. 3 Remove the two bottom hinge screws and hinge if necessary. To remove the refrigerator door: 1 Trace lightly around the door's top hinge with your refrigerator will need the following tools: Top Hinge Cover Front Screw Top Hinge Cover Rear Screw Tools Necessary: Top Hinge...
Complete Owner's Guide (English)
Page 9
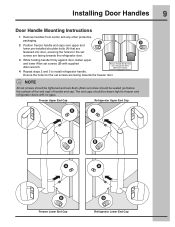
... against door, fasten upper and lower Allen set screws (B) with supplied Allen wrench. 4 Repeat steps 2 and 3 to freezer and refrigerator doors with no gaps. NOTE All set screws should be tightened and sub-flush (Allen set screw should be seated just below the ... the end cap) of handle end cap. The end caps should be drawn tight to install refrigerator handle. Freezer Upper End Cap Refrigerator Upper End Cap A A B B A A B Freezer Lower End Cap B Refrigerator Lower End Cap Installing Door Handles 9 Door Handle Mounting Instructions 1 Remove handles from carton and...
... against door, fasten upper and lower Allen set screws (B) with supplied Allen wrench. 4 Repeat steps 2 and 3 to freezer and refrigerator doors with no gaps. NOTE All set screws should be tightened and sub-flush (Allen set screw should be seated just below the ... the end cap) of handle end cap. The end caps should be drawn tight to install refrigerator handle. Freezer Upper End Cap Refrigerator Upper End Cap A A B B A A B Freezer Lower End Cap B Refrigerator Lower End Cap Installing Door Handles 9 Door Handle Mounting Instructions 1 Remove handles from carton and...
Complete Owner's Guide (English)
Page 10
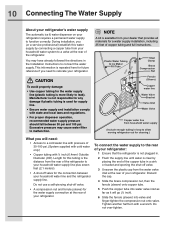
... repeated here for the water supply line (plastic tubing is clear by connecting a copper tube from the rear of the refrigerator to the rear of your refrigerator: 1 Ensure that provides all materials for cleaning.) What you (or a service professional) establish this tubing is the distance...responsible for any damage if plastic tubing is available from household water supply (Include enough tubing in loop to allow moving refrigerator out for a water supply installation, including 25 feet of 30-100 psi. (System supplied with cold water only.) • Copper tubing with ¼ inch (6....
... repeated here for the water supply line (plastic tubing is clear by connecting a copper tube from the rear of the refrigerator to the rear of your refrigerator: 1 Ensure that provides all materials for cleaning.) What you (or a service professional) establish this tubing is the distance...responsible for any damage if plastic tubing is available from household water supply (Include enough tubing in loop to allow moving refrigerator out for a water supply installation, including 25 feet of 30-100 psi. (System supplied with cold water only.) • Copper tubing with ¼ inch (6....
Complete Owner's Guide (English)
Page 11
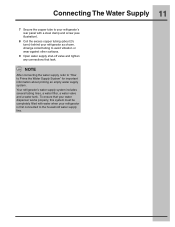
... first connected to the household water supply line. Connecting The Water Supply 11 7 Secure the copper tube to your refrigerator's rear panel with water when your refrigerator as shown. Your refrigerator's water supply system includes several tubing lines, a water filter, a water valve and a water tank. Arrange coiled tubing to avoid vibration or wear...
... first connected to the household water supply line. Connecting The Water Supply 11 7 Secure the copper tube to your refrigerator's rear panel with water when your refrigerator as shown. Your refrigerator's water supply system includes several tubing lines, a water filter, a water valve and a water tank. Arrange coiled tubing to avoid vibration or wear...
Complete Owner's Guide (English)
Page 12
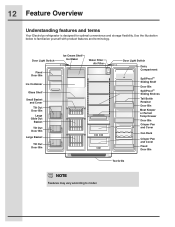
12 Feature Overview Understanding features and terms Your Electrolux refrigerator is designed for optimal convenience and storage flexibility. Use the illustration below to model. Door Light Switch Fixed Door Bin Ice Container Glass Shelf Small ...
12 Feature Overview Understanding features and terms Your Electrolux refrigerator is designed for optimal convenience and storage flexibility. Use the illustration below to model. Door Light Switch Fixed Door Bin Ice Container Glass Shelf Small ...
Complete Owner's Guide (English)
Page 14
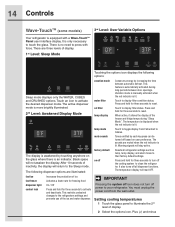
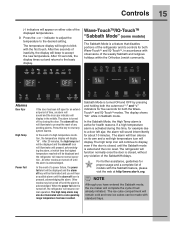
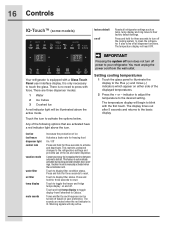
...on the glass where there is only necessary to their factory default settings. Setting cooling temperatures 1 Touch the glass panel to the refrigerators settings and prevents use of inactivity, the display will read OFF. The active dispenser mode is more brightly illuminated. 2nd Level:...activated when the red indicator is lit. Plus (+) and minus 14 Controls Wave-TouchTM (some models) 3rd Level: User Variable Options Your refrigerator is equipped with force. The sounds are three levels of display. 2 Select the options icon. Tones emitted by touching anywhere on user...
...on the glass where there is only necessary to their factory default settings. Setting cooling temperatures 1 Touch the glass panel to the refrigerators settings and prevents use of inactivity, the display will read OFF. The active dispenser mode is more brightly illuminated. 2nd Level:...activated when the red indicator is lit. Plus (+) and minus 14 Controls Wave-TouchTM (some models) 3rd Level: User Variable Options Your refrigerator is equipped with force. The sounds are three levels of display. 2 Select the options icon. Tones emitted by touching anywhere on user...
Complete Owner's Guide (English)
Page 15
... Mode is exited and the icon reset. The alarm is turned off until the Sabbath mode is a feature that disables portions of the refrigerator and its own and a red high temperature icon will display. In the event of the weekly Sabbath and religious holidays within the Orthodox ...of the displayed temperatures. 3 Press the + or - The ice cube compartment will remain cold and new ice cubes can be displayed and the refrigerator will resume normal operation. The temperature display will begin to display, even if the door is pressed, acknowledging the alarm. After 20 minutes, the...
... Mode is exited and the icon reset. The alarm is turned off until the Sabbath mode is a feature that disables portions of the refrigerator and its own and a red high temperature icon will display. In the event of the weekly Sabbath and religious holidays within the Orthodox ...of the displayed temperatures. 3 Press the + or - The ice cube compartment will remain cold and new ice cubes can be displayed and the refrigerator will resume normal operation. The temperature display will begin to display, even if the door is pressed, acknowledging the alarm. After 20 minutes, the...
Complete Owner's Guide (English)
Page 16
... only necessary to the Plus (+) and minus (-) indicators which appear on and off Resets all dispenser functions. Touch to the refrigerators settings and prevents use of the following options that are muted when the red indicator is equipped with a Glass Touch Panel user...automatic defrost. Setting cooling temperatures 1 Touch the glass panel to illuminate the display to touch the glass. Touch to reset. Your refrigerator is lit. This restricts undesired changes to display filter status. Conserves energy by each keypress can be illuminated above the icon. ...
... only necessary to the Plus (+) and minus (-) indicators which appear on and off Resets all dispenser functions. Touch to the refrigerators settings and prevents use of the following options that are muted when the red indicator is equipped with a Glass Touch Panel user...automatic defrost. Setting cooling temperatures 1 Touch the glass panel to illuminate the display to touch the glass. Touch to reset. Your refrigerator is lit. This restricts undesired changes to display filter status. Conserves energy by each keypress can be illuminated above the icon. ...
Complete Owner's Guide (English)
Page 17
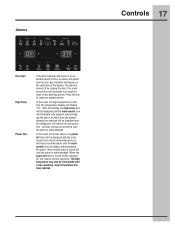
... and the mute sounds icon will hear an audible alarm until the mute sounds icon is turned off until the alarm is turned off the refrigerator will illuminate to prompt the reset of any pending alarms. Press this key to reset any system alarms. In the event of the display. ...The alarm is pressed, acknowledging the alarm. Other modes may also be displayed and the refrigerator will be illuminated until pressed, acknowledging the alarm, at which time the highest temperature reached will resume normal operation.
... and the mute sounds icon will hear an audible alarm until the mute sounds icon is turned off until the alarm is turned off the refrigerator will illuminate to prompt the reset of any pending alarms. Press this key to reset any system alarms. In the event of the display. ...The alarm is pressed, acknowledging the alarm. Other modes may also be displayed and the refrigerator will be illuminated until pressed, acknowledging the alarm, at which time the highest temperature reached will resume normal operation.
Complete Owner's Guide (English)
Page 18
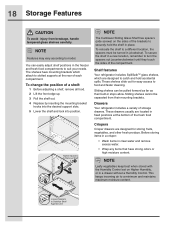
... spacers must be turned in a drawer without a Humidity Control. To change the position of storage drawers. Shelf features Your refrigerator includes SpillSafeTM glass shelves, which attach to suit your needs. Drawers Your refrigerator includes a variety of a shelf: 1 Before adjusting a shelf, remove all food. 2 Lift the front edge up. 3 Pull the shelf out...
... spacers must be turned in a drawer without a Humidity Control. To change the position of storage drawers. Shelf features Your refrigerator includes SpillSafeTM glass shelves, which attach to suit your needs. Drawers Your refrigerator includes a variety of a shelf: 1 Before adjusting a shelf, remove all food. 2 Lift the front edge up. 3 Pull the shelf out...
Complete Owner's Guide (English)
Page 20
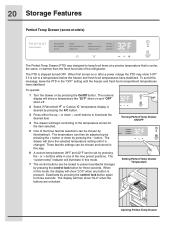
... + button or down ∨ scroll buttons to illuminate the desired item. 4 The drawer will illuminate in this message, leave the PTD in one of the refrigerator. Three favorite settings can be set to keep food items at a precise temperature that is shipped turned OFF. When in this way. 6 A custom temp between...
... + button or down ∨ scroll buttons to illuminate the desired item. 4 The drawer will illuminate in this message, leave the PTD in one of the refrigerator. Three favorite settings can be set to keep food items at a precise temperature that is shipped turned OFF. When in this way. 6 A custom temp between...
Complete Owner's Guide (English)
Page 22
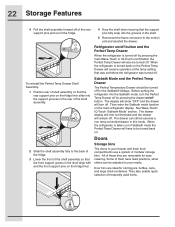
... Drawer will remain off. The display will show "OFF" and the drawer will resume operation at the temp setting that was set before the refrigerator was turned off. All of these bins are ideal for the Sabbath/Holidays. They also enable quick selection of frequently used as a non temp... To reinstall the Perfect Temp Drawer Shelf Assembly: 1 Position rear of shelf assembly so that the rear support pins on the main refrigerator display. When the refrigerator is turned back on the Perfect Temp Drawer will turn the Perfect Temp Drawer off by pressing the main Wave-Touch or IQ-Touch...
... Drawer will remain off. The display will show "OFF" and the drawer will resume operation at the temp setting that was set before the refrigerator was turned off. All of these bins are ideal for the Sabbath/Holidays. They also enable quick selection of frequently used as a non temp... To reinstall the Perfect Temp Drawer Shelf Assembly: 1 Position rear of shelf assembly so that the rear support pins on the main refrigerator display. When the refrigerator is turned back on the Perfect Temp Drawer will turn the Perfect Temp Drawer off by pressing the main Wave-Touch or IQ-Touch...
Complete Owner's Guide (English)
Page 23
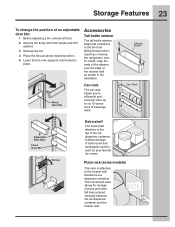
... food. 2 Grip the bin firmly with both round and rectangular cartons such as shown in the bin from falling forward when opening or closing the refrigerator door.
... food. 2 Grip the bin firmly with both round and rectangular cartons such as shown in the bin from falling forward when opening or closing the refrigerator door.
Complete Owner's Guide (English)
Page 25
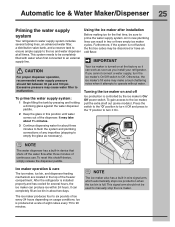
...and press to the "I" position to an external supply line. Using the ice maker after three minutes of the dispenser. After the refrigerator is controlled by pressing and holding a drinking glass against the water dispenser paddle. 2 Keep the glass in about three minutes to prime... cycles. Excessive pressure may make a loud chattering noise when it attempts to malfunction. Automatic Ice & Water Maker/Dispenser 25 Priming the water supply system Your refrigerator's water supply system includes several hours, the ice maker can produce ice within 24 hours. Ice is not flushed, ...
...and press to the "I" position to an external supply line. Using the ice maker after three minutes of the dispenser. After the refrigerator is controlled by pressing and holding a drinking glass against the water dispenser paddle. 2 Keep the glass in about three minutes to prime... cycles. Excessive pressure may make a loud chattering noise when it attempts to malfunction. Automatic Ice & Water Maker/Dispenser 25 Priming the water supply system Your refrigerator's water supply system includes several hours, the ice maker can produce ice within 24 hours. Ice is not flushed, ...


