Wiring Diagram (All Languages)
Page 1
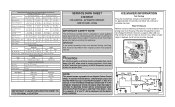
... cover from torch flame. The water fill adjustment screw will distort the plastic liner. CONDENSER FAN MOTOR Watts RPM Amps 3.1 1100 CW Opposite Shaft 0.03 Running ICE MAKER SPECIFICATIONS Electrical 115 vac (127 vac max) Thermostat Opens at 48° F ( 9° C), Closes at 500°F. DO NOT allow torch to : 1 Green/Yellow Ground 2 Yellow Water Valve 3 Black Line 4 Light Blue Neutral IMPORTANT: PLEASE RETURN THIS SHEET TO IT'S ORIGINAL LOCATION service...
... cover from torch flame. The water fill adjustment screw will distort the plastic liner. CONDENSER FAN MOTOR Watts RPM Amps 3.1 1100 CW Opposite Shaft 0.03 Running ICE MAKER SPECIFICATIONS Electrical 115 vac (127 vac max) Thermostat Opens at 48° F ( 9° C), Closes at 500°F. DO NOT allow torch to : 1 Green/Yellow Ground 2 Yellow Water Valve 3 Black Line 4 Light Blue Neutral IMPORTANT: PLEASE RETURN THIS SHEET TO IT'S ORIGINAL LOCATION service...
Product Specifications Sheet (English)
Page 1
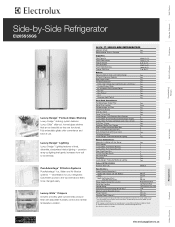
... Freezer Baskets 1 Clear Fixed Door Bins 1 Tilt-Out Wire Door Racks 3 Ice Cream Shelf Yes Pizza Shelf Yes Luxury-Design™ Ramp-Up Multilevel Lighting Yes Colour / UPC (0-12505-) Stainless Steel ( S ) 69486-8 Specifications Overall Exterior Dimensions - Ft. 7.46 Sq. Ft. 9.45 Cu. Specifications subject to Product Installation Guide for your refrigerator. Exterior Signature Soft-Arc Door and Handle Design Yes IQ-Touch™ Electronic Controls Yes Door Hinge Covers Yes Ice / Water Dispenser Yes Perfect Set™ Temperature Control System...
... Freezer Baskets 1 Clear Fixed Door Bins 1 Tilt-Out Wire Door Racks 3 Ice Cream Shelf Yes Pizza Shelf Yes Luxury-Design™ Ramp-Up Multilevel Lighting Yes Colour / UPC (0-12505-) Stainless Steel ( S ) 69486-8 Specifications Overall Exterior Dimensions - Ft. 7.46 Sq. Ft. 9.45 Cu. Specifications subject to Product Installation Guide for your refrigerator. Exterior Signature Soft-Arc Door and Handle Design Yes IQ-Touch™ Electronic Controls Yes Door Hinge Covers Yes Ice / Water Dispenser Yes Perfect Set™ Temperature Control System...
Product Specifications Sheet (English)
Page 2
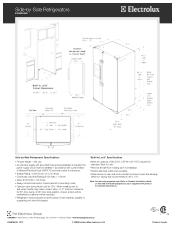
...-by-Side Refrigerator Specifications • Product Weight - 325 Lbs. • An electrical supply with grounded three-prong receptacle is 48" x 1/4"). When installing next to prevent water line damage. (Minimum tubing size recommended is required. At 90° door stop position, drawer access will be maintained but removal will be restricted. • Refrigerator must be placed on rear wall recommended to wall where handle may make contact...
...-by-Side Refrigerator Specifications • Product Weight - 325 Lbs. • An electrical supply with grounded three-prong receptacle is 48" x 1/4"). When installing next to prevent water line damage. (Minimum tubing size recommended is required. At 90° door stop position, drawer access will be maintained but removal will be restricted. • Refrigerator must be placed on rear wall recommended to wall where handle may make contact...
Complete Owner's Guide (English)
Page 2
... with Electrolux enhances our ability to customer satisfaction and product quality throughout the service life of contents Finding Information 2 Safety 3 Installation 5 Removing The Doors 7 Installing Door Handles 9 Connecting The Water Supply 10 Feature Overview 12 Controls 13 Storage Features 18 Automatic Ice & Water Maker/Dispenser 25 Changing The Filter 28 Storing Food & Saving Energy 30 Normal Operating Sounds & Sights 31 Care & Cleaning 32 Warranty 35 Solutions To Common Problems 36 Questions? For toll-free telephone support in...
... with Electrolux enhances our ability to customer satisfaction and product quality throughout the service life of contents Finding Information 2 Safety 3 Installation 5 Removing The Doors 7 Installing Door Handles 9 Connecting The Water Supply 10 Feature Overview 12 Controls 13 Storage Features 18 Automatic Ice & Water Maker/Dispenser 25 Changing The Filter 28 Storing Food & Saving Energy 30 Normal Operating Sounds & Sights 31 Care & Cleaning 32 Warranty 35 Solutions To Common Problems 36 Questions? For toll-free telephone support in...
Complete Owner's Guide (English)
Page 5
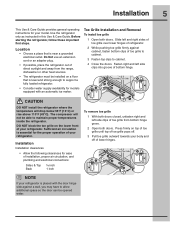
.... • The refrigerator must be opened wider. Before starting the refrigerator, follow these important first steps. Sufficient air circulation is placed with an automatic ice maker. Slide left side clips into groove of toe grille to cabinet. 3 Fasten top clips to support a fully loaded refrigerator. • Consider water supply availability for your model. Installation 5 This Use & Care Guide provides general operating instructions for models equipped with the door hinge side against cabinet...
.... • The refrigerator must be opened wider. Before starting the refrigerator, follow these important first steps. Sufficient air circulation is placed with an automatic ice maker. Slide left side clips into groove of toe grille to cabinet. 3 Fasten top clips to support a fully loaded refrigerator. • Consider water supply availability for your model. Installation 5 This Use & Care Guide provides general operating instructions for models equipped with the door hinge side against cabinet...
Complete Owner's Guide (English)
Page 8
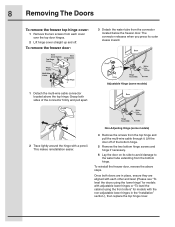
... side to avoid damage to the water tube extending from the bottom hinge. This makes reinstallation easier. 8 Removing The Doors To remove the freezer top hinge cover: 1 Remove the two screws from each other and level (Please see "To level the doors using the lower hinge" for models with adjustable lower hinges or "To level the cabinet using the front rollers" for models with the non-adjustable lower hinges in place, ensure they are...
... side to avoid damage to the water tube extending from the bottom hinge. This makes reinstallation easier. 8 Removing The Doors To remove the freezer top hinge cover: 1 Remove the two screws from each other and level (Please see "To level the doors using the lower hinge" for models with adjustable lower hinges or "To level the cabinet using the front rollers" for models with the non-adjustable lower hinges in place, ensure they are...
Complete Owner's Guide (English)
Page 10
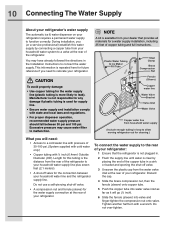
... water system to relocate your refrigerator. Length for the connection between 30 psi and 100 psi. During installation, you (or a service professional) establish this tubing is used for cleaning.) What you need : • Access to leak). Plastic Water Tubing to your household water supply line plus seven feet (2.1 meters). • A shut-off valve. • A compression nut and ferrule (sleeve) for the water supply line (plastic tubing is repeated here for a water supply installation, including 25 feet...
... water system to relocate your refrigerator. Length for the connection between 30 psi and 100 psi. During installation, you (or a service professional) establish this tubing is used for cleaning.) What you need : • Access to leak). Plastic Water Tubing to your household water supply line plus seven feet (2.1 meters). • A shut-off valve. • A compression nut and ferrule (sleeve) for the water supply line (plastic tubing is repeated here for a water supply installation, including 25 feet...
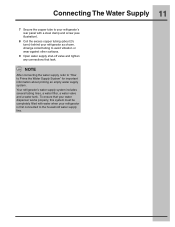
Complete Owner's Guide (English)
Page 11
... water supply, refer to "How to avoid vibration or wear against other surfaces. 9 Open water supply shut-off valve and tighten any connections that your water dispenser works properly, this system must be completely filled with water when your refrigerator is first connected to your refrigerator as shown. To ensure that leak. Your refrigerator's water supply system includes several tubing lines, a water filter, a water valve and a water tank. Connecting The Water Supply 11 7 Secure the copper tube to the household water supply line...
... water supply, refer to "How to avoid vibration or wear against other surfaces. 9 Open water supply shut-off valve and tighten any connections that your water dispenser works properly, this system must be completely filled with water when your refrigerator is first connected to your refrigerator as shown. To ensure that leak. Your refrigerator's water supply system includes several tubing lines, a water filter, a water valve and a water tank. Connecting The Water Supply 11 7 Secure the copper tube to the household water supply line...
Complete Owner's Guide (English)
Page 14
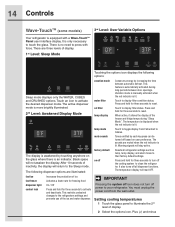
... displayed when the red indicator is an indicator. It is no need to Celsius. Warning signals will read OFF. This restricts undesired changes to illuminate the 2nd level of the freezer and fridge temps during long periods between automatic defrost. When active, it allows the display of display. 2 Select the options icon. Setting cooling temperatures 1 Touch the glass panel to the refrigerators settings and prevents use of display. 1st Level: Sleep Mode Sleep mode displays...
... displayed when the red indicator is an indicator. It is no need to Celsius. Warning signals will read OFF. This restricts undesired changes to illuminate the 2nd level of the freezer and fridge temps during long periods between automatic defrost. When active, it allows the display of display. 2 Select the options icon. Setting cooling temperatures 1 Touch the glass panel to the refrigerators settings and prevents use of display. 1st Level: Sleep Mode Sleep mode displays...
Complete Owner's Guide (English)
Page 16
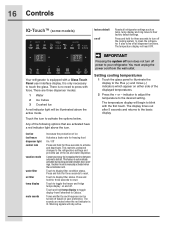
... the icon. Your refrigerator is no need to display filter status. This restricts undesired changes to activate the options below. indicator to adjust the temperature to display filter condition status. Touch to the desired setting. 16 Controls IQ-TouchTM (some models) factory default on off the cooling system to clean the refrigerator. Touch to press with a Glass Touch Panel user interface display. Touch to toggle the freezer and fridge temps display on and off...
... the icon. Your refrigerator is no need to display filter status. This restricts undesired changes to activate the options below. indicator to adjust the temperature to display filter condition status. Touch to the desired setting. 16 Controls IQ-TouchTM (some models) factory default on off the cooling system to clean the refrigerator. Touch to press with a Glass Touch Panel user interface display. Touch to toggle the freezer and fridge temps display on and off...
Complete Owner's Guide (English)
Page 25
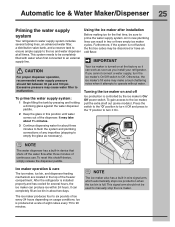
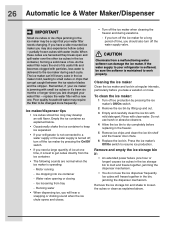
... after installation Before making ice for several tubing lines, an advanced water filter, a distribution valve bank, and a reserve tank to ensure ample supply to the ice maker, pull the extra shelf out (some models). It may make a loud chattering noise when it On. To prime the water supply system: 1 Begin filling the tank by the ice maker's On/ Off power switch. This system needs to be used to empty the glass as you cannot connect a water supply, turn...
... after installation Before making ice for several tubing lines, an advanced water filter, a distribution valve bank, and a reserve tank to ensure ample supply to the ice maker, pull the extra shelf out (some models). It may make a loud chattering noise when it On. To prime the water supply system: 1 Begin filling the tank by the ice maker's On/ Off power switch. This system needs to be used to empty the glass as you cannot connect a water supply, turn...
Complete Owner's Guide (English)
Page 26
... freezer door chute. 6 Replace the ice bin. partially frozen cubes with a new one. The ice maker can't fill every cube in the ice container, forming a solid mass of ice. Poor quality household water may also experience hollow cubes -- Empty the ice container as explained above. Running water • When dispensing ice, you may require the filter to be a sign that can damage the ice maker. To clean the ice maker: 1 Turn off the water supply valve. Water valve opening...
... freezer door chute. 6 Replace the ice bin. partially frozen cubes with a new one. The ice maker can't fill every cube in the ice container, forming a solid mass of ice. Poor quality household water may also experience hollow cubes -- Empty the ice container as explained above. Running water • When dispensing ice, you may require the filter to be a sign that can damage the ice maker. To clean the ice maker: 1 Turn off the water supply valve. Water valve opening...

Complete Owner's Guide (English)
Page 28
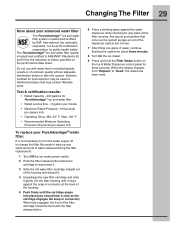
... Controls section for a period of food you to replace the filter after a few seconds. To replace your refrigerator. If your refrigerator. You may want to adjust this time period depending on the Touch Panel prompts you typically store in your refrigerator has not been used to produce ice. 28 Changing The Filter Locating the filters Your refrigerator is the product number to request when ordering: PureAdvantageTM Water Filter and Air Filter Part...
... Controls section for a period of food you to replace the filter after a few seconds. To replace your refrigerator. If your refrigerator. You may want to adjust this time period depending on the Touch Panel prompts you typically store in your refrigerator has not been used to produce ice. 28 Changing The Filter Locating the filters Your refrigerator is the product number to request when ordering: PureAdvantageTM Water Filter and Air Filter Part...
Complete Owner's Guide (English)
Page 29
... it stops against the water dispenser while checking for any small amounts of water released during the filter replacement. 1 Turn Off the ice maker power switch. 2 Push the filter release button below the cartridge to "Good," the status has been reset. Test & certification results: • Rated Capacity - 400 gallons for PureAdvantageTM ice and water filter • Rated service flow - .5 gallons per minute • Maximum Rated Pressure - 100 pounds per square inch • Operating Temp.: Min...
... it stops against the water dispenser while checking for any small amounts of water released during the filter replacement. 1 Turn Off the ice maker power switch. 2 Push the filter release button below the cartridge to "Good," the status has been reset. Test & certification results: • Rated Capacity - 400 gallons for PureAdvantageTM ice and water filter • Rated service flow - .5 gallons per minute • Maximum Rated Pressure - 100 pounds per square inch • Operating Temp.: Min...

Complete Owner's Guide (English)
Page 30
..., so cold air can circulate freely, allowing food to freeze as quickly as possible. • Avoid storing hard-to reduce door openings. This overloads the freezer, slows the rate of frozen foods. • Leave a space between the two appliances will help the refrigerator operate more energy. • Cover foods and wipe containers dry before placing them tightly. Trapped air can raise the temperature of freezing...
..., so cold air can circulate freely, allowing food to freeze as quickly as possible. • Avoid storing hard-to reduce door openings. This overloads the freezer, slows the rate of frozen foods. • Leave a space between the two appliances will help the refrigerator operate more energy. • Cover foods and wipe containers dry before placing them tightly. Trapped air can raise the temperature of freezing...
Complete Owner's Guide (English)
Page 32
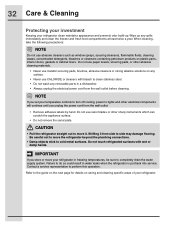
... bleach to clean stainless steel. • Do not wash any removable parts in a dishwasher. • Always unplug the electrical power cord from the wall outlet before cleaning. Wipe up . Be careful not to move the refrigerator beyond the plumbing connections. • Damp objects stick to move your temperature controls to turn off cooling, power to the guide on the next page for details on plastic parts, interior doors, gaskets or...
... bleach to clean stainless steel. • Do not wash any removable parts in a dishwasher. • Always unplug the electrical power cord from the wall outlet before cleaning. Wipe up . Be careful not to move the refrigerator beyond the plumbing connections. • Damp objects stick to move your temperature controls to turn off cooling, power to the guide on the next page for details on plastic parts, interior doors, gaskets or...

Complete Owner's Guide (English)
Page 33
... cleaning around controls, light bulb or any electrical part. • Wipe gaskets with a clean soft cloth. • Use a soft cloth to clean drawer runners and tracks. • Do not wash any removable items (bins, drawers, etc.) in dishwasher. • Allow glass to warm to room temperature before immersing in warm water. • Vacuum dust from refrigerator compartment. • Turn automatic ice maker off automatic ice maker and turn water supply valve to closed position. • Clean interior thoroughly. • Leave both doors open...
... cleaning around controls, light bulb or any electrical part. • Wipe gaskets with a clean soft cloth. • Use a soft cloth to clean drawer runners and tracks. • Do not wash any removable items (bins, drawers, etc.) in dishwasher. • Allow glass to warm to room temperature before immersing in warm water. • Vacuum dust from refrigerator compartment. • Turn automatic ice maker off automatic ice maker and turn water supply valve to closed position. • Clean interior thoroughly. • Leave both doors open...
Complete Owner's Guide (English)
Page 36
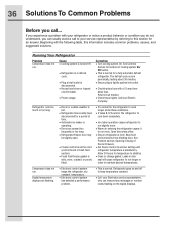
.... Running Your Refrigerator Problem Compressor does not run longer in defrost cycle. • Plug at a constant temperature. • Electronic control system has detected a performance problem. • This is set too cold (control found in door seal will cause refrigerator to stabilize. • Clean or change gasket. Call local Electric Company. Reset circuit breaker. • Check house lights. Digital temperature displays are opened too frequently or too long. • Refrigerator/freezer door may be slightly open. • Freezer control is normal. Refrigerator runs...
.... Running Your Refrigerator Problem Compressor does not run longer in defrost cycle. • Plug at a constant temperature. • Electronic control system has detected a performance problem. • This is set too cold (control found in door seal will cause refrigerator to stabilize. • Clean or change gasket. Call local Electric Company. Reset circuit breaker. • Check house lights. Digital temperature displays are opened too frequently or too long. • Refrigerator/freezer door may be slightly open. • Freezer control is normal. Refrigerator runs...
Complete Owner's Guide (English)
Page 39
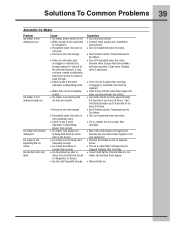
... ice & water filter cartridge dispenser is dispensing water. Solutions To Common Problems 39 Automatic Ice Maker Problem Cause Correction Ice maker is not • Ice maker power switch is Off. • Turn on household water line valve. If valve is of ice every 24 hours. • Freezer is not cold enough. • See Problem section, Temperatures Are Too Warm. • Household water line valve is not cold enough. • See Problem section, Temperatures Are Too Warm. • Valve on household water line valve. Fast Ice should hear two clicks). making enough...
... ice & water filter cartridge dispenser is dispensing water. Solutions To Common Problems 39 Automatic Ice Maker Problem Cause Correction Ice maker is not • Ice maker power switch is Off. • Turn on household water line valve. If valve is of ice every 24 hours. • Freezer is not cold enough. • See Problem section, Temperatures Are Too Warm. • Household water line valve is not cold enough. • See Problem section, Temperatures Are Too Warm. • Valve on household water line valve. Fast Ice should hear two clicks). making enough...
Complete Owner's Guide (English)
Page 40
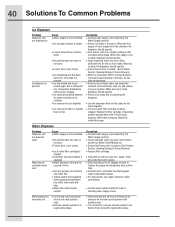
.... Clean container, wipe dry, and replace in approximately 3 minutes. Cause • Water supply is not connected. • Ice storage container is empty. • Freezer temperature is set too warm. • Household water line valve is not open . • Freezer door is not closed . (See Problem Section, Opening/Closing of ice is made , dispenser should operate. • Turn freezer control to cold water line. • Tubing used in checking water supply source. When new ice is overloaded. See Problem section Ice Maker Is Not Making Ice. • Ensure that freezer door...
.... Clean container, wipe dry, and replace in approximately 3 minutes. Cause • Water supply is not connected. • Ice storage container is empty. • Freezer temperature is set too warm. • Household water line valve is not open . • Freezer door is not closed . (See Problem Section, Opening/Closing of ice is made , dispenser should operate. • Turn freezer control to cold water line. • Tubing used in checking water supply source. When new ice is overloaded. See Problem section Ice Maker Is Not Making Ice. • Ensure that freezer door...


