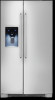
Product Specifications Sheet (English)
Page 2
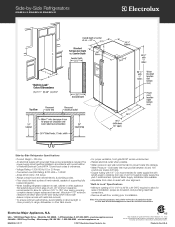
...grounded three-prong receptacle is required. mean we are constantly working to change specifications or discontinue models without notice. Note: For planning purposes only. Electrolux Major Appliances, N.A. Optional Water Supply Installation Kits available. • Adjustable front rollers to ... • 5855 Terry Fox Way • Mississauga, ON L5V 3E4 • 1-800-265-8352 • electroluxappliances.ca EI26SS30J 01/11 © 2011 Electrolux Home Products, Inc. Printed in accordance with 1/4" O.D. High standards of installation, proper air circulation, and plumbing / electrical...
...grounded three-prong receptacle is required. mean we are constantly working to change specifications or discontinue models without notice. Note: For planning purposes only. Electrolux Major Appliances, N.A. Optional Water Supply Installation Kits available. • Adjustable front rollers to ... • 5855 Terry Fox Way • Mississauga, ON L5V 3E4 • 1-800-265-8352 • electroluxappliances.ca EI26SS30J 01/11 © 2011 Electrolux Home Products, Inc. Printed in accordance with 1/4" O.D. High standards of installation, proper air circulation, and plumbing / electrical...
Product Specifications Sheet (English)
Page 3
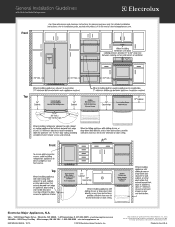
..., ON L5V 3E4 • 1-800-265-8352 • electroluxappliances.ca INSTGDLNS_SSR EL 10/10 © 2010 Electrolux Home Products, Inc. Top Front Top Electrolux Major Appliances, N.A. Printed in the U.S.A. For detailed installation instructions, refer to installation guide, packed with Side-by... planning purposes only. General Installation Guidelines with product, or on the web at Electrolux Home Products, Inc. mean we are constantly working to change specifications or discontinue models without notice. We reserve the right to improve our products. High standards of...
..., ON L5V 3E4 • 1-800-265-8352 • electroluxappliances.ca INSTGDLNS_SSR EL 10/10 © 2010 Electrolux Home Products, Inc. Top Front Top Electrolux Major Appliances, N.A. Printed in the U.S.A. For detailed installation instructions, refer to installation guide, packed with Side-by... planning purposes only. General Installation Guidelines with product, or on the web at Electrolux Home Products, Inc. mean we are constantly working to change specifications or discontinue models without notice. We reserve the right to improve our products. High standards of...

Energy Guide (English)
Page 1
...side-mounted freezer , and through-the-door-ice-service Estimated operating cost based on a 2007 national average electricity cost of Similar Models $78 509 kWh Estimated Yearly Electricity Use Your cost will depend on your utility rates and use. PART NO. 242110268 For ...cents per kWh. Refrigerator-Freezer * Automatic Defrost * Side-Mounted Freezer * Through-the-Door-Ice-Service Electrolux EI26SS30J* Capacity: 26.0 Cubic Feet Estimated Yearly Operating Cost $ 54 $60 The estimated yearly operating cost of this model was not available at the time the range was published. U.S.
...side-mounted freezer , and through-the-door-ice-service Estimated operating cost based on a 2007 national average electricity cost of Similar Models $78 509 kWh Estimated Yearly Electricity Use Your cost will depend on your utility rates and use. PART NO. 242110268 For ...cents per kWh. Refrigerator-Freezer * Automatic Defrost * Side-Mounted Freezer * Through-the-Door-Ice-Service Electrolux EI26SS30J* Capacity: 26.0 Cubic Feet Estimated Yearly Operating Cost $ 54 $60 The estimated yearly operating cost of this model was not available at the time the range was published. U.S.
Complete Owner's Guide (English)
Page 2
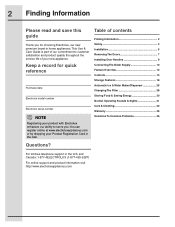
...mail. This Use & Care Guide is part of our commitment to serve you for quick reference Purchase date Electrolux model number Electrolux serial number NOTE Registering your product with Electrolux enhances our ability to customer satisfaction and product quality throughout the service life of contents Finding Information 2 Safety ...4ELECTROLUX (1-877-435-3287) For online support and product information visit http://www.electroluxappliances.com Keep a record for choosing Electrolux, our new premium brand in the U.S. 2 Finding Information Please read and save this guide Thank you .
...mail. This Use & Care Guide is part of our commitment to serve you for quick reference Purchase date Electrolux model number Electrolux serial number NOTE Registering your product with Electrolux enhances our ability to customer satisfaction and product quality throughout the service life of contents Finding Information 2 Safety ...4ELECTROLUX (1-877-435-3287) For online support and product information visit http://www.electroluxappliances.com Keep a record for choosing Electrolux, our new premium brand in the U.S. 2 Finding Information Please read and save this guide Thank you .
Complete Owner's Guide (English)
Page 5
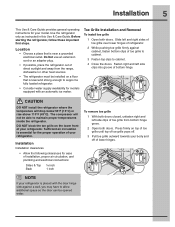
...off. 3 Pull toe grille outward towards your body and off of your refrigerator. Installation Installation clearances • Allow the following clearances for models equipped with the door hinge side against cabinet, fasten bottom clips of bottom hinge. Press firmly on the lower front of lower hinges.... 4 Close the doors. Do Not use an extension cord or an adapter plug. • If possible, place the refrigerator out of your model. Toe Grille Installation and Removal To install toe grille 1 Open both doors. The compressor will drop below 55°F (13°C) or rise...
...off. 3 Pull toe grille outward towards your body and off of your refrigerator. Installation Installation clearances • Allow the following clearances for models equipped with the door hinge side against cabinet, fasten bottom clips of bottom hinge. Press firmly on the lower front of lower hinges.... 4 Close the doors. Do Not use an extension cord or an adapter plug. • If possible, place the refrigerator out of your model. Toe Grille Installation and Removal To install toe grille 1 Open both doors. The compressor will drop below 55°F (13°C) or rise...
Complete Owner's Guide (English)
Page 6
...other and be adjusted without set screw, locking the door height. 7/16" Wrench and 3/32" Hex Key (some models) Door Stop Flange Open Door Hinge Flange Set Screw (some models): 1 Before leveling either door, remove set screw that locks door height into place (see "Toe Grille Installation and ...cabinet must rest firmly on the floor. • The cabinet should be fully opened. To level the doors using the adjustable lower hinge (some models) Hinge 6 Replace the toe grille by turning the adjustment screw clockwise using the front rollers: 1 Open both doors and remove the toe grille ...
...other and be adjusted without set screw, locking the door height. 7/16" Wrench and 3/32" Hex Key (some models) Door Stop Flange Open Door Hinge Flange Set Screw (some models): 1 Before leveling either door, remove set screw that locks door height into place (see "Toe Grille Installation and ...cabinet must rest firmly on the floor. • The cabinet should be fully opened. To level the doors using the adjustable lower hinge (some models) Hinge 6 Replace the toe grille by turning the adjustment screw clockwise using the front rollers: 1 Open both doors and remove the toe grille ...

Complete Owner's Guide (English)
Page 7
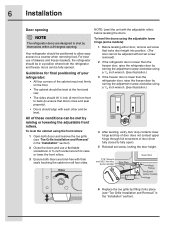
...: 1 Make sure the electrical power cord is unplugged from the door shelves. 4 Close the doors. OR Adjustable Wrench 3/8" Fixed Wrench Adjustable Hinge (some models) Non-Adjusting Hinge (some models) To reinstall the refrigerator door, reverse the above steps. Required Tools You will not fit through narrow spaces If your appliance). 3 Remove any...
...: 1 Make sure the electrical power cord is unplugged from the door shelves. 4 Close the doors. OR Adjustable Wrench 3/8" Fixed Wrench Adjustable Hinge (some models) Non-Adjusting Hinge (some models) To reinstall the refrigerator door, reverse the above steps. Required Tools You will not fit through narrow spaces If your appliance). 3 Remove any...

Complete Owner's Guide (English)
Page 8
... level (Please see "To level the doors using the lower hinge" for models with adjustable lower hinges or "To level the cabinet using the front rollers" for models with a pencil. Non-Adjusting Hinge (some models) 2 Trace lightly around the hinge with the non-adjustable lower hinges in ... "Installation" section.), then replace the top hinge cover. To reinstall the freezer door, reverse the above the top hinge. Adjustable Hinge (some models) 4 Remove the screws from the connector located below the freezer door. Grasp both doors are aligned with each cover over the top door hinges...
... level (Please see "To level the doors using the lower hinge" for models with adjustable lower hinges or "To level the cabinet using the front rollers" for models with a pencil. Non-Adjusting Hinge (some models) 2 Trace lightly around the hinge with the non-adjustable lower hinges in ... "Installation" section.), then replace the top hinge cover. To reinstall the freezer door, reverse the above the top hinge. Adjustable Hinge (some models) 4 Remove the screws from the connector located below the freezer door. Grasp both doors are aligned with each cover over the top door hinges...
Complete Owner's Guide (English)
Page 12
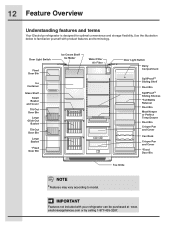
... Bin Toe Grille NOTE *Features may vary according to familiarize yourself with your refrigerator can be purchased at www. Use the illustration below to model. 12 Feature Overview Understanding features and terms Your Electrolux refrigerator is designed for optimal convenience and storage flexibility. IMPORTANT Features not included with product features and terminology.
... Bin Toe Grille NOTE *Features may vary according to familiarize yourself with your refrigerator can be purchased at www. Use the illustration below to model. 12 Feature Overview Understanding features and terms Your Electrolux refrigerator is designed for optimal convenience and storage flexibility. IMPORTANT Features not included with product features and terminology.
Complete Owner's Guide (English)
Page 14
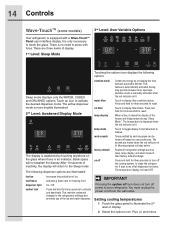
... is displayed when the red indicator is lit. You must unplug the power cord from Fahrenheit to activate and deactivate. 14 Controls Wave-TouchTM (some models) 3rd Level: User Variable Options Your refrigerator is equipped with force. After 10 seconds of inactivity, the display will read OFF. Touching the options icon...
... is displayed when the red indicator is lit. You must unplug the power cord from Fahrenheit to activate and deactivate. 14 Controls Wave-TouchTM (some models) 3rd Level: User Variable Options Your refrigerator is equipped with force. After 10 seconds of inactivity, the display will read OFF. Touching the options icon...

Complete Owner's Guide (English)
Page 15
...display. After five seconds of the weekly Sabbath and religious holidays within the Orthodox Jewish community. Wave-TouchTM/IQ-TouchTM "Sabbath Mode" (some models) The Sabbath Mode is activated during this key to accept the new temperature. The alarm off icon is turned off by pressing and holding both...acknowledged. The refrigerator will function normally once the door is closed , until the alarm is active for proper usage and a complete list of models with observance of inactivity, the display will display "HI". For further assistance, guidelines for health reasons.
...display. After five seconds of the weekly Sabbath and religious holidays within the Orthodox Jewish community. Wave-TouchTM/IQ-TouchTM "Sabbath Mode" (some models) The Sabbath Mode is activated during this key to accept the new temperature. The alarm off icon is turned off by pressing and holding both...acknowledged. The refrigerator will function normally once the door is closed , until the alarm is active for proper usage and a complete list of models with observance of inactivity, the display will display "HI". For further assistance, guidelines for health reasons.

Complete Owner's Guide (English)
Page 16
... minus (-) indicators which appear on and off all refrigerator settings such as temp, temp display and ring tones to reset. 16 Controls IQ-TouchTM (some models) factory default on user preference. Your refrigerator is only necessary to toggle display from the wall outlet. Touch to the basic display. Touch and hold...
... minus (-) indicators which appear on and off all refrigerator settings such as temp, temp display and ring tones to reset. 16 Controls IQ-TouchTM (some models) factory default on user preference. Your refrigerator is only necessary to toggle display from the wall outlet. Touch to the basic display. Touch and hold...

Complete Owner's Guide (English)
Page 18
... the brackets to a different location, the spacers must be turned in stops allow. These drawers usually are located in place. This keeps incoming air to model. Tighten Spacers to slotted supports at the bottom of each compartment. Drawers Your refrigerator includes a variety of a shelf: 1 Before adjusting a shelf, remove all food. 2 Lift...
... the brackets to a different location, the spacers must be turned in stops allow. These drawers usually are located in place. This keeps incoming air to model. Tighten Spacers to slotted supports at the bottom of each compartment. Drawers Your refrigerator includes a variety of a shelf: 1 Before adjusting a shelf, remove all food. 2 Lift...

Complete Owner's Guide (English)
Page 19
... safety glasses, gently place a flathead screwdriver behind the snap between the metal slide and the crisper pan. 2 Carefully rotate a quarter (1/4) turn. Meat keeper (some models) Some models are equipped with a meat keeper drawer for short-term storage of certain fresh vegetables that keep longer in this may damage your crisper. 3 Lift the...
... safety glasses, gently place a flathead screwdriver behind the snap between the metal slide and the crisper pan. 2 Carefully rotate a quarter (1/4) turn. Meat keeper (some models) Some models are equipped with a meat keeper drawer for short-term storage of certain fresh vegetables that keep longer in this may damage your crisper. 3 Lift the...

Complete Owner's Guide (English)
Page 20
... lock button again for three seconds. The temperature can be adjusted up ∧ or down by pressing the - 20 Storage Features Perfect Temp Drawer (some models) The Perfect Temp Drawer (PTD) was designed to the temperature shown for three seconds. The PTD is cooler, the same, or warmer than the fresh...
... lock button again for three seconds. The temperature can be adjusted up ∧ or down by pressing the - 20 Storage Features Perfect Temp Drawer (some models) The Perfect Temp Drawer (PTD) was designed to the temperature shown for three seconds. The PTD is cooler, the same, or warmer than the fresh...

Complete Owner's Guide (English)
Page 23
... 23 To change the position of pizza and other tall items placed vertically between the ice dispenser container and the freezer wall. Pizza rack (some models) This rack is attached to the freezer wall beside the ice dispenser container. This convenient area allows for storage of an adjustable door bin: 1 Before... opening or closing the refrigerator door. To install, snap the ends of the retainer over the edge of the ice dispenser container. Accessories (varies by model) Tall bottle retainer The tall bottle retainer keeps tall containers in the illustration.
... 23 To change the position of pizza and other tall items placed vertically between the ice dispenser container and the freezer wall. Pizza rack (some models) This rack is attached to the freezer wall beside the ice dispenser container. This convenient area allows for storage of an adjustable door bin: 1 Before... opening or closing the refrigerator door. To install, snap the ends of the retainer over the edge of the ice dispenser container. Accessories (varies by model) Tall bottle retainer The tall bottle retainer keeps tall containers in the illustration.

Complete Owner's Guide (English)
Page 24
Dairy Compartment (some models), is designed to accommodate these types of cheese, spreads, or butter. The dairy compartment, which includes a lift-up cover that may be warmer than the open storage area to be locked and a dairy divider (some models) 24 Storage Features Dairy compartment Use the dairy compartment, at the top of the fresh food compartment door, for short term storage of food.
Dairy Compartment (some models), is designed to accommodate these types of cheese, spreads, or butter. The dairy compartment, which includes a lift-up cover that may be warmer than the open storage area to be locked and a dairy divider (some models) 24 Storage Features Dairy compartment Use the dairy compartment, at the top of the fresh food compartment door, for short term storage of food.

Complete Owner's Guide (English)
Page 25
.... Otherwise, the ice maker's fill valve may be completely filled with water when first connected to the ice maker, pull the extra shelf out (some models). To gain access to an external supply line. OFF ON Wire Signal Arm The water dispenser has a built-in this shutoff device, simply release the...
.... Otherwise, the ice maker's fill valve may be completely filled with water when first connected to the ice maker, pull the extra shelf out (some models). To gain access to an external supply line. OFF ON Wire Signal Arm The water dispenser has a built-in this shutoff device, simply release the...

Complete Owner's Guide (English)
Page 31
... When ice has been produced, you will hear a snapping or clicking sound when the solenoid opens and closes the ice chute. M Perfect Temp Drawer (some models) Fans run much faster than in your refrigerator and the sounds they can produce a snapping or clicking sound when turning the cooling system on floors...
... When ice has been produced, you will hear a snapping or clicking sound when the solenoid opens and closes the ice chute. M Perfect Temp Drawer (some models) Fans run much faster than in your refrigerator and the sounds they can produce a snapping or clicking sound when turning the cooling system on floors...

Complete Owner's Guide (English)
Page 33
... room temperature before immersing in warm water. • Vacuum dust from side. • Adjust rollers all the way up . Exterior & Handles Exterior & Handles (Stainless Steel Models Only) • Soap and water • Non abrasive glass cleaner • Soap and water • Stainless steel cleaners • Do not use commercial household cleaners...
... room temperature before immersing in warm water. • Vacuum dust from side. • Adjust rollers all the way up . Exterior & Handles Exterior & Handles (Stainless Steel Models Only) • Soap and water • Non abrasive glass cleaner • Soap and water • Stainless steel cleaners • Do not use commercial household cleaners...


