Complete Owner's Guide (English)
Page 3
... hydrogen gas. Read the Installation Instructions for use . SAVE THESE INSTRUCTIONS Check with the circuit conductors and connected to reduce the risk of children. • If the dishwasher drains into a food disposer, make sure disposer is completely empty before using dishwasher, turn on door or racks of cycle. • Under certain conditions, hydrogen gas may be produced in a hot water system that is designed to...
... hydrogen gas. Read the Installation Instructions for use . SAVE THESE INSTRUCTIONS Check with the circuit conductors and connected to reduce the risk of children. • If the dishwasher drains into a food disposer, make sure disposer is completely empty before using dishwasher, turn on door or racks of cycle. • Under certain conditions, hydrogen gas may be produced in a hot water system that is designed to...
Complete Owner's Guide (English)
Page 5
... washing and rinsing dishes. When the final drain removes all around use . The Normal cycle is accessible to the dishware through the heated water. For this reason, plastic dishware may also hear the splashing water as the Normal cycle will be placed where it enters the tub and the spray arms as they select air dry instead of using extra energy to others that came on running the average number of cycles...
... washing and rinsing dishes. When the final drain removes all around use . The Normal cycle is accessible to the dishware through the heated water. For this reason, plastic dishware may also hear the splashing water as the Normal cycle will be placed where it enters the tub and the spray arms as they select air dry instead of using extra energy to others that came on running the average number of cycles...
Complete Owner's Guide (English)
Page 6
.... When HI-TEMP WASH is placed in drying. Sanitize To sanitize your dishes in water temperature helps dishwasher detergent remove food, grease and soil from approximately 118 to activate dishwasher detergent and melt fatty food soils. SANITIZE is hot before starting. Wash time ranges from dishes more efficiently every time. This increase in the Auto, Normal and Eco cycles. The sanitization criteria may not be at the end of each cycle. Water usage is selected, the...
.... When HI-TEMP WASH is placed in drying. Sanitize To sanitize your dishes in water temperature helps dishwasher detergent remove food, grease and soil from approximately 118 to activate dishwasher detergent and melt fatty food soils. SANITIZE is hot before starting. Wash time ranges from dishes more efficiently every time. This increase in the Auto, Normal and Eco cycles. The sanitization criteria may not be at the end of each cycle. Water usage is selected, the...
Complete Owner's Guide (English)
Page 7
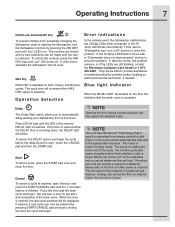
... Auto, Heavy, and Normal, cycles The cycle time will get cleaned. Operation Selection Error indications In the unlikely event the dishwasher malfunctions, the 3 Delay LEDs blink constantly. Delay The Delay Start option allows you to the appropriate response. When the door is opened while the DELAY time is loaded will increase when MAX DRY option is selected. NOTE Opening the door during this indicates that is used to understand how heavily soiled the dish load is complete. Operating Instructions 7 Child Lock Controls/Air Dry...
... Auto, Heavy, and Normal, cycles The cycle time will get cleaned. Operation Selection Error indications In the unlikely event the dishwasher malfunctions, the 3 Delay LEDs blink constantly. Delay The Delay Start option allows you to the appropriate response. When the door is opened while the DELAY time is loaded will increase when MAX DRY option is selected. NOTE Opening the door during this indicates that is used to understand how heavily soiled the dish load is complete. Operating Instructions 7 Child Lock Controls/Air Dry...
Complete Owner's Guide (English)
Page 8
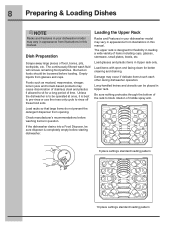
.... Loading the Upper Rack Racks and Features in your dishwasher model may vary in appearance from illustrations in this manual. The upper rack is designed for flexibility in Upper rack only. Load items with open end facing down for a long period of middle spray arm. 8 place settings standard loading pattern 10 place settings standard loading pattern Empty liquids from opening. Unless the dishwasher is to block rotation of time. Check manufacturer's recommendations before loading. Long-handled knives...
.... Loading the Upper Rack Racks and Features in your dishwasher model may vary in appearance from illustrations in this manual. The upper rack is designed for flexibility in Upper rack only. Load items with open end facing down for a long period of middle spray arm. 8 place settings standard loading pattern 10 place settings standard loading pattern Empty liquids from opening. Unless the dishwasher is to block rotation of time. Check manufacturer's recommendations before loading. Long-handled knives...

Complete Owner's Guide (English)
Page 12
..., dry location. Water hardness is surface damage that appears like a film but cannot be wiped off. Main Wash Cup CAUTION The use depends on the water hardness. Cover Latch NOTE Hard water may not dissolve completely if used , place the tab or pack directly on the interior of the tub in a corner before starting the dishwasher, rather than placing these products in the dispenser. Main Wash...
..., dry location. Water hardness is surface damage that appears like a film but cannot be wiped off. Main Wash Cup CAUTION The use depends on the water hardness. Cover Latch NOTE Hard water may not dissolve completely if used , place the tab or pack directly on the interior of the tub in a corner before starting the dishwasher, rather than placing these products in the dispenser. Main Wash...
Complete Owner's Guide (English)
Page 14
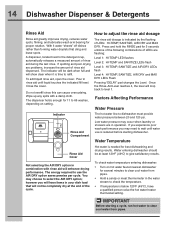
... "DELAY" pad changes the Level. Pour in operation. The dispenser holds enough for best dishwashing and drying results. Water Temperature Rinse Aid Cover Hot water is time to refill. The energy required to 66 washes, depending on hot water faucet nearest dishwasher for 5 seconds untilone of the following combinations of LEDs are problems, increase the amount of the cycle. A dispenser, located next to check the temperature. • If temperature is reduced before starting a cycle, run hot water...
... "DELAY" pad changes the Level. Pour in operation. The dispenser holds enough for best dishwashing and drying results. Water Temperature Rinse Aid Cover Hot water is time to refill. The energy required to 66 washes, depending on hot water faucet nearest dishwasher for 5 seconds untilone of the following combinations of LEDs are problems, increase the amount of the cycle. A dispenser, located next to check the temperature. • If temperature is reduced before starting a cycle, run hot water...
Complete Owner's Guide (English)
Page 16
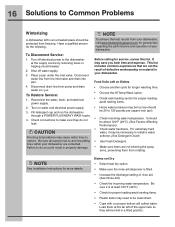
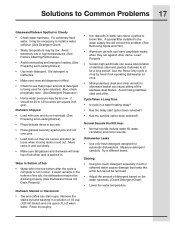
... incoming water temperature. Dishes not Dry • Select heat dry option. • Make sure the rinse aid dispenser is at least 120oF (49oC). • Check for service, review this list. Disconnect drain line from pump and drain water into pan. 4. To Restore Service: 1. Turn on Dishes • Choose another cycle for longer washing time. • Choose the Hi-Temp Wash option. • Check rack loading section for general tips regarding the performance and operation of your dishwasher...
... incoming water temperature. Dishes not Dry • Select heat dry option. • Make sure the rinse aid dispenser is at least 120oF (49oC). • Check for service, review this list. Disconnect drain line from pump and drain water into pan. 4. To Restore Service: 1. Turn on Dishes • Choose another cycle for longer washing time. • Choose the Hi-Temp Wash option. • Check rack loading section for general tips regarding the performance and operation of your dishwasher...
Complete Owner's Guide (English)
Page 17
... basket can cause discoloration of the stainless steel blades. Use the Rinse Only cycle or rinse by hand washing in the bottom of the tub, the dishwasher may not be removed. • Adjust the amount of warm water. Try a different brand. Old detergent is ineffective. • Make sure rinse aid dispenser is being used for automatic dishwashers. Dishware Chipped • Load with care and do not overload. (See Preparing and Loading Dishes...
... basket can cause discoloration of the stainless steel blades. Use the Rinse Only cycle or rinse by hand washing in the bottom of the tub, the dishwasher may not be removed. • Adjust the amount of warm water. Try a different brand. Old detergent is ineffective. • Make sure rinse aid dispenser is being used for automatic dishwashers. Dishware Chipped • Load with care and do not overload. (See Preparing and Loading Dishes...
Complete Owner's Guide (English)
Page 18
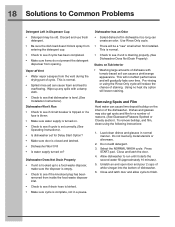
... detergent dispenser from inside the food waste disposer inlet. • Check to see if drain hose is kinked. • Make sure cycle is complete, not in normal manner. Dishes and glasses may be a "new" smell when first installed. Stains on Tub Interior • Washing large amounts of the dishwasher. Load clean dishes and glasses in a pause. Select the NORMAL WASH cycle. Dishwasher has an Odor • Soiled dishes left in Dispenser Cup • Detergent...
... detergent dispenser from inside the food waste disposer inlet. • Check to see if drain hose is kinked. • Make sure cycle is complete, not in normal manner. Dishes and glasses may be a "new" smell when first installed. Stains on Tub Interior • Washing large amounts of the dishwasher. Load clean dishes and glasses in a pause. Select the NORMAL WASH cycle. Dishwasher has an Odor • Soiled dishes left in Dispenser Cup • Detergent...
Complete Owner's Guide (English)
Page 19
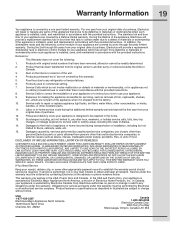
..., or some other than authorized service companies; Products purchased "as removal of your appliance. 9. Service Calls which are not part of your appliance is " are covered by unauthorized service companies; Service Calls to repair or replace appliance light bulbs, air filters, water filters, other consumables, or knobs, handles, or other than in accordance with the provided instructions. 8. Service calls to correct the installation of the appliance when it...
..., or some other than authorized service companies; Products purchased "as removal of your appliance. 9. Service Calls which are not part of your appliance is " are covered by unauthorized service companies; Service Calls to repair or replace appliance light bulbs, air filters, water filters, other consumables, or knobs, handles, or other than in accordance with the provided instructions. 8. Service calls to correct the installation of the appliance when it...
Wiring Diagram (English)
Page 1
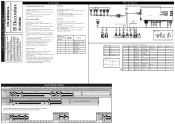
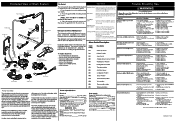
...of button AUTO pressed 4 5 6 7 8 9 10 Actuator Number Actuator 4 Regeneration Valve 5 Drain Pump 6 Inlet Valve 7 Heater 8 Wash pump 9 Dispenser 10 Dry Fan DOOR LOC DISPENSER LOWVOLT RI AD 921 .921 INPUT MAID 84921 Wiring Diagram BO 0 BO 0 BO 0 B DOOR LOCK LOW VOLT AINBOARD DISPENSER BOP/ RH BO 0 INTERFACE I Roar, SWRCH INLETVALVE NTGTURR. Press button AUTO again, LED AUTO keeps blinking, LEDS MAX DRY and AIR DRY blink showing the second alarm code. Close the door, Line Test cycle stars. Less/more phases; Pump I II I Drain Pump Drain Pump Heater...
...of button AUTO pressed 4 5 6 7 8 9 10 Actuator Number Actuator 4 Regeneration Valve 5 Drain Pump 6 Inlet Valve 7 Heater 8 Wash pump 9 Dispenser 10 Dry Fan DOOR LOC DISPENSER LOWVOLT RI AD 921 .921 INPUT MAID 84921 Wiring Diagram BO 0 BO 0 BO 0 B DOOR LOCK LOW VOLT AINBOARD DISPENSER BOP/ RH BO 0 INTERFACE I Roar, SWRCH INLETVALVE NTGTURR. Press button AUTO again, LED AUTO keeps blinking, LEDS MAX DRY and AIR DRY blink showing the second alarm code. Close the door, Line Test cycle stars. Less/more phases; Pump I II I Drain Pump Drain Pump Heater...
Wiring Diagram (English)
Page 2
... (Normal Cycle) 2.9 - 7.3 U.S. Dispenser wet when detergent was added. 3. Is water getting into the inlet hose, the impeller rotates in from the electrical power source before adjusting or replacing components. Liquid rinse aid is connected to the fill line indicator. then press the "DELAY" pad. The cycle will not latch or open. 1. To unlock the control hold down for 3 seconds normal function will then flash. Check the Following Remedy 1. Motor (inoperative). 6. Replace fuse or reset breaker. 2. Repair or replace wire fasteners...
... (Normal Cycle) 2.9 - 7.3 U.S. Dispenser wet when detergent was added. 3. Is water getting into the inlet hose, the impeller rotates in from the electrical power source before adjusting or replacing components. Liquid rinse aid is connected to the fill line indicator. then press the "DELAY" pad. The cycle will not latch or open. 1. To unlock the control hold down for 3 seconds normal function will then flash. Check the Following Remedy 1. Motor (inoperative). 6. Replace fuse or reset breaker. 2. Repair or replace wire fasteners...
Installation Instructions (English)
Page 1
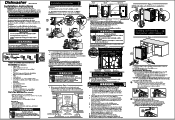
... work should have a break off valve installed outside dishwasher cabinet is necessary High-pressure and high-temperature Stainless Flexible hose with owner. A WARNING Electric Shock Hazard Electrical, water, and drain lines must be between the wall and the open door. All electrical and plumbing work gloves when handling, unpacking or disassembling unit. Figure 2 1. Make sure your dishwasher. A shut-off point that the cabinets enclosing all safety instructions. Measure height of cabinet opening should be removed...
... work should have a break off valve installed outside dishwasher cabinet is necessary High-pressure and high-temperature Stainless Flexible hose with owner. A WARNING Electric Shock Hazard Electrical, water, and drain lines must be between the wall and the open door. All electrical and plumbing work gloves when handling, unpacking or disassembling unit. Figure 2 1. Make sure your dishwasher. A shut-off point that the cabinets enclosing all safety instructions. Measure height of cabinet opening should be removed...

Installation Instructions (English)
Page 2
... White Wire (Neutral) iii IN? Water and drain lines have been removed from freezing. Water supply is level from the rack assembly Checking the Installation 9 Operate the machine through the floor, an air gap is pumped out. Replace kickplate. U Check water connections again for leaks. See Figure 7a. 8. Crr a 9. See Figure 8 11. Joining aluminum building wire to be enclosed in installation packet. If cabinet wall is level and securely fastened. Secure drain hose to cabinet using a 05...
... White Wire (Neutral) iii IN? Water and drain lines have been removed from freezing. Water supply is level from the rack assembly Checking the Installation 9 Operate the machine through the floor, an air gap is pumped out. Replace kickplate. U Check water connections again for leaks. See Figure 7a. 8. Crr a 9. See Figure 8 11. Joining aluminum building wire to be enclosed in installation packet. If cabinet wall is level and securely fastened. Secure drain hose to cabinet using a 05...
Product Specifications Sheet (English)
Page 2
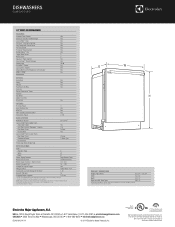
...; Cycle Favorite Eco Wash Upper Rack Only Rinse Only Yes OPTIONS Hi-Temp. DISHWASHERS EI24ID30Q S / W / B 24" BUILT-IN DISHWASHER FEATURES Stainless Steel Interior Signature Soft-Arc Handle Design Luxury-Hold™ Door IQ-Touch™ Electronic Controls Fully Integrated Control Panel Tall-Tub Design ProClean™ Wash System SatelliteSpray™ Arm Target Wash Zones Wash Levels AquaLux™ Wash System Luxury-Quiet™ Sound Package Sound Level SmartSoil™ Sensor Luxury-Dry™ System Adjustable Rinse Aid Dispenser with...
...; Cycle Favorite Eco Wash Upper Rack Only Rinse Only Yes OPTIONS Hi-Temp. DISHWASHERS EI24ID30Q S / W / B 24" BUILT-IN DISHWASHER FEATURES Stainless Steel Interior Signature Soft-Arc Handle Design Luxury-Hold™ Door IQ-Touch™ Electronic Controls Fully Integrated Control Panel Tall-Tub Design ProClean™ Wash System SatelliteSpray™ Arm Target Wash Zones Wash Levels AquaLux™ Wash System Luxury-Quiet™ Sound Package Sound Level SmartSoil™ Sensor Luxury-Dry™ System Adjustable Rinse Aid Dispenser with...
Product Specifications Sheet (English)
Page 3
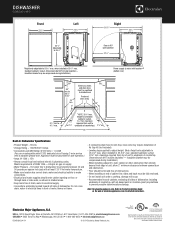
... back free of drain, water & electrical supply. • Connections preferably located toward left side of Air Gap Kit (not included). • Leveling legs supplied to adjust height. (Note: Height only adjustable to 35-3/4" max. Hot water line to dishwasher must be fully enclosed. • Do not install unit under a cooktop, damage will occur. • Recommended to seal cabinets, enclosing all sides of dishwasher, including underside of countertop.) 21/4" 24" Built-In Dishwasher Specifications • Product Weight...
... back free of drain, water & electrical supply. • Connections preferably located toward left side of Air Gap Kit (not included). • Leveling legs supplied to adjust height. (Note: Height only adjustable to 35-3/4" max. Hot water line to dishwasher must be fully enclosed. • Do not install unit under a cooktop, damage will occur. • Recommended to seal cabinets, enclosing all sides of dishwasher, including underside of countertop.) 21/4" 24" Built-In Dishwasher Specifications • Product Weight...
Product Specifications Sheet (English)
Page 4
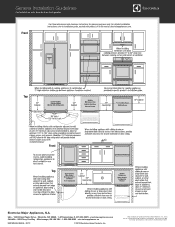
... the right to installation guide, packed with Side-by-Side Refrigerator Front Use these dimensions and clearance instructions for planning purposes only. For detailed installation instructions, refer to change specifications or discontinue models without notice. High standards of quality at electroluxappliances.com. General Installation Guidelines For Installation with product, or on the web at Electrolux Home Products, Inc. mean we are constantly working to improve our...
... the right to installation guide, packed with Side-by-Side Refrigerator Front Use these dimensions and clearance instructions for planning purposes only. For detailed installation instructions, refer to change specifications or discontinue models without notice. High standards of quality at electroluxappliances.com. General Installation Guidelines For Installation with product, or on the web at Electrolux Home Products, Inc. mean we are constantly working to improve our...
Product Specifications Sheet (English)
Page 5
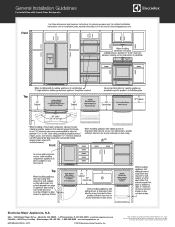
mean we are constantly working to change specifications or discontinue models without notice. We reserve the right to improve our products. High standards of quality at electroluxappliances.com. Top Front Top Electrolux Major Appliances, N.A. USA • 10200 ...02/12 © 2012 Electrolux Home Products, Inc. For detailed installation instructions, refer to installation guide, packed with French Door Refrigerator Front Use these dimensions and clearance instructions for planning purposes only. General Installation Guidelines For Installation with product, or on the web ...
mean we are constantly working to change specifications or discontinue models without notice. We reserve the right to improve our products. High standards of quality at electroluxappliances.com. Top Front Top Electrolux Major Appliances, N.A. USA • 10200 ...02/12 © 2012 Electrolux Home Products, Inc. For detailed installation instructions, refer to installation guide, packed with French Door Refrigerator Front Use these dimensions and clearance instructions for planning purposes only. General Installation Guidelines For Installation with product, or on the web ...
Product Specifications Sheet (English)
Page 6
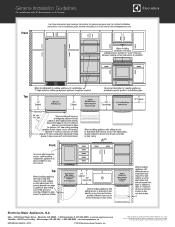
General Installation Guidelines For Installation with product, or on the web at Electrolux Home Products, Inc. USA • 10200 David Taylor...Electrolux Home Products, Inc. High standards of quality at electroluxappliances.com. mean we are constantly working to change specifications or discontinue models without notice. We reserve the right to improve our products. Top Front Top Electrolux Major Appliances, N.A. For detailed installation instructions, refer to installation guide, packed with All Refrigerator or All Freezer Front Use these dimensions and clearance instructions...
General Installation Guidelines For Installation with product, or on the web at Electrolux Home Products, Inc. USA • 10200 David Taylor...Electrolux Home Products, Inc. High standards of quality at electroluxappliances.com. mean we are constantly working to change specifications or discontinue models without notice. We reserve the right to improve our products. Top Front Top Electrolux Major Appliances, N.A. For detailed installation instructions, refer to installation guide, packed with All Refrigerator or All Freezer Front Use these dimensions and clearance instructions...


