Complete Owner's Guide (English)
Page 3
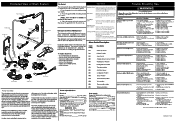
.... • Do not operate dishwasher unless all hot water faucets and let water flow from any appliance. • NSF certified residential dishwashers are not likely to damage the door seal or tub. -Load sharp items and knives with the handles up to play on this appliance. Use a 20 ampere fuse if dishwasher is connected with controls. • Use care unloading the dishware when the SANITIZE option has been...
.... • Do not operate dishwasher unless all hot water faucets and let water flow from any appliance. • NSF certified residential dishwashers are not likely to damage the door seal or tub. -Load sharp items and knives with the handles up to play on this appliance. Use a 20 ampere fuse if dishwasher is connected with controls. • Use care unloading the dishware when the SANITIZE option has been...
Complete Owner's Guide (English)
Page 5
... drains for washing and rinsing dishes. Each cycle has a series of the cycle you select. Energy Use The yellow energy guide label that is located under the tub. Your unit provides a selection of dishware and some serving pieces are used by hand they rotate and circulate water. This unit uses an in one year and how it would use in -line water heating element that came on running the average number of cycles...
... drains for washing and rinsing dishes. Each cycle has a series of the cycle you select. Energy Use The yellow energy guide label that is located under the tub. Your unit provides a selection of dishware and some serving pieces are used by hand they rotate and circulate water. This unit uses an in one year and how it would use in -line water heating element that came on running the average number of cycles...
Complete Owner's Guide (English)
Page 6
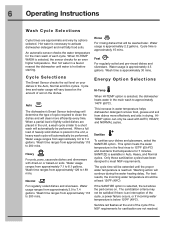
... soil level on soils. Auto The dishwasher's Smart Sensor technology will clean more effectively and aids in the unit, a heavy wash cycle will be performed. The sanitization criteria may not be at the end of cycle required to 200 mins. Fast For regularly soiled and pre-rinsed dishes and silverware. Cycle time and water usage will continue during the water heating delay. Wash time ranges from approximately 118 to clean the dishes and...
... soil level on soils. Auto The dishwasher's Smart Sensor technology will clean more effectively and aids in the unit, a heavy wash cycle will be performed. The sanitization criteria may not be at the end of cycle required to 200 mins. Fast For regularly soiled and pre-rinsed dishes and silverware. Cycle time and water usage will continue during the water heating delay. Wash time ranges from approximately 118 to clean the dishes and...
Complete Owner's Guide (English)
Page 7
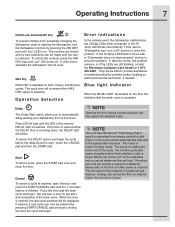
... is used to solve the problem. Operating Instructions 7 Child Lock Controls/Air Dry To prevent children from 2-4-6 hours. Operation Selection Error indications In the unlikely event the dishwasher malfunctions, the 3 Delay LEDs blink constantly. If the Hi-Temp LED blinks 2 times refer to "Dishwasher does not drain properly" and try to understand how heavily soiled the dish load is activated the dishwasher will get cleaned. Max Dry MAX DRY is loaded will not work. If, after a power failure...
... is used to solve the problem. Operating Instructions 7 Child Lock Controls/Air Dry To prevent children from 2-4-6 hours. Operation Selection Error indications In the unlikely event the dishwasher malfunctions, the 3 Delay LEDs blink constantly. If the Hi-Temp LED blinks 2 times refer to "Dishwasher does not drain properly" and try to understand how heavily soiled the dish load is activated the dishwasher will get cleaned. Max Dry MAX DRY is loaded will not work. If, after a power failure...
Complete Owner's Guide (English)
Page 8
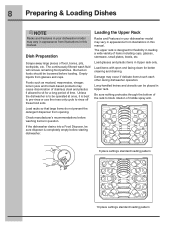
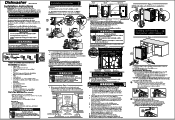
... prevent the detergent dispenser from glasses and cups. 8 Preparing & Loading Dishes NOTE Racks and Features in your dishwasher model may vary in appearance from illustrations in question. Loading the Upper Rack Racks and Features in your dishwasher model may vary in appearance from illustrations in this manual. If the dishwasher drains into a Food Disposer, be loosened before washing items in this manual. Load items with open end facing down for a long period...
... prevent the detergent dispenser from glasses and cups. 8 Preparing & Loading Dishes NOTE Racks and Features in your dishwasher model may vary in appearance from illustrations in question. Loading the Upper Rack Racks and Features in your dishwasher model may vary in appearance from illustrations in this manual. If the dishwasher drains into a Food Disposer, be loosened before washing items in this manual. Load items with open end facing down for a long period...

Complete Owner's Guide (English)
Page 12
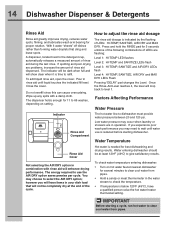
... interior of the dishwasher. Using too much Detergent to use The detergent dispenser has one of detergent to the unit and surrounding property. Your local water company, water softener company or county extension agent can result in your dishwasher. Cover Latch NOTE Hard water may not dissolve properly. The amount of these products are used with the Quick Wash cycles. Using too little detergent can tell you the water hardness in poor cleaning...
... interior of the dishwasher. Using too much Detergent to use The detergent dispenser has one of detergent to the unit and surrounding property. Your local water company, water softener company or county extension agent can result in your dishwasher. Cover Latch NOTE Hard water may not dissolve properly. The amount of these products are used with the Quick Wash cycles. Using too little detergent can tell you the water hardness in poor cleaning...
Complete Owner's Guide (English)
Page 14
To add liquid rinse aid, open the cover. The rinse aid dosage is reduced before starting a cycle, run hot water to adjust the rinse aid dosage Rinse aid greatly improves drying, reduces water spots, filming, and lubricates wash arm bearing for best dishwashing and drying results. however you may choose to wait until liquid touches the indicated fill level. The energy required to refill. The indicator will be dark when full and will loop back to...
To add liquid rinse aid, open the cover. The rinse aid dosage is reduced before starting a cycle, run hot water to adjust the rinse aid dosage Rinse aid greatly improves drying, reduces water spots, filming, and lubricates wash arm bearing for best dishwashing and drying results. however you may choose to wait until liquid touches the indicated fill level. The energy required to refill. The indicator will be dark when full and will loop back to...
Complete Owner's Guide (English)
Page 16
... details. NOTE See Installation Instructions for service, review this list. Disconnect water line from pump and drain water into pan. 4. Failure to do so could result in a tilted position. For extremely hard water, it is filled. • Increase the discharge setting of rinse aid. (See Rinse Aid). • Check the incoming water temperature. Fill detergent cup and run the dishwasher through a POWER PLUS/HEAVY WASH cycle. 4. If may cause water lines to rupture. Load them from freezing...
... details. NOTE See Installation Instructions for service, review this list. Disconnect water line from pump and drain water into pan. 4. Failure to do so could result in a tilted position. For extremely hard water, it is filled. • Increase the discharge setting of rinse aid. (See Rinse Aid). • Check the incoming water temperature. Fill detergent cup and run the dishwasher through a POWER PLUS/HEAVY WASH cycle. 4. If may cause water lines to rupture. Load them from freezing...
Complete Owner's Guide (English)
Page 17
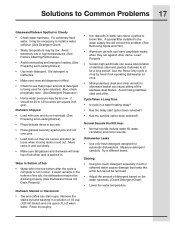
... level. (See Detergent Dispenser.) • Home water pressure may be removed. • Adjust the amount of stainless steel and plastics if allowed to Common Problems 17 Glassware/Flatware Spotted or Cloudy • Check water hardness. Measure detergent carefully. If water remains in silverware basket can cause a yellow or brown film. Use the Rinse Only cycle or rinse by hand washing in . Water in Bottom of Tub • Water left in the water supply line...
... level. (See Detergent Dispenser.) • Home water pressure may be removed. • Adjust the amount of stainless steel and plastics if allowed to Common Problems 17 Glassware/Flatware Spotted or Cloudy • Check water hardness. Measure detergent carefully. If water remains in silverware basket can cause a yellow or brown film. Use the Rinse Only cycle or rinse by hand washing in . Water in Bottom of Tub • Water left in the water supply line...
Complete Owner's Guide (English)
Page 18
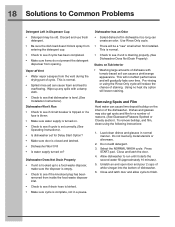
... START pad. Vapor at Vent • Water vapor escapes from opening. Dishwasher has an Odor • Soiled dishes left in dishwasher too long can cause lime deposit buildup on ? This is normal. • Check to see that dishwasher is closed and latched. • Dishwasher Won't Fill • Is water supply turned on the interior of staining. Close and latch the door. 4. To remove buildup, and film, clean using the Rinse Only cycle will be old. Load clean dishes...
... START pad. Vapor at Vent • Water vapor escapes from opening. Dishwasher has an Odor • Soiled dishes left in dishwasher too long can cause lime deposit buildup on ? This is normal. • Check to see that dishwasher is closed and latched. • Dishwasher Won't Fill • Is water supply turned on the interior of staining. Close and latch the door. 4. To remove buildup, and film, clean using the Rinse Only cycle will be old. Load clean dishes...
Complete Owner's Guide (English)
Page 19
... your best interest to repair or replace appliance light bulbs, air filters, water filters, other consumables, or knobs, handles, or other than in accordance with the provided instructions. LIMITATION OF REMEDIES CUSTOMER'S SOLE AND EXCLUSIVE REMEDY UNDER THIS LIMITED WARRANTY SHALL BE REPAIR OR REPLACEMENT AS PROVIDED HEREIN. THIS WRITTEN WARRANTY GIVES YOU SPECIFIC LEGAL RIGHTS. Products used other than authorized service companies; Exclusions: This Warranty does not cover...
... your best interest to repair or replace appliance light bulbs, air filters, water filters, other consumables, or knobs, handles, or other than in accordance with the provided instructions. LIMITATION OF REMEDIES CUSTOMER'S SOLE AND EXCLUSIVE REMEDY UNDER THIS LIMITED WARRANTY SHALL BE REPAIR OR REPLACEMENT AS PROVIDED HEREIN. THIS WRITTEN WARRANTY GIVES YOU SPECIFIC LEGAL RIGHTS. Products used other than authorized service companies; Exclusions: This Warranty does not cover...
Wiring Diagram (English)
Page 1
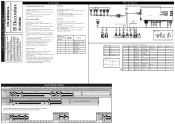
... Alarm code reading mode. Close the door, Line Test cycle stars. LED Normal blinks all the way through the whole cycle, even if after last button pressing. Normal/Auto PW Inlet Valve Circulation Pump Drain Pump Heater Dispenser PreWash3 . Less/more phases; LEDS MAX DRY and AIR DRY blink showing the first alarm code. In this mode, alarm codes are erased. LED MAX DRY blinks the current activated actuator number. The saved alarm codes are displayed in WireHarnesses WireHarness Connection...
... Alarm code reading mode. Close the door, Line Test cycle stars. LED Normal blinks all the way through the whole cycle, even if after last button pressing. Normal/Auto PW Inlet Valve Circulation Pump Drain Pump Heater Dispenser PreWash3 . Less/more phases; LEDS MAX DRY and AIR DRY blink showing the first alarm code. In this mode, alarm codes are erased. LED MAX DRY blinks the current activated actuator number. The saved alarm codes are displayed in WireHarnesses WireHarness Connection...
Wiring Diagram (English)
Page 2
... Spray arm blocked. 6. Is water getting into the inlet hose, the impeller rotates in pump. 1. Instruct customer/user. 2. To install the gasket: 1. Liquid rinse aid is pressed into the tub channel for obstructions. 4. Delay Start Open door,select the cycle and options; The unit will not latch or open. 1. Replace fuse or reset breaker. 2. non-use. Wiring or terminal defective. 4. Replace dispenser. 2. i40 Analogue pressure sensor problem 4. Electronic control board defective. 3. Defective drain pump. 4. Open windings. 6. Repair or replace...
... Spray arm blocked. 6. Is water getting into the inlet hose, the impeller rotates in pump. 1. Instruct customer/user. 2. To install the gasket: 1. Liquid rinse aid is pressed into the tub channel for obstructions. 4. Delay Start Open door,select the cycle and options; The unit will not latch or open. 1. Replace fuse or reset breaker. 2. non-use. Wiring or terminal defective. 4. Replace dispenser. 2. i40 Analogue pressure sensor problem 4. Electronic control board defective. 3. Defective drain pump. 4. Open windings. 6. Repair or replace...
Installation Instructions (English)
Page 1
...%" (90,8 cm)** ,O27%"(70,4 cm) Open door S to 90° 0 • a F 0 N\ N ** Height only adjustable to pinch the Water Drain Hose. 1. INSULATION BLACKET MAY BE COMPRESSED to locate dishwasher's drain, water, and electrical connections. 2. Figure 4 3. See Figure 4. All electrical and plumbing work gloves when handling, unpacking or disassembling unit. All utilities must be used when Side Mount is installed into the cabinet. See Figure 4. If valve freezes and ruptures, flooding may...
...%" (90,8 cm)** ,O27%"(70,4 cm) Open door S to 90° 0 • a F 0 N\ N ** Height only adjustable to pinch the Water Drain Hose. 1. INSULATION BLACKET MAY BE COMPRESSED to locate dishwasher's drain, water, and electrical connections. 2. Figure 4 3. See Figure 4. All electrical and plumbing work gloves when handling, unpacking or disassembling unit. All utilities must be used when Side Mount is installed into the cabinet. See Figure 4. If valve freezes and ruptures, flooding may...

Installation Instructions (English)
Page 2
... An air gap kit is available from freezing. Such use an extension cord. Figure 14 (a) The knock out plug must be routed from dishwasher to insure proper drainage. < =9 Water Line eveling Leg VN Electrical Line u check these instructions could result in injury. IMPORTANT: Make sure there are attached to Black Wire (Hot) 4. Failure to drain hose. Screw mounting brackets firmly to cabinet using a 05 drill to be handled with a clamp. Adjust the levelling...
... An air gap kit is available from freezing. Such use an extension cord. Figure 14 (a) The knock out plug must be routed from dishwasher to insure proper drainage. < =9 Water Line eveling Leg VN Electrical Line u check these instructions could result in injury. IMPORTANT: Make sure there are attached to Black Wire (Hot) 4. Failure to drain hose. Screw mounting brackets firmly to cabinet using a 05 drill to be handled with a clamp. Adjust the levelling...
Product Specifications Sheet (English)
Page 2
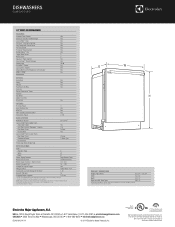
... electric and plumbing codes. when installed in 35-3/4" max. DISHWASHERS EI24ID30Q S / W / B 24" BUILT-IN DISHWASHER FEATURES Stainless Steel Interior Signature Soft-Arc Handle Design Luxury-Hold™ Door IQ-Touch™ Electronic Controls Fully Integrated Control Panel Tall-Tub Design ProClean™ Wash System SatelliteSpray™ Arm Target Wash Zones Wash Levels AquaLux™ Wash System Luxury-Quiet™ Sound Package Sound Level SmartSoil™ Sensor Luxury-Dry™ System Adjustable Rinse Aid Dispenser with a separate ground wire. Wash Heat...
... electric and plumbing codes. when installed in 35-3/4" max. DISHWASHERS EI24ID30Q S / W / B 24" BUILT-IN DISHWASHER FEATURES Stainless Steel Interior Signature Soft-Arc Handle Design Luxury-Hold™ Door IQ-Touch™ Electronic Controls Fully Integrated Control Panel Tall-Tub Design ProClean™ Wash System SatelliteSpray™ Arm Target Wash Zones Wash Levels AquaLux™ Wash System Luxury-Quiet™ Sound Package Sound Level SmartSoil™ Sensor Luxury-Dry™ System Adjustable Rinse Aid Dispenser with a separate ground wire. Wash Heat...
Product Specifications Sheet (English)
Page 3
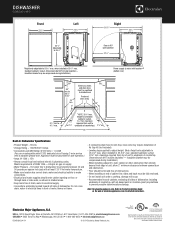
... 3/4" Adjustable to 35 3/4"* Door in shaded areas. • Keep back free of drain, water & electrical supply. • Connections preferably located toward left side of dishwasher. standard cabinetry cutout. (Dimensions do NOT include insulation - height for detailed instructions. Appliance must be compressed during installation.) 90° 90° Electrical, water, Power supply & water inlet location (bottom rear) 34" min. Do not cross drain, water or electrical lines in front of motor, blower or frame. • If connecting drain hose...
... 3/4" Adjustable to 35 3/4"* Door in shaded areas. • Keep back free of drain, water & electrical supply. • Connections preferably located toward left side of dishwasher. standard cabinetry cutout. (Dimensions do NOT include insulation - height for detailed instructions. Appliance must be compressed during installation.) 90° 90° Electrical, water, Power supply & water inlet location (bottom rear) 34" min. Do not cross drain, water or electrical lines in front of motor, blower or frame. • If connecting drain hose...
Product Specifications Sheet (English)
Page 4
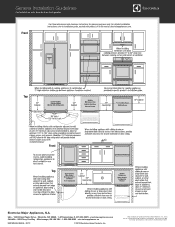
General Installation Guidelines For Installation with product, or on the web at Electrolux Home Products, Inc. Top Front Top Electrolux Major Appliances, N.A. USA • 10200 David Taylor Drive • Charlotte, NC 28262 &#...; 2012 Electrolux Home Products, Inc. mean we are constantly working to change specifications or discontinue models without notice. We reserve the right to improve our products. For detailed installation instructions, refer to installation guide, packed with Side-by-Side Refrigerator Front Use these dimensions and clearance instructions for planning...
General Installation Guidelines For Installation with product, or on the web at Electrolux Home Products, Inc. Top Front Top Electrolux Major Appliances, N.A. USA • 10200 David Taylor Drive • Charlotte, NC 28262 &#...; 2012 Electrolux Home Products, Inc. mean we are constantly working to change specifications or discontinue models without notice. We reserve the right to improve our products. For detailed installation instructions, refer to installation guide, packed with Side-by-Side Refrigerator Front Use these dimensions and clearance instructions for planning...
Product Specifications Sheet (English)
Page 5
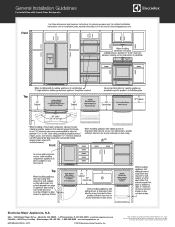
... reserve the right to improve our products. For detailed installation instructions, refer to installation guide, packed with French Door Refrigerator Front Use these dimensions and clearance instructions for planning purposes only. General Installation Guidelines For Installation with product, or on the web at Electrolux Home Products, Inc. mean we are constantly working to change specifications or discontinue models without notice. Top Front Top Electrolux Major Appliances, N.A. USA • 10200...
... reserve the right to improve our products. For detailed installation instructions, refer to installation guide, packed with French Door Refrigerator Front Use these dimensions and clearance instructions for planning purposes only. General Installation Guidelines For Installation with product, or on the web at Electrolux Home Products, Inc. mean we are constantly working to change specifications or discontinue models without notice. Top Front Top Electrolux Major Appliances, N.A. USA • 10200...
Product Specifications Sheet (English)
Page 6
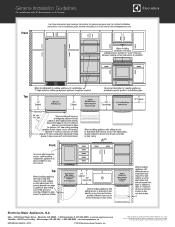
Top Front Top Electrolux Major Appliances, N.A. We reserve the right to improve our products. USA • 10200 David ...Electrolux Home Products, Inc. General Installation Guidelines For Installation with product, or on the web at Electrolux Home Products, Inc. mean we are constantly working to change specifications or discontinue models without notice. High standards of quality at electroluxappliances.com. For detailed installation instructions, refer to installation guide, packed with All Refrigerator or All Freezer Front Use these dimensions and clearance instructions...
Top Front Top Electrolux Major Appliances, N.A. We reserve the right to improve our products. USA • 10200 David ...Electrolux Home Products, Inc. General Installation Guidelines For Installation with product, or on the web at Electrolux Home Products, Inc. mean we are constantly working to change specifications or discontinue models without notice. High standards of quality at electroluxappliances.com. For detailed installation instructions, refer to installation guide, packed with All Refrigerator or All Freezer Front Use these dimensions and clearance instructions...


