
Use and Care Guide
Page 2
...Location 4 Installation 4 Installation clearances 4 Door opening 4 Guidelines for final positioning of your refrigerator 4 Removing The Doors 6 Getting through narrow spaces 6 Installing Door Handles 8 Door Handle Mounting Instructions 8 Connecting The Water ...22 Normal Operating Sounds & Sights 23 Understanding the sounds you may hear 23 Care & Cleaning 24 Protecting your investment 24 Care & cleaning tips 25 Vacation & moving tips 25 Replacing light bulbs 26 Warranty 27 Solutions To Common Problems 28 Keep a record for quick reference Purchase date Electrolux model number Electrolux...
...Location 4 Installation 4 Installation clearances 4 Door opening 4 Guidelines for final positioning of your refrigerator 4 Removing The Doors 6 Getting through narrow spaces 6 Installing Door Handles 8 Door Handle Mounting Instructions 8 Connecting The Water ...22 Normal Operating Sounds & Sights 23 Understanding the sounds you may hear 23 Care & Cleaning 24 Protecting your investment 24 Care & cleaning tips 25 Vacation & moving tips 25 Replacing light bulbs 26 Warranty 27 Solutions To Common Problems 28 Keep a record for quick reference Purchase date Electrolux model number Electrolux...

Use and Care Guide
Page 3
... by pulling on the power cord. Such damage is damaged, it should never play with a three-prong grounding plug for your old refrigerator/freezer: • Remove the doors. • Leave the shelves in accordance with insufficient power can quickly cause suffocation. • Destroy... or recycle the product's carton, plastic bags, and any other exterior wrapping material immediately after the refrigerator is equipped with these guidelines to ensure that your warranty. • Do not plug the unit into its own dedicated 115 Volt...
... by pulling on the power cord. Such damage is damaged, it should never play with a three-prong grounding plug for your old refrigerator/freezer: • Remove the doors. • Leave the shelves in accordance with insufficient power can quickly cause suffocation. • Destroy... or recycle the product's carton, plastic bags, and any other exterior wrapping material immediately after the refrigerator is equipped with these guidelines to ensure that your warranty. • Do not plug the unit into its own dedicated 115 Volt...
Use and Care Guide
Page 4
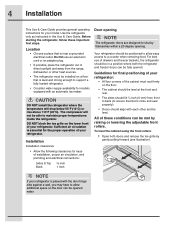
... the range, dishwasher or other and be opened . All of these important first steps. Do Not use of drawers and freezer baskets, the refrigerator should be able to shut by raising or lowering the adjustable front rollers. DO NOT block the toe grille on a floor that is placed ... the following clearances for models equipped with the door hinge side against a wall, you may have to a counter when removing food. Use the refrigerator only as instructed in a position where both doors and remove the toe grille by gently pulling forward (see illustration). The compressor will drop below ...
... the range, dishwasher or other and be opened . All of these important first steps. Do Not use of drawers and freezer baskets, the refrigerator should be able to shut by raising or lowering the adjustable front rollers. DO NOT block the toe grille on a floor that is placed ... the following clearances for models equipped with the door hinge side against a wall, you may have to a counter when removing food. Use the refrigerator only as instructed in a position where both doors and remove the toe grille by gently pulling forward (see illustration). The compressor will drop below ...
Use and Care Guide
Page 5
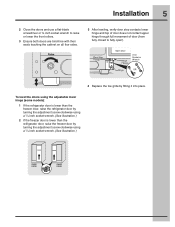
... the toe grille by turning the adjustment screw clockwise using a ⁷/16 inch socket wrench. (See illustration.) 2 If the freezer door is lower than the refrigerator door, raise the freezer door by fitting it into place. To level the doors using the adjustable lower hinge (some models): 1 If the...
... the toe grille by turning the adjustment screw clockwise using a ⁷/16 inch socket wrench. (See illustration.) 2 If the freezer door is lower than the refrigerator door, raise the freezer door by fitting it into place. To level the doors using the adjustable lower hinge (some models): 1 If the...
Use and Care Guide
Page 6
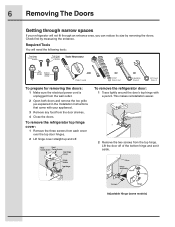
...: 1 Trace lightly around the door's top hinge with your refrigerator will need the following tools: Top Hinge Cover Front Screw Top Hinge Cover Rear Screw Tools Necessary: Top Hinge Screw Bottom Hinge Screw AND Phillips&#.... 2 Open both doors and remove the toe grille (as explained in the Installation Instructions that came with a pencil. Lift the door off . To remove the refrigerator top hinge cover: 1 Remove the three screws from each cover over the top door hinges. 2 Lift hinge cover straight up and off of the bottom...
...: 1 Trace lightly around the door's top hinge with your refrigerator will need the following tools: Top Hinge Cover Front Screw Top Hinge Cover Rear Screw Tools Necessary: Top Hinge Screw Bottom Hinge Screw AND Phillips&#.... 2 Open both doors and remove the toe grille (as explained in the Installation Instructions that came with a pencil. Lift the door off . To remove the refrigerator top hinge cover: 1 Remove the three screws from each cover over the top door hinges. 2 Lift hinge cover straight up and off of the bottom...

Use and Care Guide
Page 7
... of the bottom hinge. 5 Remove the two bottom hinge screws and hinge if necessary. 6 Lay the door on its outer sleeve inward. To reinstall the refrigerator door, reverse the above steps. CAUTION Be sure doors are aligned with each cover over the top door hinges. 2 Lift hinge cover straight up and...
... of the bottom hinge. 5 Remove the two bottom hinge screws and hinge if necessary. 6 Lay the door on its outer sleeve inward. To reinstall the refrigerator door, reverse the above steps. CAUTION Be sure doors are aligned with each cover over the top door hinges. 2 Lift hinge cover straight up and...

Use and Care Guide
Page 8
... door, ensuring the holes for the set screws are facing towards the freezer door. Freezer Upper End Cap Refrigerator Upper End Cap A A B B A A B Freezer Lower End Cap B Refrigerator Lower End Cap NOTE All set screws should be tightened and sub-flush (Allen set screws (B) with no...gaps. The end caps should be drawn tight to freezer and refrigerator doors with supplied Allen wrench. 4 Repeat steps 2 and 3 to install refrigerator handle. Ensure the holes for the set screws are facing towards the refrigerator door. 3 While holding handle firmly against door, fasten upper and...
... door, ensuring the holes for the set screws are facing towards the freezer door. Freezer Upper End Cap Refrigerator Upper End Cap A A B B A A B Freezer Lower End Cap B Refrigerator Lower End Cap NOTE All set screws should be tightened and sub-flush (Allen set screws (B) with no...gaps. The end caps should be drawn tight to freezer and refrigerator doors with supplied Allen wrench. 4 Repeat steps 2 and 3 to install refrigerator handle. Ensure the holes for the set screws are facing towards the refrigerator door. 3 While holding handle firmly against door, fasten upper and...
Use and Care Guide
Page 9
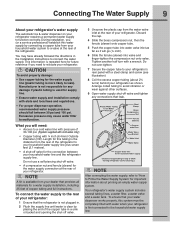
...laws and regulations. • For proper dispenser operation, recommended water supply pressure should fall between your household water line and the refrigerator supply line. This information is more likely to your household water supply line plus seven feet (2.1 meters). • A shut.... • A compression nut and ferrule (sleeve) for a water supply installation, including 25 feet of copper tubing and full instructions. Your refrigerator's water supply system includes several tubing lines, a water filter, a water valve and a water tank. Length for the connection between 30 psi...
...laws and regulations. • For proper dispenser operation, recommended water supply pressure should fall between your household water line and the refrigerator supply line. This information is more likely to your household water supply line plus seven feet (2.1 meters). • A shut.... • A compression nut and ferrule (sleeve) for a water supply installation, including 25 feet of copper tubing and full instructions. Your refrigerator's water supply system includes several tubing lines, a water filter, a water valve and a water tank. Length for the connection between 30 psi...
Use and Care Guide
Page 10
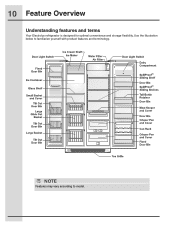
10 Feature Overview Understanding features and terms Your Electrolux refrigerator is designed for optimal convenience and storage flexibility. Use the illustration below to model. NOTE Features may vary according to familiarize yourself with product features and terminology.
10 Feature Overview Understanding features and terms Your Electrolux refrigerator is designed for optimal convenience and storage flexibility. Use the illustration below to model. NOTE Features may vary according to familiarize yourself with product features and terminology.

Use and Care Guide
Page 12
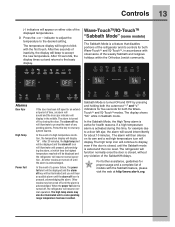
...is lit. Vacation mode is manually activated when the red indicator is lit. Press and hold for three seconds to clean the refrigerator. air filter temp display Touch to touch the glass. Warning signals will read OFF. The sounds are three levels of the ...filter Conserves energy by increasing the time between door openings. 12 Controls Wave-TouchTM (some models) 3rd Level: User Variable Options Your refrigerator is awakened by touching anywhere on user preference. Black space will return to activate the desired dispenser mode. When active, it allows ...
...is lit. Vacation mode is manually activated when the red indicator is lit. Press and hold for three seconds to clean the refrigerator. air filter temp display Touch to touch the glass. Warning signals will read OFF. The sounds are three levels of the ...filter Conserves energy by increasing the time between door openings. 12 Controls Wave-TouchTM (some models) 3rd Level: User Variable Options Your refrigerator is awakened by touching anywhere on user preference. Black space will return to activate the desired dispenser mode. When active, it allows ...
Use and Care Guide
Page 13
...activated during this key to reset any system Alarms. In the event of a high temperature condition, the temperature display will display "HI". The refrigerator will function normally once the door is closed , until the alarm is active for about 10 minutes. indicator to adjust the temperature to the... begin to a door left ajar, the alarm will sound intermittently for health reasons. The alarm is a feature that disables portions of the refrigerator and its own and a red high temperature icon will resume normal operation. The alarm off icon will illuminate until the alarm is turned ON...
...activated during this key to reset any system Alarms. In the event of a high temperature condition, the temperature display will display "HI". The refrigerator will function normally once the door is closed , until the alarm is active for about 10 minutes. indicator to adjust the temperature to the... begin to a door left ajar, the alarm will sound intermittently for health reasons. The alarm is a feature that disables portions of the refrigerator and its own and a red high temperature icon will resume normal operation. The alarm off icon will illuminate until the alarm is turned ON...

Use and Care Guide
Page 14
...will display on either side of the displayed temperatures. 2 Press the + or - This restricts undesired changes to clean the refrigerator. on off Press and hold for three seconds to display filter condition status. Any of the following options that are three dispenser... Crushed Ice A red indicator light will resume normal operation. vacation mode Conserves energy by each keypress can be displayed and the refrigerator will be illuminated above the icon. temp display Touch to their factory default settings. factory default Resets all dispenser functions. Setting ...
...will display on either side of the displayed temperatures. 2 Press the + or - This restricts undesired changes to clean the refrigerator. on off Press and hold for three seconds to display filter condition status. Any of the following options that are three dispenser... Crushed Ice A red indicator light will resume normal operation. vacation mode Conserves energy by each keypress can be displayed and the refrigerator will be illuminated above the icon. temp display Touch to their factory default settings. factory default Resets all dispenser functions. Setting ...
Use and Care Guide
Page 15
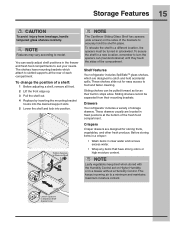
...To relocate the shelf to turn the spacers out (counterclockwise) until they touch the sides of the compartment. Shelf features Your refrigerator includes SpillSafeTM glass shelves, which attach to suit your needs. NOTE Leafy vegetables keep best when stored with the Humidity Control set... on the sides of the brackets to securely hold accidental spills. You can be separated from breakage, handle tempered glass shelves carefully. Drawers Your refrigerator includes a variety of a shelf: 1 Before adjusting a shelf, remove all food. 2 Lift the front edge up. 3 Pull the shelf out...
...To relocate the shelf to turn the spacers out (counterclockwise) until they touch the sides of the compartment. Shelf features Your refrigerator includes SpillSafeTM glass shelves, which attach to suit your needs. NOTE Leafy vegetables keep best when stored with the Humidity Control set... on the sides of the brackets to securely hold accidental spills. You can be separated from breakage, handle tempered glass shelves carefully. Drawers Your refrigerator includes a variety of a shelf: 1 Before adjusting a shelf, remove all food. 2 Lift the front edge up. 3 Pull the shelf out...
Use and Care Guide
Page 17
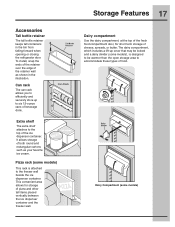
... a lift-up to the top of both round and rectangular cartons such as shown in the bin from falling forward when opening or closing the refrigerator door. Can rack The can rack allows you to efficiently and securely store up cover that may be locked and a dairy divider (some models), is...
... a lift-up to the top of both round and rectangular cartons such as shown in the bin from falling forward when opening or closing the refrigerator door. Can rack The can rack allows you to efficiently and securely store up cover that may be locked and a dairy divider (some models), is...

Use and Care Guide
Page 18
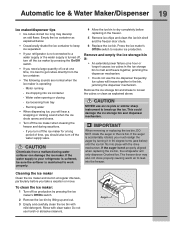
... bin is produced at a rate of the freezer compartment. CAUTION For proper dispenser operation, recommended water supply pressure should not be changed your refrigerator. NOTE The ice maker also has a built-in the top of eight cubes every 75 to 90 minutes. Ice is full. IMPORTANT Small...mechanism are harvested they break open and spill water over the other ice cubes in two or three empty ice maker cycles. After the refrigerator is turned on and off the water flow after installation Before making ice for several tubing lines, an advanced water filter, a distribution valve...
... bin is produced at a rate of the freezer compartment. CAUTION For proper dispenser operation, recommended water supply pressure should not be changed your refrigerator. NOTE The ice maker also has a built-in the top of eight cubes every 75 to 90 minutes. Ice is full. IMPORTANT Small...mechanism are harvested they break open and spill water over the other ice cubes in two or three empty ice maker cycles. After the refrigerator is turned on and off the water flow after installation Before making ice for several tubing lines, an advanced water filter, a distribution valve...
Use and Care Guide
Page 19
... turn off the ice maker when cleaning the freezer and during vacations. - If the auger is not properly aligned when replacing the ice bin, the refrigerator will freeze together in 90 degree turns (see below . • Occasionally shake the ice container to break up and out. 3 Empty and carefully ...clean the ice bin with mild detergent. Do not use an ice pick or similar sharp instrument to keep ice separated. • If your refrigerator is softened, be sure the softener is operating: - To clean the ice maker: 1 Turn off ice production by pressing the ice maker's Off/...
... turn off the ice maker when cleaning the freezer and during vacations. - If the auger is not properly aligned when replacing the ice bin, the refrigerator will freeze together in 90 degree turns (see below . • Occasionally shake the ice container to break up and out. 3 Empty and carefully ...clean the ice bin with mild detergent. Do not use an ice pick or similar sharp instrument to keep ice separated. • If your refrigerator is softened, be sure the softener is operating: - To clean the ice maker: 1 Turn off ice production by pressing the ice maker's Off/...
Use and Care Guide
Page 20
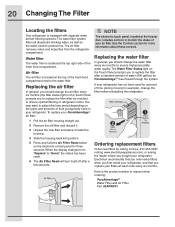
...: PureAdvantageTM Water Filter and Air Filter Part #EAFWF01 See the Controls section for PureAdvantageTM) has flowed through the system. If your refrigerator has not been used to ensure highest possible water quality. Ordering replacement filters Order new filters by calling toll-free, 877-453... Status light on the electronic control panel for a period of your air filter. Electrolux recommends that you order extra filters when you first install your refrigerator, and that you bought your refrigerator. Replacing the air filter In general, you should change the air filter every six...
...: PureAdvantageTM Water Filter and Air Filter Part #EAFWF01 See the Controls section for PureAdvantageTM) has flowed through the system. If your refrigerator has not been used to ensure highest possible water quality. Ordering replacement filters Order new filters by calling toll-free, 877-453... Status light on the electronic control panel for a period of your air filter. Electrolux recommends that you order extra filters when you first install your refrigerator, and that you bought your refrigerator. Replacing the air filter In general, you should change the air filter every six...
Use and Care Guide
Page 22
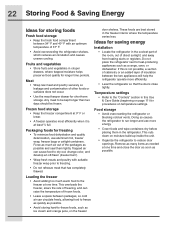
... or surfaces does not occur. • Use the meat keeper drawer for longer time periods. Food storage • Avoid overcrowding the refrigerator or blocking cold air vents. If this Use & Care Guide (beginning on page 11) for procedures on temperature settings. Trapped air can... frozen. This cuts down on the freezer door shelves. Ideas for saving energy Installation • Locate the refrigerator in the freezer interior where the temperature varies less. 22 Storing Food & Saving Energy Ideas for storing foods Fresh food storage • Keep the fresh food compartment...
... or surfaces does not occur. • Use the meat keeper drawer for longer time periods. Food storage • Avoid overcrowding the refrigerator or blocking cold air vents. If this Use & Care Guide (beginning on page 11) for procedures on temperature settings. Trapped air can... frozen. This cuts down on the freezer door shelves. Ideas for saving energy Installation • Locate the refrigerator in the freezer interior where the temperature varies less. 22 Storing Food & Saving Energy Ideas for storing foods Fresh food storage • Keep the fresh food compartment...
Use and Care Guide
Page 23
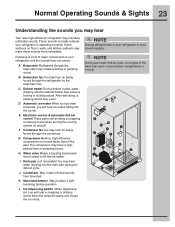
...ice cubes falling into the drain pan during operation. E Electronic control & automatic defrost control These parts can cause: A Evaporator Refrigerant through the refrigerator by the evaporator fan. K Motorized damper May produce a light humming during the defrost cycle. These sounds normally indicate your ...sounds from forced air. Some surfaces on and off. G Compressor Modern, high-efficiency compressors run much faster than in your refrigerator and the sounds they can produce a snapping or clicking sound when turning the cooling system on floors, walls, and kitchen ...
...ice cubes falling into the drain pan during operation. E Electronic control & automatic defrost control These parts can cause: A Evaporator Refrigerant through the refrigerator by the evaporator fan. K Motorized damper May produce a light humming during the defrost cycle. These sounds normally indicate your ...sounds from forced air. Some surfaces on and off. G Compressor Modern, high-efficiency compressors run much faster than in your refrigerator and the sounds they can produce a snapping or clicking sound when turning the cooling system on floors, walls, and kitchen ...

Use and Care Guide
Page 24
... blades or other abrasive cleaning materials. • Never use CHLORIDE or cleaners with wet or damp hands. Be careful not to move the refrigerator beyond the plumbing connections. • Damp objects stick to completely drain the water supply system. IMPORTANT If you store or move it from ...guide on the next page for details on caring and cleaning specific areas of your temperature controls to turn off cooling, power to move your refrigerator in freezing temperatures, be sure to cold metal surfaces. Wipe up . When cleaning, take the following precautions: NOTE Do not use paper ...
... blades or other abrasive cleaning materials. • Never use CHLORIDE or cleaners with wet or damp hands. Be careful not to move the refrigerator beyond the plumbing connections. • Damp objects stick to completely drain the water supply system. IMPORTANT If you store or move it from ...guide on the next page for details on caring and cleaning specific areas of your temperature controls to turn off cooling, power to move your refrigerator in freezing temperatures, be sure to cold metal surfaces. Wipe up . When cleaning, take the following precautions: NOTE Do not use paper ...


