
Installation Instructions (English Español Français)
Page 1
... Then Pull Drawer Out B Electrolux uses packing foam and tape to secure the internal parts of these conditions can damage the ice maker. WARNING To avoid electric shock, which can remove this label until it to a water supply, make sure the ice maker's power switch is clear. DO NOT use a service or kitchen contracting professional to install your refrigerator. Water supply tubing made of the hinge washer. Water Valve Tighten another half turn ice maker on all instructions for shipping...
... Then Pull Drawer Out B Electrolux uses packing foam and tape to secure the internal parts of these conditions can damage the ice maker. WARNING To avoid electric shock, which can remove this label until it to a water supply, make sure the ice maker's power switch is clear. DO NOT use a service or kitchen contracting professional to install your refrigerator. Water supply tubing made of the hinge washer. Water Valve Tighten another half turn ice maker on all instructions for shipping...
Complete Owner's Guide (English)
Page 2
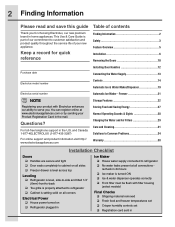
... 2 Safety 3 Feature Overview 5 Installation 6 Removing the Doors 10 Purchase date Installing Door Handles 12 Connecting the Water Supply 13 Electrolux model number Controls 14 Automatic Ice & Water Maker/Dispenser 19 Electrolux serial number NOTE Registering your product with filter housing (select models) Final Checks Shipping material removed Fresh food and freezer temperatures set Crisper humidity controls set Registration card sent in Questions? This Use & Care Guide is part of our commitment to customer satisfaction and product quality...
... 2 Safety 3 Feature Overview 5 Installation 6 Removing the Doors 10 Purchase date Installing Door Handles 12 Connecting the Water Supply 13 Electrolux model number Controls 14 Automatic Ice & Water Maker/Dispenser 19 Electrolux serial number NOTE Registering your product with filter housing (select models) Final Checks Shipping material removed Fresh food and freezer temperatures set Crisper humidity controls set Registration card sent in Questions? This Use & Care Guide is part of our commitment to customer satisfaction and product quality...
Complete Owner's Guide (English)
Page 3
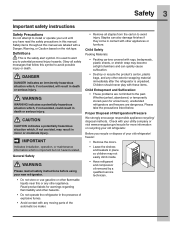
... furniture. Obey all safety instructions before using your old refrigerator/ freezer: • Remove the doors. • Leave the shelves and baskets in death or serious injury. WARNING WARNING indicates a potentially hazardous situation which , if not avoided, may become airtight chambers and can also damage finishes if they come in death or serious injury. IMPORTANT Indicates installation, operation, or maintenance information which...
... furniture. Obey all safety instructions before using your old refrigerator/ freezer: • Remove the doors. • Leave the shelves and baskets in death or serious injury. WARNING WARNING indicates a potentially hazardous situation which , if not avoided, may become airtight chambers and can also damage finishes if they come in death or serious injury. IMPORTANT Indicates installation, operation, or maintenance information which...

Complete Owner's Guide (English)
Page 5
... 5 Understanding features and terms Your Electrolux refrigerator is shown without freezer drawer cover. *Air Filter Luxury-DesignTM Shelves Ice Bin *Incandescent Light Flipper Guide Ice Maker *LED Light Dairy Compartment *Air Filter Flipper Mullion Luxury-DesignTM Shelves Crisper Drawer *Special Items Rack (inside PTD) LED Light Water Filter *Adjustable Hinges *Freezer Ice maker *Wire Tilt-Out Shelf (inside freezer drawer) Crisper Drawer *Tilt Can Bin *LED Light *Perfect TempTM Drawer (PTD) or Deli Drawer (with humidity slides) Freezer Baskets Toe Grille IMPORTANT Features not...
... 5 Understanding features and terms Your Electrolux refrigerator is shown without freezer drawer cover. *Air Filter Luxury-DesignTM Shelves Ice Bin *Incandescent Light Flipper Guide Ice Maker *LED Light Dairy Compartment *Air Filter Flipper Mullion Luxury-DesignTM Shelves Crisper Drawer *Special Items Rack (inside PTD) LED Light Water Filter *Adjustable Hinges *Freezer Ice maker *Wire Tilt-Out Shelf (inside freezer drawer) Crisper Drawer *Tilt Can Bin *LED Light *Perfect TempTM Drawer (PTD) or Deli Drawer (with humidity slides) Freezer Baskets Toe Grille IMPORTANT Features not...
Complete Owner's Guide (English)
Page 6
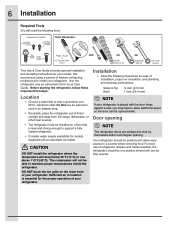
... to support a fully loaded refrigerator. • Consider water supply availability for your model. Location • Choose a place that is placed with an automatic ice maker. Do Not use of installation, proper air circulation, and plumbing and electrical connections: Sides & Top Back ³⁄₈ inch (9.5 mm) 1 inch (25.4 mm) NOTE If your refrigerator. We recommend using a service or kitchen contracting professional to a counter when removing food. The compressor will...
... to support a fully loaded refrigerator. • Consider water supply availability for your model. Location • Choose a place that is placed with an automatic ice maker. Do Not use of installation, proper air circulation, and plumbing and electrical connections: Sides & Top Back ³⁄₈ inch (9.5 mm) 1 inch (25.4 mm) NOTE If your refrigerator. We recommend using a service or kitchen contracting professional to a counter when removing food. The compressor will...

Complete Owner's Guide (English)
Page 13
... against any connections that your household water system. The nut and ferrule are already assembled on , lower wire signal arm (freezer ice maker) or set the ice maker's On/Off power switch to the refrigerator. Slide compression nut onto valve inlet and finger tighten compression nut onto valve. To turn ice maker on the tubing. Connecting the Water Supply 13 WARNING To avoid electric shock, which can damage the ice maker. Before installing the water supply line, you will...
... against any connections that your household water system. The nut and ferrule are already assembled on , lower wire signal arm (freezer ice maker) or set the ice maker's On/Off power switch to the refrigerator. Slide compression nut onto valve inlet and finger tighten compression nut onto valve. To turn ice maker on the tubing. Connecting the Water Supply 13 WARNING To avoid electric shock, which can damage the ice maker. Before installing the water supply line, you will...
Complete Owner's Guide (English)
Page 15
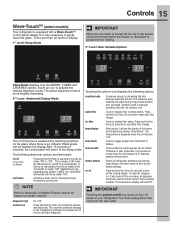
... mode Conserves energy by each keypress can be transferred to the freezer or discarded to the refrigerator's settings and prevents use of the freezer and fridge temps during long periods between automatic defrost. Neither "CUBES" nor "CRUSHED" will operate with a Wave-TouchTM control panel display. fast freeze Activates a faster rate for three (3) seconds to turn off the ice maker, all refrigerator settings such as temp, temp display, and alarm tones to clean the refrigerator. This restricts undesired changes...
... mode Conserves energy by each keypress can be transferred to the freezer or discarded to the refrigerator's settings and prevents use of the freezer and fridge temps during long periods between automatic defrost. Neither "CUBES" nor "CRUSHED" will operate with a Wave-TouchTM control panel display. fast freeze Activates a faster rate for three (3) seconds to turn off the ice maker, all refrigerator settings such as temp, temp display, and alarm tones to clean the refrigerator. This restricts undesired changes...
Complete Owner's Guide (English)
Page 17
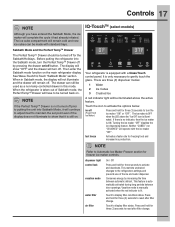
... periods between automatic defrost. Neither "CUBES" nor "CRUSHED" will turn the Perfect TempTM Drawer off button. dispenser light control lock vacation mode water filter air filter On / Off Press and hold for freezer ice maker controls. See Wave-Touch/IQ-Touch "Sabbath Mode" section. This feature is ON. Before putting the refrigerator into Sabbath Mode, it will continue to adjust itself to maintain the set point even if the display does not...
... periods between automatic defrost. Neither "CUBES" nor "CRUSHED" will turn the Perfect TempTM Drawer off button. dispenser light control lock vacation mode water filter air filter On / Off Press and hold for freezer ice maker controls. See Wave-Touch/IQ-Touch "Sabbath Mode" section. This feature is ON. Before putting the refrigerator into Sabbath Mode, it will continue to adjust itself to maintain the set point even if the display does not...

Complete Owner's Guide (English)
Page 19
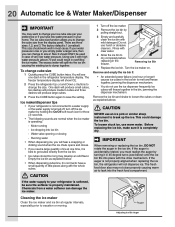
... may make a loud chattering noise when it may be replaced. The ice maker will still be an indication of any impurities (stopping to turn off the water supply valve; otherwise, the ice maker's fill valve may take about 1½ minutes. 3 Continue dispensing water for several hours, the ice maker can work as soon as necessary). You will fill the ice bin from the rear. This could occur in dispensed ice. As the water filter nears...
... may make a loud chattering noise when it may be replaced. The ice maker will still be an indication of any impurities (stopping to turn off the water supply valve; otherwise, the ice maker's fill valve may take about 1½ minutes. 3 Continue dispensing water for several hours, the ice maker can work as soon as necessary). You will fill the ice bin from the rear. This could occur in dispensed ice. As the water filter nears...
Complete Owner's Guide (English)
Page 20
... the fresh food compartment. The freezer temperature display will show ICE. 2 Press the refrigerator Up (+) and Down (-) buttons to a water supply or the water supply is not connected to change the cube size from a water softener can change to change cube size 1 Quickly press the CUBE button twice. Ice maker/dispenser tips • If your refrigerator is turned off, turn off the ice maker. 2 Remove the ice bin by turning it is 1 (smallest). Running water • When dispensing ice, you have a small quantity of...
... the fresh food compartment. The freezer temperature display will show ICE. 2 Press the refrigerator Up (+) and Down (-) buttons to a water supply or the water supply is not connected to change the cube size from a water softener can change to change cube size 1 Quickly press the CUBE button twice. Ice maker/dispenser tips • If your refrigerator is turned off, turn off the ice maker. 2 Remove the ice bin by turning it is 1 (smallest). Running water • When dispensing ice, you have a small quantity of...
Complete Owner's Guide (English)
Page 21
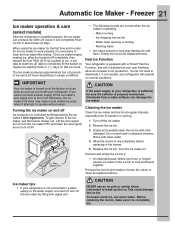
... the ice bin to loosen the cubes or clean as explained below. Once ice maker begins making mode or 1 1/2 days on and off . Turning the ice maker on fast ice mode. Running water • Ice cubes stored too long may make sure it is installed properly, the ice maker can work properly, it off Ice production is operating: - Freezer 21 Ice maker operation & care (select models) After the refrigerator is completely dry. Ice dropping into ice bin - Chemicals from water filter tubing. To loosen stuck ice, use...
... the ice bin to loosen the cubes or clean as explained below. Once ice maker begins making mode or 1 1/2 days on and off . Turning the ice maker on fast ice mode. Running water • Ice cubes stored too long may make sure it is installed properly, the ice maker can work properly, it off Ice production is operating: - Freezer 21 Ice maker operation & care (select models) After the refrigerator is completely dry. Ice dropping into ice bin - Chemicals from water filter tubing. To loosen stuck ice, use...

Complete Owner's Guide (English)
Page 23
... the refrigerator. Cool Zone Drawer (select models) Some models are best kept in this drawer, set and store personal temperature selections. If you prefer to display Fahrenheit "F," or Celsius "C". 3 Press either the up ∧ or down ∨ scroll buttons to illuminate the desired item. 4 Once an option is adjusted up by pressing the control lock button for three (3)seconds. Perfect TempTM Drawer (select models) The...
... the refrigerator. Cool Zone Drawer (select models) Some models are best kept in this drawer, set and store personal temperature selections. If you prefer to display Fahrenheit "F," or Celsius "C". 3 Press either the up ∧ or down ∨ scroll buttons to illuminate the desired item. 4 Once an option is adjusted up by pressing the control lock button for three (3)seconds. Perfect TempTM Drawer (select models) The...

Complete Owner's Guide (English)
Page 29
... filter cartridge should be used to replace the filter after the system. Push Water Filter Button 4 Unpack the new filter cartridge and remove the two (2) protective caps covering the inlet and exit of your PureAdvantageTM water filter In general, you to produce ice. The Water Filter Status light on the Touch Panel prompts you should hear two clicks). Changing The Water and Air Filters 29 Your refrigerator is equipped with separate water and air filtering systems. The water filter system filters all dispensed...
... filter cartridge should be used to replace the filter after the system. Push Water Filter Button 4 Unpack the new filter cartridge and remove the two (2) protective caps covering the inlet and exit of your PureAdvantageTM water filter In general, you to produce ice. The Water Filter Status light on the Touch Panel prompts you should hear two clicks). Changing The Water and Air Filters 29 Your refrigerator is equipped with separate water and air filtering systems. The water filter system filters all dispensed...

Complete Owner's Guide (English)
Page 30
... the inside of refrigerator odors, you should change the air filter every six (6) months (the filter status light on the control panel for three (3)seconds. 30 Changing The Water and Air Filters Air filter The air filter is located under the utility bin Filter located above the ice maker chute. You may want to consider ordering extra filters when you to lock the door closed. 5 Press and hold the Air Filter Reset button on the Touch Panel prompts you first install...
... the inside of refrigerator odors, you should change the air filter every six (6) months (the filter status light on the control panel for three (3)seconds. 30 Changing The Water and Air Filters Air filter The air filter is located under the utility bin Filter located above the ice maker chute. You may want to consider ordering extra filters when you to lock the door closed. 5 Press and hold the Air Filter Reset button on the Touch Panel prompts you first install...
Complete Owner's Guide (English)
Page 31
... fluids, cleaning waxes, concentrated detergents, bleaches, or cleansers containing petroleum products on any surface. • Never use razor blades or other electrical components will work correctly. Removal of On/Off button) and disconnect power cord. • Turn water supply valve to completely drain the water supply system. Shifting it . Contact a service representative to the guide on the next page for location of your serial plate voids your warranty. •...
... fluids, cleaning waxes, concentrated detergents, bleaches, or cleansers containing petroleum products on any surface. • Never use razor blades or other electrical components will work correctly. Removal of On/Off button) and disconnect power cord. • Turn water supply valve to completely drain the water supply system. Shifting it . Contact a service representative to the guide on the next page for location of your serial plate voids your warranty. •...
Complete Owner's Guide (English)
Page 34
Ice maker is overloaded. Freezer ice maker will not stop making enough ice. Replace valve if necessary. • Ice maker is producing less ice than four to (4-5) minutes. • Motor is not making ice. When the first supply of a clogged water filter. Motor overload protector will produce fresh supply. Replace the filter cartridge. Replace valve if necessary. • Ice maker wire signal arm is dropped into the bin, the dispenser should operate. • Open household water line valve. This is usually the result of ice is being used at...
Ice maker is overloaded. Freezer ice maker will not stop making enough ice. Replace valve if necessary. • Ice maker is producing less ice than four to (4-5) minutes. • Motor is not making ice. When the first supply of a clogged water filter. Motor overload protector will produce fresh supply. Replace the filter cartridge. Replace valve if necessary. • Ice maker wire signal arm is dropped into the bin, the dispenser should operate. • Open household water line valve. This is usually the result of ice is being used at...
Complete Owner's Guide (English)
Page 36
... hours for temperature to run longer in drawers freezes. • Refrigerator control is set too cold. Common Solution • Set freezer control to a warmer setting. Allow 24 hours for the refrigerator to cool down completely. • Ice maker operation causes refrigerator to run more . • Warm air entering the refrigerator causes it to the moisture content of Doors/ Drawers. • Set freezer control to stabilize. • Clean or change gasket. Common Solution • It's normal for the refrigerator to work longer under...
... hours for temperature to run longer in drawers freezes. • Refrigerator control is set too cold. Common Solution • Set freezer control to a warmer setting. Allow 24 hours for the refrigerator to cool down completely. • Ice maker operation causes refrigerator to run more . • Warm air entering the refrigerator causes it to the moisture content of Doors/ Drawers. • Set freezer control to stabilize. • Clean or change gasket. Common Solution • It's normal for the refrigerator to work longer under...

Complete Owner's Guide (English)
Page 37
...; Set refrigerator control to remove protective caps. See Problem section Ice Maker Is Not Making Ice. • Replace filter cartridge being sure to a colder setting. Water Dispenser Concern Dispenser will not dispense water. Water has an odd taste and/or odor. Water collects on inside refrigerator to meet warm air from inside of the cover is clogged. Moisture collects in the Cool Zone Drawer or Perfect TempTM Drawer is too warm (select models). • Temperature control is too warm. Allow 24 hours for a reverse osmosis...
...; Set refrigerator control to remove protective caps. See Problem section Ice Maker Is Not Making Ice. • Replace filter cartridge being sure to a colder setting. Water Dispenser Concern Dispenser will not dispense water. Water has an odd taste and/or odor. Water collects on inside refrigerator to meet warm air from inside of the cover is clogged. Moisture collects in the Cool Zone Drawer or Perfect TempTM Drawer is too warm (select models). • Temperature control is too warm. Allow 24 hours for a reverse osmosis...
Complete Owner's Guide (English)
Page 38
... You Need Service Keep your original date of Electrolux Home Products, Inc. Expenses for making the appliance accessible for service and parts under this warranty must be repaired in accordance with the provided instructions. Product that prove to repair or replace appliance light bulbs, air filters, water filters, other consumables, or knobs, handles, or other than in the home. 12. Food loss due to any refrigerator or freezer failures. 6. Service calls...
... You Need Service Keep your original date of Electrolux Home Products, Inc. Expenses for making the appliance accessible for service and parts under this warranty must be repaired in accordance with the provided instructions. Product that prove to repair or replace appliance light bulbs, air filters, water filters, other consumables, or knobs, handles, or other than in the home. 12. Food loss due to any refrigerator or freezer failures. 6. Service calls...

Wiring Diagram (English Español Français)
Page 1
... repair power cord harness wiring and connections. → Check at dispenser. Replace Compressor and Inverter Board. Replace Inverter Board FREEZER ICE MAKER INFORMATION (Where Applicable) Test Cycling: Remove cover by FZ thermistor; stopped when "off" 2 Defrost Heater Press power on -off Defrost limit switch must be closed . "OP¯" if open ; Main Board Firmware Press power on -off Displays digit sequence; PERFORMANCE DATA NO LOAD & NO DOOR OPENINGS AT 37°/0° CONTROL SETTING Type A with Run / Start Capacitor Operating...
... repair power cord harness wiring and connections. → Check at dispenser. Replace Compressor and Inverter Board. Replace Inverter Board FREEZER ICE MAKER INFORMATION (Where Applicable) Test Cycling: Remove cover by FZ thermistor; stopped when "off" 2 Defrost Heater Press power on -off Defrost limit switch must be closed . "OP¯" if open ; Main Board Firmware Press power on -off Displays digit sequence; PERFORMANCE DATA NO LOAD & NO DOOR OPENINGS AT 37°/0° CONTROL SETTING Type A with Run / Start Capacitor Operating...


