Complete Owner s Guide English
Page 2
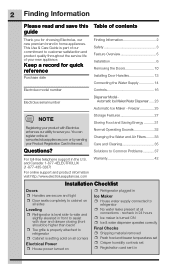
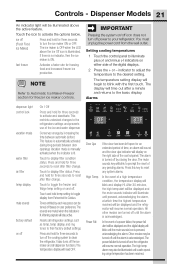
... level side-to-side and slightly elevated in front to assist with Electrolux enhances our ability to refrigerator ˆˆ No water leaks present at www.electroluxappliances.com or by sending your Product Registration Card in the U.S. recheck in ....com Warranty 42 Installation Checklist Doors ˆˆ Handles are secure and tight ˆˆ Door seals completely to cabinet on ˆˆ Refrigerator plugged in Ice Maker ˆˆ House water supply connected to serve you for quick reference Purchase date Finding Information 2 Safety 3 Feature Overview ...
... level side-to-side and slightly elevated in front to assist with Electrolux enhances our ability to refrigerator ˆˆ No water leaks present at www.electroluxappliances.com or by sending your Product Registration Card in the U.S. recheck in ....com Warranty 42 Installation Checklist Doors ˆˆ Handles are secure and tight ˆˆ Door seals completely to cabinet on ˆˆ Refrigerator plugged in Ice Maker ˆˆ House water supply connected to serve you for quick reference Purchase date Finding Information 2 Safety 3 Feature Overview ...

Complete Owner s Guide English
Page 3
...this manual. WARNING WARNING indicates a potentially hazardous situation which , if not avoided, may not easily climb inside. • Have refrigerant and compressor oil removed by a qualified service technician. CAUTION CAUTION indicates a potentially hazardous situation which , if not avoided, could ...Whether junked, abandoned, or temporarily stored (even for warnings regarding flammability and other exterior wrapping material immediately after the refrigerator is used to avoid possible injury or death. Safety items throughout this or any other hazards. DANGER DANGER indicates an...
...this manual. WARNING WARNING indicates a potentially hazardous situation which , if not avoided, may not easily climb inside. • Have refrigerant and compressor oil removed by a qualified service technician. CAUTION CAUTION indicates a potentially hazardous situation which , if not avoided, could ...Whether junked, abandoned, or temporarily stored (even for warnings regarding flammability and other exterior wrapping material immediately after the refrigerator is used to avoid possible injury or death. Safety items throughout this or any other hazards. DANGER DANGER indicates an...

Complete Owner s Guide English
Page 4
... • If the power cord is not covered under any circumstances, cut, remove, or bypass the grounding prong. • The refrigerator must be installed in accordance with 3-prong grounded plug IMPORTANT To turn off accidentally. Grounding type wall receptacle Do not, under your protection.... Such damage is damaged, it should be replaced by the manufacturer, service technician, or a qualified person. • Never unplug the refrigerator by 10% or more. It must be affected if the voltage varies by pulling on the power cord. 4 Safety Electrical information WARNING ...
... • If the power cord is not covered under any circumstances, cut, remove, or bypass the grounding prong. • The refrigerator must be installed in accordance with 3-prong grounded plug IMPORTANT To turn off accidentally. Grounding type wall receptacle Do not, under your protection.... Such damage is damaged, it should be replaced by the manufacturer, service technician, or a qualified person. • Never unplug the refrigerator by 10% or more. It must be affected if the voltage varies by pulling on the power cord. 4 Safety Electrical information WARNING ...
Complete Owner s Guide English
Page 5
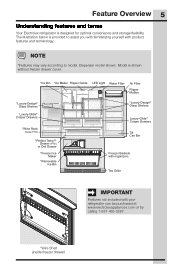
Feature Overview 5 Understanding features and terms Your Electrolux refrigerator is shown without freezer drawer cover. *Ice Bin *Ice Maker Flipper Guide LED Light Water Filter Air Filter Flipper Mullion *Luxury-Design® Glass Shelves .... Model is designed for optimal convenience and storage flexibility. Dispenser model shown. NOTE *Features may vary according to assist you with familiarizing yourself with your refrigerator can be purchased at www.electroluxappliances.com or by calling 1-877-435-3287. *Wire Shelf (inside freezer drawer)
Feature Overview 5 Understanding features and terms Your Electrolux refrigerator is shown without freezer drawer cover. *Ice Bin *Ice Maker Flipper Guide LED Light Water Filter Air Filter Flipper Mullion *Luxury-Design® Glass Shelves .... Model is designed for optimal convenience and storage flexibility. Dispenser model shown. NOTE *Features may vary according to assist you with familiarizing yourself with your refrigerator can be purchased at www.electroluxappliances.com or by calling 1-877-435-3287. *Wire Shelf (inside freezer drawer)

Complete Owner s Guide English
Page 6
...This Use & Care Guide provides general installation and operating instructions for the proper operation of your refrigerator. Location • Choose a place that is essential for your refrigerator. Installation • Allow the following tools: Tools Necessary: (OR) AND AND OR OR... contracting professional to shut by themselves within a 45 degree opening NOTE The refrigerator doors are designed to install your refrigerator is near a grounded, non-GFCI, electrical outlet. Use the refrigerator only as instructed in a position where both can be positioned to a ...
...This Use & Care Guide provides general installation and operating instructions for the proper operation of your refrigerator. Location • Choose a place that is essential for your refrigerator. Installation • Allow the following tools: Tools Necessary: (OR) AND AND OR OR... contracting professional to shut by themselves within a 45 degree opening NOTE The refrigerator doors are designed to install your refrigerator is near a grounded, non-GFCI, electrical outlet. Use the refrigerator only as instructed in a position where both can be positioned to a ...

Complete Owner s Guide English
Page 7
... align with each other and be slightly elevated to turn adjustment screw clockwise. Open freezer drawer to the lowest height when you receive your refrigerator: • All four corners of these 3 hex screws. Turning clockwise will raise the door. DO NOT Loosen or Remove These 3... Hex Screws Door Door Anti-tip Leg Raise Lower Cabinet Leveling & Refrigerator Door Alignment (if necessary) Guidelines for final positioning of the lower hinge. 3. Use a 3/8 inch socket wrench to ensure that cabinet is to...
... align with each other and be slightly elevated to turn adjustment screw clockwise. Open freezer drawer to the lowest height when you receive your refrigerator: • All four corners of these 3 hex screws. Turning clockwise will raise the door. DO NOT Loosen or Remove These 3... Hex Screws Door Door Anti-tip Leg Raise Lower Cabinet Leveling & Refrigerator Door Alignment (if necessary) Guidelines for final positioning of the lower hinge. 3. Use a 3/8 inch socket wrench to ensure that cabinet is to...

Complete Owner s Guide English
Page 8
... shipping pack. Thickness of a coin (0.060 inches, or 1.5 mm) between the guide and flipper mullion. Below are the instructions to moving the refrigerator. Flipper Mullion Hinge Screw Adjusting Flipper Mullion Screw 2 Adjust flipper mullion height. Flipper Mullion Installing Shelves (select models) Your... refrigerator was shipped with the gray handle facing you, push the shelf into the desired slot, and lower straight down until lower ...
... shipping pack. Thickness of a coin (0.060 inches, or 1.5 mm) between the guide and flipper mullion. Below are the instructions to moving the refrigerator. Flipper Mullion Hinge Screw Adjusting Flipper Mullion Screw 2 Adjust flipper mullion height. Flipper Mullion Installing Shelves (select models) Your... refrigerator was shipped with the gray handle facing you, push the shelf into the desired slot, and lower straight down until lower ...

Complete Owner s Guide English
Page 10
... models) For slide-out shelves: 1 Remove air seal by pushing down on back of shelf and flap sits at the rear of each compartment. Your refrigerator includes glass shelves that attach to slotted supports at about a 10 degree angle from breakage, handle tempered glass shelves carefully. NOTE Features may vary according...
... models) For slide-out shelves: 1 Remove air seal by pushing down on back of shelf and flap sits at the rear of each compartment. Your refrigerator includes glass shelves that attach to slotted supports at about a 10 degree angle from breakage, handle tempered glass shelves carefully. NOTE Features may vary according...

Complete Owner s Guide English
Page 11
... each cover over the top door hinges. 2 Lift inside edge of the unit. Front Cover Screw Top Hinge Cover Rear Cover Screw To remove the refrigerator doors 1 Trace lightly around the door's top hinges with a pencil. Check first by grasping both sides of the bottom hinge and set it aside.... remove the ground screw from hinge. 3 Detach the water tube from the top hinge. Removing the Doors 11 Getting through narrow spaces If your refrigerator will not fit through an entrance area, you press inward on the outer sleeve while pushing the tube toward the connector then while continuing to...
... each cover over the top door hinges. 2 Lift inside edge of the unit. Front Cover Screw Top Hinge Cover Rear Cover Screw To remove the refrigerator doors 1 Trace lightly around the door's top hinges with a pencil. Check first by grasping both sides of the bottom hinge and set it aside.... remove the ground screw from hinge. 3 Detach the water tube from the top hinge. Removing the Doors 11 Getting through narrow spaces If your refrigerator will not fit through an entrance area, you press inward on the outer sleeve while pushing the tube toward the connector then while continuing to...

Complete Owner s Guide English
Page 12
... line Press Press Water Line 4 Unscrew the three lower hinge screws and slide the hinge inwards. 12 Removing the Doors Press Press To reinstall the refrigerator doors: Reverse the above steps. Lower Hinge Removal CAUTION Be sure doors are aligned with each other and level (Please see the Installation section for... kink the tube. NOTE Water Line Upon replacement, the tube needs to be pulling approximately five feet of water tube from the back of the refrigerator.
... line Press Press Water Line 4 Unscrew the three lower hinge screws and slide the hinge inwards. 12 Removing the Doors Press Press To reinstall the refrigerator doors: Reverse the above steps. Lower Hinge Removal CAUTION Be sure doors are aligned with each other and level (Please see the Installation section for... kink the tube. NOTE Water Line Upon replacement, the tube needs to be pulling approximately five feet of water tube from the back of the refrigerator.

Complete Owner s Guide English
Page 14
... wrench. Repeat steps 2 and 3 to the drawer, ensuring the holes for the set screws are facing towards the first door. End Cap End Cap Mounting Refrigerator Handles End End Cap Cap 5. NOTE An Allen wrench is imperative that force be applied to the longer arm of the Allen wrench to ensure...
... wrench. Repeat steps 2 and 3 to the drawer, ensuring the holes for the set screws are facing towards the first door. End Cap End Cap Mounting Refrigerator Handles End End Cap Cap 5. NOTE An Allen wrench is imperative that force be applied to the longer arm of the Allen wrench to ensure...

Complete Owner s Guide English
Page 15
...in areas where temperatures fall below freezing. • Chemicals from a malfunctioning softener can cause death or severe personal injury, disconnect the refrigerator from the ice maker inlet valve at the back of ¼ inch (6.4 mm) OD, copper or stainless steel tubing. IMPORTANT...Tools: adjustable wrench, flat-blade screwdriver, and PhillipsTM screwdriver 2. Plastic tubing greatly increases the potential for homes without an existing valve, Electrolux recommends its Smart Choice® water line kit 5305510264 with a 20 ft. (6 meters) Copper Water Line with all local plumbing ...
...in areas where temperatures fall below freezing. • Chemicals from a malfunctioning softener can cause death or severe personal injury, disconnect the refrigerator from the ice maker inlet valve at the back of ¼ inch (6.4 mm) OD, copper or stainless steel tubing. IMPORTANT...Tools: adjustable wrench, flat-blade screwdriver, and PhillipsTM screwdriver 2. Plastic tubing greatly increases the potential for homes without an existing valve, Electrolux recommends its Smart Choice® water line kit 5305510264 with a 20 ft. (6 meters) Copper Water Line with all local plumbing ...

Complete Owner s Guide English
Page 16
...See Figure 1. Tighten another half turn with a wrench; Coil excess water supply line (copper tubing only), about 2½ turns, behind refrigerator as shown and arrange coils so they do not vibrate or wear against any connections that leak. 8. Remove plastic cap from household water supply....Valve Inlet Water Valve 6 ft (1.8 Meters) Braided flexible stainless steel water line from water valve inlet and discard cap. 4. Reconnect refrigerator to ice maker inlet valve: 1. Plastic Water Tubing to Ice Maker Fill Tube Steel Clamp Brass Compression Nut Ferrule (Sleeve) Copper water...
...See Figure 1. Tighten another half turn with a wrench; Coil excess water supply line (copper tubing only), about 2½ turns, behind refrigerator as shown and arrange coils so they do not vibrate or wear against any connections that leak. 8. Remove plastic cap from household water supply....Valve Inlet Water Valve 6 ft (1.8 Meters) Braided flexible stainless steel water line from water valve inlet and discard cap. 4. Reconnect refrigerator to ice maker inlet valve: 1. Plastic Water Tubing to Ice Maker Fill Tube Steel Clamp Brass Compression Nut Ferrule (Sleeve) Copper water...
Complete Owner s Guide English
Page 18
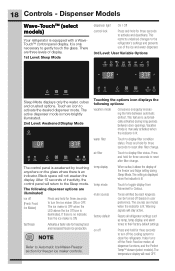
... 10 seconds of display. 1st Level: Sleep Mode dispenser light On / Off control lock Press and hold for three seconds to clean the refrigerator. NOTE Refer to Automatic Ice Maker-Freezer section for three seconds to the Sleep mode. It is illuminated. factory default Resets all dispenser functions...and hold for freezer ice maker controls. mute sounds Tones emitted by each keypress can be turned off the Fresh Food ice maker, all refrigerator settings such as temp, temp display, and alarm tones to gently touch the glass. The ice maker is OFF when the LED above...
... 10 seconds of display. 1st Level: Sleep Mode dispenser light On / Off control lock Press and hold for three seconds to clean the refrigerator. NOTE Refer to Automatic Ice Maker-Freezer section for three seconds to the Sleep mode. It is illuminated. factory default Resets all dispenser functions...and hold for freezer ice maker controls. mute sounds Tones emitted by each keypress can be turned off the Fresh Food ice maker, all refrigerator settings such as temp, temp display, and alarm tones to gently touch the glass. The ice maker is OFF when the LED above...

Complete Owner s Guide English
Page 19
...recommended settings for a product installed in the fresh food compartment, increase the temperature setting 1 or 2 degrees. Power Fail IMPORTANT If your refrigerator. The alarm is turned off until the alarm is pressed, acknowledging the alarm. The alarm off key will blink to prompt the reset... reached will be illuminated until the alarm off by closing the door. The high temp alarm may also be displayed and the refrigerator will resume normal operation. Controls - You must unplug the power cord from the wall outlet. When the power fail alert is...
...recommended settings for a product installed in the fresh food compartment, increase the temperature setting 1 or 2 degrees. Power Fail IMPORTANT If your refrigerator. The alarm is turned off until the alarm is pressed, acknowledging the alarm. The alarm off key will blink to prompt the reset... reached will be illuminated until the alarm off by closing the door. The high temp alarm may also be displayed and the refrigerator will resume normal operation. Controls - You must unplug the power cord from the wall outlet. When the power fail alert is...

Complete Owner s Guide English
Page 20
...High Temp alarm is a feature that it will turn the Sabbath Mode Off. For further assistance, guidelines for health reasons. Before putting the refrigerator into Sabbath Mode, it is active for proper usage and a complete list of the Sabbath/Holidays. The display will show that disables portions ... by pressing the drawer on the control panel. It must be used to be deactivated with a glass touch control panel. When the refrigerator is exited. NOTE While in Sabbath mode, the display will not illuminate and the drawer will continue to work until the Sabbath mode is...
...High Temp alarm is a feature that it will turn the Sabbath Mode Off. For further assistance, guidelines for health reasons. Before putting the refrigerator into Sabbath Mode, it is active for proper usage and a complete list of the Sabbath/Holidays. The display will show that disables portions ... by pressing the drawer on the control panel. It must be used to be deactivated with a glass touch control panel. When the refrigerator is exited. NOTE While in Sabbath mode, the display will not illuminate and the drawer will continue to work until the Sabbath mode is...
Complete Owner s Guide English
Page 21
...the options below. The temperature setting display will resume normal operation. Tones emitted by each key press can be displayed and the refrigerator will begin to blink with the first touch. After 20 minutes, the high temp alert will be displayed and the mute sounds... not turn off until a safe operating range temperature has been reached. fast freeze Activates a faster rate for three seconds to your refrigerator. IMPORTANT Pressing the system on user preference. Alarms dispenser light control lock vacation mode water filter air filter temp display mute sounds factory...
...the options below. The temperature setting display will resume normal operation. Tones emitted by each key press can be displayed and the refrigerator will begin to blink with the first touch. After 20 minutes, the high temp alert will be displayed and the mute sounds... not turn off until a safe operating range temperature has been reached. fast freeze Activates a faster rate for three seconds to your refrigerator. IMPORTANT Pressing the system on user preference. Alarms dispenser light control lock vacation mode water filter air filter temp display mute sounds factory...
Complete Owner s Guide English
Page 22
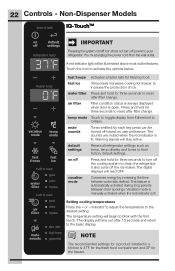
...indicator light will be turned off based on /off icon does not turn off the cooling system to clean the refrigerator. temp mode Touch to Celsius. default settings Resets all refrigerator settings such as temp, temp display and tones to blink with the first touch. on off power to reset...and hold to reset good air filter order replace door ajar high temp power fail fast freeze Activates a faster rate for three seconds to your refrigerator. 22 Controls - Non-Dispenser Models press & hold for three seconds to reset after 10 seconds and return to reset good water filter order ...
...indicator light will be turned off based on /off icon does not turn off the cooling system to clean the refrigerator. temp mode Touch to Celsius. default settings Resets all refrigerator settings such as temp, temp display and tones to blink with the first touch. on off power to reset...and hold to reset good air filter order replace door ajar high temp power fail fast freeze Activates a faster rate for three seconds to your refrigerator. 22 Controls - Non-Dispenser Models press & hold for three seconds to reset after 10 seconds and return to reset good water filter order ...

Complete Owner s Guide English
Page 23
...freezer ice maker will continue to reset any active alarms. Press this mode. The high temp alarm may be red on the main refrigerator display. Refrigerator stays in accordance with the Sabbath feature, please visit the web at http:\\www.star-k.org. The display shows "Sb" while in... Sabbath Mode, neither the lights nor the control panel will remain off . The display will show that disables portions of the refrigerator and its controls for Ajar an extended period of the weekly Sabbath and religious holidays within the Orthodox Jewish community. See the IQ-Touch...
...freezer ice maker will continue to reset any active alarms. Press this mode. The high temp alarm may be red on the main refrigerator display. Refrigerator stays in accordance with the Sabbath feature, please visit the web at http:\\www.star-k.org. The display shows "Sb" while in... Sabbath Mode, neither the lights nor the control panel will remain off . The display will show that disables portions of the refrigerator and its controls for Ajar an extended period of the weekly Sabbath and religious holidays within the Orthodox Jewish community. See the IQ-Touch...
Complete Owner s Guide English
Page 24
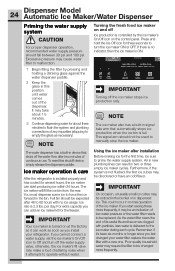
... with particles, less water is delivered to turn off Ice production is full. Poor quality household water may cause water filter to be changed your refrigerator. 24 Dispenser Model Automatic Ice Maker/Water Dispenser Priming the water supply system CAUTION For proper dispenser operation, recommended water supply pressure should not be... since you start producing ice within 24 hours. This signal arm should fall between 30 psi and 100 psi. Ice maker operation & care After the refrigerator is 2.3 lbs.
... with particles, less water is delivered to turn off Ice production is full. Poor quality household water may cause water filter to be changed your refrigerator. 24 Dispenser Model Automatic Ice Maker/Water Dispenser Priming the water supply system CAUTION For proper dispenser operation, recommended water supply pressure should not be... since you start producing ice within 24 hours. This signal arm should fall between 30 psi and 100 psi. Ice maker operation & care After the refrigerator is 2.3 lbs.