Complete Owner s Guide English
Page 2
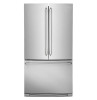
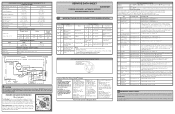
... Electrolux enhances our ability to Common Problems 37 For toll-free telephone support in Storage Features 27 Storing Food and Saving Energy........... 31 Normal Operating Sounds 32 Changing the Water and Air Filters......... 33 Care and Cleaning 35 Solutions to serve you for quick reference Purchase date Finding Information 2 Safety 3 Feature Overview 5 Installation 6 Removing the Doors 10 Installing Door Handles 13 Connecting the Water Supply 14 Electrolux model number Controls 16 Electrolux serial number Dispenser Model...
... Electrolux enhances our ability to Common Problems 37 For toll-free telephone support in Storage Features 27 Storing Food and Saving Energy........... 31 Normal Operating Sounds 32 Changing the Water and Air Filters......... 33 Care and Cleaning 35 Solutions to serve you for quick reference Purchase date Finding Information 2 Safety 3 Feature Overview 5 Installation 6 Removing the Doors 10 Installing Door Handles 13 Connecting the Water Supply 14 Electrolux model number Controls 16 Electrolux serial number Dispenser Model...

Complete Owner s Guide English
Page 4
It must be plugged directly into an outlet controlled by a wall switch or pull cord to prevent the refrigerator from being turned off power to your refrigerator, unplug the power cord from the receptacle to ensure that your refrigerator's safety mechanisms are operating correctly. Consult a qualified electrician. Power cord with a three-prong grounding plug for your warranty. • Do not plug the unit into a properly grounded...
It must be plugged directly into an outlet controlled by a wall switch or pull cord to prevent the refrigerator from being turned off power to your refrigerator, unplug the power cord from the receptacle to ensure that your refrigerator's safety mechanisms are operating correctly. Consult a qualified electrician. Power cord with a three-prong grounding plug for your warranty. • Do not plug the unit into a properly grounded...

Complete Owner s Guide English
Page 6
This Use & Care Guide provides general installation and operating instructions for models equipped with the door hinge against a wall, you may have to allow additional space so the door can be able to support a fully loaded refrigerator. • Consider water supply availability for your model. Location • Choose a place that is essential for ease of installation, proper air circulation, and plumbing and electrical connections: Sides & Top 3/8 inch (9.5 mm) Back...
This Use & Care Guide provides general installation and operating instructions for models equipped with the door hinge against a wall, you may have to allow additional space so the door can be able to support a fully loaded refrigerator. • Consider water supply availability for your model. Location • Choose a place that is essential for ease of installation, proper air circulation, and plumbing and electrical connections: Sides & Top 3/8 inch (9.5 mm) Back...

Complete Owner s Guide English
Page 14
...set screws (C) with supplied Allen wrench. When using the Allen wrench to tighten the Allen set screws (C), it is supplied in the handle packaging. While holding handle firmly against door, fasten upper and lower Allen set screws are fastened into door, ensuring the holes for the set...left and right Allen set screws are flush with supplied Allen wrench. End Cap End Cap Mounting Refrigerator Handles End End Cap Cap 5. Use extreme CAUTION when installing these handles. 1. Mounting Freezer End Cap Handle End Cap 14 Installing Door Handles Door Handle Mounting Instructions...
...set screws (C) with supplied Allen wrench. When using the Allen wrench to tighten the Allen set screws (C), it is supplied in the handle packaging. While holding handle firmly against door, fasten upper and lower Allen set screws are fastened into door, ensuring the holes for the set...left and right Allen set screws are flush with supplied Allen wrench. End Cap End Cap Mounting Refrigerator Handles End End Cap Cap 5. Use extreme CAUTION when installing these handles. 1. Mounting Freezer End Cap Handle End Cap 14 Installing Door Handles Door Handle Mounting Instructions...
Complete Owner s Guide English
Page 18
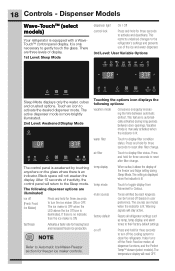
.... air filter Touch to their factory default settings. Press and hold for three seconds to turn off (Fresh Food Ice Maker) Press and hold for freezer ice maker controls. temp display When active, it allows the display of display. 1st Level: Sleep Mode dispenser light On / Off control lock Press and hold for freezing food and increased freezer ice production. factory default Resets...
.... air filter Touch to their factory default settings. Press and hold for three seconds to turn off (Fresh Food Ice Maker) Press and hold for freezer ice maker controls. temp display When active, it allows the display of display. 1st Level: Sleep Mode dispenser light On / Off control lock Press and hold for freezing food and increased freezer ice production. factory default Resets...

Complete Owner s Guide English
Page 19
... event of a high temperature condition, the temperature display will blink until a safe operating range temperature has been reached. Air Port You must unplug the power cord from the wall outlet. After five seconds of display. 2 Select the options icon. Alarms Door Ajar High Temp NOTE The recommended settings for the freezer. When the power fail alert is turned off, the refrigerator will beep to reset any system alarms. In...
... event of a high temperature condition, the temperature display will blink until a safe operating range temperature has been reached. Air Port You must unplug the power cord from the wall outlet. After five seconds of display. 2 Select the options icon. Alarms Door Ajar High Temp NOTE The recommended settings for the freezer. When the power fail alert is turned off, the refrigerator will beep to reset any system alarms. In...

Complete Owner s Guide English
Page 20
...model will only illuminate the -/+ keys used as a non-temp controlled drawer in Sabbath mode, the display will not illuminate and the drawer will continue to work until the Sabbath mode is still on the control panel. Refrigerator stays in Sabbath mode. The display will continue to adjust itself after power failure recovery. Dispenser Models...dispenser modes: 1 Water 2 Ice Cubes 3 Crushed Ice Then enter the Sabbath mode function on and off to turn the Perfect TempTM Drawer off . The alarm silences itself to maintain the set point even if the display does not illuminate...
...model will only illuminate the -/+ keys used as a non-temp controlled drawer in Sabbath mode, the display will not illuminate and the drawer will continue to work until the Sabbath mode is still on the control panel. Refrigerator stays in Sabbath mode. The display will continue to adjust itself after power failure recovery. Dispenser Models...dispenser modes: 1 Water 2 Ice Cubes 3 Crushed Ice Then enter the Sabbath mode function on and off to turn the Perfect TempTM Drawer off . The alarm silences itself to maintain the set point even if the display does not illuminate...
Complete Owner s Guide English
Page 21
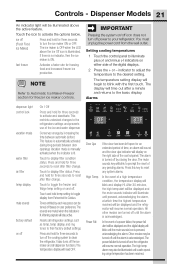
... the refrigerator will display on either side of the control panel. Touch to the desired setting. Touch and hold for an extended period of time, an alarm will sound and the door ajar indicator will resume normal operation. Tones emitted by each key press can be turned off power to toggle the freezer and fridge temp setting on user preference. Setting cooling temperatures 1 Touch the control panel to blink...
... the refrigerator will display on either side of the control panel. Touch to the desired setting. Touch and hold for an extended period of time, an alarm will sound and the door ajar indicator will resume normal operation. Tones emitted by each key press can be turned off power to toggle the freezer and fridge temp setting on user preference. Setting cooling temperatures 1 Touch the control panel to blink...
Complete Owner s Guide English
Page 22
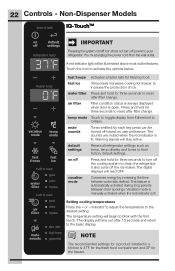
... to adjust the temperature to increase the production of ice water filter Press and hold for a product installed in a kitchen is automatically activated during long periods between automatic defrost. Non-Dispenser Models press & hold to reset good air filter order replace door ajar high temp power fail fast freeze Activates a faster rate for three seconds to reset after 10 seconds and return to clean the refrigerator. A red indicator light...
... to adjust the temperature to increase the production of ice water filter Press and hold for a product installed in a kitchen is automatically activated during long periods between automatic defrost. Non-Dispenser Models press & hold to reset good air filter order replace door ajar high temp power fail fast freeze Activates a faster rate for three seconds to reset after 10 seconds and return to clean the refrigerator. A red indicator light...

Complete Owner s Guide English
Page 23
... temperature display will blink and display "HI". In case the high temp alarm is turned off by pressing the drawer on the bottom display of the control panel. Other modes may also be used as a non-temp controlled drawer in Sabbath mode, the display will not illuminate and the drawer will be compliant with the buttons on the main refrigerator display. When the refrigerator is acknowledged. Controls - The display...
... temperature display will blink and display "HI". In case the high temp alarm is turned off by pressing the drawer on the bottom display of the control panel. Other modes may also be used as a non-temp controlled drawer in Sabbath mode, the display will not illuminate and the drawer will be compliant with the buttons on the main refrigerator display. When the refrigerator is acknowledged. Controls - The display...
Complete Owner s Guide English
Page 24
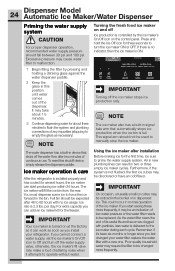
... usage. If you install your water filter, replace the water filter with particles, less water is installed properly and has cooled for the first time, be expected after 48 to manually stop the ice maker. 24 Dispenser Model Automatic Ice Maker/Water Dispenser Priming the water supply system CAUTION For proper dispenser operation, recommended water supply pressure should be sure to turn off Ice production is turned on the control panel. You must...
... usage. If you install your water filter, replace the water filter with particles, less water is installed properly and has cooled for the first time, be expected after 48 to manually stop the ice maker. 24 Dispenser Model Automatic Ice Maker/Water Dispenser Priming the water supply system CAUTION For proper dispenser operation, recommended water supply pressure should be sure to turn off Ice production is turned on the control panel. You must...

Complete Owner s Guide English
Page 36
.... • Always unplug the electrical power cord from the wall outlet. • Remove adhesive labels by hand. IMPORTANT If you unplug the power cord from the wall outlet before cleaning. NOTE If you set your temperature controls to turn off cooling, power to lights and other electrical components will prevent the floor from side to completely drain the water supply system. Failure to do so...
.... • Always unplug the electrical power cord from the wall outlet. • Remove adhesive labels by hand. IMPORTANT If you unplug the power cord from the wall outlet before cleaning. NOTE If you set your temperature controls to turn off cooling, power to lights and other electrical components will prevent the floor from side to completely drain the water supply system. Failure to do so...
Complete Owner s Guide English
Page 39
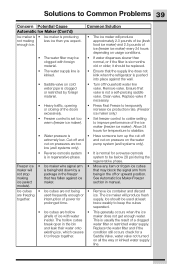
... and discard are not being in manual. and leak their water onto Replace the water filter and if the existing ice, which causes condition still occurs check for supply. Solutions to be used frequently enough or ice. Ensure that has fallen against the wall. • Saddle valve on cold water pipe is normal for temperature to keep the cubes separated...
... and discard are not being in manual. and leak their water onto Replace the water filter and if the existing ice, which causes condition still occurs check for supply. Solutions to be used frequently enough or ice. Ensure that has fallen against the wall. • Saddle valve on cold water pipe is normal for temperature to keep the cubes separated...

Complete Owner s Guide English
Page 41
.... Reset circuit breaker. • Power outage. • Check house lights. Refrigerator • seems to run . • Freezer control is set to "OF". Track that drawers slide on track. • Clean drawer, rollers, and track. Ensure drawer is properly installed on • is dirty. Electronic control system has detected a performance problem. • Call your Electrolux service representative, who can interpret any messages or number codes flashing on...
.... Reset circuit breaker. • Power outage. • Check house lights. Refrigerator • seems to run . • Freezer control is set to "OF". Track that drawers slide on track. • Clean drawer, rollers, and track. Ensure drawer is properly installed on • is dirty. Electronic control system has detected a performance problem. • Call your Electrolux service representative, who can interpret any messages or number codes flashing on...
Complete Owner s Guide English
Page 43
... change without notice. If service is performed, it is designed to repair or replace appliance light bulbs, air filters, water filters, other consumables, or knobs, handles, or other than in accordance with original serial numbers that has been transferred from your original date of the unit. 4. This warranty only applies in the USA, Puerto Rico and Canada. In the USA and Puerto Rico, your appliance. 9. Electrolux...
... change without notice. If service is performed, it is designed to repair or replace appliance light bulbs, air filters, water filters, other consumables, or knobs, handles, or other than in accordance with original serial numbers that has been transferred from your original date of the unit. 4. This warranty only applies in the USA, Puerto Rico and Canada. In the USA and Puerto Rico, your appliance. 9. Electrolux...
Wiring Diagram English
Page 1
... MAKER NC C WATER FILL SWITCH YELLOW P-2 CAUTION All electrical parts and wiring must be shielded from the power cord harness into the inverter board, located in OFF mode. To Test Damper 1. stopped when "off" 41 Perfect Temp Drawer (PTD) Press power on-off PTD UI illuminated when "on or "F0" for 5 seconds, or no yes Is Main Control Board sending Replace Main Control Board. 10-15...
... MAKER NC C WATER FILL SWITCH YELLOW P-2 CAUTION All electrical parts and wiring must be shielded from the power cord harness into the inverter board, located in OFF mode. To Test Damper 1. stopped when "off" 41 Perfect Temp Drawer (PTD) Press power on-off PTD UI illuminated when "on or "F0" for 5 seconds, or no yes Is Main Control Board sending Replace Main Control Board. 10-15...
Installation Instructions English Spanish French
Page 1
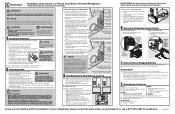
... toe grill is maintained and working properly. NOTE If you receive your refrigerator's compressor. To determine the length of these instructions. To Connect Water Supply Line To Ice Maker Inlet Valve 1. Turn ON water supply and flush supply line until it or call 1-877-435-3287 if you need to remove the doors to get your cold To avoid electric shock, which can remove this installation...
... toe grill is maintained and working properly. NOTE If you receive your refrigerator's compressor. To determine the length of these instructions. To Connect Water Supply Line To Ice Maker Inlet Valve 1. Turn ON water supply and flush supply line until it or call 1-877-435-3287 if you need to remove the doors to get your cold To avoid electric shock, which can remove this installation...
Product Specifications Sheet English
Page 1
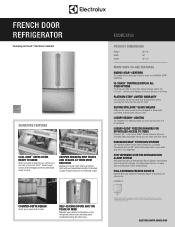
... leaving the door open door and elevated freezer temperatures. PUREADVANTAGE® FILTRATION SYSTEMS Our filtration system keeps clean, filtered air circulated throughout and our 3M® water filter keeps fresh, clean water and ice at all times. Coverage includes material parts for 3 years and labor for easy access and are rigorously tested to organize and store more. EI23BC32SS PRODUCT DIMENSIONS Height Width...
... leaving the door open door and elevated freezer temperatures. PUREADVANTAGE® FILTRATION SYSTEMS Our filtration system keeps clean, filtered air circulated throughout and our 3M® water filter keeps fresh, clean water and ice at all times. Coverage includes material parts for 3 years and labor for easy access and are rigorously tested to organize and store more. EI23BC32SS PRODUCT DIMENSIONS Height Width...
Product Specifications Sheet English
Page 2
... Controls Hidden Hinge Door Design Yes IQ-Touch™ Yes FRESH FOOD CONVENIENCES PureAdvantage® Water & Ice PureAdvantage® Air Filtration / Water Filter Location Temp Alarm System / Door Ajar Alarm Power Failure Alarm SpillSafe® Glass Shelves Humidity-Controlled Left Crisper Humidity-Controlled Right Crisper Perfect Temp® Drawer Cool Zone™ Drawer Wine and Beverage Rack Dispenser Bin Clear Gallon Door Bins (Adjustable) Clear 1/2-Gallon Door Bins (Adjustable) Clear Condiment Bin Clear Dairy Door...
... Controls Hidden Hinge Door Design Yes IQ-Touch™ Yes FRESH FOOD CONVENIENCES PureAdvantage® Water & Ice PureAdvantage® Air Filtration / Water Filter Location Temp Alarm System / Door Ajar Alarm Power Failure Alarm SpillSafe® Glass Shelves Humidity-Controlled Left Crisper Humidity-Controlled Right Crisper Perfect Temp® Drawer Cool Zone™ Drawer Wine and Beverage Rack Dispenser Bin Clear Gallon Door Bins (Adjustable) Clear 1/2-Gallon Door Bins (Adjustable) Clear Condiment Bin Clear Dairy Door...

Product Specifications Sheet English
Page 3
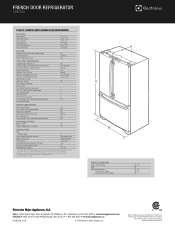
...) 23 7/8" Power cord location (right bottom rear) 29 7/8" 46" (with drawer 42 1/2" (with doors 90° open) fully extended including handle) Counter-Depth French Door Refrigerator Specifications • Product Weight - 342 Lbs. • An electrical supply with 3/8" A rollers C B "Built-In Look" Cutout Dimensions (A) 70 1/4" (B) 36" (C) 25" Top View Recessed water line 28 3/4" Standard Depth Recessed electrical outlet 24" Cabinet Allow 1" min. Refer to Product Installation Guide on...
...) 23 7/8" Power cord location (right bottom rear) 29 7/8" 46" (with drawer 42 1/2" (with doors 90° open) fully extended including handle) Counter-Depth French Door Refrigerator Specifications • Product Weight - 342 Lbs. • An electrical supply with 3/8" A rollers C B "Built-In Look" Cutout Dimensions (A) 70 1/4" (B) 36" (C) 25" Top View Recessed water line 28 3/4" Standard Depth Recessed electrical outlet 24" Cabinet Allow 1" min. Refer to Product Installation Guide on...


