
Complete Owners Guide English
Page 2
... BEFORE OPERATING THIS WASHER. For toll free telephone support or online support in the US and Canada contact: U.S. 1-877-4ELECTROLUX (1-877-435-3287) www.electroluxappliances.com Canada 1-800-265-8352 www.electroluxappliances.ca NOTE Registering your product with Electrolux enhances our ability to...be followed to minimize the risk of fire or explosion or to serve you for quick reference Purchase date Electrolux serial number Electrolux model number Electrolux model series* * The series number can register online at www.electroluxappliances.com, by sending your Product Registration ...
... BEFORE OPERATING THIS WASHER. For toll free telephone support or online support in the US and Canada contact: U.S. 1-877-4ELECTROLUX (1-877-435-3287) www.electroluxappliances.com Canada 1-800-265-8352 www.electroluxappliances.ca NOTE Registering your product with Electrolux enhances our ability to...be followed to minimize the risk of fire or explosion or to serve you for quick reference Purchase date Electrolux serial number Electrolux model number Electrolux model series* * The series number can register online at www.electroluxappliances.com, by sending your Product Registration ...

Complete Owners Guide English
Page 3
... rags or clothing on the risk type. This will result in death or serious injury. These substances give off vapors that follow this washer, comply with a Danger, Warning, or Caution based on top of mechanical breakdown and lead to fire or serious injury. Contact a ...from each for 2 weeks or more. WARNING WARNING indicates a potentially hazardous situation which , if not avoided, may be a sign of the washer. Hydrogen gas is the safety alert symbol. DANGER CAUTION DANGER indicates an imminently hazardous situation which is used for such a period, before using...
... rags or clothing on the risk type. This will result in death or serious injury. These substances give off vapors that follow this washer, comply with a Danger, Warning, or Caution based on top of mechanical breakdown and lead to fire or serious injury. Contact a ...from each for 2 weeks or more. WARNING WARNING indicates a potentially hazardous situation which , if not avoided, may be a sign of the washer. Hydrogen gas is the safety alert symbol. DANGER CAUTION DANGER indicates an imminently hazardous situation which is used for such a period, before using...

Complete Owners Guide English
Page 4
...still dangerous - Refer to the Installation sections of this warning can become airtight compartments. • Keep laundry products out of your old washer or dryer. If you are getting rid of children's reach. WARNING Improper grounding of all appliances. • Destroy the carton, ...plastic bag and other packing materials after the washer is used near children. Grounding type wall receptacle Do not, under any circumstances, cut, remove, or bypass the grounding prong. 4 ...
...still dangerous - Refer to the Installation sections of this warning can become airtight compartments. • Keep laundry products out of your old washer or dryer. If you are getting rid of children's reach. WARNING Improper grounding of all appliances. • Destroy the carton, ...plastic bag and other packing materials after the washer is used near children. Grounding type wall receptacle Do not, under any circumstances, cut, remove, or bypass the grounding prong. 4 ...

Complete Owners Guide English
Page 5
...disconnect this appliance from the power supply. • To prevent injury, DO NOT reach into the washer while parts are moving. • This washer is equipped with controls. • DO NOT install or store the washer where it will stop if it becomes overheated. • Failure to the weather. • ...DO NOT install on a solid floor. Install washer on carpet. Important Safety Information 5 WARNING HARMFUL VAPOR HAZARD DO NOT use or mix liquid chlorine bleach with other materials. These mixtures ...
...disconnect this appliance from the power supply. • To prevent injury, DO NOT reach into the washer while parts are moving. • This washer is equipped with controls. • DO NOT install or store the washer where it will stop if it becomes overheated. • Failure to the weather. • ...DO NOT install on a solid floor. Install washer on carpet. Important Safety Information 5 WARNING HARMFUL VAPOR HAZARD DO NOT use or mix liquid chlorine bleach with other materials. These mixtures ...

Complete Owners Guide English
Page 6
... Leveling Legs Not all available settings and options can be found in the following sections: Model series 18 Settings chart - 300 series washer...19 Settings chart - 400 series washer...20 Settings chart - 500 series washer...21 Settings chart - 600 series washer...22 Cycle selection 23 Cycle settings 23 Cycle options 25 Other features 26
... Leveling Legs Not all available settings and options can be found in the following sections: Model series 18 Settings chart - 300 series washer...19 Settings chart - 400 series washer...20 Settings chart - 500 series washer...21 Settings chart - 600 series washer...22 Cycle selection 23 Cycle settings 23 Cycle options 25 Other features 26
Complete Owners Guide English
Page 7
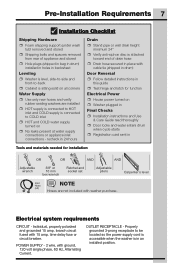
... No leaks present at water supply connections or appliance inlet connections - Individual, properly polarized and grounded 15 amp. branch circuit fused with washer purchase. OUTLET RECEPTACLE - Electrical system requirements CIRCUIT - time delay fuse or circuit breaker. Pre-Installation Requirements 7 Installation Checklist... guide ˆˆ Test hinge and latch for function Electrical Power ˆˆ House power turned on ˆˆ Washer plugged in Final Checks ˆˆ Installation instructions and Use & Care Guide read thoroughly ˆˆ Door locks and water...
... No leaks present at water supply connections or appliance inlet connections - Individual, properly polarized and grounded 15 amp. branch circuit fused with washer purchase. OUTLET RECEPTACLE - Electrical system requirements CIRCUIT - time delay fuse or circuit breaker. Pre-Installation Requirements 7 Installation Checklist... guide ˆˆ Test hinge and latch for function Electrical Power ˆˆ House power turned on ˆˆ Washer plugged in Final Checks ˆˆ Installation instructions and Use & Care Guide read thoroughly ˆˆ Door locks and water...

Complete Owners Guide English
Page 8
...codes, with threading for electrical current. 2. Water supply requirements Hot and cold water faucets MUST be installed within hose length of your washer is equipped with a power supply cord having an equipment-grounding conductor and a grounding plug, the plug MUST be more than the ...) Maximum height: 96 in doubt, call a licensed electrician. Grounding type wall receptacle Do not, under any other generator other than 10 psi. The washer MUST be 3/4 inch (1.9 cm) with the National Electrical Codes, ANSI/ NFPA 70 (latest edition), or in a risk of electrical shock. Pressure...
...codes, with threading for electrical current. 2. Water supply requirements Hot and cold water faucets MUST be installed within hose length of your washer is equipped with a power supply cord having an equipment-grounding conductor and a grounding plug, the plug MUST be more than the ...) Maximum height: 96 in doubt, call a licensed electrician. Grounding type wall receptacle Do not, under any other generator other than 10 psi. The washer MUST be 3/4 inch (1.9 cm) with the National Electrical Codes, ANSI/ NFPA 70 (latest edition), or in a risk of electrical shock. Pressure...

Complete Owners Guide English
Page 9
... to be necessary. 4. On carpet. On top of a dryer. Do not stack a dryer on top of washer already installed on top of another washer or on pedestal. 60 sq. in. (387.1cm²) 3" (7.6cm) closet door MINIMUM INSTALLATION CLEARANCES Inches ... 0" (0 cm) n/a UnderCounter 0" (0 cm) 0" (0 cm) 0" (0 cm) n/a Closet 0" (0 cm) 0" (0 cm) 0" (0 cm) 1" (2.5 cm) 0" (0 cm) 0" (0 cm) Installation in a recess or closet If washer and dryer are kept or stored. 3. Pre-Installation Requirements 9 96" (244 cm) max. 24" (61 cm) min. 3" (7.6cm) 60 sq. Louvered openings should be solid...
... to be necessary. 4. On carpet. On top of a dryer. Do not stack a dryer on top of washer already installed on top of another washer or on pedestal. 60 sq. in. (387.1cm²) 3" (7.6cm) closet door MINIMUM INSTALLATION CLEARANCES Inches ... 0" (0 cm) n/a UnderCounter 0" (0 cm) 0" (0 cm) 0" (0 cm) n/a Closet 0" (0 cm) 0" (0 cm) 0" (0 cm) 1" (2.5 cm) 0" (0 cm) 0" (0 cm) Installation in a recess or closet If washer and dryer are kept or stored. 3. Pre-Installation Requirements 9 96" (244 cm) max. 24" (61 cm) min. 3" (7.6cm) 60 sq. Louvered openings should be solid...
Complete Owners Guide English
Page 10
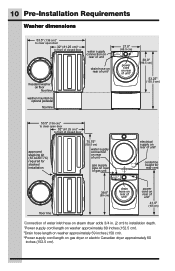
..." (81.25 cm)* to front of closed door water supply connection on rear of unit drain hose on rear of unit3 freestand washer on floor floor line washer mounted on optional pedestal floor line 27.0" (68.5 cm) power cord on rear of unit1 38.0" (96.5 cm) 53....Connection of water inlet hose on steam dryer adds 3/4 in. (2 cm) to installation depth. 1Power supply cord length on washer approximately 60 inches (152.5 cm). 2Drain hose length on washer approximately 59 inches (150 cm). 3Power supply cord length on gas dryer or electric Canadian dryer approximately 60 inches (152.5 cm...
..." (81.25 cm)* to front of closed door water supply connection on rear of unit drain hose on rear of unit3 freestand washer on floor floor line washer mounted on optional pedestal floor line 27.0" (68.5 cm) power cord on rear of unit1 38.0" (96.5 cm) 53....Connection of water inlet hose on steam dryer adds 3/4 in. (2 cm) to installation depth. 1Power supply cord length on washer approximately 60 inches (152.5 cm). 2Drain hose length on washer approximately 59 inches (150 cm). 3Power supply cord length on gas dryer or electric Canadian dryer approximately 60 inches (152.5 cm...

Complete Owners Guide English
Page 11
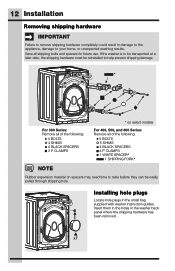
... its back without the shipping bolts. 6. Do not contact the following parts while the appliance is unpacked. IMPORTANT DO NOT tip washer upside down onto its top or onto its back. Temporarily remove door tape. 2. WARNING ELECTRIC SHOCK HAZARD Certain internal parts are ...intentionally not grounded and may present a risk of the carton and plastic bags after the washer is energized • Pump • Drive motor • Electrical control boards • Water valves IMPORTANT Save styrofoam base and shipping plug...
... its back without the shipping bolts. 6. Do not contact the following parts while the appliance is unpacked. IMPORTANT DO NOT tip washer upside down onto its top or onto its back. Temporarily remove door tape. 2. WARNING ELECTRIC SHOCK HAZARD Certain internal parts are ...intentionally not grounded and may present a risk of the carton and plastic bags after the washer is energized • Pump • Drive motor • Electrical control boards • Water valves IMPORTANT Save styrofoam base and shipping plug...
Complete Owners Guide English
Page 12
... panel where the shipping hardware has been removed. Insert them in the holes in the small bag supplied with washer instruction guides. If the washer is to be transported at a later date, the shipping hardware must be easily pulled through shipping hole. 12 Installation Removing shipping hardware IMPORTANT Failure to ...
... panel where the shipping hardware has been removed. Insert them in the holes in the small bag supplied with washer instruction guides. If the washer is to be transported at a later date, the shipping hardware must be easily pulled through shipping hole. 12 Installation Removing shipping hardware IMPORTANT Failure to ...
Complete Owners Guide English
Page 13
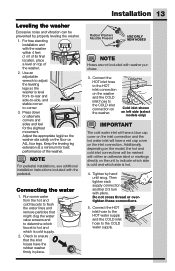
... noise and vibration can be marked with either an adhesive label or markings directly on the inlet connection. Press down on top of the washer. Keep the leveling leg extension at a minimum for the slightest movement. Run some water from the hot and cold faucets to flush the water lines ... ONLY NEW HOSES NOTE Hoses are not included with pliers. Additionally, depending on the model, the hot and cold inlet connections will have the rubber washer firmly in place. Connect the HOT inlet hose to the HOT water supply and the COLD inlet hose to indicate which side is cold and...
... noise and vibration can be marked with either an adhesive label or markings directly on the inlet connection. Press down on top of the washer. Keep the leveling leg extension at a minimum for the slightest movement. Run some water from the hot and cold faucets to flush the water lines ... ONLY NEW HOSES NOTE Hoses are not included with pliers. Additionally, depending on the model, the hot and cold inlet connections will have the rubber washer firmly in place. Connect the HOT inlet hose to the HOT water supply and the COLD inlet hose to indicate which side is cold and...

Complete Owners Guide English
Page 14
...grounded outlet. Plug the power cord into an outlet. WARNING ELECTRICAL SHOCK HAZARD Improper connection of the detergent dispenser housing. Run the washer through a complete cycle, checking for additional information. 2. Place these instructions in doubt as to ensure the power is in the ...reference. IMPORTANT Check to whether the appliance is properly grounded. NOTE A wiring diagram and technical data sheet are in a location near the washer for service. 6. 14 Installation 6. A snug hose fit can cause an electrical shock that may result in the enclosure package) to its ...
...grounded outlet. Plug the power cord into an outlet. WARNING ELECTRICAL SHOCK HAZARD Improper connection of the detergent dispenser housing. Run the washer through a complete cycle, checking for additional information. 2. Place these instructions in doubt as to ensure the power is in the ...reference. IMPORTANT Check to whether the appliance is properly grounded. NOTE A wiring diagram and technical data sheet are in a location near the washer for service. 6. 14 Installation 6. A snug hose fit can cause an electrical shock that may result in the enclosure package) to its ...

Complete Owners Guide English
Page 15
...: 1. Be sure you remove the wiring harness terminal cap. Protect flat work surface, such as top of the hinge plate dislocate from the washer until you have adequate swing area before servicing could result in personal injury or even death. Removing door assembly 1. x4 4. While supporting the door... door. 2. While supporting the door at the hinge, press firmly with the other hand until the locating pins on the back of washer or floor near washer, with a #2 square bit and plastic knife (or small, flat prying tool that won't damage paint). 3. Gather your tools - Be sure...
...: 1. Be sure you remove the wiring harness terminal cap. Protect flat work surface, such as top of the hinge plate dislocate from the washer until you have adequate swing area before servicing could result in personal injury or even death. Removing door assembly 1. x4 4. While supporting the door... door. 2. While supporting the door at the hinge, press firmly with the other hand until the locating pins on the back of washer or floor near washer, with a #2 square bit and plastic knife (or small, flat prying tool that won't damage paint). 3. Gather your tools - Be sure...

Complete Owners Guide English
Page 17
... door should not be able to snap the other locating pins into the hole that the scoop (wider section) of the door glass is in washer and close the door. two front screws first, then two side screws. 13 x4 Fine Thread 4 2 Reinstalling door assembly 1. See illustration, Step 1. 5. Plug in the...
... door should not be able to snap the other locating pins into the hole that the scoop (wider section) of the door glass is in washer and close the door. two front screws first, then two side screws. 13 x4 Fine Thread 4 2 Reinstalling door assembly 1. See illustration, Step 1. 5. Plug in the...

Complete Owners Guide English
Page 19
...; = Factory presets. = Non-modifiable presets. Controls and Settings 19 Settings chart - 300 series washer These temperature, spin speeds, soil levels and options are available with the following cycles: CYCLE SELECTIONS heavy duty normal delicates rinse & spin clean...
...; = Factory presets. = Non-modifiable presets. Controls and Settings 19 Settings chart - 300 series washer These temperature, spin speeds, soil levels and options are available with the following cycles: CYCLE SELECTIONS heavy duty normal delicates rinse & spin clean...

Complete Owners Guide English
Page 20
...; delay time chime control lock = Available selections. = Factory presets. = Non-modifiable presets. CYCLE OPTIONS 20 Controls and Settings Settings chart - 400 series washer These temperature, spin speeds, soil levels and options are available with the following cycles: CYCLE SELECTIONS heavy duty whitest whites normal delicates 20min fast wash...
...; delay time chime control lock = Available selections. = Factory presets. = Non-modifiable presets. CYCLE OPTIONS 20 Controls and Settings Settings chart - 400 series washer These temperature, spin speeds, soil levels and options are available with the following cycles: CYCLE SELECTIONS heavy duty whitest whites normal delicates 20min fast wash...

Complete Owners Guide English
Page 21
... ANY ITEMS IN DRUM DURING SYSTEM CLEAN CYCLE. CYCLE OPTIONS PODS® is a registered trademark of Procter & Gamble Company, Cincinnati OH, used under license by Electrolux. Controls and Settings 21 Settings chart - 500 series washer heavy duty whitest whites normal activewear colors delicates 18min fast wash rinse & spin clean...
... ANY ITEMS IN DRUM DURING SYSTEM CLEAN CYCLE. CYCLE OPTIONS PODS® is a registered trademark of Procter & Gamble Company, Cincinnati OH, used under license by Electrolux. Controls and Settings 21 Settings chart - 500 series washer heavy duty whitest whites normal activewear colors delicates 18min fast wash rinse & spin clean...

Complete Owners Guide English
Page 22
... duty whitest whites normal activewear colors delicates 15min fast wash rinse & spin clean washer NO OPTIONS AVAILABLE WITH THIS CYCLE. CYCLE OPTIONS PODS® is a registered trademark of Procter & Gamble Company, Cincinnati OH, used under license by Electrolux. These temperature, spin speeds, soil levels and options are available with the following cycles...
... duty whitest whites normal activewear colors delicates 15min fast wash rinse & spin clean washer NO OPTIONS AVAILABLE WITH THIS CYCLE. CYCLE OPTIONS PODS® is a registered trademark of Procter & Gamble Company, Cincinnati OH, used under license by Electrolux. These temperature, spin speeds, soil levels and options are available with the following cycles...

Complete Owners Guide English
Page 23
See Washer Settings Chart for default settings for detailed directions and descriptions of liquid chlorine bleach. See Cycle Settings and Cycle Options for each cycle. To stop .... rinse & spin Select rinse & spin for the cycle selected. Add the fabric softener to fiber content, colorfastness and soil level. clean washer To clean and freshen the washer, perform the clean washer cycle. If you wish to begin the cycle, empty the drum, add bleach and press start again. See Inside Routine Cleaning...
See Washer Settings Chart for default settings for detailed directions and descriptions of liquid chlorine bleach. See Cycle Settings and Cycle Options for each cycle. To stop .... rinse & spin Select rinse & spin for the cycle selected. Add the fabric softener to fiber content, colorfastness and soil level. clean washer To clean and freshen the washer, perform the clean washer cycle. If you wish to begin the cycle, empty the drum, add bleach and press start again. See Inside Routine Cleaning...


