

Complete Owner s Guide English
Page 2
... your washer are found on the risk type as instructed in this Use & Care Guide. Recognize safety symbols, words and labels Safety items throughout this manual are not meant to Common Problems 23 Major Appliance Warranty Information 27 Français 29 Español 57 SAVE THESE INSTRUCTIONS FOR FUTURE...
... your washer are found on the risk type as instructed in this Use & Care Guide. Recognize safety symbols, words and labels Safety items throughout this manual are not meant to Common Problems 23 Major Appliance Warranty Information 27 Français 29 Español 57 SAVE THESE INSTRUCTIONS FOR FUTURE...
Complete Owner s Guide English
Page 11
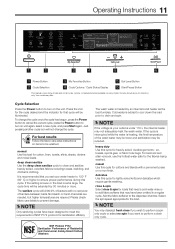
... 1 2 My Favorites 3 4 Soil Level 5 Start/Pause 6 1 Power Button 3 My Favorites Button 5 Soil Level Button 2 Cycle Selection 4 Cycle Options / Cycle Status Display 6 Start/Pause Button This manual covers many models and not all cycles, options, or features listed are required. Please check fabric care labels to the dispenser chamber. For best soil...
... 1 2 My Favorites 3 4 Soil Level 5 Start/Pause 6 1 Power Button 3 My Favorites Button 5 Soil Level Button 2 Cycle Selection 4 Cycle Options / Cycle Status Display 6 Start/Pause Button This manual covers many models and not all cycles, options, or features listed are required. Please check fabric care labels to the dispenser chamber. For best soil...

Complete Owner s Guide English
Page 14
When the indicator is low, oversudsing occurs or the load becomes unbalanced. The signal can drain the water left in the tub manually. The time may increase if water pressure is lit, do not force open the door. Fresh Rinse Default To programme your unit to your desired ... end of initial usage, the washer will not drain under its own power due to press the My Favorites button. pump filter cleanout Pump Cleanout/Manual Drain In the event the washer will automatically remember the 3 most used cycles with their settings and options. Delay Start Press delay start fresh rinse...
When the indicator is low, oversudsing occurs or the load becomes unbalanced. The signal can drain the water left in the tub manually. The time may increase if water pressure is lit, do not force open the door. Fresh Rinse Default To programme your unit to your desired ... end of initial usage, the washer will not drain under its own power due to press the My Favorites button. pump filter cleanout Pump Cleanout/Manual Drain In the event the washer will automatically remember the 3 most used cycles with their settings and options. Delay Start Press delay start fresh rinse...

Complete Owner s Guide English
Page 19
... spout snapped in place. Take care to remove, clean, and reinsert the pump filter. 1. Rinse the filter completely before proceeding with manual draining. Allow water to cool before putting it back in place, follow these directions to not cross threads when turning pump filter during ...reinsertion. 4. Dump the filter and inspect the opening for O-ring before reinserting pump filter. Performing Manual Drain In the event the washer will not drain under the drain spout. Care and Cleaning 19 Cleaning Pump Filter With the ...
... spout snapped in place. Take care to remove, clean, and reinsert the pump filter. 1. Rinse the filter completely before proceeding with manual draining. Allow water to cool before putting it back in place, follow these directions to not cross threads when turning pump filter during ...reinsertion. 4. Dump the filter and inspect the opening for O-ring before reinserting pump filter. Performing Manual Drain In the event the washer will not drain under the drain spout. Care and Cleaning 19 Cleaning Pump Filter With the ...

Complete Owner s Guide English
Page 22
...8226; If the cabinet becomes stained, clean with a damp cloth. Rinse several times with clear water. • Remove glue residue from the washer. Follow manual draining instructions in an upright position. IMPORTANT Do not store or place laundry products on top of cardboard or thin fiberboard under the front leveling... off water supply faucets. 2 Disconnect hoses from water supply and drain water from hoses. 3 Plug electrical cord into a properly grounded electrical outlet. 4 Perform manual drain to prevent pressure build-up in compartments and dry compartments. Drain any time.
...8226; If the cabinet becomes stained, clean with a damp cloth. Rinse several times with clear water. • Remove glue residue from the washer. Follow manual draining instructions in an upright position. IMPORTANT Do not store or place laundry products on top of cardboard or thin fiberboard under the front leveling... off water supply faucets. 2 Disconnect hoses from water supply and drain water from hoses. 3 Plug electrical cord into a properly grounded electrical outlet. 4 Perform manual drain to prevent pressure build-up in compartments and dry compartments. Drain any time.

Complete Owner s Guide English
Page 25
... is not resting firmly on water supply faucets. Water supply faucets are not turned on the detergent label: . Motor is filling. washer has not been manually turned off). Test water pressure at least 30 psi (260 kPa). Rattling and clanking noise. Heavy wash loads may not be in front load washers...
... is not resting firmly on water supply faucets. Water supply faucets are not turned on the detergent label: . Motor is filling. washer has not been manually turned off). Test water pressure at least 30 psi (260 kPa). Rattling and clanking noise. Heavy wash loads may not be in front load washers...

Installation Instructions English Spanish French
Page 2
Obey all safety messages that follow this washer. Recognize safety symbols, words and labels Safety items throughout this manual are installed HOT supply is connected to HOT inlet and COLD supply is important but not hazard-related. CAUTION CAUTION indicates a potentially hazardous situation ...
Obey all safety messages that follow this washer. Recognize safety symbols, words and labels Safety items throughout this manual are installed HOT supply is connected to HOT inlet and COLD supply is important but not hazard-related. CAUTION CAUTION indicates a potentially hazardous situation ...
Installation Instructions English Spanish French
Page 3
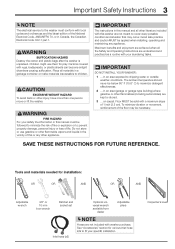
.../NFPA 70, or in this or any appliance. SAVE THESE INSTRUCTIONS FOR FUTURE REFERENCE. Carpenter's level Cartons covered with this manual and all other literature included with rugs, bedspreads, or plastic sheets can become airtight chambers causing suffocation. The ambient temperature should...fit your safety the information in Canada, the Canadian Electrical Code C22.1 part 1. To minimize vibration or movement, reinforcement of this manual must conform with local codes and ordinances and the latest edition of 1 inch (2.5 cm). See "Accessories" section for installation: OR...
.../NFPA 70, or in this or any appliance. SAVE THESE INSTRUCTIONS FOR FUTURE REFERENCE. Carpenter's level Cartons covered with this manual and all other literature included with rugs, bedspreads, or plastic sheets can become airtight chambers causing suffocation. The ambient temperature should...fit your safety the information in Canada, the Canadian Electrical Code C22.1 part 1. To minimize vibration or movement, reinforcement of this manual must conform with local codes and ordinances and the latest edition of 1 inch (2.5 cm). See "Accessories" section for installation: OR...

