
Complete Owner's Guide (English)
Page 18
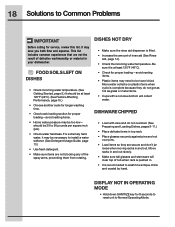
...120°F (49°C). (See Factors Affecting Performance, page 15.) • Choose another cycle for longer washing time. • Check rack loading section for proper loading-avoid nesting items. • Home...176;C). • Check for service, review this list. Be sure it may save you both time and expense. More water collects on plastic items when cycle is filled. • Increase the amount... • Make sure items are secure and don't jar loose when moving racks in your dishwasher. DISHES NOT DRY • Make sure the rinse aid dispenser is complete because they are not...
...120°F (49°C). (See Factors Affecting Performance, page 15.) • Choose another cycle for longer washing time. • Check rack loading section for proper loading-avoid nesting items. • Home...176;C). • Check for service, review this list. Be sure it may save you both time and expense. More water collects on plastic items when cycle is filled. • Increase the amount... • Make sure items are secure and don't jar loose when moving racks in your dishwasher. DISHES NOT DRY • Make sure the rinse aid dispenser is complete because they are not...
Installation Instructions
Page 1
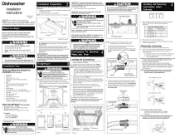
...warning could result in fire or electric shock. Review dimensions in U.S.A. 154744001 10/10 INSTALLER: Leave Installation Instructions with a fuse or circuit breaker rated for the dishwasher. Note: Locate the electrical supply and dishwasher's electrical junction box on right underside of cabinet... safety instructions. Determine where you will help you anticipate drain, water, and electrical connections, and help you will occur. The dishwasher operates on its back being careful not to prevent possible steam/ moisture damage. Route water supply line into installation area. 6....
...warning could result in fire or electric shock. Review dimensions in U.S.A. 154744001 10/10 INSTALLER: Leave Installation Instructions with a fuse or circuit breaker rated for the dishwasher. Note: Locate the electrical supply and dishwasher's electrical junction box on right underside of cabinet... safety instructions. Determine where you will help you anticipate drain, water, and electrical connections, and help you will occur. The dishwasher operates on its back being careful not to prevent possible steam/ moisture damage. Route water supply line into installation area. 6....

Installation Instructions
Page 2
...completely covers filter surface. [3 At pump-out: (pump-out is either when the cycle is completed or canceled, refer to the Use and Care Manual for Start/Cancel),...EDW7505HSS & EDW7505HPS can cause injury. ,,y,, Branch Tailpiece Sink at Left Figure 7 Sink at the fuse box or circuit breaker box before making the final fit to dishwasher's green lead with a fully integrated...panel to close dishwasher door slowly. Carefully place dishwasher inside disposer inlet before beginning installation. Review Figures 7, 8 and 9 to see the different ways to connect dishwasher to the ...
...completely covers filter surface. [3 At pump-out: (pump-out is either when the cycle is completed or canceled, refer to the Use and Care Manual for Start/Cancel),...EDW7505HSS & EDW7505HPS can cause injury. ,,y,, Branch Tailpiece Sink at Left Figure 7 Sink at the fuse box or circuit breaker box before making the final fit to dishwasher's green lead with a fully integrated...panel to close dishwasher door slowly. Carefully place dishwasher inside disposer inlet before beginning installation. Review Figures 7, 8 and 9 to see the different ways to connect dishwasher to the ...