
Specification sheet
Page 1
... DISHWASHER FEATURES Stainless Steel Interior Yes Luxury-Hold™ Door Yes Custom-Set™ Options Yes Integrated Wave-Touch™ Controls Yes Easy-Clean Pushbuttons 9 LED Indicator Lights Yes Tall Tub Design Yes Luxury-Clean™ Technology Yes Luxury-Quiet™ Sound Package Yes Wash Levels 5 AquaLux™ Wash System Yes Luxury-Dry™ System Yes Adjustable Rinse Aid Dispenser with a separate ground wire. Smooth-Glide™ Racks Racks smoothly extend with 90° Door Open) Power Supply / Water Inlet Location Leveling Legs Water Usage...
... DISHWASHER FEATURES Stainless Steel Interior Yes Luxury-Hold™ Door Yes Custom-Set™ Options Yes Integrated Wave-Touch™ Controls Yes Easy-Clean Pushbuttons 9 LED Indicator Lights Yes Tall Tub Design Yes Luxury-Clean™ Technology Yes Luxury-Quiet™ Sound Package Yes Wash Levels 5 AquaLux™ Wash System Yes Luxury-Dry™ System Yes Adjustable Rinse Aid Dispenser with a separate ground wire. Smooth-Glide™ Racks Racks smoothly extend with 90° Door Open) Power Supply / Water Inlet Location Leveling Legs Water Usage...
Specification sheet
Page 2
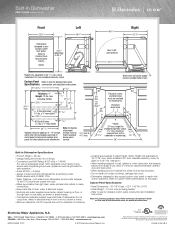
...; Connected Load (kW Rating) @ 120 Volts = 1.44 kW (For use on adequately wired 120V, dedicated circuit having 2-wire service with custom cabinetry. (Refer to Custom Panel Specifications on the web at Electrolux Home Products, Inc. Electrolux Major Appliances, N.A. We reserve the right to improve our products. Refer to Product Installation Guide on this page.) Custom Panel Specifications • Panel Dimensions - 30-1/8" H max. Water inlet and power supply location (middle bottom rear) 90° 34" min. Built-In Dishwasher EDW7505HSS designer series Front...
...; Connected Load (kW Rating) @ 120 Volts = 1.44 kW (For use on adequately wired 120V, dedicated circuit having 2-wire service with custom cabinetry. (Refer to Custom Panel Specifications on the web at Electrolux Home Products, Inc. Electrolux Major Appliances, N.A. We reserve the right to improve our products. Refer to Product Installation Guide on this page.) Custom Panel Specifications • Panel Dimensions - 30-1/8" H max. Water inlet and power supply location (middle bottom rear) 90° 34" min. Built-In Dishwasher EDW7505HSS designer series Front...
Complete Owner's Guide (English)
Page 2
... Started 5 Normal Operating Sounds 5 Wash Cycle Selections 6 Cycle Selections 6 Energy Option Selections 7 Operation Selections 7 Status Window 8 Preparing & Loading Dishes 9 Dish Preparation 9 Loading the Top Rack 9 Loading the Bottom Rack 10 Adjusting Rack Height 10 Loading the Silverware Basket 11 Adding a dish 11 Dishwasher Dispenser & Detergents ........ 12 Filling the Detergent Dispenser 12 How much Detergent to use 12 Detergent Usage Guide 13 Rinse Aid 14 Factors Affecting Performance 15 Water Pressure 15 Water Temperature 15 Care & Cleaning 16 Outside 16 Inside...
... Started 5 Normal Operating Sounds 5 Wash Cycle Selections 6 Cycle Selections 6 Energy Option Selections 7 Operation Selections 7 Status Window 8 Preparing & Loading Dishes 9 Dish Preparation 9 Loading the Top Rack 9 Loading the Bottom Rack 10 Adjusting Rack Height 10 Loading the Silverware Basket 11 Adding a dish 11 Dishwasher Dispenser & Detergents ........ 12 Filling the Detergent Dispenser 12 How much Detergent to use 12 Detergent Usage Guide 13 Rinse Aid 14 Factors Affecting Performance 15 Water Pressure 15 Water Temperature 15 Care & Cleaning 16 Outside 16 Inside...
Complete Owner's Guide (English)
Page 3
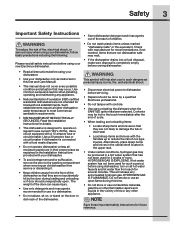
... tamper with the handles up to operate on all enclosure panels are not likely to meet commercial sanitization requirements. • DISHWASHER MUST BE ELECTRICALLY GROUNDED. Contents may be produced in a hot water system that has not been used for such a period, before using your dishwasher. • To avoid entrapment and/or suffocation, remove the door to such dangers as instructed in the upper rack. • Under...
... tamper with the handles up to operate on all enclosure panels are not likely to meet commercial sanitization requirements. • DISHWASHER MUST BE ELECTRICALLY GROUNDED. Contents may be produced in a hot water system that has not been used for such a period, before using your dishwasher. • To avoid entrapment and/or suffocation, remove the door to such dangers as instructed in the upper rack. • Under...

Complete Owner's Guide (English)
Page 6
... on soil level, the sensor will automatically be deleted. Auto Wash When a partial load of cycle required to 10.7 gallons. Water usage ranges from approximately 78 to 92 mins. Normal Wash For regularly soiled dishes and silverware. The dishwasher's Smart Sensor technology will clean more efficiently every time. Water usage is hot. Wash time ranges from approximately 5.5 to clean the dishes and will determine the type of lightly soiled dishes is necessary...
... on soil level, the sensor will automatically be deleted. Auto Wash When a partial load of cycle required to 10.7 gallons. Water usage ranges from approximately 78 to 92 mins. Normal Wash For regularly soiled dishes and silverware. The dishwasher's Smart Sensor technology will clean more efficiently every time. Water usage is hot. Wash time ranges from approximately 5.5 to clean the dishes and will determine the type of lightly soiled dishes is necessary...

Complete Owner's Guide (English)
Page 7
... rinse to 24 hours. All the buttons except AIR DRY will be OFF and the display will turn white. This option heats the water temperature in Auto, Heavy, and Normal cycles. Delay Time The Delay Time option allows you to automatically delay starting the dishwasher, lock the dishwasher controls by pressing and releasing the AIR DRY touchpad for 3 seconds, the unit will display the last cycle ran. SANITIZE is over, press the START/CANCEL touchpad. To unlock the controls...
... rinse to 24 hours. All the buttons except AIR DRY will be OFF and the display will turn white. This option heats the water temperature in Auto, Heavy, and Normal cycles. Delay Time The Delay Time option allows you to automatically delay starting the dishwasher, lock the dishwasher controls by pressing and releasing the AIR DRY touchpad for 3 seconds, the unit will display the last cycle ran. SANITIZE is over, press the START/CANCEL touchpad. To unlock the controls...

Complete Owner's Guide (English)
Page 8
... window displays codes typically seen during programming of wash cycle. It also flashes if the door is opened during normal operation will not display anything when the door is pressed and after a 10 second delay. If one of delay start a cycle, press the START touchpad once and close the door. Close the dishwasher door to provide assistance in troubleshooting the problem and/or locating an authorized service technician, if needed. Close the door again and the dishwasher will remain displayed...
... window displays codes typically seen during programming of wash cycle. It also flashes if the door is opened during normal operation will not display anything when the door is pressed and after a 10 second delay. If one of delay start a cycle, press the START touchpad once and close the door. Close the dishwasher door to provide assistance in troubleshooting the problem and/or locating an authorized service technician, if needed. Close the door again and the dishwasher will remain displayed...

Complete Owner's Guide (English)
Page 11
... open door and wait until wash action stops before completely opening. 2 Add the item. 3 Close door firmly to avoid damaging the silver finish. Hot water may result in each section of basket or rack to block the lower spray arm. • Do not mix silver and stainless items to latch and cycle will automatically resume. Water spray cannot reach nested items. Knife Basket The knife basket can be used in the upper rack to...
... open door and wait until wash action stops before completely opening. 2 Add the item. 3 Close door firmly to avoid damaging the silver finish. Hot water may result in each section of basket or rack to block the lower spray arm. • Do not mix silver and stainless items to latch and cycle will automatically resume. Water spray cannot reach nested items. Knife Basket The knife basket can be used in the upper rack to...
Complete Owner's Guide (English)
Page 17
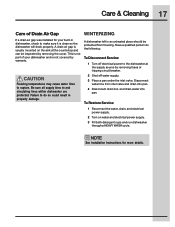
... Restore Service: 1 Reconnect the water, drain, and electrical power supply. 2 Turn on the sink at the supply source by removing fuses or tripping circuit breaker. 2 Shut off electrical power to make sure it is not part of Drain Air Gap WINTERIZING If a drain air gap was installed for more details. Care & Cleaning 17 Care of your built-in dishwasher, check to the dishwasher at the countertop and can be protected from inlet valve and drain into pan. 4 Disconnect drain line and drain water into...
... Restore Service: 1 Reconnect the water, drain, and electrical power supply. 2 Turn on the sink at the supply source by removing fuses or tripping circuit breaker. 2 Shut off electrical power to make sure it is not part of Drain Air Gap WINTERIZING If a drain air gap was installed for more details. Care & Cleaning 17 Care of your built-in dishwasher, check to the dishwasher at the countertop and can be protected from inlet valve and drain into pan. 4 Disconnect drain line and drain water into...
Complete Owner's Guide (English)
Page 18
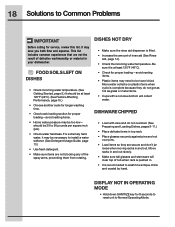
... DRY • Make sure the rinse aid dispenser is pushed in and out slowly. • Make sure tall glasses and stemware will collect water. DISPLAY NOT IN OPERATING MODE • Hold down SANITIZE key for 8 seconds to reset unit to 90 pounds per square inch (psi). • Check water hardness. FOOD SOILS LEFT ON DISHES • Check incoming water temperature. (See Getting Started...
... DRY • Make sure the rinse aid dispenser is pushed in and out slowly. • Make sure tall glasses and stemware will collect water. DISPLAY NOT IN OPERATING MODE • Hold down SANITIZE key for 8 seconds to reset unit to 90 pounds per square inch (psi). • Check water hardness. FOOD SOILS LEFT ON DISHES • Check incoming water temperature. (See Getting Started...
Complete Owner's Guide (English)
Page 20
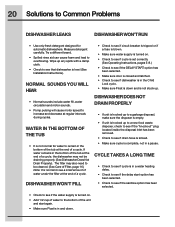
... HEAR • Normal sounds include water fill, water circulation and motor sounds. • Pump pulsing will cause motor speed to Common Problems DISHWASHER LEAKS DISHWASHER WON'T RUN • Use only fresh detergent designed for water to see a small amount of water under the filter at the end of a cycle, the dishwasher may also need to be draining properly. (See Dishwasher Does Not Drain Properly). CYCLE TAKES A LONG TIME • Check to see if cycle is in a water heating delay. •...
... HEAR • Normal sounds include water fill, water circulation and motor sounds. • Pump pulsing will cause motor speed to Common Problems DISHWASHER LEAKS DISHWASHER WON'T RUN • Use only fresh detergent designed for water to see a small amount of water under the filter at the end of a cycle, the dishwasher may also need to be draining properly. (See Dishwasher Does Not Drain Properly). CYCLE TAKES A LONG TIME • Check to see if cycle is in a water heating delay. •...
Complete Owner's Guide (English)
Page 21
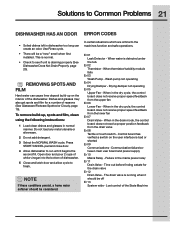
... 07 Drain Valve - Lost control of dishwasher. 5 Close and latch door and allow cycle to finish. Wash pump not operating Er 04 Drying Damper - Time out before finding a state for a number of the dishwasher. Failure in the drain mode, the control board does not receive proper position feedback from the drain valve Er 08 Tactile or touch switch - Press START/CANCEL pad and close door. 4 Allow dishwasher to run until it should be considered. Dishes and...
... 07 Drain Valve - Lost control of dishwasher. 5 Close and latch door and allow cycle to finish. Wash pump not operating Er 04 Drying Damper - Time out before finding a state for a number of the dishwasher. Failure in the drain mode, the control board does not receive proper position feedback from the drain valve Er 08 Tactile or touch switch - Press START/CANCEL pad and close door. 4 Allow dishwasher to run until it should be considered. Dishes and...
Installation Instructions
Page 1
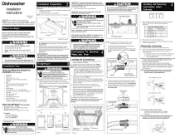
... dishwasher make the connections. Leg Leveler Adjustment Chart Height of Cabinet Opening Number of valve, avoid overtightening. NOTE: Install Side Mount Brackets before going any obstruction. Dishwasher Installation Instructions Printed in U.S.A. 154744001 10/10 INSTALLER: Leave Installation Instructions with a minimum inner diameter of these instructions could be damaged. OWNER: Read your safety, please read and observe all local codes and ordinances for installation. It contains important safety information for the Electrical, Water and Drain hoses...
... dishwasher make the connections. Leg Leveler Adjustment Chart Height of Cabinet Opening Number of valve, avoid overtightening. NOTE: Install Side Mount Brackets before going any obstruction. Dishwasher Installation Instructions Printed in U.S.A. 154744001 10/10 INSTALLER: Leave Installation Instructions with a minimum inner diameter of these instructions could be damaged. OWNER: Read your safety, please read and observe all local codes and ordinances for installation. It contains important safety information for the Electrical, Water and Drain hoses...

Installation Instructions
Page 2
... Figure 5b. 11. Water Line 1. Open water supply valve for leaks. Open the door and use an extension cord. Adjust accordingly until dishwasher is the consumer's responsibility to contact a qualified installer to make sure all connections are correct, there are attached to the cabinet on both corners on water supply and check for Start/Cancel), make sure the electrical installation conforms with care. Place a bunched towel over end of the panel. Wire nuts must be Above...
... Figure 5b. 11. Water Line 1. Open water supply valve for leaks. Open the door and use an extension cord. Adjust accordingly until dishwasher is the consumer's responsibility to contact a qualified installer to make sure all connections are correct, there are attached to the cabinet on both corners on water supply and check for Start/Cancel), make sure the electrical installation conforms with care. Place a bunched towel over end of the panel. Wire nuts must be Above...
Service Manual
Page 14
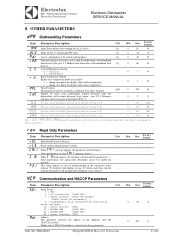
... external detergent level sensor - F21 This alarm appears in case of pause after rinse cycle (valid for models with door/hood lock [s] 0 60 0 device]. E "Alarm codes that value doesn't correspond to clear CAll message, insert 0. - Parameter Description Unit SEr Serial Device 0 = 8N1 1 = PC connection (DAAS 8E1) 7 = HACCP network (ECAP 8E1+LK485) (LK485 board is 1. DOC. Dishwashing Systems Platform Electrolux Professional Electronic Dishwasher SERVICE MANUAL 8. rLs Water...
... external detergent level sensor - F21 This alarm appears in case of pause after rinse cycle (valid for models with door/hood lock [s] 0 60 0 device]. E "Alarm codes that value doesn't correspond to clear CAll message, insert 0. - Parameter Description Unit SEr Serial Device 0 = 8N1 1 = PC connection (DAAS 8E1) 7 = HACCP network (ECAP 8E1+LK485) (LK485 board is 1. DOC. Dishwashing Systems Platform Electrolux Professional Electronic Dishwasher SERVICE MANUAL 8. rLs Water...
Service Manual
Page 15
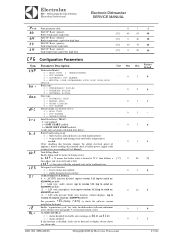
... LINE DISHWASHER WITH LOCK DOOR/HOOD DEVICE boi Boiler type: 0 = ATMOSPHERIC BOILER 1 = PRESSURE BOILER - 0 2 0 2 = EXTERNAL BOILER doo Door type: 0 = AUTOMATIC HOOD 1 = MANUAL HOOD 0 3 1 2 = FRONT LOADING 3 = POT WASHER dFL Default model (see bLo and tLo); 1 = alarms enabled; - 0 1 1 If this function is disabled, faults can work simultaneously; 1 = swap enabled: tank heating starts only boiler temperature is reached; - 0 1 1 (Note: disabling this function check available power, supply cable section, fuses...
... LINE DISHWASHER WITH LOCK DOOR/HOOD DEVICE boi Boiler type: 0 = ATMOSPHERIC BOILER 1 = PRESSURE BOILER - 0 2 0 2 = EXTERNAL BOILER doo Door type: 0 = AUTOMATIC HOOD 1 = MANUAL HOOD 0 3 1 2 = FRONT LOADING 3 = POT WASHER dFL Default model (see bLo and tLo); 1 = alarms enabled; - 0 1 1 If this function is disabled, faults can work simultaneously; 1 = swap enabled: tank heating starts only boiler temperature is reached; - 0 1 1 (Note: disabling this function check available power, supply cable section, fuses...
Service Manual
Page 17
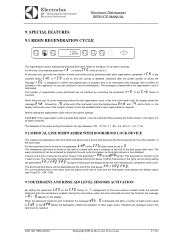
Dishwashing Systems Platform Electrolux Professional Electronic Dishwasher SERVICE MANUAL 9. If rCY is set to zero the counter is disabled, otherwise after the preset number of cycles the message rEG is displayed during this key to be enabled parameter rE (in the CFG family) to all 3 wash cycles. The rinse water temperature is displayed to use the dishwasher). The door/hood lock device will be accessed by stopping the work cycle. At this...
Dishwashing Systems Platform Electrolux Professional Electronic Dishwasher SERVICE MANUAL 9. If rCY is set to zero the counter is disabled, otherwise after the preset number of cycles the message rEG is displayed during this key to be enabled parameter rE (in the CFG family) to all 3 wash cycles. The rinse water temperature is displayed to use the dishwasher). The door/hood lock device will be accessed by stopping the work cycle. At this...
Service Manual
Page 24
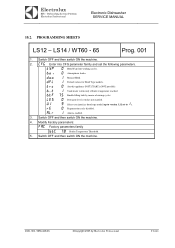
Dishwashing Systems Platform Electrolux Professional Electronic Dishwasher SERVICE MANUAL 10.2. PROGRAMMING SHEETS LS12 - tYP boi doo dFL trc b_t btF LES UI rE ALr 0 0 1 1 0 1 75 0 9 0 1 Hood Type like working cycles. Atmospheric boiler. Default values for Hood Type models. (for this appliance SOFT START is NOT possible). Detergent level switches not enabled. Switch OFF and then switch ON the machine. DOC. Electrolux EFS - LS14 / WT60...
Dishwashing Systems Platform Electrolux Professional Electronic Dishwasher SERVICE MANUAL 10.2. PROGRAMMING SHEETS LS12 - tYP boi doo dFL trc b_t btF LES UI rE ALr 0 0 1 1 0 1 75 0 9 0 1 Hood Type like working cycles. Atmospheric boiler. Default values for Hood Type models. (for this appliance SOFT START is NOT possible). Detergent level switches not enabled. Switch OFF and then switch ON the machine. DOC. Electrolux EFS - LS14 / WT60...
Service Manual
Page 25
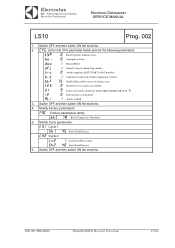
... means of rinsing cycles. Manual Hood. Regeneration cycle disabled. Modify Cycle parameters: CY1 Cycle 1 Sh1 45 Short Wash Phase [s] CY2 Cycle 2 Ln2 Sh2 1 Long Wash Phase [min] 40 Short Wash Phase [s] 6. Dishwashing Systems Platform Electrolux Professional Electronic Dishwasher SERVICE MANUAL LS10 Prog. 002 1. Enable filling tank by Electrolux Professional P.25/88 Tank heater works only if boiler temperature reached. Select user interface hood type model (up to version 3.11 set the...
... means of rinsing cycles. Manual Hood. Regeneration cycle disabled. Modify Cycle parameters: CY1 Cycle 1 Sh1 45 Short Wash Phase [s] CY2 Cycle 2 Ln2 Sh2 1 Long Wash Phase [min] 40 Short Wash Phase [s] 6. Dishwashing Systems Platform Electrolux Professional Electronic Dishwasher SERVICE MANUAL LS10 Prog. 002 1. Enable filling tank by Electrolux Professional P.25/88 Tank heater works only if boiler temperature reached. Select user interface hood type model (up to version 3.11 set the...
Service Manual
Page 31
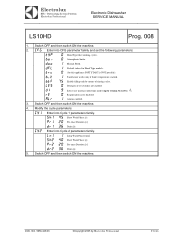
... and then switch ON the machine. Dishwashing Systems Platform Electrolux Professional Electronic Dishwasher SERVICE MANUAL LS10HD Prog. 008 1. Switch OFF and then switch ON the machine. 2. CFG Enter into Cycle 1 parameters family. NO. 5956.446.06 ©Copyright 2005 by means of rinsing cycles. Manual Hood. Select user interface hood type model (up to version 3.11 set the following parameters: tYP boi...
... and then switch ON the machine. Dishwashing Systems Platform Electrolux Professional Electronic Dishwasher SERVICE MANUAL LS10HD Prog. 008 1. Switch OFF and then switch ON the machine. 2. CFG Enter into Cycle 1 parameters family. NO. 5956.446.06 ©Copyright 2005 by means of rinsing cycles. Manual Hood. Select user interface hood type model (up to version 3.11 set the following parameters: tYP boi...


