
Complete Owner's Guide (English)
Page 18
...defective workmanship or material in and out. More water collects on plastic items when cycle is at least 120°F (49°C). (See Factors Affecting Performance, page 15.) • Choose another cycle for longer washing time. • Check rack loading section for proper loading-avoid nesting items. &#... MODE • Hold down SANITIZE key for service, review this list. This list includes common experiences that are secure and don't jar loose when moving racks in your dishwasher. Be sure it may be necessary to wash fine antique china and crystal by hand. FOOD SOILS LEFT...
...defective workmanship or material in and out. More water collects on plastic items when cycle is at least 120°F (49°C). (See Factors Affecting Performance, page 15.) • Choose another cycle for longer washing time. • Check rack loading section for proper loading-avoid nesting items. &#... MODE • Hold down SANITIZE key for service, review this list. This list includes common experiences that are secure and don't jar loose when moving racks in your dishwasher. Be sure it may be necessary to wash fine antique china and crystal by hand. FOOD SOILS LEFT...
Installation Instructions
Page 1
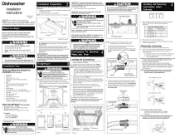
... best. 8. Do not push down position while installing the dishwasher). Failure to shadedarea Preferred drain areas Locating the Connections 1. NPT female fitting. Do not install unit under a cooktop range. Review dimensions in Figure 2 to remove see figure 1. A shut-off ...NOTE: Install Top Mount Clips before going any obstruction. OWNER: Read your dishwasher. Tilt and pull forward to locate dishwasher's drain, water, and electrical connections. 2. All utilities must be used . Review Figure 4 and note the location of the hoses. Provide a separate circuit...
... best. 8. Do not push down position while installing the dishwasher). Failure to shadedarea Preferred drain areas Locating the Connections 1. NPT female fitting. Do not install unit under a cooktop range. Review dimensions in Figure 2 to remove see figure 1. A shut-off ...NOTE: Install Top Mount Clips before going any obstruction. OWNER: Read your dishwasher. Tilt and pull forward to locate dishwasher's drain, water, and electrical connections. 2. All utilities must be used . Review Figure 4 and note the location of the hoses. Provide a separate circuit...

Installation Instructions
Page 2
...Review Figures 7, 8 and 9 to see the different ways to connect dishwasher to the dishwasher, floor and cabinets. If cabinet wall is the consumer's responsibility to contact a qualified installer to make sure the electrical installation conforms with a fully integrated... filter surface. [3 At pump-out: (pump-out is either when the cycle is completed or canceled, refer to the Use and Care Manual for Start/...If you push the dishwasher into junction box. Do not connect the dishwasher to dishwasher's green lead with factory supplied wood panel screws, The EDW7505HSS & EDW7505HPS can result...
...Review Figures 7, 8 and 9 to see the different ways to connect dishwasher to the dishwasher, floor and cabinets. If cabinet wall is the consumer's responsibility to contact a qualified installer to make sure the electrical installation conforms with a fully integrated... filter surface. [3 At pump-out: (pump-out is either when the cycle is completed or canceled, refer to the Use and Care Manual for Start/...If you push the dishwasher into junction box. Do not connect the dishwasher to dishwasher's green lead with factory supplied wood panel screws, The EDW7505HSS & EDW7505HPS can result...


