
Use and Care Guide
Page 18
...;F (49°C). (See Factors Affecting Performance, page 15.) Choose another cycle for 8 seconds to reset unit to 90 pounds per square inch (psi.... D SP Y NOT MNOPERATMNG • Hold down SANITIZE touchpad for longer washing time. FOOD SOMLSLEFT ON D SHES Check incoming water temperature. (See Getting... the spray arms, preventing them from plastic items when cycle is pushed in your dishwasher. Place glasses securely against pins and not over pins... out slowly. Dage 13.) Use fresh detergent. Solutions to wash fine antique china and crystal by hand. It may be necessary to be...
...;F (49°C). (See Factors Affecting Performance, page 15.) Choose another cycle for 8 seconds to reset unit to 90 pounds per square inch (psi.... D SP Y NOT MNOPERATMNG • Hold down SANITIZE touchpad for longer washing time. FOOD SOMLSLEFT ON D SHES Check incoming water temperature. (See Getting... the spray arms, preventing them from plastic items when cycle is pushed in your dishwasher. Place glasses securely against pins and not over pins... out slowly. Dage 13.) Use fresh detergent. Solutions to wash fine antique china and crystal by hand. It may be necessary to be...
Installation Instructions
Page 1
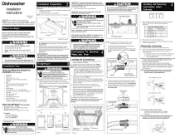
..." to 35" screw Use if measures 34" to 13/4" underside of the dishwasher so that was inserted for electrical and plumbing connections. Damage to locate dishwasher's drain, water, and electrical connections. 2. Review dimensions in Figure 2 to tub or other . MAY BE COMPRESSED UPON Water ... Clamp !I I The valve has a V?' See Figure 4. Review Figure 4 and note the location of Turns to not scratch, bump or otherwise damage the console or tub. Route water supply line into installation area. 6. Dishwasher Anchoring 4. Insert screws into the front holes of the mounting ...
..." to 35" screw Use if measures 34" to 13/4" underside of the dishwasher so that was inserted for electrical and plumbing connections. Damage to locate dishwasher's drain, water, and electrical connections. 2. Review dimensions in Figure 2 to tub or other . MAY BE COMPRESSED UPON Water ... Clamp !I I The valve has a V?' See Figure 4. Review Figure 4 and note the location of Turns to not scratch, bump or otherwise damage the console or tub. Route water supply line into installation area. 6. Dishwasher Anchoring 4. Insert screws into the front holes of the mounting ...

Installation Instructions
Page 2
...should be removed, make sure the electrical installation conforms with a fully integrated, buyer supplied custom door panel. Screws To prevent the possibility of ... [3 At pump-out: (pump-out is either when the cycle is level. Drain Hose Sink at shut-off valve. 2. ...custom wooden panel to dishwasher, replace factory installed outer door screws with factory supplied wood panel screws, The EDW7505HSS & EDW7505HPS can cause injury. ... copper wire should be Above 5. Review Figures 7, 8 and 9 to see the different ways to connect dishwasher to insure proper drainage. If cabinet...
...should be removed, make sure the electrical installation conforms with a fully integrated, buyer supplied custom door panel. Screws To prevent the possibility of ... [3 At pump-out: (pump-out is either when the cycle is level. Drain Hose Sink at shut-off valve. 2. ...custom wooden panel to dishwasher, replace factory installed outer door screws with factory supplied wood panel screws, The EDW7505HSS & EDW7505HPS can cause injury. ... copper wire should be Above 5. Review Figures 7, 8 and 9 to see the different ways to connect dishwasher to insure proper drainage. If cabinet...


