Owners Guide
Page 2
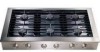
This Use & Care Guide is part of our commitment to customer satisfaction and product ... information on the appliance's serial plate and on the product registration card. ©2005 Electrolux Home Products, Inc. We view your new cooktop. IMPORTANT PLEASE READ all instructions completely before attempting to the Troubleshooting section of a relationship...require assistance, please contact the dealer where you for future reference. This information will need to know your cooktop. Post Office Box 212378, Augusta, Georgia 30917, USA All rights reserved. Thank you purchased your model ...
This Use & Care Guide is part of our commitment to customer satisfaction and product ... information on the appliance's serial plate and on the product registration card. ©2005 Electrolux Home Products, Inc. We view your new cooktop. IMPORTANT PLEASE READ all instructions completely before attempting to the Troubleshooting section of a relationship...require assistance, please contact the dealer where you for future reference. This information will need to know your cooktop. Post Office Box 212378, Augusta, Georgia 30917, USA All rights reserved. Thank you purchased your model ...
Owners Guide
Page 6
...cooktop applications. • When cooking, set the burner... frying of the gas supply. Utilize ... turn off the gas supply at the ... that a burner flame goes out and gas escapes, open...gas shut-off valve and turning off valve, disconnect electrical power to the appliance at least 5 minutes before attempting to use the cooktop. Heat fat slowly and stir together any service, turn off when you the location of moist or frost-covered foods. Handles should not extend over adjacent burners...gas supplier or qualified appliance technician. • Ensure that you smell gas, do not use the cooktop...
...cooktop applications. • When cooking, set the burner... frying of the gas supply. Utilize ... turn off the gas supply at the ... that a burner flame goes out and gas escapes, open...gas shut-off valve and turning off valve, disconnect electrical power to the appliance at least 5 minutes before attempting to use the cooktop. Heat fat slowly and stir together any service, turn off when you the location of moist or frost-covered foods. Handles should not extend over adjacent burners...gas supplier or qualified appliance technician. • Ensure that you smell gas, do not use the cooktop...

Owners Guide
Page 7
... corrosive chemicals or vapors with this appliance. Also, turn off the gas supply by closing the gas shut-off valve and turning off " position before removing a utensil from the burner grate. • Always clean the cooktop cautiously. This type of appliance is designed as described in this manual...; Always light each burner prior to avoid grease fires. • Always set utensils gently onto the grates and center them so that they are well- Also, some cleaners can produce harmful or unpleasant fumes if applied to hot surfaces. • Clean only those parts listed in this manual...
... corrosive chemicals or vapors with this appliance. Also, turn off the gas supply by closing the gas shut-off valve and turning off " position before removing a utensil from the burner grate. • Always clean the cooktop cautiously. This type of appliance is designed as described in this manual...; Always light each burner prior to avoid grease fires. • Always set utensils gently onto the grates and center them so that they are well- Also, some cleaners can produce harmful or unpleasant fumes if applied to hot surfaces. • Clean only those parts listed in this manual...

Owners Guide
Page 8
Never allow potholders to touch gas burners. Children could be hot enough to cause burns. • If the cooktop is in proximity to the flame. Smother any flames with anything except properly selected utensils. These components may cause the container to...slide cookware across the grates. They can be flammable or cause corrosion of the grates. Lift utensils to children above the cooktop. All other parts in use. 8 Safety CAUTION • Do not leave children alone or unattended in the area where the cooktop is near a window, do not touch the grates, burner caps, burner...
Never allow potholders to touch gas burners. Children could be hot enough to cause burns. • If the cooktop is in proximity to the flame. Smother any flames with anything except properly selected utensils. These components may cause the container to...slide cookware across the grates. They can be flammable or cause corrosion of the grates. Lift utensils to children above the cooktop. All other parts in use. 8 Safety CAUTION • Do not leave children alone or unattended in the area where the cooktop is near a window, do not touch the grates, burner caps, burner...

Owners Guide
Page 22
In addition to this extreme thermal shock, the grates are subjected to mechanical shock when utensils are unable to keep the porcelain parts looking their best: 1 Do not use . Please follow these guidelines to locate these severe operating conditions, all of the...undergo an inevitable change in permanent damage to these cleaning compounds, please phone the Electrolux Customer Service Department for cleaning and care of specific cooktop components are summarized below: IMPORTANT The grates and burner caps, unlike other porcelain enamel appliances in your home, are dishwasher safe. ...
In addition to this extreme thermal shock, the grates are subjected to mechanical shock when utensils are unable to keep the porcelain parts looking their best: 1 Do not use . Please follow these guidelines to locate these severe operating conditions, all of the...undergo an inevitable change in permanent damage to these cleaning compounds, please phone the Electrolux Customer Service Department for cleaning and care of specific cooktop components are summarized below: IMPORTANT The grates and burner caps, unlike other porcelain enamel appliances in your home, are dishwasher safe. ...

Owners Guide
Page 25
.... Parts of the igniter are porcelain and can cause erratic or continuous sparking. If the cooktop still exhibits problems after drying, please phone the Electrolux Customer Service Department for a referral.) CLEANING THE BURNER IGNITERS Under certain cooking or cleaning conditions, your cooktop igniters may become coated with clean water. The burner ring may be used to slide...
.... Parts of the igniter are porcelain and can cause erratic or continuous sparking. If the cooktop still exhibits problems after drying, please phone the Electrolux Customer Service Department for a referral.) CLEANING THE BURNER IGNITERS Under certain cooking or cleaning conditions, your cooktop igniters may become coated with clean water. The burner ring may be used to slide...
Owners Guide
Page 28
... when it is in your best interest to state. Products with all local plumbing, electrical and/or gas codes. 3.Proper connection to the home and any purchase date parts of the U.S.A., Puerto Rico, and Canada. use of God. 4. obtained from state to obtain and... are not a part of service. *NORMAL RESPONSIBILITIES OF THE CONSUMER EXCLUSIONS IF YOU NEED SERVICE This warranty applies only to you specific legal rights. Warranty Information 28 COOKTOP WARRANTY Your cooktop is protected by this warranty In the U.S.A., your appliance is warranted by Electrolux Home Products North ...
... when it is in your best interest to state. Products with all local plumbing, electrical and/or gas codes. 3.Proper connection to the home and any purchase date parts of the U.S.A., Puerto Rico, and Canada. use of God. 4. obtained from state to obtain and... are not a part of service. *NORMAL RESPONSIBILITIES OF THE CONSUMER EXCLUSIONS IF YOU NEED SERVICE This warranty applies only to you specific legal rights. Warranty Information 28 COOKTOP WARRANTY Your cooktop is protected by this warranty In the U.S.A., your appliance is warranted by Electrolux Home Products North ...

Installation Instructions
Page 21
...Gas (LPG) Conversion Kit Instructions Cooktop Models: E36GC76EPS, E48GC76EPS Model E36GC76EPS shown WARNING: This conversion kit shall be sure to keep the original factory installed orifices for instructions on how to convert this appliance to natural gas from LPG. CAUTION: Before proceeding with the conversion. The cooktop... these instructions for future use and for each burner are installed for each burner and valve and the air shutters for use...these instructions is responsible for the proper installation of life. Part No. 100444 Rev. 3 If the information in accordance ...
...Gas (LPG) Conversion Kit Instructions Cooktop Models: E36GC76EPS, E48GC76EPS Model E36GC76EPS shown WARNING: This conversion kit shall be sure to keep the original factory installed orifices for instructions on how to convert this appliance to natural gas from LPG. CAUTION: Before proceeding with the conversion. The cooktop... these instructions for future use and for each burner are installed for each burner and valve and the air shutters for use...these instructions is responsible for the proper installation of life. Part No. 100444 Rev. 3 If the information in accordance ...

Installation Instructions
Page 22
...Models E36GC76EPS and E48GC76EPS (36 and 48-Inch) Kit Part Number: 700208-1 Part Number Description 65480 LABEL, CONVERSION INFORMATION 86007 TOOL, REMOVAL, BURNER RING 100444 INSTALLATION INSTRUCTIONS, LPG CONVERSION KIT 76125* O-RING, BYPASS 92125-48 ORIFICE, BYPASS, .48 MM 92125-61... ORIFICE, BYPASS, .61 MM 72427-86 ORIFICE, MAIN, .86 MM 72427-112 ORIFICE, MAIN, 1.12 MM 72427-118 ORIFICE, MAIN, 1.18 MM * Provided assembled to the installation instructions provided. Before Starting... Before converting to LPG, install the cooktop...
...Models E36GC76EPS and E48GC76EPS (36 and 48-Inch) Kit Part Number: 700208-1 Part Number Description 65480 LABEL, CONVERSION INFORMATION 86007 TOOL, REMOVAL, BURNER RING 100444 INSTALLATION INSTRUCTIONS, LPG CONVERSION KIT 76125* O-RING, BYPASS 92125-48 ORIFICE, BYPASS, .48 MM 92125-61... ORIFICE, BYPASS, .61 MM 72427-86 ORIFICE, MAIN, .86 MM 72427-112 ORIFICE, MAIN, 1.12 MM 72427-118 ORIFICE, MAIN, 1.18 MM * Provided assembled to the installation instructions provided. Before Starting... Before converting to LPG, install the cooktop...

Installation Instructions
Page 28
...line. 8-5 Make sure all knobs on the front of the cooktop are in Table 9-2 for the remaining burners. WC +/- ½ inch. Consult the burner. The manometer should read 10 inches factory if the pressure is not within the limits. The shutter part number appears on its side. 9-2 Thread the air shutter ... part number for the left rear column (WC) and below ½ PSI. to match the model number and burner location. Place end of the gap indicated in the table. 9-7 Secure the shutter with thread-locker (see Figure 9-2). 9-8 Check to the gap listed in the off the burner and the gas ...
...line. 8-5 Make sure all knobs on the front of the cooktop are in Table 9-2 for the remaining burners. WC +/- ½ inch. Consult the burner. The manometer should read 10 inches factory if the pressure is not within the limits. The shutter part number appears on its side. 9-2 Thread the air shutter ... part number for the left rear column (WC) and below ½ PSI. to match the model number and burner location. Place end of the gap indicated in the table. 9-7 Secure the shutter with thread-locker (see Figure 9-2). 9-8 Check to the gap listed in the off the burner and the gas ...

Installation Instructions
Page 29
...Cooktop LPG Conversion Kit Burner Location E36GC76EPS (36-Inch) E48GC76EPS (48-Inch) Left Rear HN A-0053-E HN A-0053-E Left Front HN A-0052-E HN A-0052-E Right Rear HN A-0052-E HN A-0052-E Right Front HN A-0053-E HN A-0053-E Center Rear HN A-0053-E HN A-0053-E Center Front HN A-0053-E HN A-0053-E Table 9-1 Air Shutter Part Numbers Burner... Location E36GC76EPS (36-Inch) E48GC76EPS (48-Inch) Left Rear .38/9.7 .39/9.8 Left Front .27/6.9 .12/3.1 Right Rear .29/7.4...
...Cooktop LPG Conversion Kit Burner Location E36GC76EPS (36-Inch) E48GC76EPS (48-Inch) Left Rear HN A-0053-E HN A-0053-E Left Front HN A-0052-E HN A-0052-E Right Rear HN A-0052-E HN A-0052-E Right Front HN A-0053-E HN A-0053-E Center Rear HN A-0053-E HN A-0053-E Center Front HN A-0053-E HN A-0053-E Table 9-1 Air Shutter Part Numbers Burner... Location E36GC76EPS (36-Inch) E48GC76EPS (48-Inch) Left Rear .38/9.7 .39/9.8 Left Front .27/6.9 .12/3.1 Right Rear .29/7.4...

Installation Instructions
Page 32
...) Air Shutter Part No. 81 184 HN A-0053-E 72 135 HN A-0052-E 72 135 HN A-0052-E 81 184 HN A-0053-E 81 194 HN A-0053-E 81 194 HN A-0053-E Model E48GC76EPS (48-Inch) Air Shutter Gap .38/9.6 .09/2.3 .09/2.3 .39/9.9 .37/9.5 .38/9.7 The Electrolux Group USA • 250 Bobby Jones Expressway • Augusta, GA 30907 1-877...
...) Air Shutter Part No. 81 184 HN A-0053-E 72 135 HN A-0052-E 72 135 HN A-0052-E 81 184 HN A-0053-E 81 194 HN A-0053-E 81 194 HN A-0053-E Model E48GC76EPS (48-Inch) Air Shutter Gap .38/9.6 .09/2.3 .09/2.3 .39/9.9 .37/9.5 .38/9.7 The Electrolux Group USA • 250 Bobby Jones Expressway • Augusta, GA 30907 1-877...


