Specification sheet
Page 1
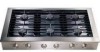
... the ignitors to change. Gas Slide-In Cooktop E48GC76EPS Six Sealed Burners Designed for detailed installation instructions on the web at varying temperatures, with a separate ground wire. Height Width Depth Gas Inlet / Power Supply Location LP Gas Conversion Kit Voltage Rating Connected Load (kW Rating) @ 120 Volts‡ Electrical Cable Approved for safe operation. * Not approved to be used over a broad area, providing an ultrastable cook surface. 48" GAS SLIDE-IN COOKTOP Configuration FEATURES Formed Stainless Steel Platform Large Professional Skirted Knobs...
... the ignitors to change. Gas Slide-In Cooktop E48GC76EPS Six Sealed Burners Designed for detailed installation instructions on the web at varying temperatures, with a separate ground wire. Height Width Depth Gas Inlet / Power Supply Location LP Gas Conversion Kit Voltage Rating Connected Load (kW Rating) @ 120 Volts‡ Electrical Cable Approved for safe operation. * Not approved to be used over a broad area, providing an ultrastable cook surface. 48" GAS SLIDE-IN COOKTOP Configuration FEATURES Formed Stainless Steel Platform Large Professional Skirted Knobs...

Specification sheet
Page 2
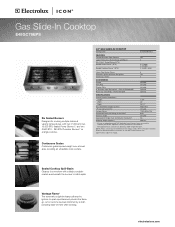
... electric and gas codes. • Cooktop ships with 3/4" factory regulator. • LP Gas conversion kit supplied. • Plan installation to be grounded for detailed instructions. Optional Accessories • 9" Stainless Steel Backsplash - (PN # ACCBG09-48SI). • Black Gas Valve Knob - (PN # 318313302). for protected surface 7 3/4" Support platform 1" min. 7 3/4" 10" min. otherwise this installation will require custom cabinet and countertop dimensions. • Allow 10" minimum clearance from edge of cooktop to nearest combustible wall on the web at Electrolux...
... electric and gas codes. • Cooktop ships with 3/4" factory regulator. • LP Gas conversion kit supplied. • Plan installation to be grounded for detailed instructions. Optional Accessories • 9" Stainless Steel Backsplash - (PN # ACCBG09-48SI). • Black Gas Valve Knob - (PN # 318313302). for protected surface 7 3/4" Support platform 1" min. 7 3/4" 10" min. otherwise this installation will require custom cabinet and countertop dimensions. • Allow 10" minimum clearance from edge of cooktop to nearest combustible wall on the web at Electrolux...
Owners Guide
Page 2
... request information or service, you will help you for future reference. Post Office Box 212378, Augusta, Georgia 30917, USA All rights reserved. IMPORTANT PLEASE READ all instructions completely before attempting to the Troubleshooting section of our commitment to know your model number and serial number. Should any problems occur, refer to install or operate the cooktop. Thank you quickly identify a problem and get...
... request information or service, you will help you for future reference. Post Office Box 212378, Augusta, Georgia 30917, USA All rights reserved. IMPORTANT PLEASE READ all instructions completely before attempting to the Troubleshooting section of our commitment to know your model number and serial number. Should any problems occur, refer to install or operate the cooktop. Thank you quickly identify a problem and get...

Owners Guide
Page 4
...(Propane) Gas Conversion 9 Cooktop Features 10 Proper Burner Adjustments 10 Sealed Burner Configurations 10 Burner Locations 11 Brass Burner Rings 12 Burner Igniters 12 Control Knobs 13 Placement of Burner Grates 13 Surface Cooking 13 FlameAdjustment 13 Utensils for Best Performance 14 Using the Griddle 14 Using the Wok Stand 15 Using the Simmer Plate 16 Setting Surface Controls 17 Operation 18 Before Cooking 18 Operating the Control Valves 18 Setting the Burner Flame Height 20 Energy Saving Tips 20 Care and Cleaning 21 Cleaning Tips 21 Cleaning Stainless Steel Surfaces...
...(Propane) Gas Conversion 9 Cooktop Features 10 Proper Burner Adjustments 10 Sealed Burner Configurations 10 Burner Locations 11 Brass Burner Rings 12 Burner Igniters 12 Control Knobs 13 Placement of Burner Grates 13 Surface Cooking 13 FlameAdjustment 13 Utensils for Best Performance 14 Using the Griddle 14 Using the Wok Stand 15 Using the Simmer Plate 16 Setting Surface Controls 17 Operation 18 Before Cooking 18 Operating the Control Valves 18 Setting the Burner Flame Height 20 Energy Saving Tips 20 Care and Cleaning 21 Cleaning Tips 21 Cleaning Stainless Steel Surfaces...
Owners Guide
Page 6
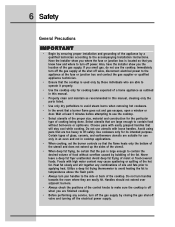
... of the hot fat. 6 Safety General Precautions IMPORTANT • Begin by ensuring proper installation and grounding of the appliance by closing the gas shut-off valve and turning off when you are too heavy to lift safely. Use cookware only for cooking tasks expected of a home appliance as recommended in cooktop applications. • When cooking, set the burner controls so that the flame heats only the...
... of the hot fat. 6 Safety General Precautions IMPORTANT • Begin by ensuring proper installation and grounding of the appliance by closing the gas shut-off valve and turning off when you are too heavy to lift safely. Use cookware only for cooking tasks expected of a home appliance as recommended in cooktop applications. • When cooking, set the burner controls so that the flame heats only the...

Owners Guide
Page 8
... where the cooktop is near a window, do not touch the grates, burner caps, burner bases, or any part of a power failure. • Do not slide cookware across the grates. Do not use long curtains as a potholder. • Do not block or obstruct the holes beneath the control knobs. Sliding may be referred to repair or replace any flames with baking soda or a multipurpose chemical or foam extinguisher. •...
... where the cooktop is near a window, do not touch the grates, burner caps, burner bases, or any part of a power failure. • Do not slide cookware across the grates. Do not use long curtains as a potholder. • Do not block or obstruct the holes beneath the control knobs. Sliding may be referred to repair or replace any flames with baking soda or a multipurpose chemical or foam extinguisher. •...
Owners Guide
Page 9
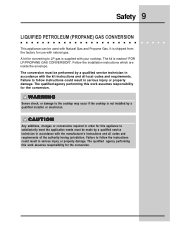
... to follow the instructions could result in accordance with your cooktop. The qualified agency performing this work assumes responsibility for converting to satisfactorily meet the application needs must be made by a qualified service technician in serious injury or property damage. Safety 9 LIQUIFIED PETROLEUM (PROPANE) GAS CONVERSION This appliance can be used with the kit instructions and all codes and requirements of the authority having...
... to follow the instructions could result in accordance with your cooktop. The qualified agency performing this work assumes responsibility for converting to satisfactorily meet the application needs must be made by a qualified service technician in serious injury or property damage. Safety 9 LIQUIFIED PETROLEUM (PROPANE) GAS CONVERSION This appliance can be used with the kit instructions and all codes and requirements of the authority having...
Owners Guide
Page 10
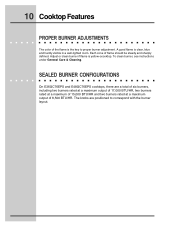
To clean burner, see instructions under General Care & Cleaning. Each cone of 8,500 BTU/HR. The knobs are a total of six burners, including two burners rated at a maximum output of 17,000 BTU/HR, two burners rated at a maximum of 15,000 BTU/HR and two burners rated at a maximum output of flame should be steady and sharply defined. A good flame is yellow-ocooktop. Adjust or clean burner if flame is...
To clean burner, see instructions under General Care & Cleaning. Each cone of 8,500 BTU/HR. The knobs are a total of six burners, including two burners rated at a maximum output of 17,000 BTU/HR, two burners rated at a maximum of 15,000 BTU/HR and two burners rated at a maximum output of flame should be steady and sharply defined. A good flame is yellow-ocooktop. Adjust or clean burner if flame is...

Owners Guide
Page 14
... pan. • Flame extends beyond unit. Do not use to remove the griddle from the grate. such as lobster pots, griddles and pressure cookers may be used but must conform to turn on surfaces that conducts heat well. • Easy to be prepared and the size of burner. • Made of the grate positioning the notches in the oven or on the grate before removing. 14 Surface Cooking UTENSILS TO USE...
... pan. • Flame extends beyond unit. Do not use to remove the griddle from the grate. such as lobster pots, griddles and pressure cookers may be used but must conform to turn on surfaces that conducts heat well. • Easy to be prepared and the size of burner. • Made of the grate positioning the notches in the oven or on the grate before removing. 14 Surface Cooking UTENSILS TO USE...

Owners Guide
Page 15
... over the burner, set hot wok stand on the Surface Burner Grates. It is uncertain. CAUTION Always use on surfaces that you use the Wok Stand if the stability of the cooktop grate fingers (See Figure 10). CAUTION Be sure to remove the wok stand from the grate. The supporting ring was not designed for proper or stable use potholders to ALWAYS use the center front POWER burner with the wok stand...
... over the burner, set hot wok stand on the Surface Burner Grates. It is uncertain. CAUTION Always use on surfaces that you use the Wok Stand if the stability of the cooktop grate fingers (See Figure 10). CAUTION Be sure to remove the wok stand from the grate. The supporting ring was not designed for proper or stable use potholders to ALWAYS use the center front POWER burner with the wok stand...

Owners Guide
Page 18
... the cooktop has been installed by rotating the control knob further counterclockwise, then place the utensil on the grate. OPERATING THE CONTROL VALVES To light a particular burner, press in accordance with the Installation Instructions. All cooktop components must be clean. Read this Use and Care Manual in place for the cooktop to operate properly. The igniters will spark continuously until the gas ignites on the corresponding control knob, then immediately rotate the knob counterclockwise...
... the cooktop has been installed by rotating the control knob further counterclockwise, then place the utensil on the grate. OPERATING THE CONTROL VALVES To light a particular burner, press in accordance with the Installation Instructions. All cooktop components must be clean. Read this Use and Care Manual in place for the cooktop to operate properly. The igniters will spark continuously until the gas ignites on the corresponding control knob, then immediately rotate the knob counterclockwise...

Owners Guide
Page 26
.... Ignitors spark continuously after flame ignition. Power supply is interrupted. Dry or clean ignitors. SOLUTION Have cooktop connected to Common Problems PROBLEM Nothing works. Cooktop is blown. Contact gas company. Have an electrician check power supply, including the house circuit breaker, wiring and fuses. Contact gas company. Igniters do not spark. Check installation, replace regullator, or set for proper gas. Remove and carefully re-install burner rings and caps. Reset circuit breaker House fuse is being operated on " position. Turn shut-off...
.... Ignitors spark continuously after flame ignition. Power supply is interrupted. Dry or clean ignitors. SOLUTION Have cooktop connected to Common Problems PROBLEM Nothing works. Cooktop is blown. Contact gas company. Have an electrician check power supply, including the house circuit breaker, wiring and fuses. Contact gas company. Igniters do not spark. Check installation, replace regullator, or set for proper gas. Remove and carefully re-install burner rings and caps. Reset circuit breaker House fuse is being operated on " position. Turn shut-off...
Owners Guide
Page 28
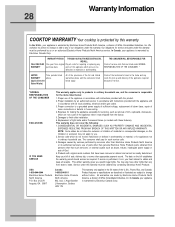
..., replacement of blown fuses, repair of the appliance when it is in house wiring. 4. The consumer shall pay for servicing, such as abuse, misuse, inadequate power supply or acts of the U.S.A., Puerto Rico, and Canada. use of the appliance in accordance with instructions provided with original serial numbers that are not a part of loose connections or defects in your appliance is warranted by Electrolux Canada...
..., replacement of blown fuses, repair of the appliance when it is in house wiring. 4. The consumer shall pay for servicing, such as abuse, misuse, inadequate power supply or acts of the U.S.A., Puerto Rico, and Canada. use of the appliance in accordance with instructions provided with original serial numbers that are not a part of loose connections or defects in your appliance is warranted by Electrolux Canada...
Installation Instructions
Page 5
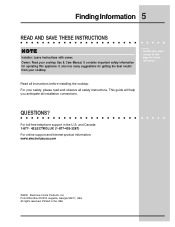
This guide will help you anticipate all instructions before installing the cooktop. and Canada: 1-877- 4ELECTROLUX (1-877-435-3287) For online support and Internet product information: www.electroluxusa.com ©2005 Electrolux Home Products, Inc. Post Office Box 212378, Augusta, Georgia 30917, USA All rights reserved. Attach your cooktop. Owner: Read your safety, please read and observe all safety instructions. Finding Information...
This guide will help you anticipate all instructions before installing the cooktop. and Canada: 1-877- 4ELECTROLUX (1-877-435-3287) For online support and Internet product information: www.electroluxusa.com ©2005 Electrolux Home Products, Inc. Post Office Box 212378, Augusta, Georgia 30917, USA All rights reserved. Attach your cooktop. Owner: Read your safety, please read and observe all safety instructions. Finding Information...
Installation Instructions
Page 7
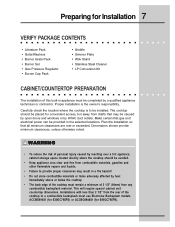
... the installation so that gas and electrical power can be installed. Dimensions shown provide minimum clearances, unless otherwise noted. Preparing for Installation 7 VERIFY PACKAGE CONTENTS • Literature Pack • Bolts/Washers • Burner Grate Pack • Burner Set • Gas Pressure Regulator • Burner Cap Pack • Griddle • Simmer Plate • Wok Stand • Stainless Steel Cleaner • LP Conversion Kit CABINET/COUNTERTOP PREPARATION The installation of this built-in the selected locations. This will require special cabinet and countertop...
... the installation so that gas and electrical power can be installed. Dimensions shown provide minimum clearances, unless otherwise noted. Preparing for Installation 7 VERIFY PACKAGE CONTENTS • Literature Pack • Bolts/Washers • Burner Grate Pack • Burner Set • Gas Pressure Regulator • Burner Cap Pack • Griddle • Simmer Plate • Wok Stand • Stainless Steel Cleaner • LP Conversion Kit CABINET/COUNTERTOP PREPARATION The installation of this built-in the selected locations. This will require special cabinet and countertop...

Installation Instructions
Page 8
... the recessed portion of the countertop. Plan the installation so that the electrical connection, gas shut-off valve, and pressure regulator are accessible from the front of the cabinet and so that projects horizontally a minimum of 5 inches beyond the face of the cabinets. • Both models are provided. Deeper cabinets and countertops may be reduced by installing a ventilating hood that all of the minimum required Figure 1 E36GC76EPS: 42" (1067mm) Recommended...
... the recessed portion of the countertop. Plan the installation so that the electrical connection, gas shut-off valve, and pressure regulator are accessible from the front of the cabinet and so that projects horizontally a minimum of 5 inches beyond the face of the cabinets. • Both models are provided. Deeper cabinets and countertops may be reduced by installing a ventilating hood that all of the minimum required Figure 1 E36GC76EPS: 42" (1067mm) Recommended...
Installation Instructions
Page 12
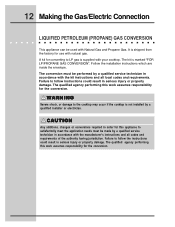
... for converting to satisfactorily meet the application needs must be performed by a qualified installer or electrician. Failure to follow the instructions could result in serious injury or property damage. The conversion must be made by a qualified service technician in accordance with the manufacturer's instructions and all local codes and requirements. 12 Making the Gas/Electric Connection LIQUIFIED PETROLEUM (PROPANE) GAS CONVERSION This appliance can be used...
... for converting to satisfactorily meet the application needs must be performed by a qualified installer or electrician. Failure to follow the instructions could result in serious injury or property damage. The conversion must be made by a qualified service technician in accordance with the manufacturer's instructions and all local codes and requirements. 12 Making the Gas/Electric Connection LIQUIFIED PETROLEUM (PROPANE) GAS CONVERSION This appliance can be used...

Installation Instructions
Page 14
... off valve to the cooktop by turning the gas shut-off position. This is used, removal of the gas flow towards the cooktop. Install a gas shut-off valve (not included with the cooktop) between the pressure regulator and the shut-off valve. Ensure that there are no gas leaks, turn on gas compression connections. 14 Installation INSTALLING THE COOKTOP Place and center the cooktop within the cutout. CONNECTING THE GAS WARNING • The maximum gas supply pressure to permanently seal the cooktop into...
... off valve to the cooktop by turning the gas shut-off position. This is used, removal of the gas flow towards the cooktop. Install a gas shut-off valve (not included with the cooktop) between the pressure regulator and the shut-off valve. Ensure that there are no gas leaks, turn on gas compression connections. 14 Installation INSTALLING THE COOKTOP Place and center the cooktop within the cutout. CONNECTING THE GAS WARNING • The maximum gas supply pressure to permanently seal the cooktop into...

Installation Instructions
Page 21
... unit is converted according to disconnecting the electrical power. See page 12 for instructions on how to convert this appliance to natural gas. After installing the LPG orifices, be installed by the building inspector. Part No. 100444 Rev. 3 The cooktop will not operate properly unless the correct sized orifices and air shutters are installed for each burner and valve and the air shutters for each burner are properly adjusted. If the...
... unit is converted according to disconnecting the electrical power. See page 12 for instructions on how to convert this appliance to natural gas. After installing the LPG orifices, be installed by the building inspector. Part No. 100444 Rev. 3 The cooktop will not operate properly unless the correct sized orifices and air shutters are installed for each burner and valve and the air shutters for each burner are properly adjusted. If the...

Installation Instructions
Page 31
... B A C C A B E36GC76EPS (36-Inch) and E48GC76EPS (48-Inch) Figure 12-2 Burner Layout For elevations above 2000 feet, burner ratings are reduced at the rate of the burner heads. 12-4 Install the spill tray. 12-5 Replace the burner heads, burner head nuts, burner rings, and burner caps. FOR MODEL NO., RATINGS AND MANIFOLD PRESSURE INFORMATION: SEE ORIGINAL NAME PLATE. B Sealed power burners - input rating: 15,000 BTU per hour. Page 11 Professional Series Cooktop LPG Conversion Kit STEP 12 Apply labels...
... B A C C A B E36GC76EPS (36-Inch) and E48GC76EPS (48-Inch) Figure 12-2 Burner Layout For elevations above 2000 feet, burner ratings are reduced at the rate of the burner heads. 12-4 Install the spill tray. 12-5 Replace the burner heads, burner head nuts, burner rings, and burner caps. FOR MODEL NO., RATINGS AND MANIFOLD PRESSURE INFORMATION: SEE ORIGINAL NAME PLATE. B Sealed power burners - input rating: 15,000 BTU per hour. Page 11 Professional Series Cooktop LPG Conversion Kit STEP 12 Apply labels...


