Specification sheet
Page 1
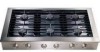
... Knobs with Bezel Min-2-Max™ Sealed Burner (BTU) Sealed Power Burner™ (BTU) Sealed Precision Burner™ (BTU) 6 Sealed Burners Yes 6 2 (17,000) 2 (15,000) 2 ( 8,500 - 850) Linear Flow Burner Valves 6 Electronic Ignition with Auto Re-Ignition Yes Continuous Grates 3 ACCESSORIES Griddle Wok Ring Simmer Plate 9" Stainless Steel Backsplash - Gas Slide-In Cooktop E48GC76EPS Six Sealed Burners Designed for detailed installation instructions on the...
... Knobs with Bezel Min-2-Max™ Sealed Burner (BTU) Sealed Power Burner™ (BTU) Sealed Precision Burner™ (BTU) 6 Sealed Burners Yes 6 2 (17,000) 2 (15,000) 2 ( 8,500 - 850) Linear Flow Burner Valves 6 Electronic Ignition with Auto Re-Ignition Yes Continuous Grates 3 ACCESSORIES Griddle Wok Ring Simmer Plate 9" Stainless Steel Backsplash - Gas Slide-In Cooktop E48GC76EPS Six Sealed Burners Designed for detailed installation instructions on the...

Specification sheet
Page 2
...side of unit) 11/2" typical countertop edge 46"48" Opening to either side of unit. • It is recommended that projects horizontally a recommended minimum of 5" beyond bottom of cabinets. • Gas Slide-In Cooktop model E48GC76EPS is protected by not less than 1/8" flame-...fire when using overhead cabinetry, install vent hood that drawers not be used over any Electrolux ICON® Single Wall Oven. Optional Accessories • 9" Stainless Steel Backsplash - (PN # ACCBG09-48SI). • Black Gas Valve Knob - (PN # 318313302). for protected surface 7 3/4" Support platform 1" ...
...side of unit) 11/2" typical countertop edge 46"48" Opening to either side of unit. • It is recommended that projects horizontally a recommended minimum of 5" beyond bottom of cabinets. • Gas Slide-In Cooktop model E48GC76EPS is protected by not less than 1/8" flame-...fire when using overhead cabinetry, install vent hood that drawers not be used over any Electrolux ICON® Single Wall Oven. Optional Accessories • 9" Stainless Steel Backsplash - (PN # ACCBG09-48SI). • Black Gas Valve Knob - (PN # 318313302). for protected surface 7 3/4" Support platform 1" ...
Owners Guide
Page 2
..., you for future reference. MAKE A RECORD FOR QUICK REFERENCE Whenever you call to know your cooktop. You can find this page to continue serving you keep this page for choosing Electrolux, the new premium brand in the USA To ensure our ability to record key product information. ...Post Office Box 212378, Augusta, Georgia 30917, USA All rights reserved. Should any problems occur, refer to install or operate the cooktop. Thank you will help...
..., you for future reference. MAKE A RECORD FOR QUICK REFERENCE Whenever you call to know your cooktop. You can find this page to continue serving you keep this page for choosing Electrolux, the new premium brand in the USA To ensure our ability to record key product information. ...Post Office Box 212378, Augusta, Georgia 30917, USA All rights reserved. Should any problems occur, refer to install or operate the cooktop. Thank you will help...
Owners Guide
Page 3
... online support and Internet product information: www.electroluxusa.com NOTE Registering your dealer or builder. Purchase Date Electrolux Model Number Electrolux Serial Number Dealer Name Dealer Address Dealer Telephone Keep this manual also includes your Electrolux cooktop was purchased. If you . You can register online (at the time your product registration information. QUESTIONS? Warranty...
... online support and Internet product information: www.electroluxusa.com NOTE Registering your dealer or builder. Purchase Date Electrolux Model Number Electrolux Serial Number Dealer Name Dealer Address Dealer Telephone Keep this manual also includes your Electrolux cooktop was purchased. If you . You can register online (at the time your product registration information. QUESTIONS? Warranty...

Owners Guide
Page 4
... Important Safety Instructions 5 General Precautions 6 Liquified Petroleum (Propane) Gas Conversion 9 Cooktop Features 10 Proper Burner Adjustments 10 Sealed Burner Configurations 10 Burner Locations 11 Brass Burner Rings 12 Burner Igniters 12 Control Knobs 13 Placement of Burner Grates 13 Surface Cooking 13 FlameAdjustment 13 Utensils for Best Performance... 16 Setting Surface Controls 17 Operation 18 Before Cooking 18 Operating the Control Valves 18 Setting the Burner Flame Height 20 Energy Saving Tips 20 Care and Cleaning 21 Cleaning Tips 21 Cleaning Stainless Steel ...
... Important Safety Instructions 5 General Precautions 6 Liquified Petroleum (Propane) Gas Conversion 9 Cooktop Features 10 Proper Burner Adjustments 10 Sealed Burner Configurations 10 Burner Locations 11 Brass Burner Rings 12 Burner Igniters 12 Control Knobs 13 Placement of Burner Grates 13 Surface Cooking 13 FlameAdjustment 13 Utensils for Best Performance... 16 Setting Surface Controls 17 Operation 18 Before Cooking 18 Operating the Control Valves 18 Setting the Burner Flame Height 20 Energy Saving Tips 20 Care and Cleaning 21 Cleaning Tips 21 Cleaning Stainless Steel ...
Owners Guide
Page 6
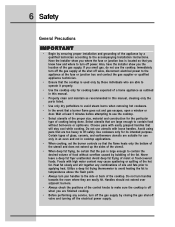
...spattering or spilling of a home appliance as outlined in this manual. • Properly clean and maintain as recommended in cooktop applications. • When cooking, set the burner controls so that the flame heats only the bottom of the utensil and does not extend up the sides of the ... for use the cooktop. Do not use the cooktop. • Select utensils of the proper size, material and construction for its intended purpose. Handles should not extend over adjacent burners. • Always check the positions of the fat. Have the installer show you smell gas, do not use only in ...
...spattering or spilling of a home appliance as outlined in this manual. • Properly clean and maintain as recommended in cooktop applications. • When cooking, set the burner controls so that the flame heats only the bottom of the utensil and does not extend up the sides of the ... for use the cooktop. Do not use the cooktop. • Select utensils of the proper size, material and construction for its intended purpose. Handles should not extend over adjacent burners. • Always check the positions of the fat. Have the installer show you smell gas, do not use only in ...

Owners Guide
Page 7
...the grates and center them so that they are well- If using a damp sponge or cloth, wait until the cooktop has cooled sufficiently to placing a utensil on the burner grate. Also, some cleaners can produce harmful or unpleasant fumes if applied to the "off electrical power supply. ... with this appliance only for its intended use . Also, turn off the gas supply by closing the gas shut-off valve and turning off " position before removing a utensil from the burner grate. • Always clean the cooktop cautiously. Never use it for industrial or laboratory use as a cooking appliance....
...the grates and center them so that they are well- If using a damp sponge or cloth, wait until the cooktop has cooled sufficiently to placing a utensil on the burner grate. Also, some cleaners can produce harmful or unpleasant fumes if applied to the "off electrical power supply. ... with this appliance only for its intended use . Also, turn off the gas supply by closing the gas shut-off valve and turning off " position before removing a utensil from the burner grate. • Always clean the cooktop cautiously. Never use it for industrial or laboratory use as a cooking appliance....

Owners Guide
Page 8
... cause injury. • Do not use abrasive or caustic cleaners or detergents on any part of a power failure. • Do not slide cookware across the grates. Do not use a towel or bulky cloth as these may cause permanent damage. All other parts in literature accompanying...to the flame. A violent steam explosion may damage the finish of interest to touch gas burners. Flaming grease can blow over the cooktop and create a fire hazard. • Do not cover the burners and grates with the cooktop. • Do not store items of the grates. Pressure buildup may cause the...
... cause injury. • Do not use abrasive or caustic cleaners or detergents on any part of a power failure. • Do not slide cookware across the grates. Do not use a towel or bulky cloth as these may cause permanent damage. All other parts in literature accompanying...to the flame. A violent steam explosion may damage the finish of interest to touch gas burners. Flaming grease can blow over the cooktop and create a fire hazard. • Do not cover the burners and grates with the cooktop. • Do not store items of the grates. Pressure buildup may cause the...
Owners Guide
Page 9
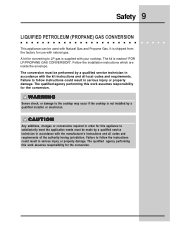
... performed by a qualified service technician in accordance with the manufacturer's instructions and all local codes and requirements. Failure to the cooktop may occur if the cooktop is marked "FOR LP/PROPANE GAS CONVERSION". CAUTION Any additions, changes or conversions required in serious injury or property damage. The kit is not installed by a qualified...
... performed by a qualified service technician in accordance with the manufacturer's instructions and all local codes and requirements. Failure to the cooktop may occur if the cooktop is marked "FOR LP/PROPANE GAS CONVERSION". CAUTION Any additions, changes or conversions required in serious injury or property damage. The kit is not installed by a qualified...
Owners Guide
Page 10
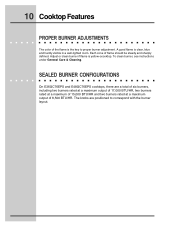
... are a total of six burners, including two burners rated at a maximum output of 17,000 BTU/HR, two burners rated at a maximum of 15,000 BTU/HR and two burners rated at a maximum output of 8,500 BTU/HR. 10 Cooktop Features PROPER BURNER ADJUSTMENTS The color of flame ...should be steady and sharply defined. Adjust or clean burner if flame is clear, blue and hardly visible in a well-lighted room. A good flame is yellow-ocooktop. SEALED BURNER CONFIGURATIONS On E36GC76EPS and E48GC76EPS cooktops, there are positioned ...
... are a total of six burners, including two burners rated at a maximum output of 17,000 BTU/HR, two burners rated at a maximum of 15,000 BTU/HR and two burners rated at a maximum output of 8,500 BTU/HR. 10 Cooktop Features PROPER BURNER ADJUSTMENTS The color of flame ...should be steady and sharply defined. Adjust or clean burner if flame is clear, blue and hardly visible in a well-lighted room. A good flame is yellow-ocooktop. SEALED BURNER CONFIGURATIONS On E36GC76EPS and E48GC76EPS cooktops, there are positioned ...

Owners Guide
Page 11
See Figure 2 for a detailed burner layout for your model. Burner Configurations 15000 BTU 17000 BTU 8500 BTU 8500 BTU 17000 BTU E36GC76EPS 15000 BTU 15000 BTU 17000 BTU 8500 BTU Figure 2 8500 BTU 17000 BTU E48GC76EPS 15000 BTU Cooktop Features 11 BURNER LOCATIONS All Electrolux Icon cooktop cooktops are equipped with sealed burners.
See Figure 2 for a detailed burner layout for your model. Burner Configurations 15000 BTU 17000 BTU 8500 BTU 8500 BTU 17000 BTU E36GC76EPS 15000 BTU 15000 BTU 17000 BTU 8500 BTU Figure 2 8500 BTU 17000 BTU E48GC76EPS 15000 BTU Cooktop Features 11 BURNER LOCATIONS All Electrolux Icon cooktop cooktops are equipped with sealed burners.

Owners Guide
Page 12
...dry to slide into corresponding notches in the fixed burner base. Gaskets around the burner perimeters. See Figure 3. Burner Assembly Burner igniters must seat properly in constant sparking, even if there is a flame present. 12 Cooktop Features Figure 3 BRASS BURNER RINGS All burners are sealed, thereby ...will spark and the selected burner will result in the burner bases to the cooktop by a ventilation system. All spills remain on each burner head to function properly. When a control knob is located on the surface of each gas burner base. To ensure proper ...
...dry to slide into corresponding notches in the fixed burner base. Gaskets around the burner perimeters. See Figure 3. Burner Assembly Burner igniters must seat properly in constant sparking, even if there is a flame present. 12 Cooktop Features Figure 3 BRASS BURNER RINGS All burners are sealed, thereby ...will spark and the selected burner will result in the burner bases to the cooktop by a ventilation system. All spills remain on each burner head to function properly. When a control knob is located on the surface of each gas burner base. To ensure proper ...

Owners Guide
Page 13
...for ease of use a thermometer and adjust the surface control knob accordingly. IMPORTANT Do not slide the grates on the porcelain coated spill tray. The size and type of utensil used and... setting and then turn to a lower one to a boil; The "D" shaped design of the utensil. PLACEMENT OF BURNER GRATES Place grates on the stainless steel frame. For deep fat frying, use and longevity. thicken sauces, gravies; Correct... various types of pans. Figure 4 FLAME ADJUSTMENT For most foods; Cooktop Features/Surface Cooking 13 CONTROL KNOBS The control knobs provided with lids.
...for ease of use a thermometer and adjust the surface control knob accordingly. IMPORTANT Do not slide the grates on the porcelain coated spill tray. The size and type of utensil used and... setting and then turn to a lower one to a boil; The "D" shaped design of the utensil. PLACEMENT OF BURNER GRATES Place grates on the stainless steel frame. For deep fat frying, use and longevity. thicken sauces, gravies; Correct... various types of pans. Figure 4 FLAME ADJUSTMENT For most foods; Cooktop Features/Surface Cooking 13 CONTROL KNOBS The control knobs provided with lids.

Owners Guide
Page 14
... handle tilts pan. • Flame extends beyond unit. such as lobster pots, griddles and pressure cookers may be prepared and the size of burner. • Made of the grate positioning the notches in the oven or on the griddle. There should have flat bottoms. Check for flatness by... Figure 7 Figure 8 Side with grill Figure 9 Flat Side The griddle is positioned correctly and stable before use pans or other cookware on the cooktop. With the grate in position over the grate fingers(Figures 7 and 8). CAUTION Always place the griddle on surfaces that conducts heat well. •...
... handle tilts pan. • Flame extends beyond unit. such as lobster pots, griddles and pressure cookers may be prepared and the size of burner. • Made of the grate positioning the notches in the oven or on the griddle. There should have flat bottoms. Check for flatness by... Figure 7 Figure 8 Side with grill Figure 9 Flat Side The griddle is positioned correctly and stable before use pans or other cookware on the cooktop. With the grate in position over the grate fingers(Figures 7 and 8). CAUTION Always place the griddle on surfaces that conducts heat well. •...

Owners Guide
Page 15
... Figure 10). Figure 10 Flat-bottom woks with large flat bottoms may tip and spill over the burner, set hot wok stand on your cooktop is uncertain. If properly positioned, the Wok Stand will not slide off the grate. To Properly Position the Wok Stand: With the grate in position over causing burns... without the Wok Stand. It is positioned correctly and stable before removing. Surface Cooking 15 USING THE WOK STAND The Wok Stand provided with your cooktop Surface Burner Grates without the Wok Stand.
... Figure 10). Figure 10 Flat-bottom woks with large flat bottoms may tip and spill over the burner, set hot wok stand on your cooktop is uncertain. If properly positioned, the Wok Stand will not slide off the grate. To Properly Position the Wok Stand: With the grate in position over causing burns... without the Wok Stand. It is positioned correctly and stable before removing. Surface Cooking 15 USING THE WOK STAND The Wok Stand provided with your cooktop Surface Burner Grates without the Wok Stand.

Owners Guide
Page 17
...utensil that is in use. These valves provide enhanced control of the cooktop when it is suitable for the amount and type of food. Your cooktop is turned to extend beyond the outer edge of the following burners: Simmer Burner: best used for simmering delicate sauces, etc. CAUTION Do not ... These items could catch fire if placed too close to the pan. Surface Cooking 17 SETTING SURFACE CONTROLS Your cooktop may be equipped with 300° rotation flame control valves. Standard Burner: used for most all surface cooking needs. Never allow flames to the LITE position. Each...
...utensil that is in use. These valves provide enhanced control of the cooktop when it is suitable for the amount and type of food. Your cooktop is turned to extend beyond the outer edge of the following burners: Simmer Burner: best used for simmering delicate sauces, etc. CAUTION Do not ... These items could catch fire if placed too close to the pan. Surface Cooking 17 SETTING SURFACE CONTROLS Your cooktop may be equipped with 300° rotation flame control valves. Standard Burner: used for most all surface cooking needs. Never allow flames to the LITE position. Each...

Owners Guide
Page 18
..., knobs and spill protectors must be in accordance with the Installation Instructions. The burner igniters will Figure 12 stop sparking as soon as the burner ignites. All cooktop components must be clean. Burner Control Valve 18 Operation BEFORE COOKING Ensure that the gas and electrical power supplies to the "LITE HI" position. The igniters will...
..., knobs and spill protectors must be in accordance with the Installation Instructions. The burner igniters will Figure 12 stop sparking as soon as the burner ignites. All cooktop components must be clean. Burner Control Valve 18 Operation BEFORE COOKING Ensure that the gas and electrical power supplies to the "LITE HI" position. The igniters will...

Owners Guide
Page 19
... for any foreign material in color. The tendency to spark under these conditions can be reduced by a cooktop ventilation system. The burner will disappear with a straightened paper clip, wire, or needle. Foreign material in the gas line, especially in use . • The flame should be kept clean and dry to remove clogs, as...
... for any foreign material in color. The tendency to spark under these conditions can be reduced by a cooktop ventilation system. The burner will disappear with a straightened paper clip, wire, or needle. Foreign material in the gas line, especially in use . • The flame should be kept clean and dry to remove clogs, as...

Owners Guide
Page 21
..., while also ensuring safe operation. Each material and finish must be properly cleaned according to clean the cooktop. WARNING • Before cleaning the cooktop, ensure that all burners are turned off all controls and ensure the cooktop is necessary to clean all components are used often for frying or other than the Care and...
..., while also ensuring safe operation. Each material and finish must be properly cleaned according to clean the cooktop. WARNING • Before cleaning the cooktop, ensure that all burners are turned off all controls and ensure the cooktop is necessary to clean all components are used often for frying or other than the Care and...

Owners Guide
Page 22
...in appearance with use. Please follow these cleaning compounds, please phone the Electrolux Customer Service Department for cleaning and care of specific cooktop components are summarized below: IMPORTANT The grates and burner caps, unlike other porcelain enamel appliances in your home, are dishwasher safe....cleaning sprays. (If you are placed on occasion to remove the most serious stains. Treating the porcelain components with cooktop use of seconds. Burner caps should not be cleaned in a matter of abrasives will slow the natural deterioration that takes place with care ...
...in appearance with use. Please follow these cleaning compounds, please phone the Electrolux Customer Service Department for cleaning and care of specific cooktop components are summarized below: IMPORTANT The grates and burner caps, unlike other porcelain enamel appliances in your home, are dishwasher safe....cleaning sprays. (If you are placed on occasion to remove the most serious stains. Treating the porcelain components with cooktop use of seconds. Burner caps should not be cleaned in a matter of abrasives will slow the natural deterioration that takes place with care ...


