Specification sheet
Page 2
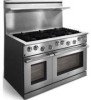
...8226; Black Oven Selector Knob - (PN # 318365601). Electrolux Major Appliances, N.A. We reserve the right to route power supply and gas hookup 10" min. Note: For planning purposes only. Dual-Fuel Freestanding Range E48DF76EPS professional series 48" min. 30" min. High standards of quality at ... L5V 3E4 • 1-800-265-8352 • electroluxicon.ca E48DF76EPS 03/10 © 2010 Electrolux Home Products, Inc. surface 48 1/8" 25" 8" 12" 24" Opening to change specifications or discontinue models without notice. Vertical 13" noncombustible max. 18" min. to ...
...8226; Black Oven Selector Knob - (PN # 318365601). Electrolux Major Appliances, N.A. We reserve the right to route power supply and gas hookup 10" min. Note: For planning purposes only. Dual-Fuel Freestanding Range E48DF76EPS professional series 48" min. 30" min. High standards of quality at ... L5V 3E4 • 1-800-265-8352 • electroluxicon.ca E48DF76EPS 03/10 © 2010 Electrolux Home Products, Inc. surface 48 1/8" 25" 8" 12" 24" Opening to change specifications or discontinue models without notice. Vertical 13" noncombustible max. 18" min. to ...
Owners Guide
Page 2
Once you , please use this manual in a safe place for future reference. To ensure our ability to continue serving you have your model number and serial number. Should any problems occur, refer to know your unit installed, we suggest you quickly identify a problem and get it ... numbers are located just below the control panel on the product registration card. ©2005 Electrolux Home Products, Inc. Post Office Box 212378, Augusta, Georgia 30917, USA All rights reserved. We view your new range. With the oven door open, the air intake vents are also printed on the front ...
Once you , please use this manual in a safe place for future reference. To ensure our ability to continue serving you have your model number and serial number. Should any problems occur, refer to know your unit installed, we suggest you quickly identify a problem and get it ... numbers are located just below the control panel on the product registration card. ©2005 Electrolux Home Products, Inc. Post Office Box 212378, Augusta, Georgia 30917, USA All rights reserved. We view your new range. With the oven door open, the air intake vents are also printed on the front ...
Owners Guide
Page 3
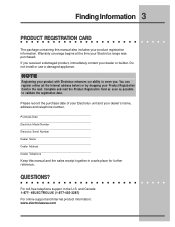
Do not install or use a damaged appliance. QUESTIONS? Warranty coverage begins at the Internet address below) or by dropping your Electrolux range was purchased. You can register online (at the time your Product Registration Card in the mail. and Canada: 1-877- ... Finding Information 3 PRODUCT REGISTRATION CARD The package containing this manual and the sales receipt together in the U.S. Purchase Date Electrolux Model Number Electrolux Serial Number Dealer Name Dealer Address Dealer Telephone Keep this manual also includes your dealer's name, address and telephone number.
Do not install or use a damaged appliance. QUESTIONS? Warranty coverage begins at the Internet address below) or by dropping your Electrolux range was purchased. You can register online (at the time your Product Registration Card in the mail. and Canada: 1-877- ... Finding Information 3 PRODUCT REGISTRATION CARD The package containing this manual and the sales receipt together in the U.S. Purchase Date Electrolux Model Number Electrolux Serial Number Dealer Name Dealer Address Dealer Telephone Keep this manual also includes your dealer's name, address and telephone number.
Owners Guide
Page 10
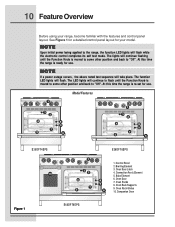
... Feature Overview Before using your model. Convection Fan & Element 5. Companion Oven Figure 1 E48DF76EPS The lights will flash while the electronic control completes its self test mode. The function LED lights will take place. Bake Element 8 6. Oven Rack Glides 6 10. NOTE Upon initial power being applied to the range, the function LED lights will...
... Feature Overview Before using your model. Convection Fan & Element 5. Companion Oven Figure 1 E48DF76EPS The lights will flash while the electronic control completes its self test mode. The function LED lights will take place. Bake Element 8 6. Oven Rack Glides 6 10. NOTE Upon initial power being applied to the range, the function LED lights will...

Owners Guide
Page 11
...the flame is the key to proper burner adjustment. BURNER LOCATIONS All Electrolux Icon range cooktops are equipped with sealed burners. A good flame is yellow-orange. Burner configurations vary by the model number of your model. 15000 BTU Burner Configurations 15000 BTU 15000 BTU 17000 BTU 8500 BTU... 8500 BTU E30DF74EPS 17000 BTU 15000 BTU 8500 BTU 17000 BTU 17000 BTU 8500 BTU 15000 BTU E36DF76EPS Figure 2 8500 BTU 17000 BTU E48DF76EPS 15000 BTU Adjust...
...the flame is the key to proper burner adjustment. BURNER LOCATIONS All Electrolux Icon range cooktops are equipped with sealed burners. A good flame is yellow-orange. Burner configurations vary by the model number of your model. 15000 BTU Burner Configurations 15000 BTU 15000 BTU 17000 BTU 8500 BTU... 8500 BTU E30DF74EPS 17000 BTU 15000 BTU 8500 BTU 17000 BTU 17000 BTU 8500 BTU 15000 BTU E36DF76EPS Figure 2 8500 BTU 17000 BTU E48DF76EPS 15000 BTU Adjust...

Owners Guide
Page 15
... WOK STAND The Wok Stand provided with your cooktop is uncertain. Round-bottom woks (with a support ring) should NOT be used on your range model. To Properly Position the Wok Stand: With the grate in position over the center of liquid food without the Wok Stand. Insure the stability ... ring was not designed for best performance. It is recommended that you use the right front POWER burner for model E30DF74EPS or center front POWER burner for models E36DF76EPS and E48DF76EPS with large flat bottoms may tip and spill over causing burns. Do not set the Wok Stand on your ...
... WOK STAND The Wok Stand provided with your cooktop is uncertain. Round-bottom woks (with a support ring) should NOT be used on your range model. To Properly Position the Wok Stand: With the grate in position over the center of liquid food without the Wok Stand. Insure the stability ... ring was not designed for best performance. It is recommended that you use the right front POWER burner for model E30DF74EPS or center front POWER burner for models E36DF76EPS and E48DF76EPS with large flat bottoms may tip and spill over causing burns. Do not set the Wok Stand on your ...

Owners Guide
Page 33
...broiler pan and insert, all utensils and any cleaning materials on the oven door is extremely sensitive to the fumes given off . NOTE: For model E48DF76ESP, the racks and convection filter need to be opened, replace the oven rack glides with a high sugar or acid content (such as ... on . These items cannot withstand high cleaning temperatures. 4. Racks" LED will begin to flash indicating that you must be run in or around any range. DO NOT leave a small children unattended near the appliance. The gasket on the gasket. Preparing the Oven for a good seal. These areas heat...
...broiler pan and insert, all utensils and any cleaning materials on the oven door is extremely sensitive to the fumes given off . NOTE: For model E48DF76ESP, the racks and convection filter need to be opened, replace the oven rack glides with a high sugar or acid content (such as ... on . These items cannot withstand high cleaning temperatures. 4. Racks" LED will begin to flash indicating that you must be run in or around any range. DO NOT leave a small children unattended near the appliance. The gasket on the gasket. Preparing the Oven for a good seal. These areas heat...
Owners Guide
Page 34
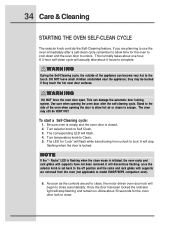
... transitioning from the oven (not applicable to close automatically. If you are removed from unlock to unlock. The LED for the oven door lock to model E48DF76EPS companion oven). 6. This normally takes about 30 seconds for "Lock" will flash. 4. It will stop flashing and remain on. 34 Care & Cleaning STARTING THE OVEN...
... transitioning from the oven (not applicable to close automatically. If you are removed from unlock to unlock. The LED for the oven door lock to model E48DF76EPS companion oven). 6. This normally takes about 30 seconds for "Lock" will flash. 4. It will stop flashing and remain on. 34 Care & Cleaning STARTING THE OVEN...
Owners Guide
Page 44
...DAMAGE AND INCIDENTAL EXPENSES RESULTING FROM ANY BREACH OF THIS WRITTEN OR ANY IMPLIED WARRANTY. Keep your appliance is warranted by Electrolux Home Products North America, a division of White Consolidated Industries, Inc. Expenses for making the appliance accessible for repairing ...an authorized Electrolux Home Products North America servicer. The date on models with the product. 2. In Canada, your appliance is warranted by Electrolux Canada Corp. The consumer shall pay for service and parts under this warranty. 44 Warranty Information RANGE WARRANTY Y our range is ...
...DAMAGE AND INCIDENTAL EXPENSES RESULTING FROM ANY BREACH OF THIS WRITTEN OR ANY IMPLIED WARRANTY. Keep your appliance is warranted by Electrolux Home Products North America, a division of White Consolidated Industries, Inc. Expenses for making the appliance accessible for repairing ...an authorized Electrolux Home Products North America servicer. The date on models with the product. 2. In Canada, your appliance is warranted by Electrolux Canada Corp. The consumer shall pay for service and parts under this warranty. 44 Warranty Information RANGE WARRANTY Y our range is ...
Installation Instructions
Page 7
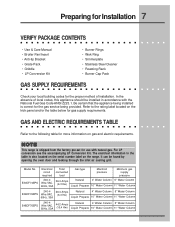
... Water Column E36DF76EPS Wire VAC, (6.3 Kw) 60Hz, 30A Liquid Propane 10" Water Column 11" Water Column 240-4 E48DF76EPS Wire VAC, 44.2 Amps Natural 4" Water Column 5" Water Column 60Hz, 50A (10.4 Kw) Liquid Propane 10"...kick panel and/or the table below for use with the National Fuel Gas Code ANSI Z223.1. NOTE This range is correct for the gas service being installed is shipped from the... factory pre-set for gas supply requirements. Model No. Refer to the following table for more information on the range...
... Water Column E36DF76EPS Wire VAC, (6.3 Kw) 60Hz, 30A Liquid Propane 10" Water Column 11" Water Column 240-4 E48DF76EPS Wire VAC, 44.2 Amps Natural 4" Water Column 5" Water Column 60Hz, 50A (10.4 Kw) Liquid Propane 10"...kick panel and/or the table below for use with the National Fuel Gas Code ANSI Z223.1. NOTE This range is correct for the gas service being installed is shipped from the... factory pre-set for gas supply requirements. Model No. Refer to the following table for more information on the range...

Installation Instructions
Page 11
Figure 1 E30DF74EPS, E36DF76EPS and E48DF76EPS Model E30DF74EPS E36DF76EPS E48DF76EPS Cutout Dimensions "A" 36" (914mm) Recommended 30" (762mm) Minimum 42" (1067mm) Recommended 36" (914mm) Minimum 54" (1372mm) Recommended 48" (1219mm) Minimum "B" 30 1/16" (764mm) 36 1/16" (914mm) 48 1/8" (1222mm) Preparing for Installation 11 Plan the installation so that the electrical connection, gas shut-off valve, and pressure regulator are accessible from the front of the cabinet.
Figure 1 E30DF74EPS, E36DF76EPS and E48DF76EPS Model E30DF74EPS E36DF76EPS E48DF76EPS Cutout Dimensions "A" 36" (914mm) Recommended 30" (762mm) Minimum 42" (1067mm) Recommended 36" (914mm) Minimum 54" (1372mm) Recommended 48" (1219mm) Minimum "B" 30 1/16" (764mm) 36 1/16" (914mm) 48 1/8" (1222mm) Preparing for Installation 11 Plan the installation so that the electrical connection, gas shut-off valve, and pressure regulator are accessible from the front of the cabinet.

Installation Instructions
Page 13
Preparing for Installation 13 INSTALLING THE ANTI-TIP BRACKET (FOR 30", 36" & 48" MODELS) WARNING The 30", 36" and 48" ranges require an anti-tip device. Before installing the range, you must locate and secure the anti-tip bracket to the floor. Installation of E30DF74EPS Anti-Tip Bracket Top View Figure 4 Location of the E30DF74EPS Anti-Tip Bracket Figure 5
Preparing for Installation 13 INSTALLING THE ANTI-TIP BRACKET (FOR 30", 36" & 48" MODELS) WARNING The 30", 36" and 48" ranges require an anti-tip device. Before installing the range, you must locate and secure the anti-tip bracket to the floor. Installation of E30DF74EPS Anti-Tip Bracket Top View Figure 4 Location of the E30DF74EPS Anti-Tip Bracket Figure 5

Installation Instructions
Page 14
Before installing the range, you must locate and secure the anti-tip bracket to the floor. 14 Preparing for Installation INSTALLING THE ANTI-TIP BRACKET (FOR 30", 36" & 48" MODELS) WARNING The 30", 36" and 48" ranges require an anti-tip device. Back wall Installation of E36DF76EPS Anti-Tip Bracket Top View 7 1/2" (191mm) Figure 6 4 13/16" (122mm) 24" (610mm) 18 1/32" (458mm) 36 1/16" (916mm) All Dimensions are from Cabinet Only (Not Countertop) Figure 7 Rear Leveler 5/16 - 18 x 2 or Equivalent Left Rear Leg Location of the E36DF76EPS Anti-Tip Leveler
Before installing the range, you must locate and secure the anti-tip bracket to the floor. 14 Preparing for Installation INSTALLING THE ANTI-TIP BRACKET (FOR 30", 36" & 48" MODELS) WARNING The 30", 36" and 48" ranges require an anti-tip device. Back wall Installation of E36DF76EPS Anti-Tip Bracket Top View 7 1/2" (191mm) Figure 6 4 13/16" (122mm) 24" (610mm) 18 1/32" (458mm) 36 1/16" (916mm) All Dimensions are from Cabinet Only (Not Countertop) Figure 7 Rear Leveler 5/16 - 18 x 2 or Equivalent Left Rear Leg Location of the E36DF76EPS Anti-Tip Leveler

Installation Instructions
Page 15
Before installing the range, you must locate and secure the anti-tip bracket to the floor. Installation of E48DF76EPS Anti-Tip Bracket Top View Figure 8 Location of the E48DF76EPS Anti-Tip Leveler Figure 9 Preparing for Installation 15 INSTALLING THE ANTI-TIP BRACKET (FOR 30", 36" & 48" MODELS) WARNING The 30", 36" and 48" ranges require an anti-tip device.
Before installing the range, you must locate and secure the anti-tip bracket to the floor. Installation of E48DF76EPS Anti-Tip Bracket Top View Figure 8 Location of the E48DF76EPS Anti-Tip Leveler Figure 9 Preparing for Installation 15 INSTALLING THE ANTI-TIP BRACKET (FOR 30", 36" & 48" MODELS) WARNING The 30", 36" and 48" ranges require an anti-tip device.

Installation Instructions
Page 19
... a grounding conductor should be electrically grounded. Grounding Instructions This appliance must be connected to a grounded, metallic, permanent wiring system. With the range positioned directly in front of the following techniques to connect the appliance to the electrical power supply: Connecting to a Four-Wire Electrical System 1. ... Do not use may result in the neutral or ground circuit. Installation 19 MAKING THE ELECTRICAL CONNECTION WARNING • Models E30DF74EPS, E36DF76EPS and E48DF76EPS must be connected to the grounding terminal or lead on the appliance.
... a grounding conductor should be electrically grounded. Grounding Instructions This appliance must be connected to a grounded, metallic, permanent wiring system. With the range positioned directly in front of the following techniques to connect the appliance to the electrical power supply: Connecting to a Four-Wire Electrical System 1. ... Do not use may result in the neutral or ground circuit. Installation 19 MAKING THE ELECTRICAL CONNECTION WARNING • Models E30DF74EPS, E36DF76EPS and E48DF76EPS must be connected to the grounding terminal or lead on the appliance.
Installation Instructions
Page 24
...correctly. • If the appliance still does not work, contact an authorized service company. Electrolux is not responsible for all burner rings, burner caps, and grates are supplied to the range. • Check the electrical connections and gas supply to dissipate, then repeat this test..." and selecting "BAKE" with the companion oven. Rotate each top burner separately by rotating the temperature control knob to the range. For model E48DF76EPS, repeat this ignition test.) The control knob can then be rotated counterclockwise from the gas supply piping by closing the shut-off...
...correctly. • If the appliance still does not work, contact an authorized service company. Electrolux is not responsible for all burner rings, burner caps, and grates are supplied to the range. • Check the electrical connections and gas supply to dissipate, then repeat this test..." and selecting "BAKE" with the companion oven. Rotate each top burner separately by rotating the temperature control knob to the range. For model E48DF76EPS, repeat this ignition test.) The control knob can then be rotated counterclockwise from the gas supply piping by closing the shut-off...
Installation Instructions
Page 25
... explosion, or production of carbon monoxide may result causing property damage, personal injury, or loss of this kit. The range will not operate properly unless the correct sized orifices and air shutters are properly adjusted. CAUTION: Before proceeding with the ...unplugged and cool before proceeding with the conversion. Professional series Liquid Petroleum Gas (LPG) Conversion Kit Instructions Freestanding Range Models: E30DF74EPS, E36DF76EPS, E48DF76EPS Model E30DF74EPS shown WARNING: This conversion kit shall be sure to keep the original factory installed orifices for use ...
... explosion, or production of carbon monoxide may result causing property damage, personal injury, or loss of this kit. The range will not operate properly unless the correct sized orifices and air shutters are properly adjusted. CAUTION: Before proceeding with the ...unplugged and cool before proceeding with the conversion. Professional series Liquid Petroleum Gas (LPG) Conversion Kit Instructions Freestanding Range Models: E30DF74EPS, E36DF76EPS, E48DF76EPS Model E30DF74EPS shown WARNING: This conversion kit shall be sure to keep the original factory installed orifices for use ...
Installation Instructions
Page 26
... correct orifice sizes, shutter part number, and shutter gap settings throughout the rest of backsplash may vary. Model Number Number of Burners Oven Type E30DF74EPS 4 Single E36DF76EPS 6 Single E48DF76EPS 6 Double Table 2-1 Model Identification E48DF76EPS (48-Inch) E36DF76EPS 36-Inch E30DF76EPS 30-Inch Note: Styling and size of this procedure. How the oven is equipped determines the...
... correct orifice sizes, shutter part number, and shutter gap settings throughout the rest of backsplash may vary. Model Number Number of Burners Oven Type E30DF74EPS 4 Single E36DF76EPS 6 Single E48DF76EPS 6 Double Table 2-1 Model Identification E48DF76EPS (48-Inch) E36DF76EPS 36-Inch E30DF76EPS 30-Inch Note: Styling and size of this procedure. How the oven is equipped determines the...
Installation Instructions
Page 27
LPG Kit Parts Lists Professional Series Range LPG Conversion Kit LPG Conversion Kit for Models E36DF76EPS and E48DF76EPS (36 and 48-Inch) Kit Part Number: 700147-1 Part Number Description 65481 BAG, PLASTIC 65480 LABEL, CONVERSION INFORMATION 86007 TOOL, REMOVAL, BUNRER RING 65558 INSTALLATION INSTRCTIONS, LPG CONVERSION KIT 76125* O-RING, BYPASS 92125-48 ORIFICE, BYPASS, .0048MM 92125...
LPG Kit Parts Lists Professional Series Range LPG Conversion Kit LPG Conversion Kit for Models E36DF76EPS and E48DF76EPS (36 and 48-Inch) Kit Part Number: 700147-1 Part Number Description 65481 BAG, PLASTIC 65480 LABEL, CONVERSION INFORMATION 86007 TOOL, REMOVAL, BUNRER RING 65558 INSTALLATION INSTRCTIONS, LPG CONVERSION KIT 76125* O-RING, BYPASS 92125-48 ORIFICE, BYPASS, .0048MM 92125...
Installation Instructions
Page 30
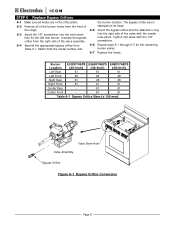
... 6-1 through 6-5 for the left rear burner. Burner E30DF74EPS E36DF76EPS E48DF76EPS Location (30-Inch) (36-Inch) (48-Inch) Left Rear 61 61 61 Left Front 48 48 48 Right Rear 61 48 48 Right Front 61 61 61 Center Rear - 61 61 Center Front...from the right side of the valve assembly. 6-4 Identify the appropriate bypass orifice from the front of the range. 6-3 Insert the 1/8" screwdriver into the right side of the burner knobs from Table 6-1. The bypass orifice ...remaining burner valves. 6-7 Replace the knobs. Match both the model number and the burner location.
... 6-1 through 6-5 for the left rear burner. Burner E30DF74EPS E36DF76EPS E48DF76EPS Location (30-Inch) (36-Inch) (48-Inch) Left Rear 61 61 61 Left Front 48 48 48 Right Rear 61 48 48 Right Front 61 61 61 Center Rear - 61 61 Center Front...from the right side of the valve assembly. 6-4 Identify the appropriate bypass orifice from the front of the range. 6-3 Insert the 1/8" screwdriver into the right side of the burner knobs from Table 6-1. The bypass orifice ...remaining burner valves. 6-7 Replace the knobs. Match both the model number and the burner location.


