
Specification sheet
Page 1
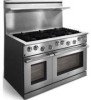
...48 2-1/2" Stainless Steel Kick Plate - NOTE: Always consult local and national electric and gas codes. Refer to Product Installation Guide for cooking multiple dishes at electroluxicon.com. Patented ball bearing rack system allows racks to change. Dual-Fuel Freestanding Range E48DF76EPS...never been easier. 48" DUAL-FUEL FREESTANDING RANGE CONTROL PANEL FEATURES Electronic Oven Control Yes Professional-Style Stainless Steel Console ... Oven Racks 2.6 Cu. Six Sealed Burners Designed for detailed installation instructions on a single rangetop. Cooking every meal to oven contents...
...48 2-1/2" Stainless Steel Kick Plate - NOTE: Always consult local and national electric and gas codes. Refer to Product Installation Guide for cooking multiple dishes at electroluxicon.com. Patented ball bearing rack system allows racks to change. Dual-Fuel Freestanding Range E48DF76EPS...never been easier. 48" DUAL-FUEL FREESTANDING RANGE CONTROL PANEL FEATURES Electronic Oven Control Yes Professional-Style Stainless Steel Console ... Oven Racks 2.6 Cu. Six Sealed Burners Designed for detailed installation instructions on a single rangetop. Cooking every meal to oven contents...
Specification sheet
Page 2
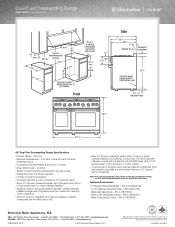
Dual-Fuel Freestanding Range E48DF76EPS professional series 48" min. 30" min. Front Side 31" 295/16" 281/8" 3" Optional 9" Standard 3" backsplash Gas inlet / power supply location (right bottom rear) 325/8" 27/8"- 6" adjustable legs 355/8" 4715/16" 48" Dual-Fuel Freestanding Range Specifications •... when using overhead cabinetry, install vent hood that projects horizontally a recommended minimum of 5" beyond bottom of quality at electroluxicon.com for detailed instructions. Optional Accessories • 9" Stainless Steel Backsplash - (PN # ACCBG09-48). • 2-1/2" Stainless ...
Dual-Fuel Freestanding Range E48DF76EPS professional series 48" min. 30" min. Front Side 31" 295/16" 281/8" 3" Optional 9" Standard 3" backsplash Gas inlet / power supply location (right bottom rear) 325/8" 27/8"- 6" adjustable legs 355/8" 4715/16" 48" Dual-Fuel Freestanding Range Specifications •... when using overhead cabinetry, install vent hood that projects horizontally a recommended minimum of 5" beyond bottom of quality at electroluxicon.com for detailed instructions. Optional Accessories • 9" Stainless Steel Backsplash - (PN # ACCBG09-48). • 2-1/2" Stainless ...
Owners Guide
Page 2
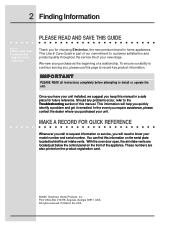
...receipt to this page for future reference. I M P O R TA N T PLEASE READ all instructions completely before attempting to know your model number and serial number. MAKE A RECORD FOR QUICK REFERENCE ...or service, you , please use this information on the product registration card. ©2005 Electrolux Home Products, Inc. Post Office Box 212378, Augusta, Georgia 30917, USA All rights reserved...reference. Printed in home appliances. Once you have your unit installed, we suggest you purchased your new range. These numbers are located just below the control panel on the...
...receipt to this page for future reference. I M P O R TA N T PLEASE READ all instructions completely before attempting to know your model number and serial number. MAKE A RECORD FOR QUICK REFERENCE ...or service, you , please use this information on the product registration card. ©2005 Electrolux Home Products, Inc. Post Office Box 212378, Augusta, Georgia 30917, USA All rights reserved...reference. Printed in home appliances. Once you have your unit installed, we suggest you purchased your new range. These numbers are located just below the control panel on the...

Owners Guide
Page 5
... injury. CAUTION CAUTION used to alert you have read the safety precautions in property damage. I M P O R TA N T Indicates installation, operation or maintenance information which , if not avoided, could result in minor or moderate injury. Safety items throughout this symbol to avoid possible...indicates a potentially hazardous situation which , if not avoided, may result in this manual. Safety 5 IMPORTANT SAFETY INSTRUCTIONS Safety Precautions Do not attempt to install or operate your appliance until you to potential personal injury hazards. It is the safety alert symbol.
... injury. CAUTION CAUTION used to alert you have read the safety precautions in property damage. I M P O R TA N T Indicates installation, operation or maintenance information which , if not avoided, could result in minor or moderate injury. Safety items throughout this symbol to avoid possible...indicates a potentially hazardous situation which , if not avoided, may result in this manual. Safety 5 IMPORTANT SAFETY INSTRUCTIONS Safety Precautions Do not attempt to install or operate your appliance until you to potential personal injury hazards. It is the safety alert symbol.
Owners Guide
Page 6
... handles towards the room where they are able to operate it properly. • Use the range only for use the range. • Select utensils of oils and fats prior to the accompanying Installation Instructions. Choose pans with high water content may cause spattering or spilling of food without boil-overs .... Use cookware only for the particular type of the fat. Do not use the range. Have the installer show you smell gas, do not use utensils with loose handles. Also, have the installer show you are too heavy to make sure the cooktop is located so that are ...
... handles towards the room where they are able to operate it properly. • Use the range only for use the range. • Select utensils of oils and fats prior to the accompanying Installation Instructions. Choose pans with high water content may cause spattering or spilling of food without boil-overs .... Use cookware only for the particular type of the fat. Do not use the range. Have the installer show you smell gas, do not use utensils with loose handles. Also, have the installer show you are too heavy to make sure the cooktop is located so that are ...
Owners Guide
Page 9
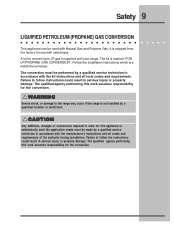
... conversions required in serious injury or property damage. The qualified agency performing this appliance to follow instructions could result in accordance with your range. Safety 9 LIQUIFIED PETROLEUM (PROPANE) GAS CONVERSION This appliance can be made by a qualified installer or electrician. The kit is shipped from the factory for this work assumes responsibility for...
... conversions required in serious injury or property damage. The qualified agency performing this appliance to follow instructions could result in accordance with your range. Safety 9 LIQUIFIED PETROLEUM (PROPANE) GAS CONVERSION This appliance can be made by a qualified installer or electrician. The kit is shipped from the factory for this work assumes responsibility for...
Owners Guide
Page 18
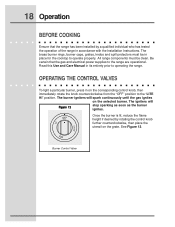
...on the selected burner. Burner Control Valve 18 Operation BEFORE COOKING Ensure that the gas and electrical power supplies to the range are operational. Once the burner is lit, reduce the flame height if desired by a qualified individual who has tested the operation of... soon as the burner ignites. See Figure 12. Be certain that the range has been installed by rotating the control knob further counterclockwise, then place the utensil on the grate. The brass burner rings, burner caps, grates, knobs and spill protectors must be in accordance with the Installation Instructions.
...on the selected burner. Burner Control Valve 18 Operation BEFORE COOKING Ensure that the gas and electrical power supplies to the range are operational. Once the burner is lit, reduce the flame height if desired by a qualified individual who has tested the operation of... soon as the burner ignites. See Figure 12. Be certain that the range has been installed by rotating the control knob further counterclockwise, then place the utensil on the grate. The brass burner rings, burner caps, grates, knobs and spill protectors must be in accordance with the Installation Instructions.
Owners Guide
Page 27
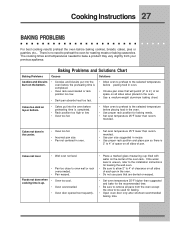
Cakes too dark on top or bottom. • Cakes put into the oven before preheating time is uneven, refer to the installation instructions for leveling the wall oven. • Be sure to allow 2" to 4" of clearance on all sides of each pan in the oven. • Do ...176;F lower than recommended. • Use pan size suggested and bake for baking. • Open oven door only after shortest recommended baking time. Cooking Instructions 27 BAKING PROBLEMS For best cooking results preheat the oven before placing food in oven. • Choose pan sizes that are dented or warped. •...
Cakes too dark on top or bottom. • Cakes put into the oven before preheating time is uneven, refer to the installation instructions for leveling the wall oven. • Be sure to allow 2" to 4" of clearance on all sides of each pan in the oven. • Do ...176;F lower than recommended. • Use pan size suggested and bake for baking. • Open oven door only after shortest recommended baking time. Cooking Instructions 27 BAKING PROBLEMS For best cooking results preheat the oven before placing food in oven. • Choose pan sizes that are dented or warped. •...
Owners Guide
Page 44
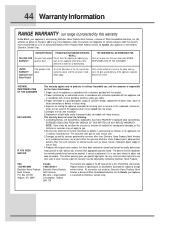
... appliance when it is warranted by Electrolux Canada Corp. Box 212378 Augusta, GA 30917 Canada 1•866•294•9911 Electrolux Home Products North America 802, boul. Proper installation by an authorized servicer in accordance with instructions provided with the appliance and in the... to change without notice. This warranty does not cover the following: 1. 44 Warranty Information RANGE WARRANTY Y our range is protected by this warranty In the U.S.A., your appliance is warranted by Electrolux Canada Corp. We authorize no person to be performed by us or an authorized...
... appliance when it is warranted by Electrolux Canada Corp. Box 212378 Augusta, GA 30917 Canada 1•866•294•9911 Electrolux Home Products North America 802, boul. Proper installation by an authorized servicer in accordance with instructions provided with the appliance and in the... to change without notice. This warranty does not cover the following: 1. 44 Warranty Information RANGE WARRANTY Y our range is protected by this warranty In the U.S.A., your appliance is warranted by Electrolux Canada Corp. We authorize no person to be performed by us or an authorized...
Installation Instructions
Page 1
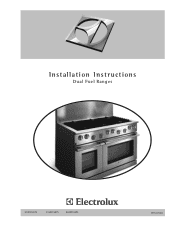
Installation Instructions Dual Fuel Ranges E30DF74EPS E36DF76EPS E48DF76EPS 5995447082
Installation Instructions Dual Fuel Ranges E30DF74EPS E36DF76EPS E48DF76EPS 5995447082
Installation Instructions
Page 2
...CAUTION indicates a potentially hazardous situation which , if not avoided, could result in minor or moderate injury. I M P O R TA N T Indicates installation, operation or maintenance information which , if not avoided, may result in death or serious injury. Safety items throughout this manual. CAUTION CAUTION used to alert... you have read the safety precautions in property damage. 2 Safety IMPORTANT SAFETY INSTRUCTIONS Safety Precautions Do not attempt to install or operate your unit until you to avoid possible injury or death.
...CAUTION indicates a potentially hazardous situation which , if not avoided, could result in minor or moderate injury. I M P O R TA N T Indicates installation, operation or maintenance information which , if not avoided, may result in death or serious injury. Safety items throughout this manual. CAUTION CAUTION used to alert... you have read the safety precautions in property damage. 2 Safety IMPORTANT SAFETY INSTRUCTIONS Safety Precautions Do not attempt to install or operate your unit until you to avoid possible injury or death.

Installation Instructions
Page 3
...appliance must not be grounded. For assistance or additional information, consult a qualified installer, service agency, manufacturer (dealer), or the gas supplier. • For your safety: - Connect only to these installation instructions. • Use this appliance only for its intended use corrosive chemicals or vapors...service, or maintenance can cause personal injury or property damage. Safety 3 SAFETY PRECAUTIONS WARNING • Read all instructions before installing or servicing the appliance. • This appliance must be used by qualified service personnel. • Some ...
...appliance must not be grounded. For assistance or additional information, consult a qualified installer, service agency, manufacturer (dealer), or the gas supplier. • For your safety: - Connect only to these installation instructions. • Use this appliance only for its intended use corrosive chemicals or vapors...service, or maintenance can cause personal injury or property damage. Safety 3 SAFETY PRECAUTIONS WARNING • Read all instructions before installing or servicing the appliance. • This appliance must be used by qualified service personnel. • Some ...

Installation Instructions
Page 4
Follow the gas supplier's instructions. - Do not touch any electrical switch, do if you cannot reach your building. - 4 Safety WARNING • Based on safety considerations, the top burner flame should ... damage, personal injury, or death. • What to light any phone in this appliance must be performed by a qualified installer, service agency or the gas supplier. Immediately call the fire department. • Installation of the cooking utensil. • If the information in your gas supplier, call the gas supplier from a neighbor's phone...
Follow the gas supplier's instructions. - Do not touch any electrical switch, do if you cannot reach your building. - 4 Safety WARNING • Based on safety considerations, the top burner flame should ... damage, personal injury, or death. • What to light any phone in this appliance must be performed by a qualified installer, service agency or the gas supplier. Immediately call the fire department. • Installation of the cooking utensil. • If the information in your gas supplier, call the gas supplier from a neighbor's phone...
Installation Instructions
Page 5
... online support and Internet product information: www.electroluxusa.com ©2005 Electrolux Home Products, Inc. For toll-free telephone support in the USA Attach your Range. QUESTIONS? Owner: Read your safety, please read and observe all safety instructions. Read all installation connections. For your Range Use & Care Manual. Printed in the U.S. Post Office Box 212378...
... online support and Internet product information: www.electroluxusa.com ©2005 Electrolux Home Products, Inc. For toll-free telephone support in the USA Attach your Range. QUESTIONS? Owner: Read your safety, please read and observe all safety instructions. Read all installation connections. For your Range Use & Care Manual. Printed in the U.S. Post Office Box 212378...
Installation Instructions
Page 6
6 Finding Information TABLE OF CONTENTS Safety 2 Definitions 2 Important Safety Instructions 2 Safety Precautions 3 Finding Information 5 Please Read And Save This Guide 5 Questions 5 Table Of Contents 6 Preparing for Installation 7 Verifying Package Contents 7 Gas Supply Requirements 7 Gas and Electric Requirements ... Electrical Rough-In 9 Cabinet/Counterop Preparation 10 Overal Dimensions 12 Installing the Anti-Tip Bracket 13 Gas Regulator and Electrical Conduit Location 16 Installation 17 Installing the Range Backguards 17 Removing the Door(s 18 Reinstalling the Door(s 18 ...
6 Finding Information TABLE OF CONTENTS Safety 2 Definitions 2 Important Safety Instructions 2 Safety Precautions 3 Finding Information 5 Please Read And Save This Guide 5 Questions 5 Table Of Contents 6 Preparing for Installation 7 Verifying Package Contents 7 Gas Supply Requirements 7 Gas and Electric Requirements ... Electrical Rough-In 9 Cabinet/Counterop Preparation 10 Overal Dimensions 12 Installing the Anti-Tip Bracket 13 Gas Regulator and Electrical Conduit Location 16 Installation 17 Installing the Range Backguards 17 Removing the Door(s 18 Reinstalling the Door(s 18 ...
Installation Instructions
Page 17
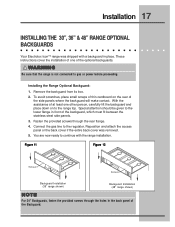
... provided screws through the holes in the back panel of the Backguard. Installing the Range Optional Backguard: 1. Installation 17 INSTALLING THE 30", 36" & 48" RANGE OPTIONAL BACKGUARDS Your Electrolux IconTM range was removed. 5. Remove the backguard from its box. 2. Special attention... was shipped with the range installation. Figure 11 Figure 12 Backguard Installation (36" range shown) Backguard Installation (48" range shown) NOTE For 24" Backguards, fasten the provided screws through the rear flange. 4. These instructions cover the installation of one other person,...
... provided screws through the holes in the back panel of the Backguard. Installing the Range Optional Backguard: 1. Installation 17 INSTALLING THE 30", 36" & 48" RANGE OPTIONAL BACKGUARDS Your Electrolux IconTM range was removed. 5. Remove the backguard from its box. 2. Special attention... was shipped with the range installation. Figure 11 Figure 12 Backguard Installation (36" range shown) Backguard Installation (48" range shown) NOTE For 24" Backguards, fasten the provided screws through the rear flange. 4. These instructions cover the installation of one other person,...

Installation Instructions
Page 19
...appliance wire to the red (L2) power supply wire in the junction box. 5. Grounding Instructions This appliance must be connected to the black (L1) power supply wire in the junction... wire to a grounded, metallic, permanent wiring system. Installation 19 MAKING THE ELECTRICAL CONNECTION WARNING • Models E30DF74EPS, E36DF76EPS and E48DF76EPS must be connected to do so may result in an... this appliance. Alternatively, a grounding conductor should be electrically grounded. With the range positioned directly in the junction box. Figure 14 Cable from power supply RED RED...
...appliance wire to the red (L2) power supply wire in the junction box. 5. Grounding Instructions This appliance must be connected to the black (L1) power supply wire in the junction... wire to a grounded, metallic, permanent wiring system. Installation 19 MAKING THE ELECTRICAL CONNECTION WARNING • Models E30DF74EPS, E36DF76EPS and E48DF76EPS must be connected to do so may result in an... this appliance. Alternatively, a grounding conductor should be electrically grounded. With the range positioned directly in the junction box. Figure 14 Cable from power supply RED RED...
Installation Instructions
Page 22
...on the stub out. To convert the range for leaks using a soap and water solution. The gas valve must be turned off valve previously installed on gas flex line connections. • Turn all lines and connections for LP gas, see the instructions supplied in addition to the pressure regulator... provided with the appliance. This is pre-set at the right rear of the range.
...on the stub out. To convert the range for leaks using a soap and water solution. The gas valve must be turned off valve previously installed on gas flex line connections. • Turn all lines and connections for LP gas, see the instructions supplied in addition to the pressure regulator... provided with the appliance. This is pre-set at the right rear of the range.
Installation Instructions
Page 24
...INSTRUCTIONS. All ignitors will spark continuously, but only the burner with gas flowing to it will ignite. (It will take approximately 4 seconds for service required to the burner size. Turn on the top frame. For model E48DF76EPS... piping during any pressure testing exceeding 1/2 psi (3.5kPa). • The range must be steady and quiet. Electrolux is not responsible for ignition to "350" and selecting "BAKE" with the... power and gas are in length proportional to correct a faulty installation. Repeat the ignition test for at or below 1/2 psi (3.5 kPa). If ignition does ...
...INSTRUCTIONS. All ignitors will spark continuously, but only the burner with gas flowing to it will ignite. (It will take approximately 4 seconds for service required to the burner size. Turn on the top frame. For model E48DF76EPS... piping during any pressure testing exceeding 1/2 psi (3.5kPa). • The range must be steady and quiet. Electrolux is not responsible for ignition to "350" and selecting "BAKE" with the... power and gas are in length proportional to correct a faulty installation. Repeat the ignition test for at or below 1/2 psi (3.5 kPa). If ignition does ...
Installation Instructions
Page 25
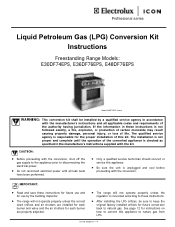
... a qualified service agency in the manufacture's instructions supplied with the manufacturer's instructions and all leak tests have been performed. Professional series Liquid Petroleum Gas (LPG) Conversion Kit Instructions Freestanding Range Models: E30DF74EPS, E36DF76EPS, E48DF76EPS Model E30DF74EPS shown WARNING: This conversion kit shall be sure to keep the original factory installed orifices for future conversion back to...
... a qualified service agency in the manufacture's instructions supplied with the manufacturer's instructions and all leak tests have been performed. Professional series Liquid Petroleum Gas (LPG) Conversion Kit Instructions Freestanding Range Models: E30DF74EPS, E36DF76EPS, E48DF76EPS Model E30DF74EPS shown WARNING: This conversion kit shall be sure to keep the original factory installed orifices for future conversion back to...


