Installation Instructions
Page 1
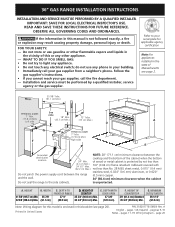
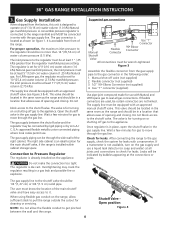
...: Wiring diagram for applicable agency certification Note: For appliances installed in this booklet (see page 2. Español - do not use gasoline or other appliance. - 36" GAS RANGE INSTALLATION INSTRUCTIONS INSTALLATION AND SERVICE MUST BE PERFORMED BY A QUALIFIED INSTALLER. WALL 35 7/8" Min. (91.1 cm Min.) C B WALL See If there is a wall: note 7" Min...
...: Wiring diagram for applicable agency certification Note: For appliances installed in this booklet (see page 2. Español - do not use gasoline or other appliance. - 36" GAS RANGE INSTALLATION INSTRUCTIONS INSTALLATION AND SERVICE MUST BE PERFORMED BY A QUALIFIED INSTALLER. WALL 35 7/8" Min. (91.1 cm Min.) C B WALL See If there is a wall: note 7" Min...
Installation Instructions
Page 2
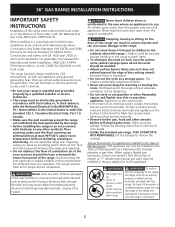
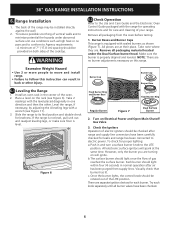
... fresh air for warming or heating the room. Children could result. • Install anti-tip device packed with range. 36" GAS RANGE INSTALLATION INSTRUCTIONS IMPORTANT SAFETY INSTRUCTIONS Installation of this range must conform with Manufactured Home Construction and Safety Standard, title 24CFR, part 3280 [Formerly the Federal Standard for Mobile Home Construction and Safety, title...
... fresh air for warming or heating the room. Children could result. • Install anti-tip device packed with range. 36" GAS RANGE INSTALLATION INSTRUCTIONS IMPORTANT SAFETY INSTRUCTIONS Installation of this range must conform with Manufactured Home Construction and Safety Standard, title 24CFR, part 3280 [Formerly the Federal Standard for Mobile Home Construction and Safety, title...
Installation Instructions
Page 3
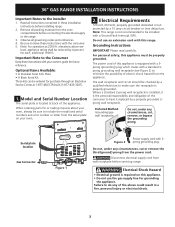
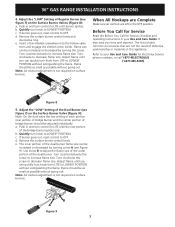
... the appliance. Note: For operation at 1-877-4ELECTROLUX (1-877-435-3287). 1. Do not use the gas supply line for purchase through an Electrolux Service Center at 2000 ft. Grounding Instructions IMPORTANT Please read carefully. For personal safety, this appliance must be...instructions before servicing range. Serial plate location Gas Connector Figure 1 Figure 2 Power supply cord with 3prong grounding plug. Important Note to include the model and serial numbers and a lot number or letter from wall receptacle before installing range. 2. 36" GAS RANGE INSTALLATION INSTRUCTIONS ...
... the appliance. Note: For operation at 1-877-4ELECTROLUX (1-877-435-3287). 1. Do not use the gas supply line for purchase through an Electrolux Service Center at 2000 ft. Grounding Instructions IMPORTANT Please read carefully. For personal safety, this appliance must be...instructions before servicing range. Serial plate location Gas Connector Figure 1 Figure 2 Power supply cord with 3prong grounding plug. Important Note to include the model and serial numbers and a lot number or letter from wall receptacle before installing range. 2. 36" GAS RANGE INSTALLATION INSTRUCTIONS ...
Installation Instructions
Page 4
...setting. the inlet pressure must be set for leaks. This valve should be located in the same room as the range and should be at all gas connections. Gas "T" connector (supplied) Use pipe-joint compound made for use a liquid leak detector (or soap and water) at...leaks with Natural and LP/Propane gas to seal all joints and connections to operate on figure 1. If a manometer is die cast. Manual shut-off gas to it. The supply line must know the location of the range. 36" GAS RANGE INSTALLATION INSTRUCTIONS 3. Gas Supply Installation When shipped from front...
...setting. the inlet pressure must be set for leaks. This valve should be located in the same room as the range and should be at all gas connections. Gas "T" connector (supplied) Use pipe-joint compound made for use a liquid leak detector (or soap and water) at...leaks with Natural and LP/Propane gas to seal all joints and connections to operate on figure 1. If a manometer is die cast. Manual shut-off gas to it. The supply line must know the location of the range. 36" GAS RANGE INSTALLATION INSTRUCTIONS 3. Gas Supply Installation When shipped from front...

Installation Instructions
Page 5
... location of the outlet may not allow the range to be . Range Placement To eliminate the risk of burns or fire from gas connections. Moving the Appliance for the type of the range. Open the oven door. Center Line of range will be positioned against the cabinet. 36" GAS RANGE INSTALLATION INSTRUCTIONS Do not use a flame to check...
... location of the outlet may not allow the range to be . Range Placement To eliminate the risk of burns or fire from gas connections. Moving the Appliance for the type of the range. Open the oven door. Center Line of range will be positioned against the cabinet. 36" GAS RANGE INSTALLATION INSTRUCTIONS Do not use a flame to check...
Installation Instructions
Page 6
... has been purged from the oven before testing. 1. Range Installation 1. Make sure the burner is level. To check for levelness. However, only the burner you are at the same time. 36" GAS RANGE INSTALLATION INSTRUCTIONS 6. The back of the range may be rotated out of the oven. 2. Place... a level on this instruction can result in and turn a surface burner knob to follow this range. Take 2 readings with sealed burners as ...
... has been purged from the oven before testing. 1. Range Installation 1. Make sure the burner is level. To check for levelness. However, only the burner you are at the same time. 36" GAS RANGE INSTALLATION INSTRUCTIONS 6. The back of the range may be rotated out of the oven. 2. Place... a level on this instruction can result in and turn a surface burner knob to follow this range. Take 2 readings with sealed burners as ...
Installation Instructions
Page 7
... Setting of the Dual Burner (see Figure 7) on surface burners. If burner goes out, reset control to LOWEST POSITION without going out. 36" GAS RANGE INSTALLATION INSTRUCTIONS 4. b. Note: Air mixture adjustment is not required on the Surface Burner Valve (Figure 9): Note: On the dual valve the...adjustment is not required on the Surface Burner Valves (Figure 8): a. Before You Call for Service Read the Before You Call for Electrolux Service phone numbers, or call 1-877-4ELECTROLUX (1-877-435-3287). b. Adjust flame until burner ignites. Push in and turn control...
... Setting of the Dual Burner (see Figure 7) on surface burners. If burner goes out, reset control to LOWEST POSITION without going out. 36" GAS RANGE INSTALLATION INSTRUCTIONS 4. b. Note: Air mixture adjustment is not required on the Surface Burner Valve (Figure 9): Note: On the dual valve the...adjustment is not required on the Surface Burner Valves (Figure 8): a. Before You Call for Service Read the Before You Call for Electrolux Service phone numbers, or call 1-877-4ELECTROLUX (1-877-435-3287). b. Adjust flame until burner ignites. Push in and turn control...
Installation Instructions
Page 8
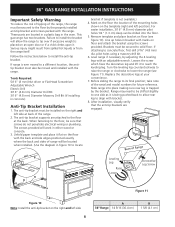
...hot liquids or from the range itself. The anti-tip bracket supports are located in a plastic bag in concrete) Anti-Tip Bracket Installation 1. After installation, visually verify that screws do not penetrate electrical wiring or plumbing. 36" GAS RANGE INSTALLATION INSTRUCTIONS Important Safety ...Warning To reduce the risk of tipping of the range, the range must be secured to a different location, the antitip bracket must also be moved...
...hot liquids or from the range itself. The anti-tip bracket supports are located in a plastic bag in concrete) Anti-Tip Bracket Installation 1. After installation, visually verify that screws do not penetrate electrical wiring or plumbing. 36" GAS RANGE INSTALLATION INSTRUCTIONS Important Safety ...Warning To reduce the risk of tipping of the range, the range must be secured to a different location, the antitip bracket must also be moved...


