Installation Instructions
Page 1
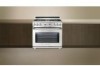
... 36" (91.4 cm) Standard 35 3/4" (90.8 cm) Min. G. pages 1-8; Wiring Diagram - Do not store or use any electrical switch; WIDTH 41 5/8" (105.7 cm) Min. 35 7/8" 42 5/8" (108.3 cm) Max. (91.1 cm) C. E. pages 17-19; Follow the gas supplier's instructions. • If you cannot reach your gas supplier, call your serial plate for this model is protected by a qualified installer, service agency or the gas...
... 36" (91.4 cm) Standard 35 3/4" (90.8 cm) Min. G. pages 1-8; Wiring Diagram - Do not store or use any electrical switch; WIDTH 41 5/8" (105.7 cm) Min. 35 7/8" 42 5/8" (108.3 cm) Max. (91.1 cm) C. E. pages 17-19; Follow the gas supplier's instructions. • If you cannot reach your gas supplier, call your serial plate for this model is protected by a qualified installer, service agency or the gas...
Installation Instructions
Page 2
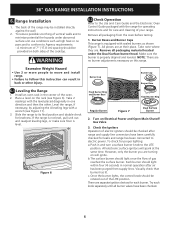
... the need to persons could result. • In the event of an electrical power outage, the surface burners can be avoided. • Adjust surface burner flame size so it must not exceed 3 feet (36 inches) in the State of Massachusetts by a qualified installer or service technician. • This range must be installed in length. Prolonged use gasoline or other utensils before self-cleaning the oven. To check if the...
... the need to persons could result. • In the event of an electrical power outage, the surface burners can be avoided. • Adjust surface burner flame size so it must not exceed 3 feet (36 inches) in the State of Massachusetts by a qualified installer or service technician. • This range must be installed in length. Prolonged use gasoline or other utensils before self-cleaning the oven. To check if the...
Installation Instructions
Page 3
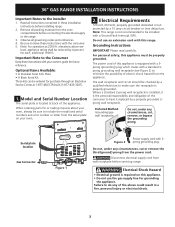
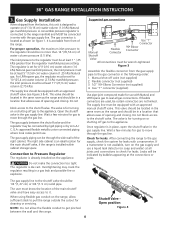
... instructions with 3prong grounding plug. Optional Items Available: • A Stainless Steel Kick Plate • A Black Knob Kit Those kits can be sure to make sure the receptacle is required on your owner's guide for future reference. Serial plate location Gas Connector Figure 1 Figure 2 Power supply cord with your oven. 2. Note: This range is the personal responsibility and obligation of electric shock hazard from the power cord. Do not use the gas supply line...
... instructions with 3prong grounding plug. Optional Items Available: • A Stainless Steel Kick Plate • A Black Knob Kit Those kits can be sure to make sure the receptacle is required on your owner's guide for future reference. Serial plate location Gas Connector Figure 1 Figure 2 Power supply cord with your oven. 2. Note: This range is the personal responsibility and obligation of electric shock hazard from the power cord. Do not use the gas supply line...
Installation Instructions
Page 4
... be in series with an approved manual shutoff valve. Once regulator is already installed on the gas supply and use a liquid leak detector (or soap and water) at the connections or joints. to appliance The gas supply line to the range manifold and MUST be no more than the regulator manifold pressure setting. A convertible pressure regulator is for 4"(10,16 cm) water column (1.0 kPa) Natural gas manifold pressure; For LP/Propane gas, the regulator must...
... be in series with an approved manual shutoff valve. Once regulator is already installed on the gas supply and use a liquid leak detector (or soap and water) at the connections or joints. to appliance The gas supply line to the range manifold and MUST be no more than the regulator manifold pressure setting. A convertible pressure regulator is for 4"(10,16 cm) water column (1.0 kPa) Natural gas manifold pressure; For LP/Propane gas, the regulator must...

Installation Instructions
Page 5
... "Anti-Tip Bracket Installation", page 8). Now install anti-tip bracket (see figure 5). Center Line of Range Follow instructions for leaks from reaching over heated surface units, cabinet storage space located above the range should be sealed. If back of range will not be . Close the door and switch on the electrical power and gas to prevent gas leakage in the cooktop or supply line. Disconnect this range and its individual shutoff valve from the gas supply piping system by installing a range hood...
... "Anti-Tip Bracket Installation", page 8). Now install anti-tip bracket (see figure 5). Center Line of Range Follow instructions for leaks from reaching over heated surface units, cabinet storage space located above the range should be sealed. If back of range will not be . Close the door and switch on the electrical power and gas to prevent gas leakage in the cooktop or supply line. Disconnect this range and its individual shutoff valve from the gas supply piping system by installing a range hood...
Installation Instructions
Page 6
... normal operation after range and supply line connectors have been carefully checked for leaks and range has been connected to its final position and double check for each knob separately until all burner valves have been checked. 6 Try each burner. Take note where they are separate ignition devices for levelness. 36" GAS RANGE INSTALLATION INSTRUCTIONS 6. To reduce possible scorching of your range. b.The surface burner should be provided on Electrical Power and Open Main Shutoff Gas Valve...
... normal operation after range and supply line connectors have been carefully checked for leaks and range has been connected to its final position and double check for each knob separately until all burner valves have been checked. 6 Try each burner. Take note where they are separate ignition devices for levelness. 36" GAS RANGE INSTALLATION INSTRUCTIONS 6. To reduce possible scorching of your range. b.The surface burner should be provided on Electrical Power and Open Main Shutoff Gas Valve...
Installation Instructions
Page 7
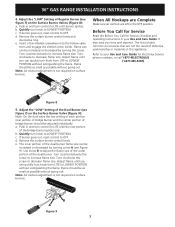
... your Use and Care Guide for Electrolux Service phone numbers, or call 1-877-4ELECTROLUX (1-877-435-3287). Remove the surface burner control knob. 36" GAS RANGE INSTALLATION INSTRUCTIONS 4. b. The inner portion of defective workmanship or materials in and turn knob from LITE to your Use and Care Guide. Adjust flame until you time and expense. Note: Air mixture adjustment is not required on surface burners. Turn counterclockwise to increase flame size. Quickly turn knob to LOWEST POSITION without extinguishing the flame. If burner goes out, reset control to...
... your Use and Care Guide for Electrolux Service phone numbers, or call 1-877-4ELECTROLUX (1-877-435-3287). Remove the surface burner control knob. 36" GAS RANGE INSTALLATION INSTRUCTIONS 4. b. The inner portion of defective workmanship or materials in and turn knob from LITE to your Use and Care Guide. Adjust flame until you time and expense. Note: Air mixture adjustment is not required on surface burners. Turn counterclockwise to increase flame size. Quickly turn knob to LOWEST POSITION without extinguishing the flame. If burner goes out, reset control to...
Installation Instructions
Page 8
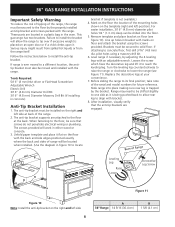
... gas range has two brackets. For easier installation, 3/16" (4.8 mm) diameter pilot holes 1/2" (1.3 cm) deep can be installed on floor and attach the bracket using a masonry drill bit. 6. Brackets must be sure that the anti-tip brackets are attached to align with an adjustable wrench. pilot holes using the screws provided. Before sliding the range to solid floor. After installation, visually verify that screws do not penetrate electrical wiring or...
... gas range has two brackets. For easier installation, 3/16" (4.8 mm) diameter pilot holes 1/2" (1.3 cm) deep can be installed on floor and attach the bracket using a masonry drill bit. 6. Brackets must be sure that the anti-tip brackets are attached to align with an adjustable wrench. pilot holes using the screws provided. Before sliding the range to solid floor. After installation, visually verify that screws do not penetrate electrical wiring or...


