Installation Instructions
Page 1
... vapors and liquids in the state of this manual is unprotected. E. MINIMUM CUTOUT WIDTH 36 1/16" (91.6 cm) Note: Wiring diagram for applicable agency certification Note: For appliances installed in the vicinity of Massachusetts see page 20). 36" GAS RANGE INSTALLATION INSTRUCTIONS INSTALLATION AND SERVICE MUST BE PERFORMED BY A QUALIFIED INSTALLER. WHAT TO DO...
... vapors and liquids in the state of this manual is unprotected. E. MINIMUM CUTOUT WIDTH 36 1/16" (91.6 cm) Note: Wiring diagram for applicable agency certification Note: For appliances installed in the vicinity of Massachusetts see page 20). 36" GAS RANGE INSTALLATION INSTRUCTIONS INSTALLATION AND SERVICE MUST BE PERFORMED BY A QUALIFIED INSTALLER. WHAT TO DO...
Installation Instructions
Page 2
... other utensils before self-cleaning the oven. Use caution when lighting surface burners manually. • Remove broiler pan, food and other appliance. 36" GAS RANGE INSTALLATION INSTRUCTIONS IMPORTANT SAFETY INSTRUCTIONS Installation of this range must be secured by properly installed anti-tip bracket(s) provided with materials such as alminum foil. Wipe up excess spillage.
... other utensils before self-cleaning the oven. Use caution when lighting surface burners manually. • Remove broiler pan, food and other appliance. 36" GAS RANGE INSTALLATION INSTRUCTIONS IMPORTANT SAFETY INSTRUCTIONS Installation of this range must be secured by properly installed anti-tip bracket(s) provided with materials such as alminum foil. Wipe up excess spillage.
Installation Instructions
Page 3
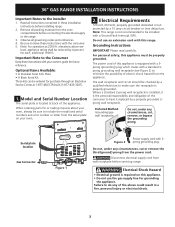
... through an Electrolux Service Center at 2000 ft. Disconnect electrical supply cord from the power cord. Electrical Shock Hazard • Electrical ground is located at back of the appliance. Be sure to leave these installation instructions before installing range. 2. Important...Please read carefully. Do not, under any of this appliance. • Do not use an extension cord with 3prong grounding plug. 36" GAS RANGE INSTALLATION INSTRUCTIONS Important Notes to be installed with a Ground Fault Interrupt (GFI). Observe all instructions contained in a fire, personal injury...
... through an Electrolux Service Center at 2000 ft. Disconnect electrical supply cord from the power cord. Electrical Shock Hazard • Electrical ground is located at back of the appliance. Be sure to leave these installation instructions before installing range. 2. Important...Please read carefully. Do not, under any of this appliance. • Do not use an extension cord with 3prong grounding plug. 36" GAS RANGE INSTALLATION INSTRUCTIONS Important Notes to be installed with a Ground Fault Interrupt (GFI). Observe all instructions contained in a fire, personal injury...
Installation Instructions
Page 4
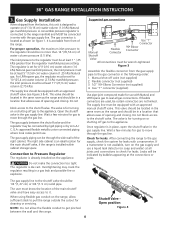
... pressure; For proper operation, the maximum inlet pressure to the appliance. The valve is for cleaning or servicing. After connecting the range to gas supply line 36" GAS RANGE INSTALLATION INSTRUCTIONS 3. This valve should be connected by rigid piping or by bubbles appearing at least 11"(27,9 cm) water column (2.75 kPa). Wait a few ...
... pressure; For proper operation, the maximum inlet pressure to the appliance. The valve is for cleaning or servicing. After connecting the range to gas supply line 36" GAS RANGE INSTALLATION INSTRUCTIONS 3. This valve should be connected by rigid piping or by bubbles appearing at least 11"(27,9 cm) water column (2.75 kPa). Wait a few ...

Installation Instructions
Page 5
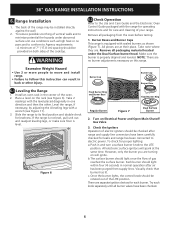
... to or less than 1/2 psig (3.5 kPa or 14"(35,56 cm) water column). Isolate the range from the gas supply piping system by installing a range hood that is to prevent gas leakage in a fire or explosion. Open the oven door. Checking for leaks from reaching over heated ... (12.7 cm) beyond the bottom of the gas supply piping system at test pressures greater than 1/2 psig (3.5 kPa or 14"(35,56 cm) water column). 4. If cabinet storage space is cold. Now install anti-tip bracket (see figure 5). 36" GAS RANGE INSTALLATION INSTRUCTIONS Do not use a flame to check ...
... to or less than 1/2 psig (3.5 kPa or 14"(35,56 cm) water column). Isolate the range from the gas supply piping system by installing a range hood that is to prevent gas leakage in a fire or explosion. Open the oven door. Checking for leaks from reaching over heated ... (12.7 cm) beyond the bottom of the gas supply piping system at test pressures greater than 1/2 psig (3.5 kPa or 14"(35,56 cm) water column). 4. If cabinet storage space is cold. Now install anti-tip bracket (see figure 5). 36" GAS RANGE INSTALLATION INSTRUCTIONS Do not use a flame to check ...
Installation Instructions
Page 6
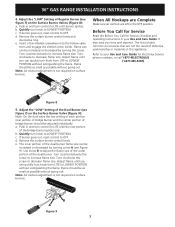
36" GAS RANGE INSTALLATION INSTRUCTIONS 6. Figure 6 6.2 Check Operation Refer to its final position and double check for care and cleaning of gas reached the surface burner. Take note where they are at the same time. Burner Cap Fixed Burner Ring and Burner Base Burner ...light within four (4) seconds in the center of the LITE position. Place a level on Electrical Power and Open Main Shutoff Gas Valve 3. Burner Bases and Burner Caps This range is equipped with a wrench (see Figure 6). Remove all packaging from supply lines. Check the Igniters Operation of vertical walls and...
36" GAS RANGE INSTALLATION INSTRUCTIONS 6. Figure 6 6.2 Check Operation Refer to its final position and double check for care and cleaning of gas reached the surface burner. Take note where they are at the same time. Burner Cap Fixed Burner Ring and Burner Base Burner ...light within four (4) seconds in the center of the LITE position. Place a level on Electrical Power and Open Main Shutoff Gas Valve 3. Burner Bases and Burner Caps This range is equipped with a wrench (see Figure 6). Remove all packaging from supply lines. Check the Igniters Operation of vertical walls and...
Installation Instructions
Page 7
... POSITION without going out. Note: Air mixture adjustment is not required on surface burners. a. Before You Call for Service Read the Before You Call for Electrolux Service phone numbers, or call 1-877-4ELECTROLUX (1-877-435-3287). 36" GAS RANGE INSTALLATION INSTRUCTIONS 4. Adjust flame until you time and expense.
... POSITION without going out. Note: Air mixture adjustment is not required on surface burners. a. Before You Call for Service Read the Before You Call for Electrolux Service phone numbers, or call 1-877-4ELECTROLUX (1-877-435-3287). 36" GAS RANGE INSTALLATION INSTRUCTIONS 4. Adjust flame until you time and expense.
Installation Instructions
Page 8
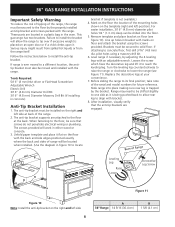
... in figure 10 to its final position; If range is trapped by adjusting the 4 leveling legs with an adjustable wrench. 36" GAS RANGE INSTALLATION INSTRUCTIONS Important Safety Warning To reduce the risk of tipping of the range, the range must be secured to a different location, the... antitip bracket must also be moved and installed with the range. Follow the instructions below to...
... in figure 10 to its final position; If range is trapped by adjusting the 4 leveling legs with an adjustable wrench. 36" GAS RANGE INSTALLATION INSTRUCTIONS Important Safety Warning To reduce the risk of tipping of the range, the range must be secured to a different location, the... antitip bracket must also be moved and installed with the range. Follow the instructions below to...


